Simon Says Stamp Black Eyed Susans Birthday

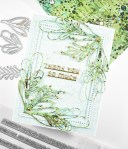
Hello Crafty Friends and welcome back! How’s your STAMPtember going so far? What are your favorites from the new release? Yeah, I’m nosey! There are so many cool things that it’s hard for me to narrow down my favorites! Anyhoo, today’s project is featuring the new Black Eyed Susans stamp set, so let’s run through the details!

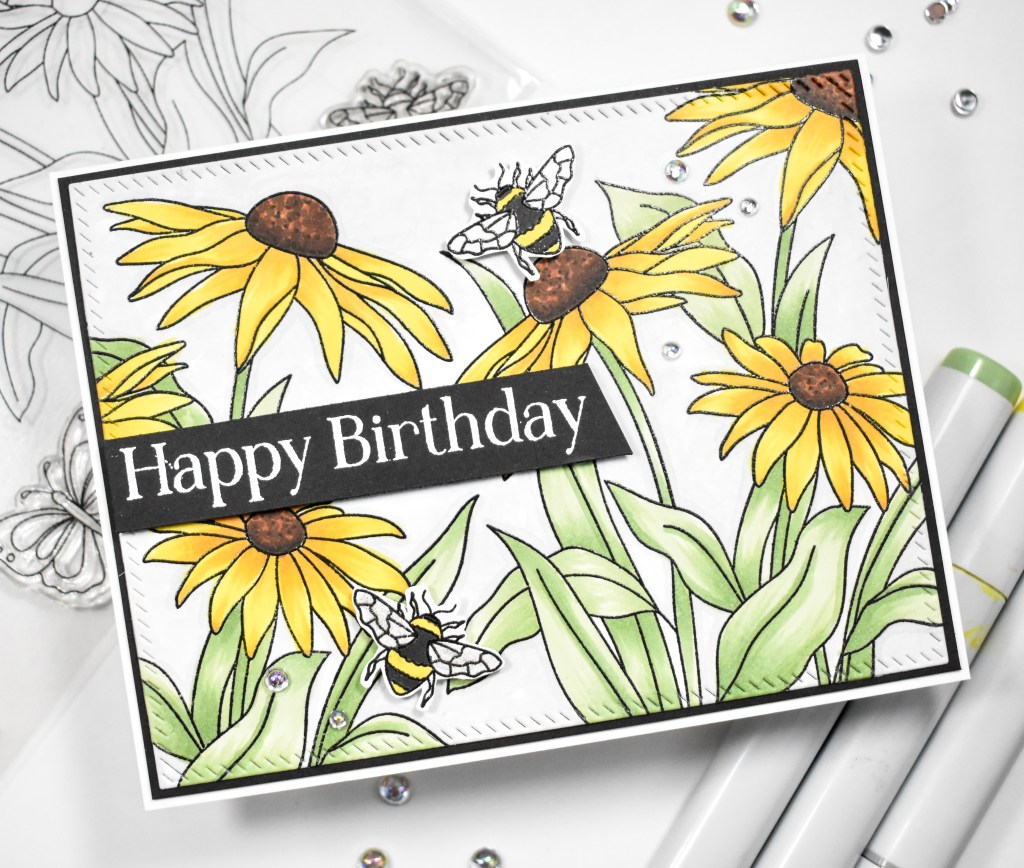
To begin, I stamped the floral images from the SSS Black Eyed Susans set onto a panel of Neenah Classic Crest 110lb cardstock using VersaFine Onyx Black ink and heat set that using Ranger Clear Embossing Powder. I pulled out some Copic markers and began coloring using Y06, Y08, Y18, YR23, E39, E79, E99, G24, G82, YG61, N0 and N1.

Once all of the coloring was complete, I used a Copic Multi Liner 0.5 to add some additional black dot detail to the centers of the flowers. Next, I stamped a bee from the set twice in the same way and colored those using one of the yellow markers along with the Copic 110 Special Black marker. For a bit more added detail, I went over the wings using a Wink of Stella marker as well before fussy cutting them.

I trimmed the floral panel using PFS Diagonal Stitched Rectangles and adhered it to a black panel using SSS Dot Tape Runner. I used the Happy Birthday sentiment from the same set and stamped that onto black cardstock using VersaMark Ink and heat set it using SSS Detail White Embossing Powder. Once that was done, I trimmed it down and adhered it to the panel using SSS Foam Tape.

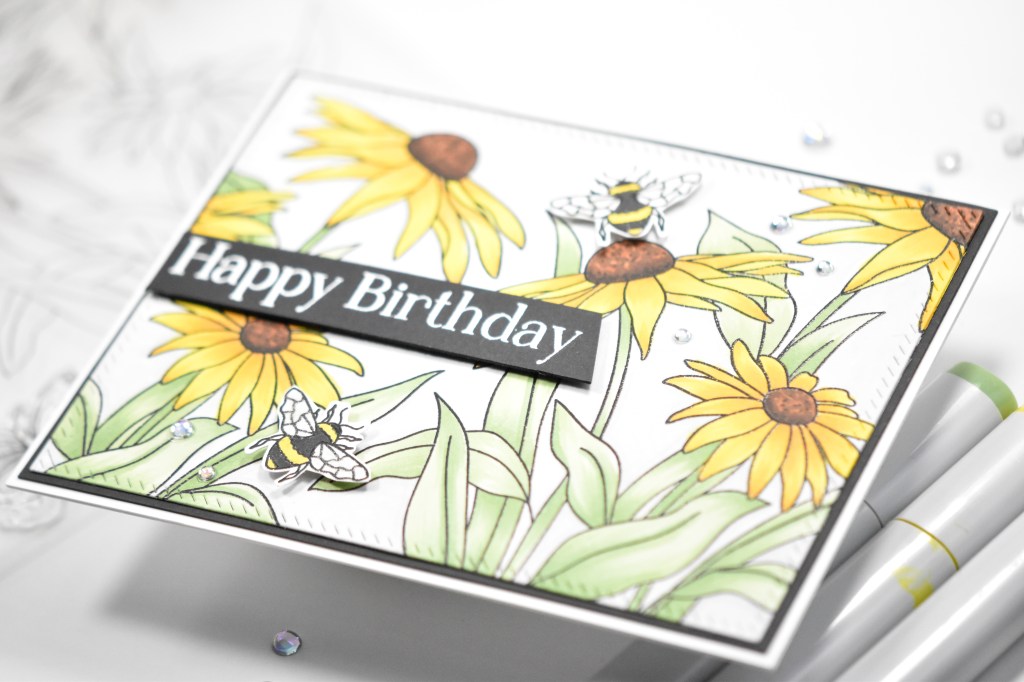
I adhered the bees to the panel as well using SSS Foam Squares, before adhering everything to the card base. No card is complete without some bling, so I added some PFS Iridescent Clear Drops to finish up this one.

That does it for this project! I hope you enjoyed it, and I hope it inspires you to get crafty! Don’t forget to swing by and check out the entire STAMPtember release! Have yourself a wonderful day and stay awesome!

Supply List:

* Affiliate links used at no cost to you. Thanks so much for your support!

Latest Posts
Latest Instagram Posts

Simon Says Stamp Thankful Layered Pumpkin

Hello Lovelies and thanks for stopping by! It’s STAMPtember and you know what that means .. a super, awesome release from Simon Says Stamp! We are celebrating today with a blog party, so be sure to start at Simon’s blog for links to everyone’s posts! There’s tons of inspiration, as well as exclusive promotions, so you’ll want to check those out for sure! Check the bottom of this post, for my STAMPtember promotion! For today’s project, I’m featuring the new Layered Pumpkin die. This project was super fun to put together, so let’s go through the details!

To begin, I pulled out five different yellow and orange scraps of patterned paper from my stash and cut each of them using the SSS Layered Pumpkin die. There is a solid pumpkin die in this set, and I cut that from a brown cardstock so that I would have a base for assembling the pumpkin.

I adhered the pieces of the pumpkin in their spots using liquid glue and then used some Copic Markers in Y02, Y17, YR24 and YR27 to add a bit of shading for a little more added interest. Once the pumpkin was assembled, I got to work of the rest of the card.

For the background, I used the SSS Stitched Whirl Background die on a panel of kraft cardstock, and I used the SSS Ornate Leaves set to cut one of the leaves twice from two different colors of green cardstock. Some of the pieces of the leaves fell out after die cutting, and I left them as they were, and adhered them together using liquid glue.

I arranged the leaves on the background and secured with glue, while adhering the pumpkin atop the leaves using SSS White Foam Tape for added dimension. I trimmed two SSS Sentiment Strips and adhered those with foam tape as well. The panel was then adhered to the card base using SSS Dot Tape Runner, and I finished up by adding some PFS Gold Metallic Pearls.

That does it for this project! I hope you enjoyed it, and I hope it inspires you to get crafty! Don’t forget to stop by and check out the entire STAMPtember release! You won’t be disappointed! Have a wonderful day and stay awesome! As mentioned above, here is my exclusive promotion for this awesome release!

Supply List:

* Affiliate links used at no cost to you. Thanks so much for your support!

Latest Posts
Latest Instagram Posts

Simon Says Stamp You Mean the World

Hello Crafty Friends and thanks for joining me! Happy STAMPtember! It’s the best month of the year, in my opinion! What an amazing release! As exciting as today is, there’s a huge blog party happening tomorrow with exclusive promotions, so stay tuned for that! Today’s project is featuring the new Overlapping Drops background stamp. So, let’s go through the deets!

To begin this project, I stamped the SSS Overlapping Drops onto a panel of Neenah Classic Crest 110lb cardstock using VersaFine Onyx Black ink. Once I got a good impression, I heat set it using Ranger Clear Embossing Powder.

The panel was then trimmed down using the PFS Diagonal Stitched Rectangles. I pulled out my Copic Markers BG72 and BG75 and did some coloring of the pattern, and then used the 110 Special Black to color in the background.

I used the SSS You Mean the World to Me die and cut that from SSS Matte Silver cardstock once and then cut it two additional times from black cardstock. I also cut the shadow die from black cardstock as well. I adhered all of those together using liquid glue.

My stamped panel was adhered to a black panel using SSS Dot Tape Runner and that was then adhered to the card base. The sentiment was adhered to the panel using SSS Foam Squares, and I added a few PFS Silver Metallic Pearls.

That finishes up this project. It was a relatively simple card, but I like how it came out just the same. I hope you’ll stop by and check out the entire STAMPtember release, and let me know your favorites! Have a wonderful day, and don’t forget to stay awesome!

Supply List:

* Affiliate links used at no cost to you. Thanks so much for your support!

Latest Posts
Latest Instagram Posts