Melon Birthday Bouquet

Hello Friends and welcome back! Thanks so much for stopping by to check out today’s project. Simon Says Stamp’s latest release, Just a Note, is live and I’m featuring a card using the new Summer Bouquet Stencil. So, let’s run through the deets, shall we?

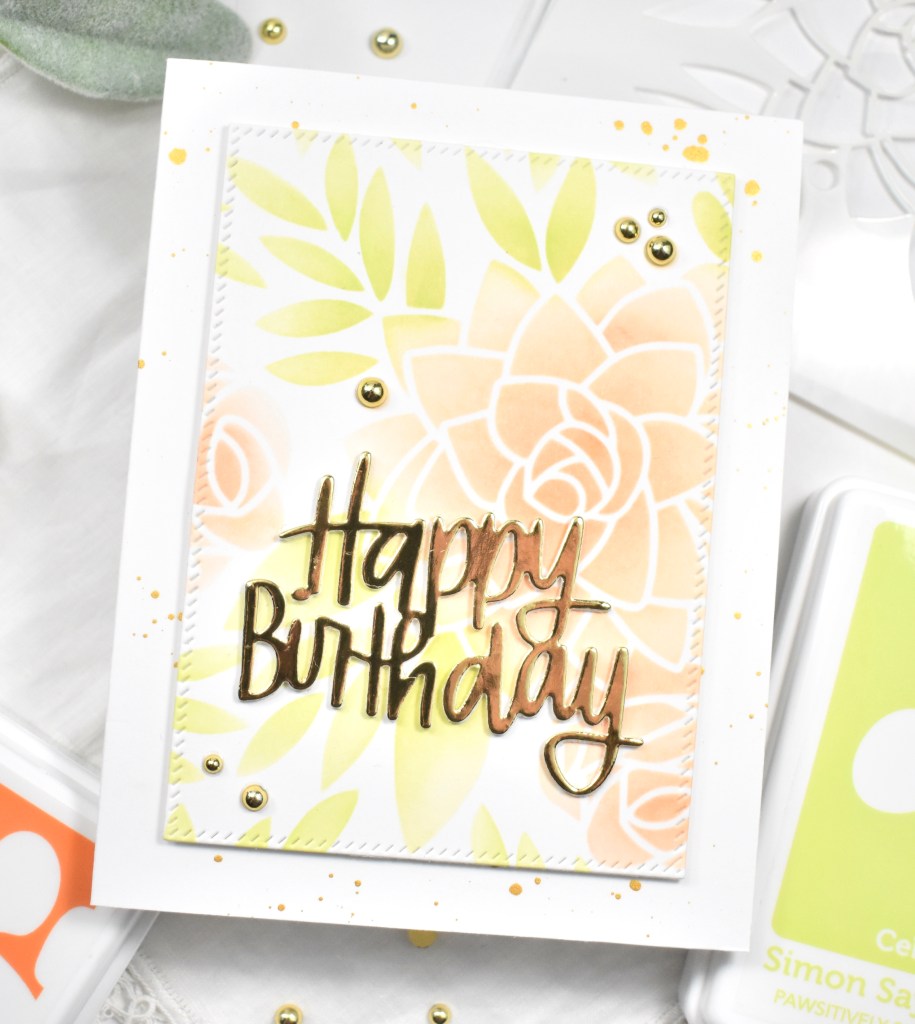
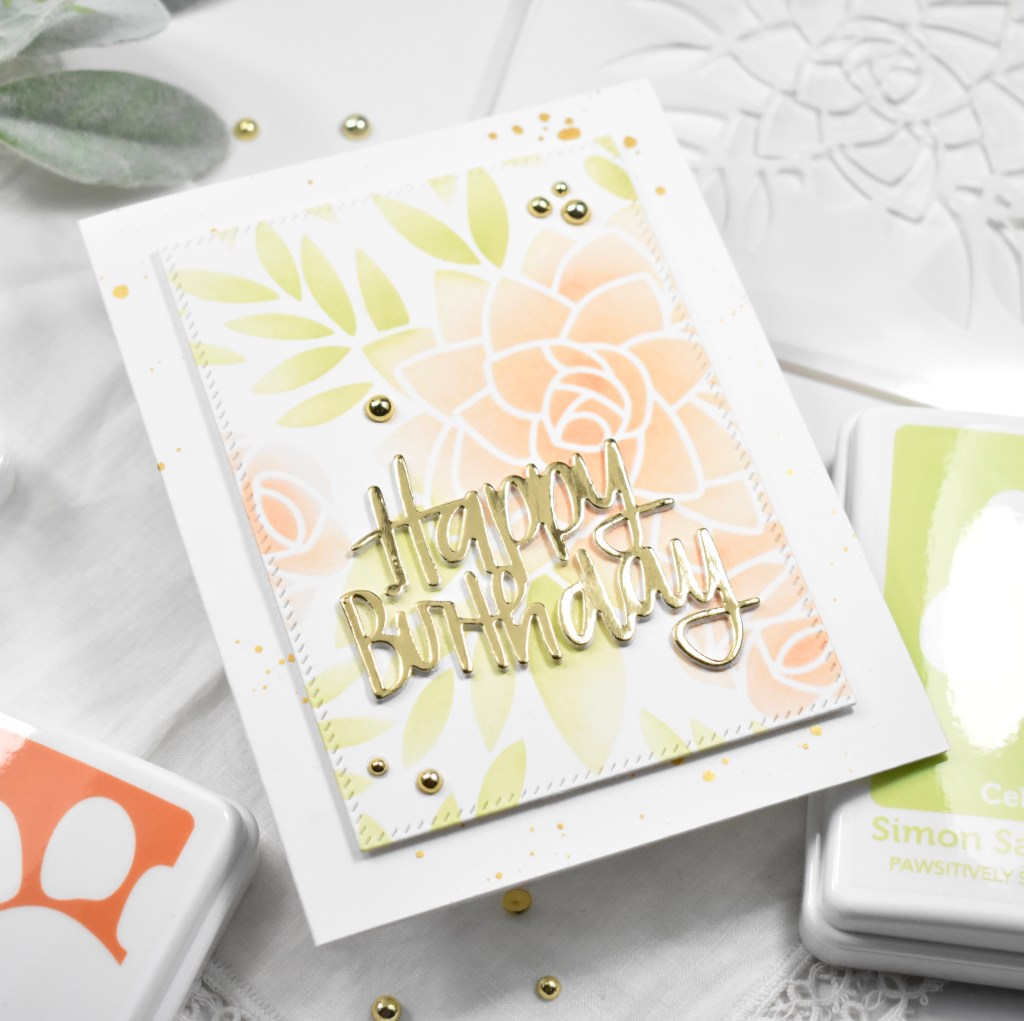
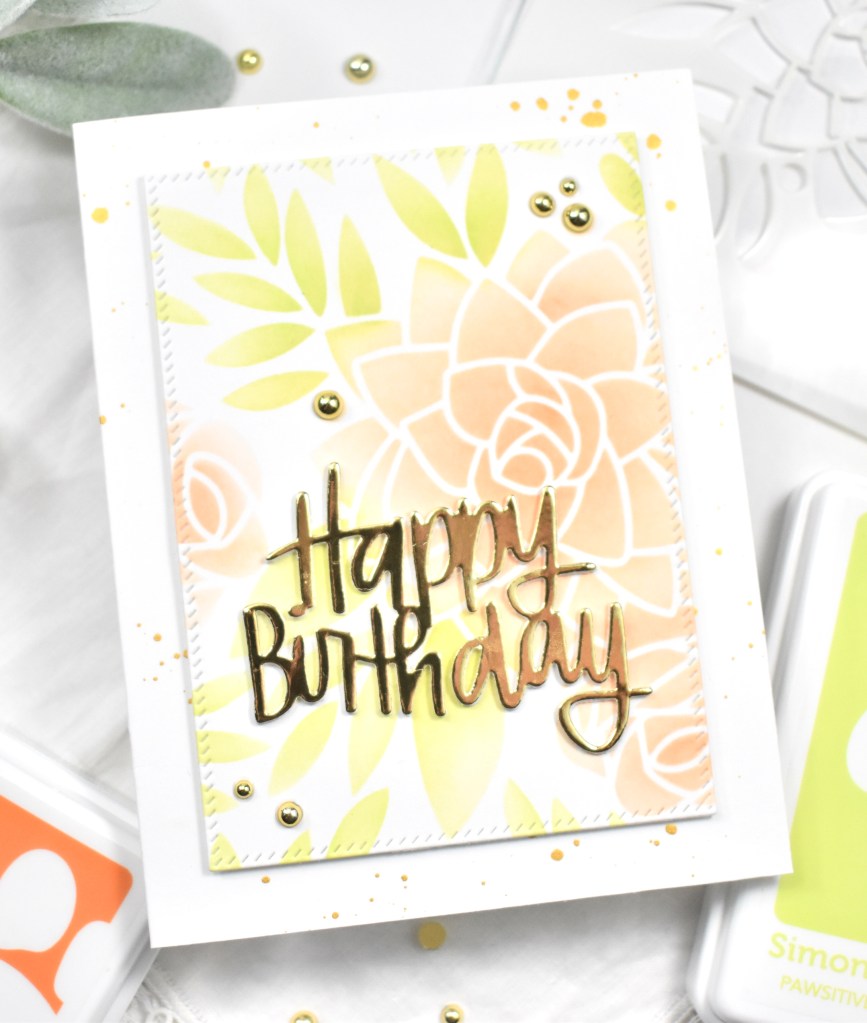
To begin, I taped the stencil to a panel of Neenah 110lb cardstock and added ink using SSS Pawsitively Saturated Ink in Melon, Sherbet, Celery and Limelicious. I concentrated color towards the centers of the flowers and at the base of the leaves. I rotated the stencil around to fill the panel before trimming it down using the PFS Diagonal Stitched Rectangles.

I chose the SSS Happy Birthday Brush Script for my sentiment, and die cut that once from gold cardstock and twice from Neenah 110lb cardstock and adhered all of those together using liquid glue. The sentiment was then adhered towards the bottom of the panel.

Before assembling the card, I splattered my card base using some gold acrylic ink. Once that was dry, I adhered the panel using foam tape for a little added dimension. To finish up, I added some PFS Gold Pearls for that much needed bling.

That does it for this one. I hope you enjoyed it! Don’t forget to check out the entire Just a Note release over on Simon’s website. Thanks again for stopping by today! Have a wonderful day and stay awesome friend!

Supply List:

* Affiliate links used at no cost to you. Thanks so much for your support!

Latest Posts

Latest Instagram Posts

Full Bloom Sunrise Stem

Hello Crafty Friends, and thanks for stopping by. Simon Says Stamp’s latest release, Just a Note, is live, and I’m back today with a card featuring the new Plant Sentiments stamp set. Since I gravitate towards flowers, I was super happy to receive a sentiment set that would coordinate. So, let’s run through the details for this one.

I began this card by die cutting three of the SSS Sunrise Stem flowers from Neenah 110lb cardstock. To add color to the flowers, I did some ink blending using SSS Pawsitively Saturated Ink in Celery, Limelicious, Lemonade, Sunbeam and Lilac.

Once the flowers had some color, I cut a background using the SSS Stitched Whirl Background and set that aside while I worked on the sentiment. I selected a sentiment from the SSS Plant Sentiments set, and stamped that onto some black cardstock using VersaMark Ink. I then heat set it using SSS Detail White Embossing Powder and hand trimmed it out.

I assembled the flowers using liquid glue and then arranged them atop the background and adhered those to the panel. I then figured out the placement for the sentiment and adhered that using foam tape for a little added dimension. The panel was then adhered to a black panel for contrast before being adhered to the card base. I also added a few clear drops for added interest.

That does it for this project. I hope you enjoyed it, and I hope it inspires you to get crafty in your space. Be sure to check out the entire Just a Note release over on Simon’s website, because there’s lots of fun things to look at and be inspired by. Have a wonderful day and don’t forget to stay awesome!

Supply List:

* Affiliate links used at no cost to you. Thanks so much for your support!

Latest Posts

Latest Instagram Posts

Framed English Garden

Hello Crafty Friends, and thanks so much for stopping by! I spent some time not too long ago playing with some PinkFresh Studio Washi Tapes, and today’s project is a product of that playtime! So, let’s run through the detail, shall we?

To begin, I adhered a portion of the PFS English Garden Washi Tape to a panel of Neenah 110lb cardstock and used the coordinating die to trim those pieces out. I then used the PFS Sparkling Diamonds cover plate to cut another panel of Neenah to use for the background.

I also pulled out a scrap and used the PFS Stitched Scalloped Rectangles to cut one of the smaller rectangles from this set. I set all of these pieces aside while I worked on the sentiment, and for that I used the PFS Scripted Sentiments. I used gold hot foil to foil the sentiment and used the coordinating die to trim it out. I cut two additional sentiments and adhered those together to make it a bit more sturdy and to add more dimension.

To assemble the card, I adhered the frame to the background panel using foam tape, placing some of the washi tape pieces underneath it. I adhered the additional pieces atop the frame using liquid glue. I decided that it needed some additional leaves, so I used the PFS Leafy Branch and cut a few from Neenah and tucked those behind the flowers, securing with glue.

I adhered the sentiment, offset from the frame just a little bit, using a combination of glue and foam tape. The panel was then adhered to the card base before adding a few PFS Gold Metallic Pearls to finish up.

I really enjoy working with the PinkFresh Studio washi tapes, because beautiful cards come together so effortlessly! They have so many to choose from and each one is gorgeous in its own way! I hope you enjoyed this project, and I hope it inspires you to get crafty in your space. As always, have a wonderful day and don’t forget to stay awesome!

Supply List:

* Affiliate links used at no cost to you. Thanks so much for your support!

Latest Posts

Latest Instagram Posts