Spellbinders Picture Perfect Sunflowers Large Die of the Month

Hello Crafty Friends, and welcome back! Thanks so much for stopping by! The September Large Die of the Month from Spellbinders is titled Picture Perfect Autumn, and for today’s project, I only used the sunflowers from the set. You can check out my last post to see the scene that I created with more elements from this set.

If you are not familiar with the Spellbinders Clubs, here’s a little bit about how it works ..

  • On the 6th of the month, Non-Club members can join the club and get this month’s Club product(s) at the reduced Club Member price with free shipping.
  • On the 27th of the month, registration for this month’s club products closes.
  • On the 10th of the next month, Club products become available to everyone without requiring a Club membership; however, they are available at regular price and there is no free shipping. If a product is sold out, it will be re-ordered.

NOTE: all supplies are linked to multiple sources in the thumbnails at the end of this blog post.

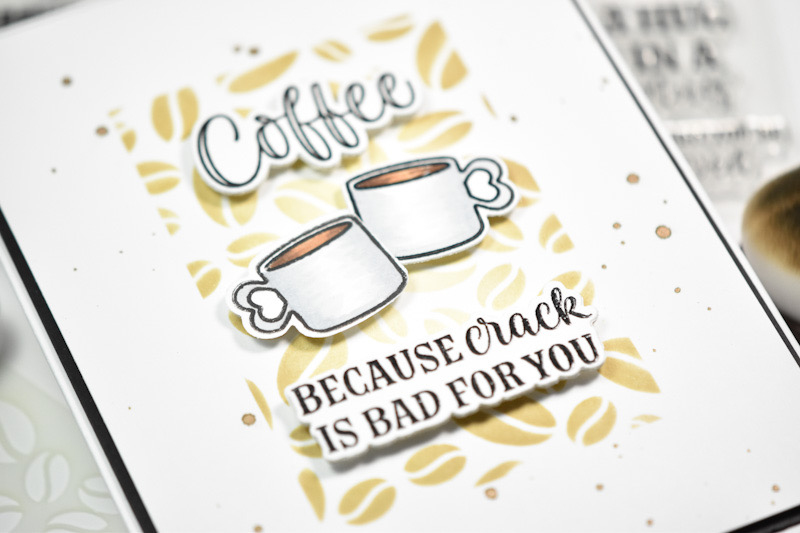
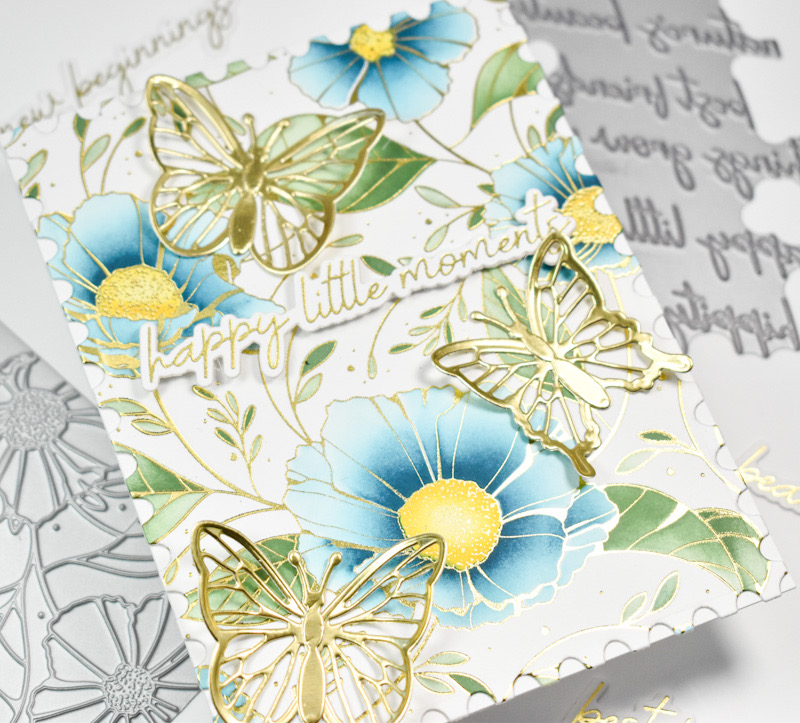
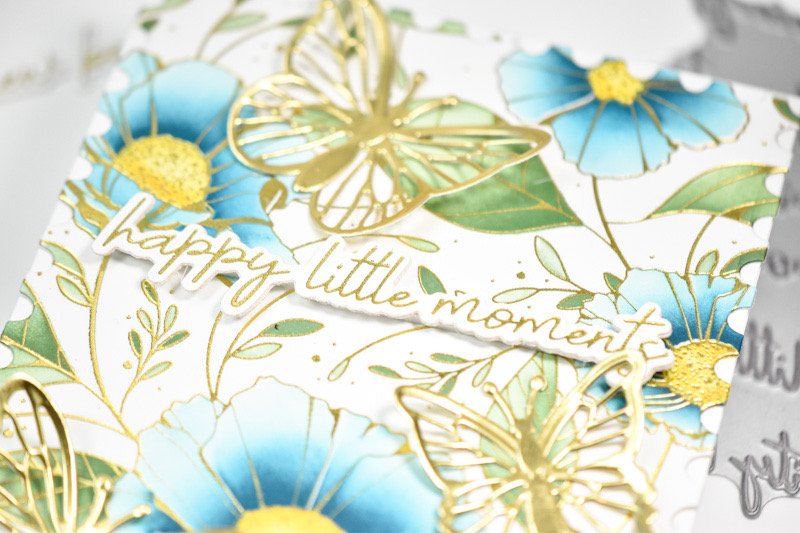
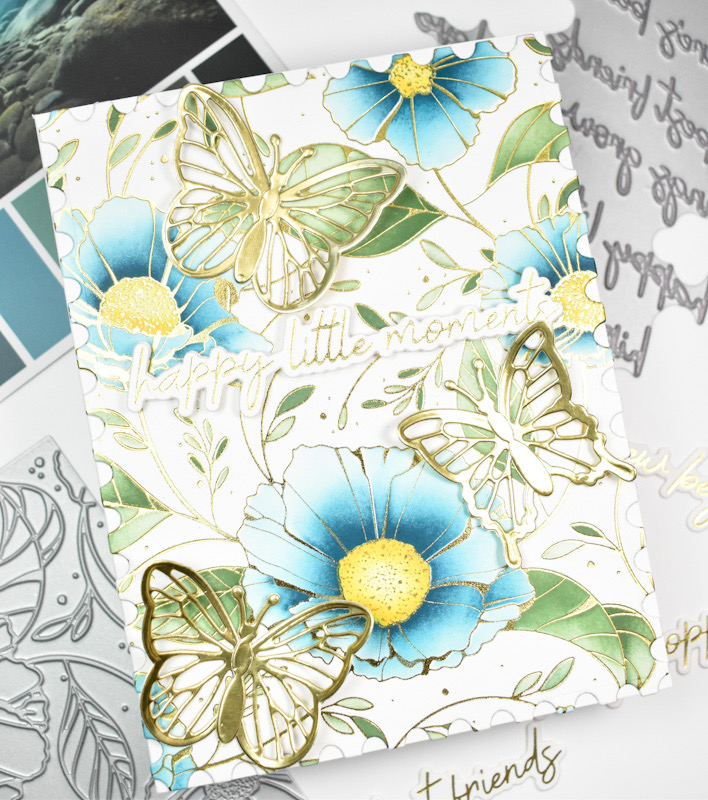
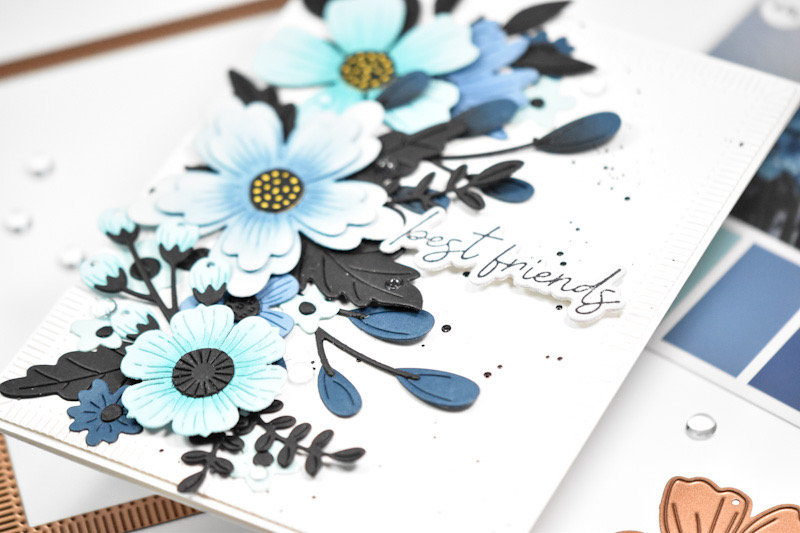
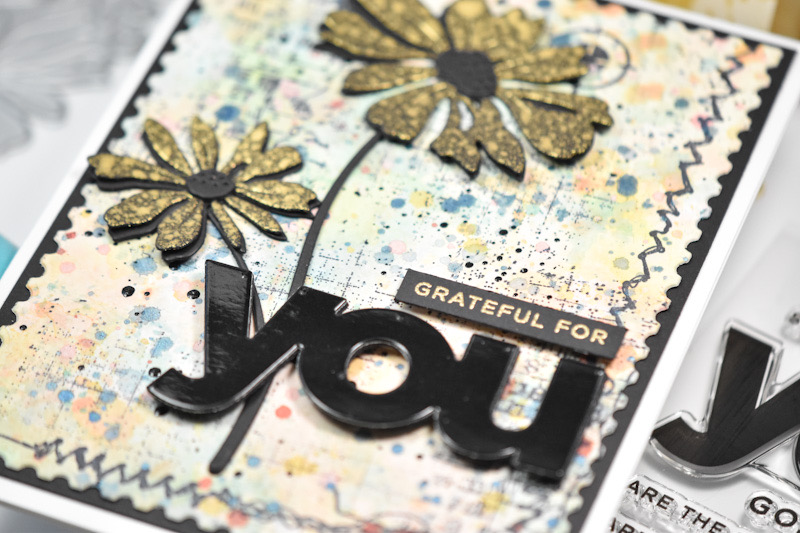
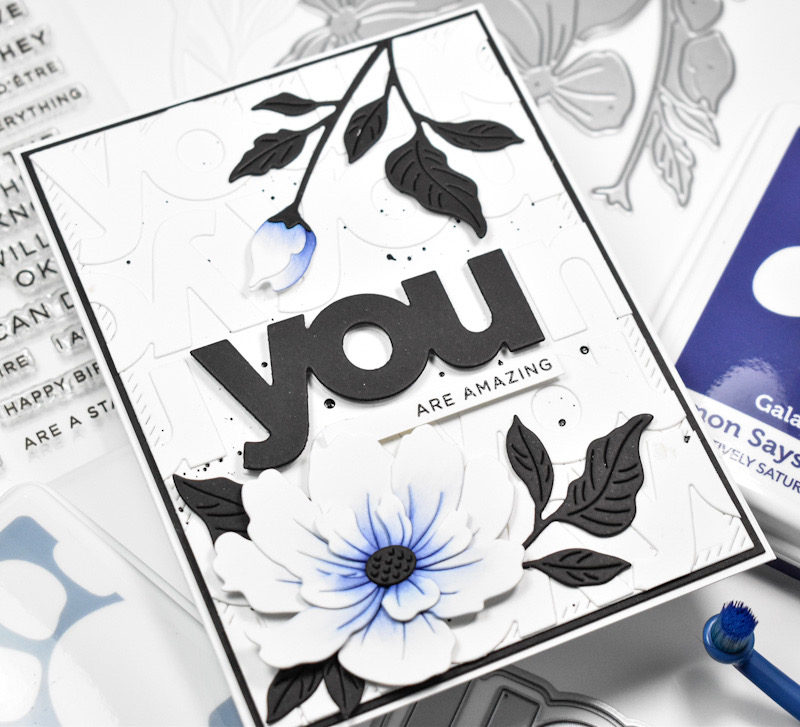
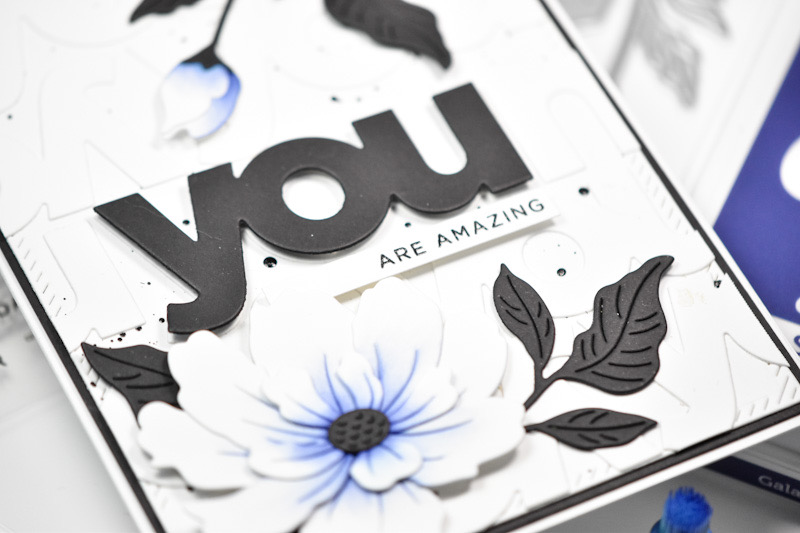
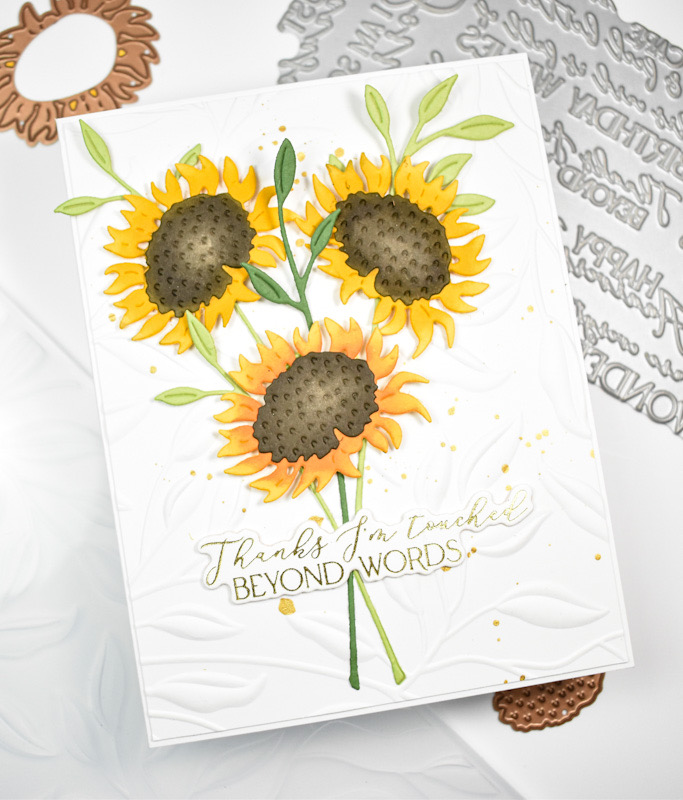
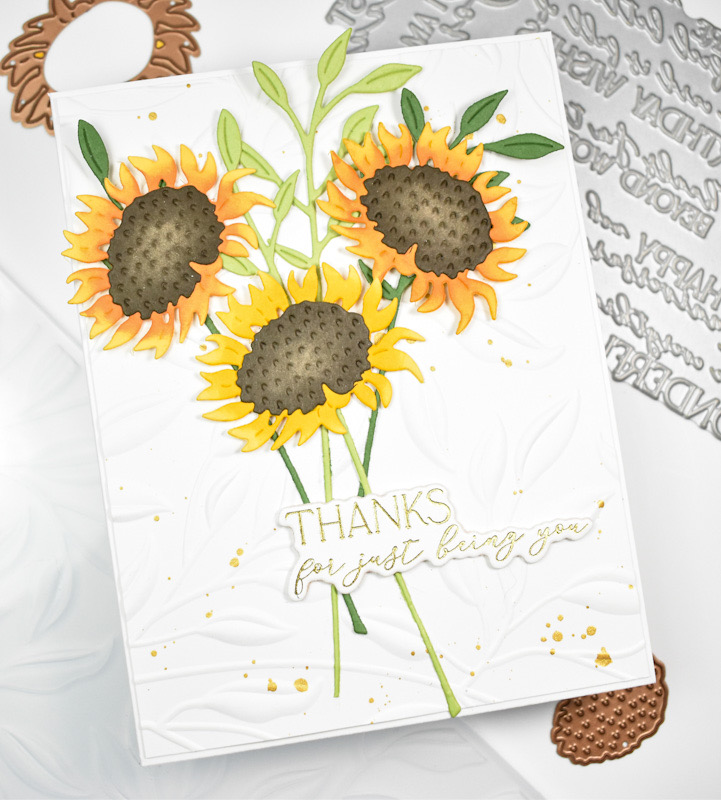
Even though I’m only featuring the sunflower today, I think it’s great to look at sets and think of different ways that you can use them. To begin these cards, I die cut the sunflowers from yellow cardstock and cut the centers from a dune colored cardstock.

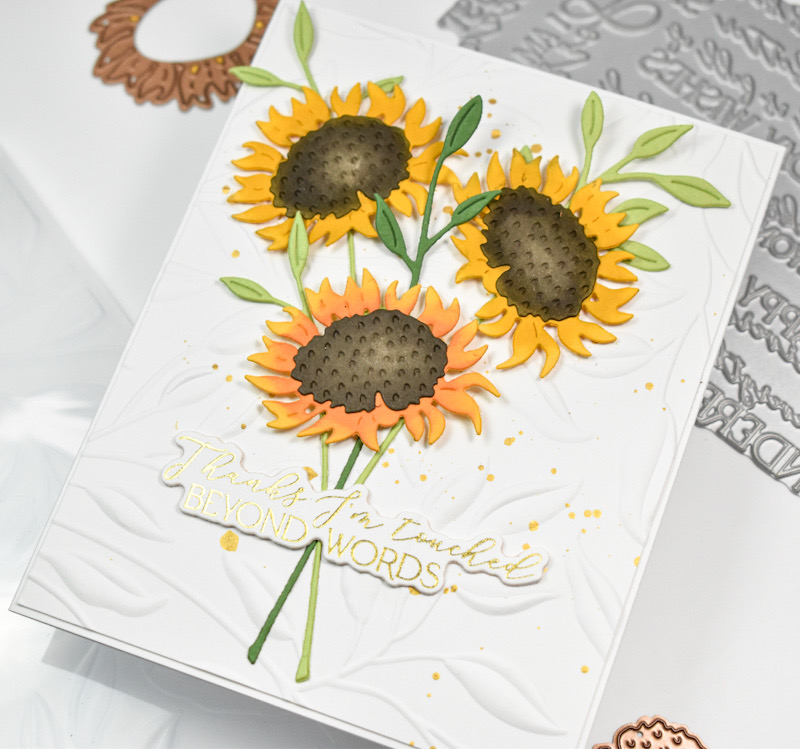
When I was done cutting, I did some ink blending on the pieces using SSS Pawsitively Saturated Ink in Citrine, Clay and Woodsy. Those pieces were then adhered together using liquid glue. For the leaves on these cards, I opted to use the Sealed Leaf Sprigs and cut a bunch of those from two colors of green cardstock.

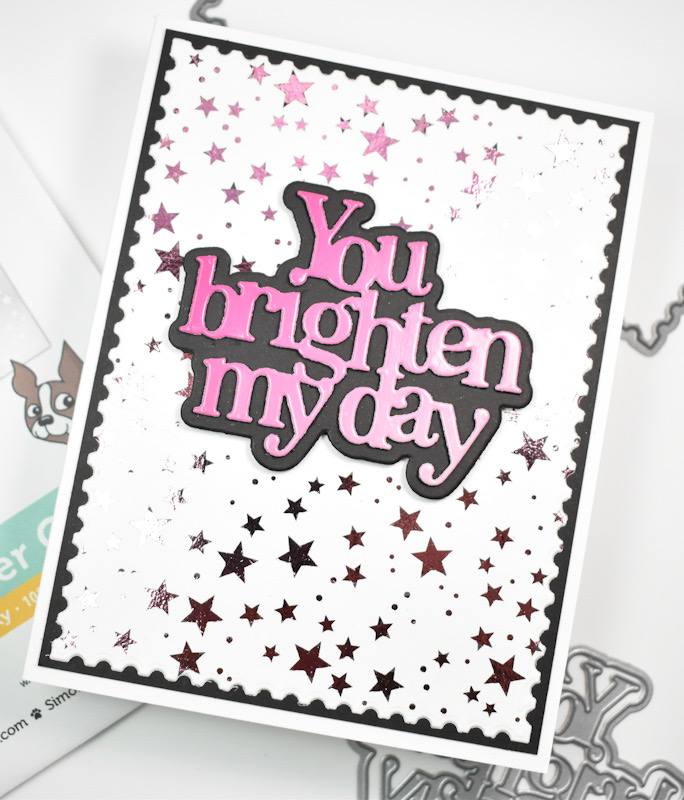
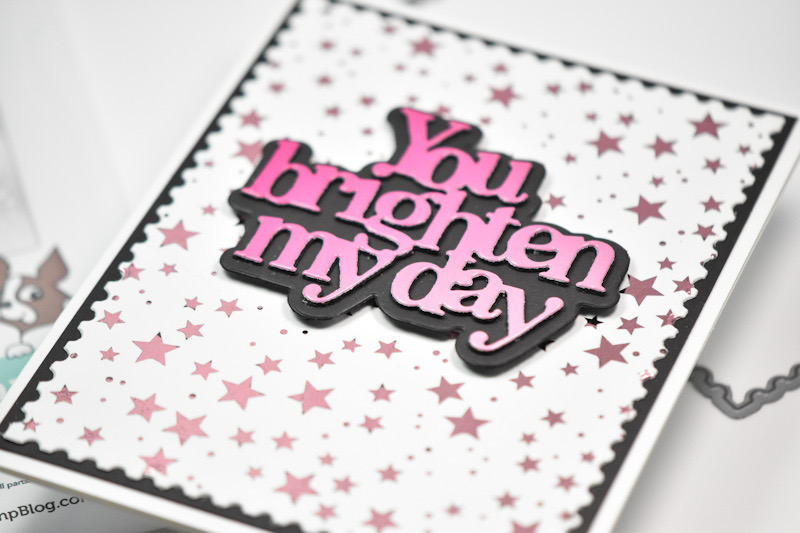
My background was created using the Leafy 3D Embossing Folder, along with some splatter and those were adhered to the card bases before assembly. The sentiments that I used were already made, because I like having a stash of sentiments on hand to choose from. These were created from the You are Everything Sentiments BetterPress Plate and the Faith Glimmer Sentiments, along with gold and matte gold foil. When trying to link the faith sentiments, I was unable to find those, so I think those must have been discontinued, unfortunately. Whenever I create sentiments, I do cut them three times and stack them for more sturdiness.

To assemble the card, I arranged and glued the leaves in place, adhered the flowers using foam tape, and glued the sentiments atop the leaf stems.

That does it for this set of cards! I hope you enjoyed it, and I hope it inspires you to look at your die sets a little bit differently! Don’t forget to head over to the Spellbinders website to check out all of the Clubs that they have to offer! They really are a great value! Thanks again for stopping by, and I hope you have a wonderful day!
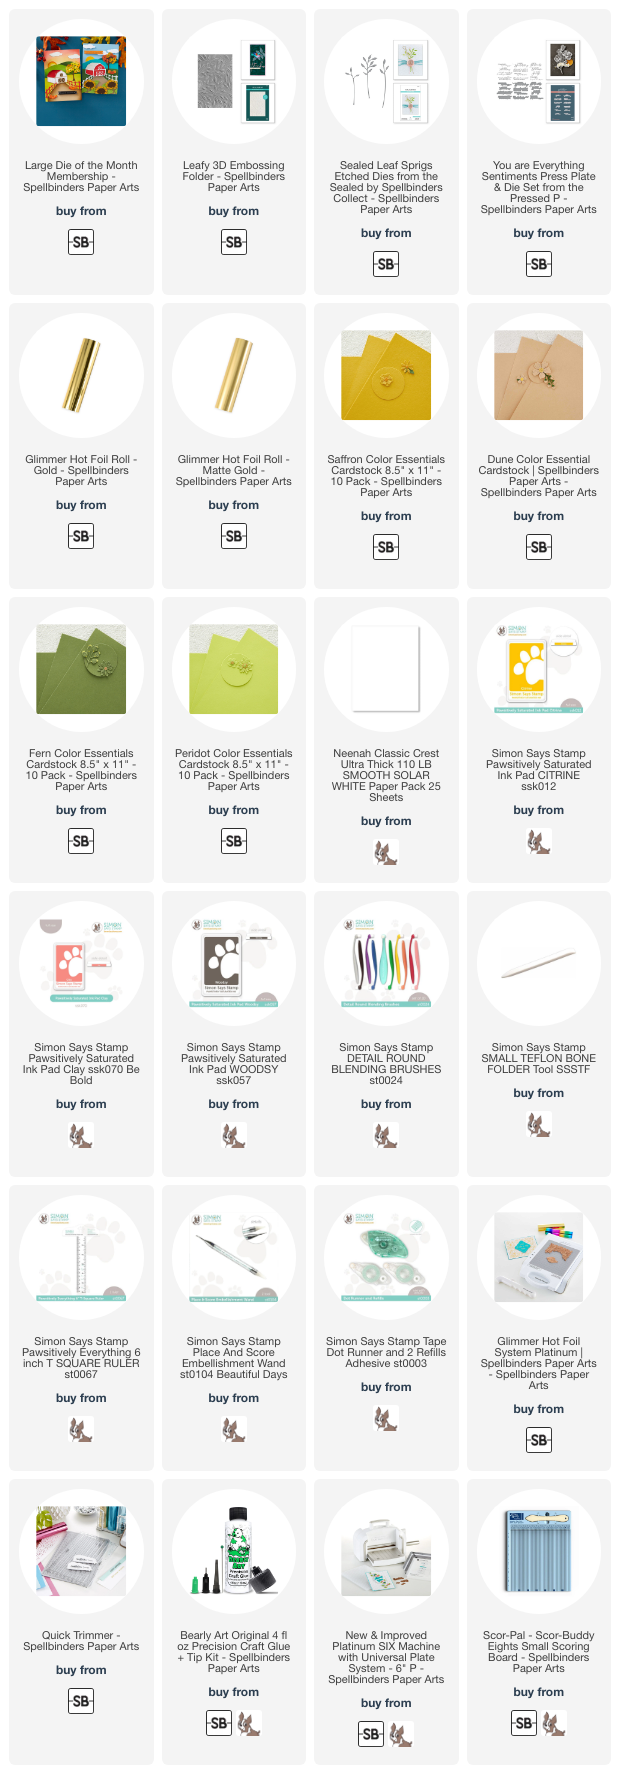
Supply List

Affiliate links used at no cost to you. What does this mean? If you use the links within this post to make a purchase, I receive a small commission, which allows me to continue to post crafty content for your enjoyment. I truly appreciate your support!

Latest Posts

Latest Instagram Posts

Simon Says Stamp Double Plaid Floral

Hello Crafty Friends, and welcome back to my blog! I’m so glad that you stopped by to check out today’s project featuring the new Double Plaid Cover, as well as the new Rustic Layering Flower. These new products are from the STAMPtember release, and I had a blast making this card, so let’s get into the details!

NOTE: all supplies are linked in the thumbnails at the end of this blog post.

I began this project by pulling an inspiration card from the Color Cubes, just to get some color variety going on. Once I decided on a color combo that I liked, I die cut the Rustic Layering Flower three times from aqua, orange and pink cardstock. This flower has several pieces so I did some ink blending on those pieces before assembling them. The ink colors that I used were Carnation, Sweets, Ocean, Cantaloupe and Sherbet.

For some additional flowers and leaves, I used the Fine Floral Stem for some light blue flowers, as well as the Budding Branches for some white leaves. I have to say that the Budding Branches is by far my most used leaf set from Simon! I did die cut the centers of the flowers from gold cardstock to pull the elements together.

Moving on to assembly .. I splattered my card base using black acrylic ink before adhering the Double Plaid Cover with foam strips. I arranged the flowers and leaves and adhered those using a combination of liquid glue and foam strips to provide support where necessary. I always have to add embellishments to the “buds” of the leaves, because I just think it’s so awesome and so pretty!

I stamped the sentiment, which is from the Mix & Match Butterflies set, using VersaFine Onyx Black ink and heat set that using Ranger Clear Embossing Powder. I used the coordinating die to cut it several times for a stacked look. The sentiment was glued directly to the panel to finish up.

That does it for this project! I’m sorry if you’re sick of florals, but I literally can’t help myself! Florals and leaves are my jam! Don’t forget to check out the entire STAMPtember release, as well as all of the collaboration sets happening all month long! Thanks again for joining me, and have yourself a wonderful day!

Supply List

Affiliate links used at no cost to you. What does this mean? If you use the links within this post to make a purchase, I receive a small commission, which allows me to continue to post crafty content for your enjoyment. I truly appreciate your support!

Latest Posts

Latest Instagram Posts

Simon Says Stamp Fresh Roasted Coffee

Hello Crafty Friends and welcome back! I’m once again playing with the Coffee Time set from Simon’s latest STAMPtember release. This is a CZ Design card if I ever did see one! Cathy is just so freaking talented! Let’s not waste time and go through the details.

NOTE: all supplies are linked to multiple sources in the thumbnails at the end of this blog post.

This card is a double stencil technique. I used the SSS A2 Mask Stencils on a panel of Neenah 110lb cardstock and then secured the new SSS Fresh Roast Stencil atop that. I did some light ink blending using SSS Pawsitively Saturated Inks in Latte and Cappuccino. Once the ink blending was complete, I used the rectangle portion of the mask stencil to cover my ink blending and then splattered it with TH Distress Mica Spray in Crooked Broomstick.

I stamped the coffee mug and the sentiments using VersaFine Onyx Black in and heat set those using Ranger Clear Embossing Powder. I wanted two mugs, so I did a mirror stamping for the second one. In all honesty, I did have to watch a Jennifer McGuire video to learn how to do it! I then used the coordinating dies to trim those out. I did cut the sentiments two additional times for that stacked sentiment look.

I colored the mugs using Copic Markers in C1, C2, C3, E23 and E47, and those, along with the sentiments were adhered to the panel using foam strips. That panel was then adhered to a black panel with foam tape for added dimension, because what do we say? Dimension is life!

And, that does it for this one! I hope you enjoyed it, and I hope it inspires you to get crafty in your space. Don’t forget to check out the entire STAMPtember release over on Simon’s website, and stay tuned all month long for the collaboration sets! Have a wonderful day!

Supply List

Affiliate links used at no cost to you. What does this mean? If you use the links within this post to make a purchase, I receive a small commission, which allows me to continue to post crafty content for your enjoyment. I truly appreciate your support!

Latest Posts

Latest Instagram Posts

Spellbinders Happy Little Moments

Hello Crafters, and welcome back! Thanks for stopping by! Today’s project is featuring the new Spellbinders All Season Spring BetterPress plate. This is a cute little set that features several sentiments suited for spring time cards. And the best thing, it’s a single plate and die set that creates multiple sentiments at once! Such a game changer for me! Let’s run through the details for this one, shall we?

NOTE: all supplies are linked to multiple sources in the thumbnails at the end of this blog post.

To be honest, I’ve been struggling with different color combinations lately. I find a combo that I like, and it’s hard for me to break away from that one. So, I pulled a few cards from the Color Cubes and settled on this combo which features aqua colors with sage green colors, and it’s beautiful. I began my project by gold foiling the Spellbinders Cosmos Backdrop BetterPress plate and using the coordinating stencil to add the color.

The inks that I used were PinkFresh Studio Eucalyptus, Paradise, Atlantis and Sweet Mustard. Once the ink blending was complete, I used the Spellbinders Nested Postage Labels & Tag set to trim it down. While I was foiling the panel, I went ahead and gold foiled the Spellbinders All Season Spring BetterPress plate as well, and trimmed that out using the included die. I did cut it several times for a stacked sentiment.

I felt that the panel needed some additional elements, so I used the Spellbinders Delicate Butterflies and cut three of those from gold cardstock. The butterflies were adhered with liquid glue, while the sentiment was adhered using foam strips for added dimension.

That does it for this one! I hope you enjoyed this project! Don’t forget to stop by the Spellbinders website to check out all of the fun things for August! Thanks again for joining me, and I hope you have an awesome day!

Supply List

Affiliate links used at no cost to you. What does this mean? If you use the links within this post to make a purchase, I receive a small commission, which allows me to continue to post crafty content for your enjoyment. I truly appreciate your support!

Latest Posts

Latest Instagram Posts

Spellbinders Best Friends

Hello Crafty Friends! I’m so glad that you stopped by! The Spellbinders August releases are live, and I’m back today with a card featuring the new All Seasons Spring BetterPress Press Plate. Let’s not waste time and go through the details!

NOTE: all supplies are linked to multiple sources in the thumbnails at the end of this blog post.

I look for any reason to create with Spellbinders flower sets, so having a new sentiment set was all I needed to pull them out. The Spellbinders All Season Spring set is great because it’s a single plate and a single die, so you’re able to create multiple sentiments in one pass! I love this so much, because it allows you to add so many sentiments to you stash for those times when you don’t have much time to create.

I began this card by pulling an inspiration card from the Color Cubes and die cutting a bunch of flowers and leaves from aqua, various shades of blue, yellow and black cardstock using several sets from Spellbinders. I’ll link to those sets below for your reference. Once those were cut, I did some ink blending on the flowers using SSS Pawsitively Saturated Inks in Seafoam, Morning and Dusk, before adhering the pieces together using liquid glue.

For my background panel, I used the Spellbinders Fluted Classic Rectangles and splattered that with black acrylic ink. While that was drying, I prepared my sentiment by using BetterPress Black Ink onto Grey BetterPress Paper. I did cut the sentiment several times for a stacked sentiment for added dimension.

I began adhering the leaves to my panel using glue, along with the lower level flowers. Once I reached the main flowers, those were adhered with foam strips, as well as the sentiment. To finish up, I did add some clear drops for a little shine.

That does it for this one! I hope you enjoyed it as much as I did! I really can’t get enough of creating beautiful flowers! Thanks again for stopping by, and don’t forget to head over to the Spellbinders site to check out all of the new August releases! Have yourself a wonderful day!

Supply List

Affiliate links used at no cost to you. What does this mean? If you use the links within this post to make a purchase, I receive a small commission, which allows me to continue to post crafty content for your enjoyment. I truly appreciate your support!

Latest Posts

Latest Instagram Posts

Spellbinders All Seasons Floral

Hello Crafty Friends, and welcome back! The Spellbinders August release is live, and there’s some awesome stuff to peruse! Today’s card is featuring the new All Seasons Spring BetterPress Plate, and if you know me, you know that I’m going to pair it with florals! So, let’s run through the details.

NOTE: all supplies are linked to multiple sources in the thumbnails at the end of this blog post.

When I was thinking about this card, I wanted to do a monochromatic color scheme, so I went with black, white and grey. I love the look of white flowers with grey shading, so that’s what I set out to do! I used the Spellbinders Be Bold Blooms set and cut a bunch of the flowers from Neenah 110lb cardstock, and I cut the centers and foliage from black cardstock.

I used SSS Pawsitively Saturated Ink in Earl to do the ink blending on the flowers, and when that was complete, I assembled the flowers using liquid glue. I created the background panel by using gravel cardstock and the Spellbinders Argyle Plaid 3D Embossing Folder, and splattered that with some black acrylic ink.

While the panel was drying, I inked up the All Seasons Spring Press Plate using the BetterPress Black ink onto a panel of Pebble BetterPress Cardstock. That was then cut using the included die. I did cut it a second time from Neenah 110 and adhered those pieces together for a stacked sentiment. This particular sentiment is a very long sentiment, and I didn’t like the way it looked on this particular card, so I ended up cutting it into two pieces so that it would fit better.

My embossed panel was then adhered to a black panel for contrast, and I began gluing in the bottom layers first, which included the smaller flowers and the foliage. I adhered the top flowers with foam strips, as well as the sentiment. I had a few leaves left over, so I secured those in place where needed. To finish up, I added a few clear drops.

That does it for this project! I hope you enjoyed it as much as I did! I really love this color combo from time to time, as a change from the pastel flowers. Don’t forget to head over to the Spellbinders website to check out all of the fun, new August products! Thanks again for stopping by, and I hope you have a wonderful day!

Supply List

Affiliate links used at no cost to you. What does this mean? If you use the links within this post to make a purchase, I receive a small commission, which allows me to continue to post crafty content for your enjoyment. I truly appreciate your support!

Latest Posts

Latest Instagram Posts

Simon Says Stamp Grateful For You Cosmos

Hello Crafters and welcome back! I’m participating in an Instagram Hop today to celebrate Simon Says Stamp’s latest release, Cheering For You. Head on over there to check it out and comment along the hop for your chance to win a $25 gift card! Today’s project is a mixed media-ish type, which I never do, but always love them when I’m done! It’s featuring a few new products from the latest release, so let’s go ahead and get into the details!

NOTE: all supplies are linked to multiple sources in the thumbnails at the end of this blog post.

This background panel was left over from a previous ink smooshing session, so I pulled that out for this card. But, I’ll post how it was created just in case you feel inspired to create your own. I grabbed a piece of watercolor paper, and Distress Oxide ink pads in Saltwater Taffy, Crackling Campfire, Spiced Marmalade, Fossilized Amber and Evergreen Bough. I worked one color at a time by smooshing the ink pad onto my silicone mat, spritzing with water and swiping or dabbing my paper into the ink. I made my way through the colors, drying the paper in between each addition, so that the colors didn’t get muddled. Once I was satisfied with the additions of color, I took the panel to my splat box and splattered it with Distress Oxide Sprays in Saltwater Taffy, Crackling Campfire and Fossilized Amber.

Like I said, this panel was made a little while back, but I recently bought the new TH Distress Spritzs so I decided to splatter the panel with some of the Peacock Feathers Spritz, along with some black acrylic ink. The panel was trimmed down using the SSS Postage Stamp Edge Frames, and I did some stamping using a few TH Stampers Anonymous sets with Archival Black ink. I’ll link to those stamp sets below.

I die cut the SSS Cosmos Duo twice from black cardstock and used the Fossilized Amber Distress Spritz on one set. Once the pieces were dry, I adhered them together using liquid glue. I also die cut the You twice from black cardstock and once from black glossy cardstock and adhered those together as well. The small sentiment is from the You stamp set, and that was stamped onto black cardstock with VersaMark Ink and heat set using Ranger Princess Gold Embossing Powder.

I adhered the flowers to my panel with liquid glue and adhered my sentiments using SSS 3D Foam Strips for added dimension. This panel was then adhered to a black panel for contrast before being adhered to the card base.

That does it for this project! I hope you enjoyed it as much as I did! Not sure why I don’t do this type of card more often, so maybe I need to work on that. Don’t forget to check out the Instagram Hop for your chance to win a $25 gift card at each stop along the hop! Thanks again for joining me for today’s project, and I hope you have a wonderful day!

Supply List

Affiliate links used at no cost to you. What does this mean? If you use the links within this post to make a purchase, I receive a small commission, which allows me to continue to post crafty content for your enjoyment. I truly appreciate your support!

Latest Posts

Latest Instagram Posts

Simon Says Stamp You Are A Star

Hello Crafty Friends! Thanks so much for joining me for today’s project featuring the new You die and stamp set from Simon’s latest release, Cheering For You! This project is also featuring the new Starry Sky Foil Transfer Cards, so let’s run through the details!

NOTE: all supplies are linked to multiple sources in the thumbnails at the end of this blog post.

I began this project by foiling the Starry Sky panel using silver foil and my Minc Mini. Once I was done foiling, I trimmed the panel down using the SSS Postage Stamp Edge Frames. Next, I die cut the new SSS You once from silver cardstock and three times from black cardstock and adhered all of those pieces together using liquid glue.

The sub-sentiment, which is from the new You stamp set, was stamped onto a scrap of black cardstock using VersaMark Ink and heat set using SSS Detail White Embossing Powder. Both sentiments were adhered to the foiled panel using SSS 3D Foam Strips for some added dimension.

I decided that the panel needed some black starts to tie everything together, so I used the SSS Mini Stars Party and cut a few of those and added to the panel using foam strip pieces. The panel was then adhered to the card base to finish up.

That does it for this one! Super simple, but I thought this sentiment went perfectly with these foil transfer cards. Don’t forget to check out the entire Cheering For You release over on Simon’s website! Thanks again for stopping by, and I hope you have a wonderful day!

Supply List

Affiliate links used at no cost to you. What does this mean? If you use the links within this post to make a purchase, I receive a small commission, which allows me to continue to post crafty content for your enjoyment. I truly appreciate your support!

Latest Posts

Latest Instagram Posts

Simon Says Stamp You Are Amazing

Hello Friends, and welcome back! Thanks so much for stopping by to check out today’s project! This project is featuring the new You die and You stamp set from Simon’s latest release, Cheering for You. Let’s go ahead and roll through the details!

NOTE: all supplies are linked to multiple sources in the thumbnails at the end of this blog post.

I really like creating backgrounds with single dies, and Simon’s new You die was perfect for this technique! I began this project by die cutting the new SSS You a bunch of times from Neenah 110lb cardstock. I also die cut the SSS Divine Peony and did some ink blending on that using SSS Pawsitively Saturated Ink in Morning and Galaxy.

Once the ink blending was complete, I assembled the florals using liquid glue, and then decided that I wanted the leaves to be black, so I went back and cut those. To begin assembly, I cut a panel of Neenah 110lb cardstock using the PFS Diagonal Stitched Rectangles and splattered it using black acrylic ink. When that was dry, I began adhering the You die cut to cover the panel and trimming off the excess.

I adhered the leaves in place and then adhered the larger flower using SSS 3D Foam Strips for added dimension. The card was missing something, so I cut the You from black cardstock and adhered that using foam strips, and that brought things together, in my opinion. I then used the new SSS You Stamp set and stamped the sub-sentiment using VersaFine Onyx Black ink, heat set that using Ranger Clear Embossing Powder and adhered it with the same foam strips.

Once everything was complete, I adhered the panel to a black panel for contrast using SSS Dot Tape Runner, and then everything was adhered to the card base to finish up.

That does it for this card! I love creating my own backgrounds using die cuts, and I love creating beautiful flowers, so this card was right up my alley! I hope you enjoyed it! Thanks again for stopping by, and don’t forget to check out the entire Cheering for You release over on Simon’s website! Have yourself a wonderful day!

Supply List:

Affiliate links used at no cost to you. What does this mean? If you use the links within this post to make a purchase, I receive a small commission, which allows me to continue to post crafty content for your enjoyment. I truly appreciate your support!

Latest Posts

Latest Instagram Posts

Simon Says Stamp Bright Starry Sky

Hello Crafty Friends, and welcome back! I’m back today with a card featuring the new Starry Sky Foil Transfer Cards from Simon’s latest release, Cheering for You. Have you checked out the new release yet? I would love to know your favorites! Let go through the deets for this one, shall we?

NOTE: all supplies are linked to multiple sources in the thumbnails at the end of this blog post.

I began this card by foiling the Starry Sky panel using pink foil and the Minc Mini. Once the foiling was done, I trimmed it down using the SSS Postage Stamp Edge Frame and adhered it to a black panel.

I used the SSS You Brighten My Day for the sentiment and cut that once from SSS Color Blend Cardstock and twice from black cardstock. I also cut the shadow portion twice and adhered all of the pieces together using liquid glue for a stacked sentiment.

The panel was adhered to the card base and the sentiment was adhered using SSS 3D Foam Strips for added dimension.

That does it for this card! A super simple card for today, but I love the pink foil with the pink sentiment. Don’t forget to head on over to Simon’s website to check out the entire Cheering for You release. Thanks for stopping by, and I hope you have an awesome day!

Supply List:

Affiliate links used at no cost to you. What does this mean? If you use the links within this post to make a purchase, I receive a small commission, which allows me to continue to post crafty content for your enjoyment. I truly appreciate your support!

Latest Posts

Latest Instagram Posts