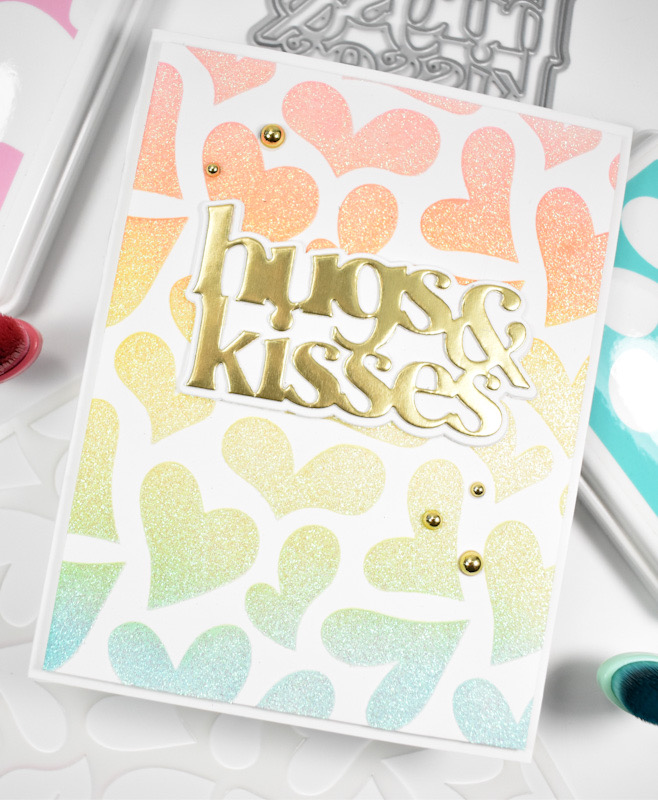
Simon Says Stamp Rainbow Tucked Hearts

Hello Crafty Friends! I hope you’re having a great day! Thanks so much for stopping by to check out today’s project featuring the new Tucked Hearts stamp from Simon’s latest release, To Be Loved. Let’s go ahead and jump into the details!

NOTE: all supplies are linked in the thumbnails at the end of this blog post.

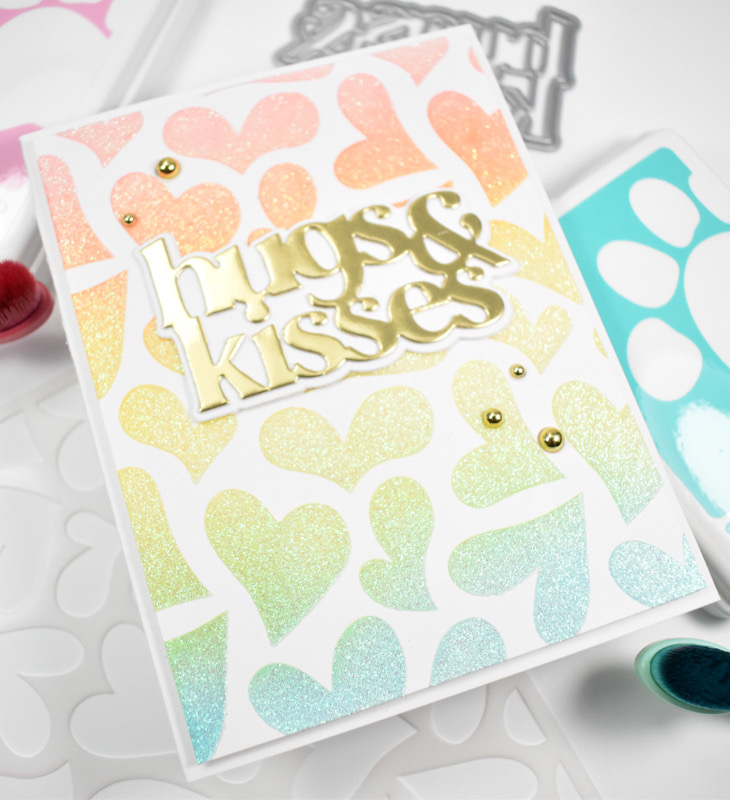
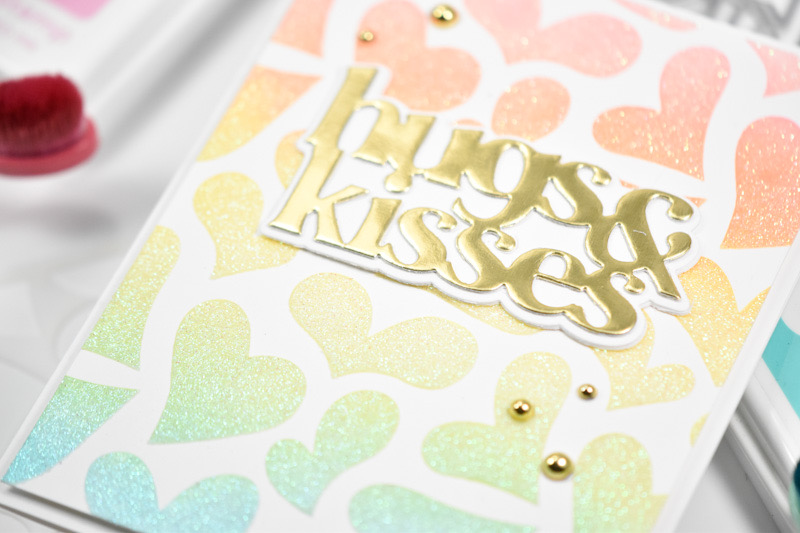
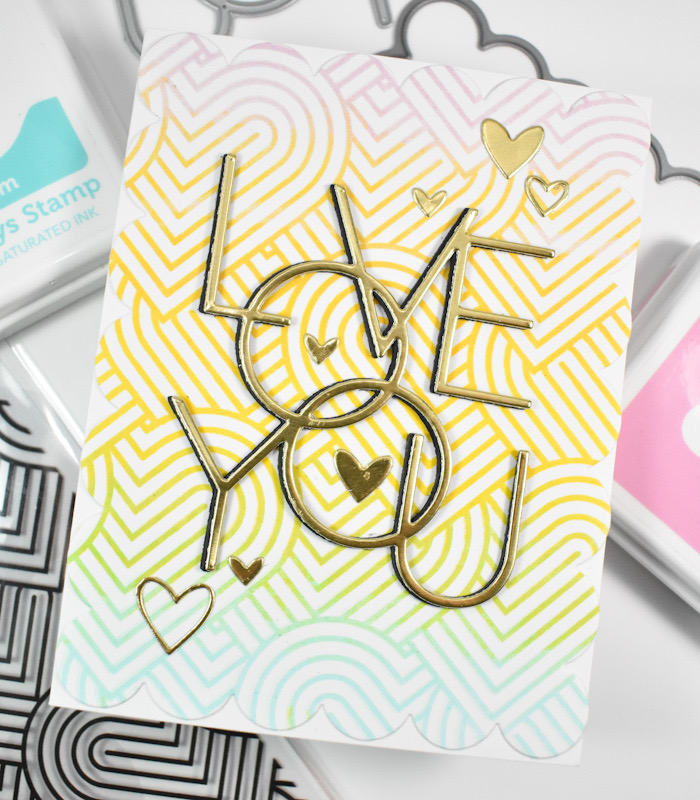
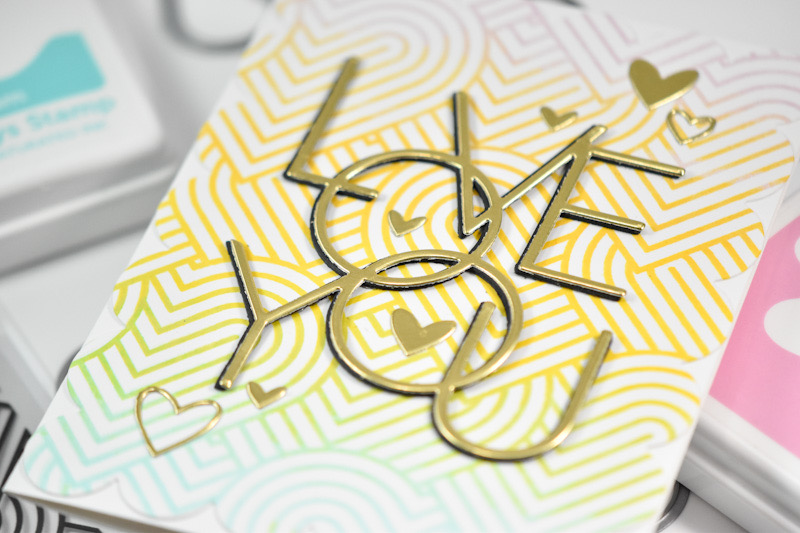
I began this project by pulling my inks, which were Bubblegum, Sunbeam, Seafoam and Lilac. I inked up the top portion of the stamp in the Misti and softened the edges of ink with a blending brush so that I didn’t have any harsh lines. I worked my way down the panel and through the colors until I was satisfied with the vibrance.

Once I was done stamping, I trimmed the panel down using the Chunky A2 Scalloped Rectangles. That was then adhered to the card base, and I went to work on the remaining elements of the card. I die cut the Lined Love You once from gold cardstock and three times from black cardstock and adhered all of those together using liquid glue.

I did offset the gold layer slightly so that you would be able to see the black shadow. The gold hearts are actually leftovers from the Clipping Heart that I had in my stash. The sentiment and the hearts were glued in place to finish up this project.

A super simple one for today, but those are good sometimes! We don’t always have lots of time to devote to a card, so easy peasy ones are a must from time to time. Thanks again for stopping by, and I hope you enjoy your day! Stay awesome, Friend!

Supply List

Affiliate links used at no cost to you. What does this mean? If you use the links within this post to make a purchase, I receive a small commission, which allows me to continue to post crafty content for your enjoyment. I truly appreciate your support!

Latest Posts

Latest Instagram Posts

Simon Says Stamp Harlequin Heart

Hello Friends and welcome back! I’m back today with a project featuring the new Harlequin Heart stamp from one of Simonn’s latest releases, To Love. Let’s go ahead and get right into it!

NOTE: all supplies are linked in the thumbnails at the end of this blog post.

I began this project by stamping the Harlequin Heart onto a panel of Neenah 110lb cardstock using VersaFine Onyx Black ink and heat setting that using Ranger Clear Embossing Powder. Next, I did some ink blending on the panel using Lilac, Orchid and Amethyst inks.

The panel was trimmed down and adhered to a black panel for contrast, before being adhered to the card base. I die cut the You sentiment once from silver cardstock and three times from black and adhered all of those together for a stacked sentiment. I stamped the sub-sentiment, which is from the You stamp set, using VersaMark ink and heat set that using Detail White Embossing Powder.

I adhered the sub-sentiment using foam strips and added some silver metallic pearls to pull it all together and add some bling.

I hope you enjoyed this project! Don’t forget to check out the entire release, as there are lots of good things for those Valentine cards. Thanks again for joining me, and have a wonderful day!

Supply List

Affiliate links used at no cost to you. What does this mean? If you use the links within this post to make a purchase, I receive a small commission, which allows me to continue to post crafty content for your enjoyment. I truly appreciate your support!

Latest Posts

Latest Instagram Posts

Simon Says Stamp Falling in Love

Hey There Friends! Thanks so much for stopping by to check out today’s project featuring the Falling in Love stencil from Simon’s latest release, To Love. I love good rainbow cards, so let’s go through the deets!

NOTE: all supplies are linked in the thumbnails at the end of this blog post.

I began this project by ink blending over the stencil using Bubblegum, Sunbeam, Celery and Surf inks. I went and washed the stencil and put it back over the panel and applied Snow Angel Paste over that.

While that was drying, I die cut the Hugs & Kisses sentiment once from gold cardstock, twice from Neenah 110lb and cut the shadow twice as well. Those were all adhered together for that stacked sentiment that I love so very much!

Once my panel was completely dry, I adhered it to the card base using foam tape and glued the sentiment directly atop that. A few gold embellishments were added to finish up.

Super simple project for today! Head on over to Simon’s website to catch the full To Love release! Thanks again for joining me, and don’t forget to stay awesome, friend!

Supply List

Affiliate links used at no cost to you. What does this mean? If you use the links within this post to make a purchase, I receive a small commission, which allows me to continue to post crafty content for your enjoyment. I truly appreciate your support!

Latest Posts

Latest Instagram Posts

Simon Says Stamp Give Thanks Pumpkin

Hello Crafty Friends, and welcome back! Simon’s STAMPtember release has dropped, and I’m curious what your favorites are? If you know me, you know that the florals and leaves are my favorites! Today’s project is featuring the new Give Thanks & Eat Pie set that I used in a different way. Let’s run through the details, shall we?

NOTE: all supplies are linked in the thumbnails at the end of this blog post.

This stamp set really isn’t my style, but I had the idea of putting the pilgrim hat on top of a pumpkin, so that’s the direction that I went! I began this project by die cutting the SSS Layered Pumpkin from Neenah 110lb cardstock, assembling the pumpkin and ink blending it using SSS Pawsitively Saturated Ink in Cantalope, Sherbet and Nutmeg.

I also die cut some leaves from green and brown cardstock using the SSS Lush Leaves and the SSS Arching Leaf Border. Those were ink blended as well using Artichoke and Mocha ink. I stamped the pilgrim hat, which is a layered stamp set, using the Mocha ink along with Clay, Buttercream and Black. Once the stamping was done, I fussy cut the hat and set that aside. I needed another smaller pumpkin and a sentiment, so I went to the SSS Happy Fall Y’all set and stamped those elements using VersaFiny Onyx Black ink and heat set them using Ranger Clear Embossing Powder. Those were cut out using the coordinating dies and set aside as well. In trying to link to the Happy Fall Y’all set, it would appear that this set has been discontinued, unfortunately.

The background panel uses the SSS Stitched Whirl Background along with some splatter from TH Distress Mica Spray Crooked Broomstick. Now to assemble the card! I began by gluing the background leaves in place first and then the large pumpkin, and next were the other leaves. The smaller pumpkin was tucked in and glued in place, while the hat and the sentiment were adhered using foam strips. The panel was then adhered to a brown panel before being adhered to the card base to finish up.

That finishes up this project! Not all stamp sets are going to be your style, but it’s fun to think of different ways to use the elements. Don’t forget to head on over to Simon’s website to check out the entire STAMPtember release! Thanks again for stopping by, and I hope you have an awesome day!

Supply List

Affiliate links used at no cost to you. What does this mean? If you use the links within this post to make a purchase, I receive a small commission, which allows me to continue to post crafty content for your enjoyment. I truly appreciate your support!

Latest Posts

Latest Instagram Posts

Spellbinders Withered Viburnum

Hello Friends, and welcome back! I’m back today with a card featuring the new Withered Viburnum from the Winter’s Grace Garden collection from Spellbinders. This is such a beautiful set from Susan Tierney-Cockburn, and I just loved adding sparklies for the berries! Let’s go ahead and go through the details.

NOTE: all supplies are linked to multiple sources in the thumbnails at the end of this blog post.

I began this project by cutting the leaves from Fern cardstock, and cutting the berry portion from Indigo cardstock. I did end up cutting the leaves several times for a fuller spray. Once the cutting was complete, I did some ink blending on the leaves using SSS Pawsitively Saturated Inks in Cabernet and Kale.

Like I said earlier, I added jewels to the berry portions and then went to work on the rest of the card. The background was created using the Leafy 3D Embossing Folder and I lightly ink blended some Sprout ink on that before splattering it with some gold acrylic ink.

The sentiment, which is from the Making Me Smile Sentiments set, was gold foiled onto black cardstock and die cut several times using the included die. I adhered the background panel to the card base and then began the layout.

The leaves were adhered first and the berry clusters were adhered next, tucking those in as needed. To finish up, the sentiment was adhered with foam strips for dimension.

That does it for this one! I hope you enjoyed it, and I hope it inspires you to get crafty in your space! Don’t forget to head over to the Spellbinders website to catch all of the September releases! Thanks again for stopping by, and have a wonderful day!

Supply List

Affiliate links used at no cost to you. What does this mean? If you use the links within this post to make a purchase, I receive a small commission, which allows me to continue to post crafty content for your enjoyment. I truly appreciate your support!

Latest Posts

Latest Instagram Posts

Simon Says Stamp Double Plaid Floral

Hello Crafty Friends, and welcome back to my blog! I’m so glad that you stopped by to check out today’s project featuring the new Double Plaid Cover, as well as the new Rustic Layering Flower. These new products are from the STAMPtember release, and I had a blast making this card, so let’s get into the details!

NOTE: all supplies are linked in the thumbnails at the end of this blog post.

I began this project by pulling an inspiration card from the Color Cubes, just to get some color variety going on. Once I decided on a color combo that I liked, I die cut the Rustic Layering Flower three times from aqua, orange and pink cardstock. This flower has several pieces so I did some ink blending on those pieces before assembling them. The ink colors that I used were Carnation, Sweets, Ocean, Cantaloupe and Sherbet.

For some additional flowers and leaves, I used the Fine Floral Stem for some light blue flowers, as well as the Budding Branches for some white leaves. I have to say that the Budding Branches is by far my most used leaf set from Simon! I did die cut the centers of the flowers from gold cardstock to pull the elements together.

Moving on to assembly .. I splattered my card base using black acrylic ink before adhering the Double Plaid Cover with foam strips. I arranged the flowers and leaves and adhered those using a combination of liquid glue and foam strips to provide support where necessary. I always have to add embellishments to the “buds” of the leaves, because I just think it’s so awesome and so pretty!

I stamped the sentiment, which is from the Mix & Match Butterflies set, using VersaFine Onyx Black ink and heat set that using Ranger Clear Embossing Powder. I used the coordinating die to cut it several times for a stacked look. The sentiment was glued directly to the panel to finish up.

That does it for this project! I’m sorry if you’re sick of florals, but I literally can’t help myself! Florals and leaves are my jam! Don’t forget to check out the entire STAMPtember release, as well as all of the collaboration sets happening all month long! Thanks again for joining me, and have yourself a wonderful day!

Supply List

Affiliate links used at no cost to you. What does this mean? If you use the links within this post to make a purchase, I receive a small commission, which allows me to continue to post crafty content for your enjoyment. I truly appreciate your support!

Latest Posts

Latest Instagram Posts

Spellbinders Best Friends

Hello Crafty Friends! I’m so glad that you stopped by! The Spellbinders August releases are live, and I’m back today with a card featuring the new All Seasons Spring BetterPress Press Plate. Let’s not waste time and go through the details!

NOTE: all supplies are linked to multiple sources in the thumbnails at the end of this blog post.

I look for any reason to create with Spellbinders flower sets, so having a new sentiment set was all I needed to pull them out. The Spellbinders All Season Spring set is great because it’s a single plate and a single die, so you’re able to create multiple sentiments in one pass! I love this so much, because it allows you to add so many sentiments to you stash for those times when you don’t have much time to create.

I began this card by pulling an inspiration card from the Color Cubes and die cutting a bunch of flowers and leaves from aqua, various shades of blue, yellow and black cardstock using several sets from Spellbinders. I’ll link to those sets below for your reference. Once those were cut, I did some ink blending on the flowers using SSS Pawsitively Saturated Inks in Seafoam, Morning and Dusk, before adhering the pieces together using liquid glue.

For my background panel, I used the Spellbinders Fluted Classic Rectangles and splattered that with black acrylic ink. While that was drying, I prepared my sentiment by using BetterPress Black Ink onto Grey BetterPress Paper. I did cut the sentiment several times for a stacked sentiment for added dimension.

I began adhering the leaves to my panel using glue, along with the lower level flowers. Once I reached the main flowers, those were adhered with foam strips, as well as the sentiment. To finish up, I did add some clear drops for a little shine.

That does it for this one! I hope you enjoyed it as much as I did! I really can’t get enough of creating beautiful flowers! Thanks again for stopping by, and don’t forget to head over to the Spellbinders site to check out all of the new August releases! Have yourself a wonderful day!

Supply List

Affiliate links used at no cost to you. What does this mean? If you use the links within this post to make a purchase, I receive a small commission, which allows me to continue to post crafty content for your enjoyment. I truly appreciate your support!

Latest Posts

Latest Instagram Posts

Spellbinders All Seasons Floral

Hello Crafty Friends, and welcome back! The Spellbinders August release is live, and there’s some awesome stuff to peruse! Today’s card is featuring the new All Seasons Spring BetterPress Plate, and if you know me, you know that I’m going to pair it with florals! So, let’s run through the details.

NOTE: all supplies are linked to multiple sources in the thumbnails at the end of this blog post.

When I was thinking about this card, I wanted to do a monochromatic color scheme, so I went with black, white and grey. I love the look of white flowers with grey shading, so that’s what I set out to do! I used the Spellbinders Be Bold Blooms set and cut a bunch of the flowers from Neenah 110lb cardstock, and I cut the centers and foliage from black cardstock.

I used SSS Pawsitively Saturated Ink in Earl to do the ink blending on the flowers, and when that was complete, I assembled the flowers using liquid glue. I created the background panel by using gravel cardstock and the Spellbinders Argyle Plaid 3D Embossing Folder, and splattered that with some black acrylic ink.

While the panel was drying, I inked up the All Seasons Spring Press Plate using the BetterPress Black ink onto a panel of Pebble BetterPress Cardstock. That was then cut using the included die. I did cut it a second time from Neenah 110 and adhered those pieces together for a stacked sentiment. This particular sentiment is a very long sentiment, and I didn’t like the way it looked on this particular card, so I ended up cutting it into two pieces so that it would fit better.

My embossed panel was then adhered to a black panel for contrast, and I began gluing in the bottom layers first, which included the smaller flowers and the foliage. I adhered the top flowers with foam strips, as well as the sentiment. I had a few leaves left over, so I secured those in place where needed. To finish up, I added a few clear drops.

That does it for this project! I hope you enjoyed it as much as I did! I really love this color combo from time to time, as a change from the pastel flowers. Don’t forget to head over to the Spellbinders website to check out all of the fun, new August products! Thanks again for stopping by, and I hope you have a wonderful day!

Supply List

Affiliate links used at no cost to you. What does this mean? If you use the links within this post to make a purchase, I receive a small commission, which allows me to continue to post crafty content for your enjoyment. I truly appreciate your support!

Latest Posts

Latest Instagram Posts

Simon Says Stamp Grateful For You Cosmos

Hello Crafters and welcome back! I’m participating in an Instagram Hop today to celebrate Simon Says Stamp’s latest release, Cheering For You. Head on over there to check it out and comment along the hop for your chance to win a $25 gift card! Today’s project is a mixed media-ish type, which I never do, but always love them when I’m done! It’s featuring a few new products from the latest release, so let’s go ahead and get into the details!

NOTE: all supplies are linked to multiple sources in the thumbnails at the end of this blog post.

This background panel was left over from a previous ink smooshing session, so I pulled that out for this card. But, I’ll post how it was created just in case you feel inspired to create your own. I grabbed a piece of watercolor paper, and Distress Oxide ink pads in Saltwater Taffy, Crackling Campfire, Spiced Marmalade, Fossilized Amber and Evergreen Bough. I worked one color at a time by smooshing the ink pad onto my silicone mat, spritzing with water and swiping or dabbing my paper into the ink. I made my way through the colors, drying the paper in between each addition, so that the colors didn’t get muddled. Once I was satisfied with the additions of color, I took the panel to my splat box and splattered it with Distress Oxide Sprays in Saltwater Taffy, Crackling Campfire and Fossilized Amber.

Like I said, this panel was made a little while back, but I recently bought the new TH Distress Spritzs so I decided to splatter the panel with some of the Peacock Feathers Spritz, along with some black acrylic ink. The panel was trimmed down using the SSS Postage Stamp Edge Frames, and I did some stamping using a few TH Stampers Anonymous sets with Archival Black ink. I’ll link to those stamp sets below.

I die cut the SSS Cosmos Duo twice from black cardstock and used the Fossilized Amber Distress Spritz on one set. Once the pieces were dry, I adhered them together using liquid glue. I also die cut the You twice from black cardstock and once from black glossy cardstock and adhered those together as well. The small sentiment is from the You stamp set, and that was stamped onto black cardstock with VersaMark Ink and heat set using Ranger Princess Gold Embossing Powder.

I adhered the flowers to my panel with liquid glue and adhered my sentiments using SSS 3D Foam Strips for added dimension. This panel was then adhered to a black panel for contrast before being adhered to the card base.

That does it for this project! I hope you enjoyed it as much as I did! Not sure why I don’t do this type of card more often, so maybe I need to work on that. Don’t forget to check out the Instagram Hop for your chance to win a $25 gift card at each stop along the hop! Thanks again for joining me for today’s project, and I hope you have a wonderful day!

Supply List

Affiliate links used at no cost to you. What does this mean? If you use the links within this post to make a purchase, I receive a small commission, which allows me to continue to post crafty content for your enjoyment. I truly appreciate your support!

Latest Posts

Latest Instagram Posts

Simon Says Stamp You Are Amazing

Hello Friends, and welcome back! Thanks so much for stopping by to check out today’s project! This project is featuring the new You die and You stamp set from Simon’s latest release, Cheering for You. Let’s go ahead and roll through the details!

NOTE: all supplies are linked to multiple sources in the thumbnails at the end of this blog post.

I really like creating backgrounds with single dies, and Simon’s new You die was perfect for this technique! I began this project by die cutting the new SSS You a bunch of times from Neenah 110lb cardstock. I also die cut the SSS Divine Peony and did some ink blending on that using SSS Pawsitively Saturated Ink in Morning and Galaxy.

Once the ink blending was complete, I assembled the florals using liquid glue, and then decided that I wanted the leaves to be black, so I went back and cut those. To begin assembly, I cut a panel of Neenah 110lb cardstock using the PFS Diagonal Stitched Rectangles and splattered it using black acrylic ink. When that was dry, I began adhering the You die cut to cover the panel and trimming off the excess.

I adhered the leaves in place and then adhered the larger flower using SSS 3D Foam Strips for added dimension. The card was missing something, so I cut the You from black cardstock and adhered that using foam strips, and that brought things together, in my opinion. I then used the new SSS You Stamp set and stamped the sub-sentiment using VersaFine Onyx Black ink, heat set that using Ranger Clear Embossing Powder and adhered it with the same foam strips.

Once everything was complete, I adhered the panel to a black panel for contrast using SSS Dot Tape Runner, and then everything was adhered to the card base to finish up.

That does it for this card! I love creating my own backgrounds using die cuts, and I love creating beautiful flowers, so this card was right up my alley! I hope you enjoyed it! Thanks again for stopping by, and don’t forget to check out the entire Cheering for You release over on Simon’s website! Have yourself a wonderful day!

Supply List:

Affiliate links used at no cost to you. What does this mean? If you use the links within this post to make a purchase, I receive a small commission, which allows me to continue to post crafty content for your enjoyment. I truly appreciate your support!

Latest Posts

Latest Instagram Posts