Simon Says Stamp Floral Sparkle Strands

Hello Friends, and welcome back! I’m so glad that you stopped by to check out today’s project featuring the new Sparkle Strands stamp from Simon’s latest release, Sweet Wishes. This is a really fun stamp, and I can see using it in many different ways! Let’s go ahead and go through the details.

NOTE: all supplies are linked in the thumbnails at the end of this blog post.

I began this project by stamping the Sparkle Strands onto a panel of Neenah 110lb cardstock using PFS Misty Coast ink. I then trimmed it down using the SSS Postage Stamp Edge Frames, and went to work on the other elements of the card.

I used the Divine Peony and cut that three times from Neenah 110lb and cut the leaves and centers from black cardstock. I did some ink blending on the layers of the flowers using Bubblegum and Sunbeam and then assembled those layers using liquid glue. The sentiment, which is from the Friendship Leafy Cluster set, was stamped with VersaMark ink and heat set using Detail White Embossing Powder. That was trimmed out with the coordinating die, along with two additional cuts for a stacked sentiment look.

Time for assembly! The panel was adhered to the card base, and the leaves were glued in place, while the flowers were adhered using foam tape for a bit of dimension. The sentiment was glued in place, and white pearls were added to the strands to finish up.

That does it for this project! I hope you enjoyed it, and I hope it inspires you to get creative in your space! Thanks again for joining me, and have a fabulous day!

Supply List

Affiliate links used at no cost to you. What does this mean? If you use the links within this post to make a purchase, I receive a small commission, which allows me to continue to post crafty content for your enjoyment. I truly appreciate your support!

Latest Posts

Latest Instagram Posts

Simon Says Stamp Positive Birthday Wishes

Hello Friends, and welcome back to my blog! Thanks so much for stopping by to check out today’s project featuring the new Positivity Stencil from Simon’s latest release, Sweet Wishes. Let’s go ahead and get right into the details!

NOTE: all supplies are linked in the thumbnails at the end of this blog post.

This was a simple card to pull together, but I love the how it came out! I began by taping the stencil to a panel of Neenah 110lb cardstock and did some ink blending using Sprout, Surf and Cadette inks. Once the ink blending was complete, I trimmed the panel down using the SSS Postage Stamp Edge Frames.

At this point, the panel was missing something, so I decided to use a Copic Multiliner and draw lines within the white spaces. I wasn’t being careful or perfect with my lines, as I’m sure you can tell, but I felt like this simple addition of black made all the difference.

I stamped the sentiment, which is from the Clean Line Stacks set, onto a panel of black cardstock using VersaMark Ink, and heat set that using Detail White Embossing Powder. I used the coordinating die to trim it out, along with two additional cuts and adhered all of those together using liquid glue. The sentiment was then glued to the panel, and everything was then adhered to the card base to finish up.

That does it for this one! Like I said, a super, simple card, but I love the finished project! Don’t forget to check out the entire Sweet Wishes release, and let me know your favorites! Thanks again for joining me, and I hope you have a fabulous day!

Supply List

Affiliate links used at no cost to you. What does this mean? If you use the links within this post to make a purchase, I receive a small commission, which allows me to continue to post crafty content for your enjoyment. I truly appreciate your support!

Latest Posts

Latest Instagram Posts

Spellbinders Holly Holiday Background

Hello Friends and thanks for joining me! Today’s project is featuring the new Holiday Background Panel, as well as the Festive Circle Sentiments from the Spellbinders September release! Let’s go ahead and go through the details, shall we?

NOTE: all supplies are linked to multiple sources in the thumbnails at the end of this blog post.

I began this project by gold foiling one of the panels from the Holiday Background Panels BetterPress set. There are four panels in this set, so you have lots of options for creating beautiful backgrounds. While I was foiling, I went ahead and gold foiled the Festive Circle Sentiments as well and used the coordinating die to trim those out.

I knew that I wanted some florals and some holly, so I used the Sealed Holly Sprigs and Petite Blooms and Sentiments for that and cut those from red and green cardstock. To add some depth to the leaves, I used Field ink and did some ink blending on the edges of those. The foiled panel was adhered to the card base using foam tape, and the sentiment was glued in the center of that.

The leaves and flowers were adhered with liquid glue as well, and I added some red jewels to add a bit more interest and shine for berries.

That does it for this project! It’s nice to be adding some holiday cards to my stash this early! When do you typically start on your holiday cards? I usually begin my personal Christmas cards in October, which is quickly approaching! Thanks again for joining me, and I hope you have a fabulous day!

Supply List

Affiliate links used at no cost to you. What does this mean? If you use the links within this post to make a purchase, I receive a small commission, which allows me to continue to post crafty content for your enjoyment. I truly appreciate your support!

Latest Posts

Latest Instagram Posts

Spellbinders Floral Thanks Cardfront

Hello Crafty Friends and thanks for joining me! Today’s project is featuring the new Thanks A2 Cardfront 3D Embossing Folder from Spellbinders September releases. I paired it with a bunch of florals for added interest, because we all know that I’m addicted to flowers! Let’s go ahead and go through the details.

NOTE: all supplies are linked to multiple sources in the thumbnails at the end of this blog post.

I began this project by running a gold panel in the Thanks folder through the machine, and then began die cutting all the flowers. The sets used for the flowers were Autumn Sealed Sprigs, Be Bold Blooms and Club Blooms, and the colors used were Black, Orange, Pink Sand, Saffron, Sage and Waterfall. Once that was done, I did a little bit of ink blending on the flowers using Carnation, Ocean, Sage and Honey inks before assembling the flowers.

The flowers on the sides were adhered first using liquid glue, and then I added a few to the center of the panel to balance everything out. My panel was adhered to the card base, and to finish up, I added a few clear drops.

This was a super simple card, but I loved adding all of the flowers to it for that pop of color! Be sure to head over to the Spellbinders website to check out all of the awesome releases for September! Thanks again for stopping by, and I hope you have an amazing day!

Supply List

Affiliate links used at no cost to you. What does this mean? If you use the links within this post to make a purchase, I receive a small commission, which allows me to continue to post crafty content for your enjoyment. I truly appreciate your support!

Latest Posts

Latest Instagram Posts

Simon Says Stamp Everything is Okayer Now

Hello! Hello! Thanks so much for stopping by! I’m back today with a project featuring the new Coffee Time set. Are you a coffee drinker? If so, this set is definitely for you! I’m loving all of the fun sentiments in this set! Let’s go ahead and go through the details!

NOTE: all supplies are linked in the thumbnails at the end of this blog post.

For the background on this one, I used the SSS Brush Strokes stencil along with SSS Pawsitively Saturated Ink in Latte, Cappuccino and Mocha. Once the ink blending was complete, I used the SSS Postage Stamp Edge Frames to trim it down. I stamped the coffee mug and the sentiments from the SSS Coffee Time set using VersaFine Onyx Black ink and heat set those using Ranger Clear Embossing Powder. I used the coordinating dies to trim those out, cutting the sentiments two more times for that stacked look.

I decided that I wanted some other coffee cups, and the only one that I could find is from the SSS Happy Fall Y’all set. So, I stamped that one twice and did the same heat setting, and colored it in using Copics E31, E37, C1, C2, C3, G21 and G24.

Before assembling the card, I did splatter the base using TH Distress Mica Spray in Crooked Broomstick. The striped panel was adhered, and all of the elements on the front of the card were adhered using foam strips to finish up.

A super simple card for today! I hope you enjoyed it, and I hope it inspires you to get crafty in your space! Head on over to Simon’s website to check out the entire STAMPtember release! Thanks again for joining me, and I hope you have a fabulous day!

Supply List

Affiliate links used at no cost to you. What does this mean? If you use the links within this post to make a purchase, I receive a small commission, which allows me to continue to post crafty content for your enjoyment. I truly appreciate your support!

Latest Posts

Latest Instagram Posts

Simon Says Stamp Give Thanks Pumpkin

Hello Crafty Friends, and welcome back! Simon’s STAMPtember release has dropped, and I’m curious what your favorites are? If you know me, you know that the florals and leaves are my favorites! Today’s project is featuring the new Give Thanks & Eat Pie set that I used in a different way. Let’s run through the details, shall we?

NOTE: all supplies are linked in the thumbnails at the end of this blog post.

This stamp set really isn’t my style, but I had the idea of putting the pilgrim hat on top of a pumpkin, so that’s the direction that I went! 
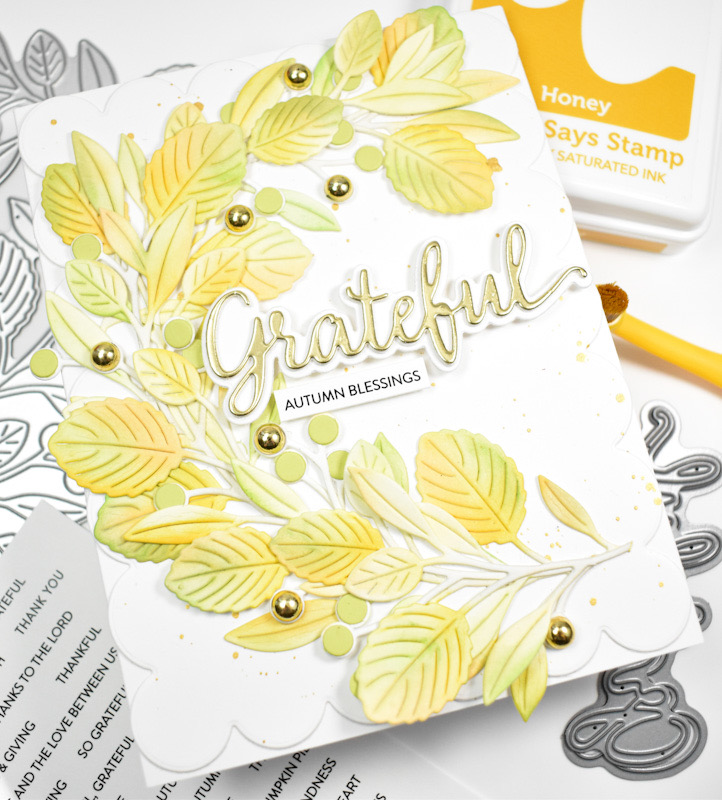
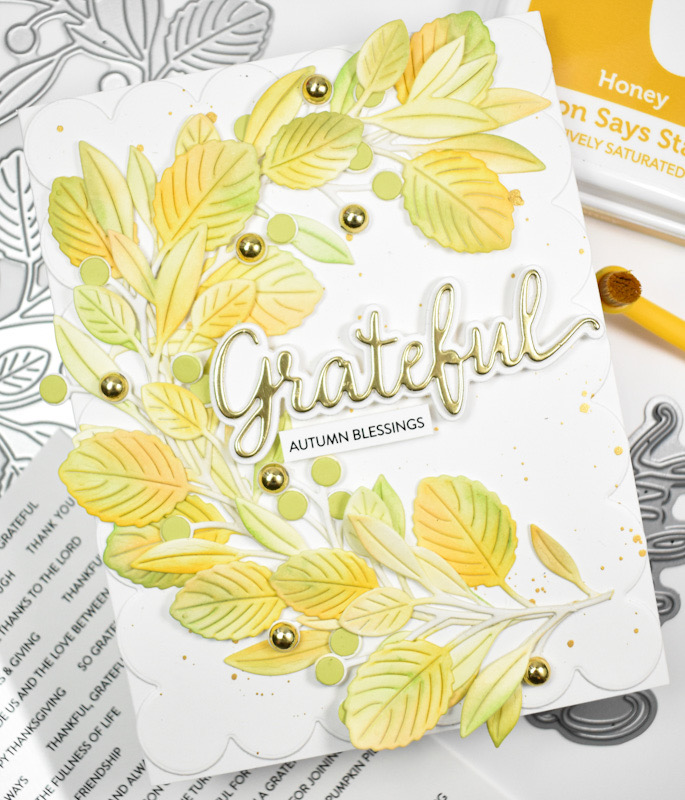
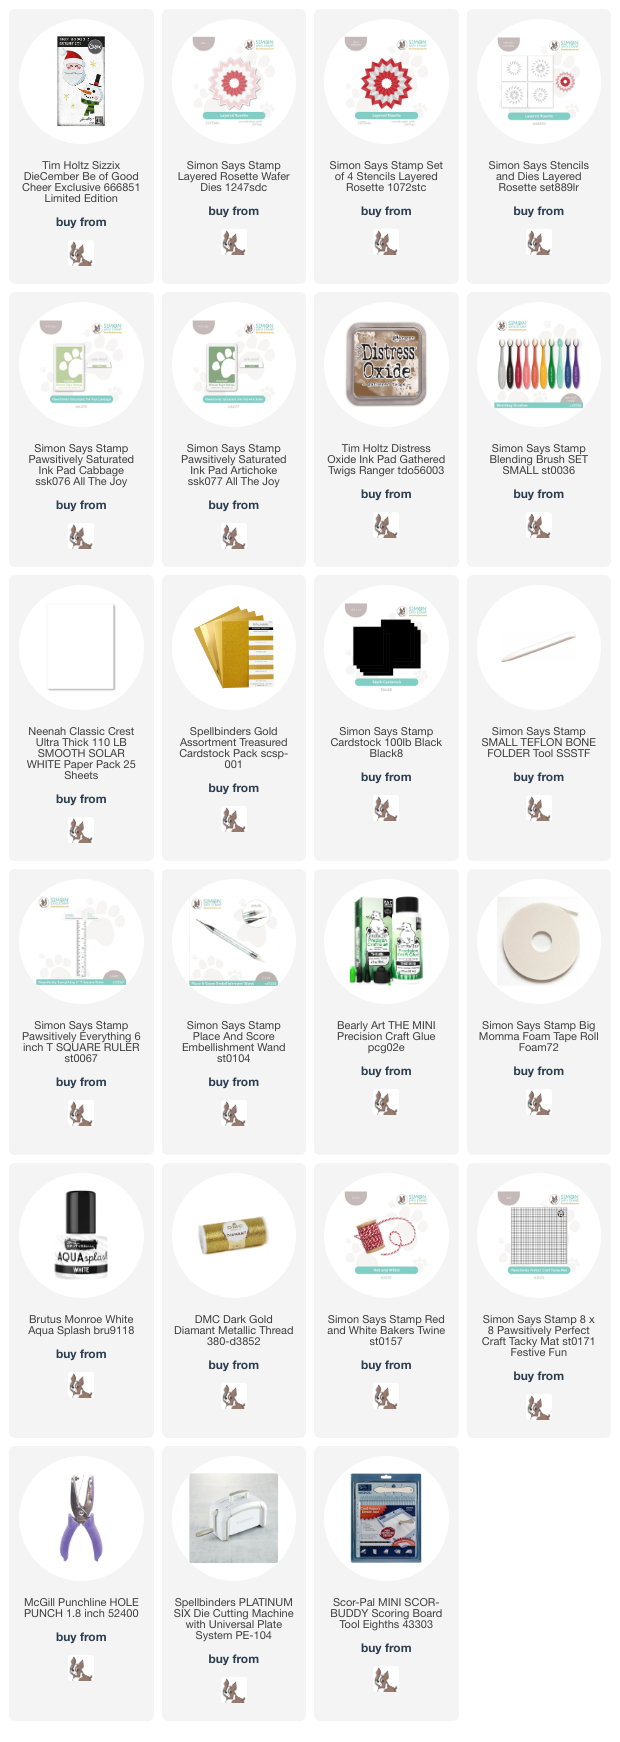
I began this project by die cutting the SSS Layered Pumpkin from Neenah 110lb cardstock, assembling the pumpkin and ink blending it using SSS Pawsitively Saturated Ink in Cantalope, Sherbet and Nutmeg.

I also die cut some leaves from green and brown cardstock using the SSS Lush Leaves and the SSS Arching Leaf Border. Those were ink blended as well using Artichoke and Mocha ink. I stamped the pilgrim hat, which is a layered stamp set, using the Mocha ink along with Clay, Buttercream and Black. Once the stamping was done, I fussy cut the hat and set that aside. I needed another smaller pumpkin and a sentiment, so I went to the SSS Happy Fall Y’all set and stamped those elements using VersaFiny Onyx Black ink and heat set them using Ranger Clear Embossing Powder. Those were cut out using the coordinating dies and set aside as well. In trying to link to the Happy Fall Y’all set, it would appear that this set has been discontinued, unfortunately.

The background panel uses the SSS Stitched Whirl Background along with some splatter from TH Distress Mica Spray Crooked Broomstick. Now to assemble the card! I began by gluing the background leaves in place first and then the large pumpkin, and next were the other leaves. The smaller pumpkin was tucked in and glued in place, while the hat and the sentiment were adhered using foam strips. The panel was then adhered to a brown panel before being adhered to the card base to finish up.

That finishes up this project! Not all stamp sets are going to be your style, but it’s fun to think of different ways to use the elements. Don’t forget to head on over to Simon’s website to check out the entire STAMPtember release! Thanks again for stopping by, and I hope you have an awesome day!

Supply List

Affiliate links used at no cost to you. What does this mean? If you use the links within this post to make a purchase, I receive a small commission, which allows me to continue to post crafty content for your enjoyment. I truly appreciate your support!

Latest Posts

Latest Instagram Posts

Spellbinders Autumn Health & Happiness

Hello Crafty Friends and welcome back! Have you checked out the Spellbinders September releases? So many awesome things to feast your eyes upon! Today’s project is featuring the new Autumn Rain BetterPress Plate and coordinating stencil, in some warm fall colors. So, let’s get into it!

NOTE: all supplies are linked to multiple sources in the thumbnails at the end of this blog post.

I began this project by inking up the Autumn Rain plate with Seafoam ink and then using the stencil to add color to the leaves and umbrellas using Sunbeam, Citrine, Melon and Cantaloupe ink. Once the ink blending was complete, I trimmed the panel using Fluted Classic Rectangles. I should mention that the color added to the handles of the umbrellas was leftover ink on a grey blending brush.

The sentiment is from the Making Me Smile Sentiments set and that was gold foiled onto black cardstock. It was trimmed out several times and adhered together for a stacked look. I adhered the sentiment to the panel using foam strips, and the panel was then adhered to the card base. To finish up, I added some gold pearls for some bling and added some shimmer to the rain using a Wink of Stella brush.

That doe sit for this one! I hope you enjoyed it as much as I did! Don’t forget to check out all of the Spellbinders September releases! Thanks again for joining me, and I hope you have a fabulous day!

Supply List

Affiliate links used at no cost to you. What does this mean? If you use the links within this post to make a purchase, I receive a small commission, which allows me to continue to post crafty content for your enjoyment. I truly appreciate your support!

Latest Posts

Latest Instagram Posts

Spellbinders Black Alder Christmas

Hello Friends and thanks so much for stopping by! I’m back today with a project featuring the new Black Alder dies from the Spellbinders Winter’s Grace Garden Collection. This is a die set from Susan Tierney-Cockburn and it’s absolutely beautiful! She has a wonderful video over on the Spellbinders product page, so definitely check that out! Let’s go ahead and go through the details for my card!

NOTE: all supplies are linked to multiple sources in the thumbnails at the end of this blog post.

I began my card by doing all of my die cutting using green and red cardstock. Once that was done, I did some ink blending on the leaves using SSS Pawsitively Saturated Ink in Kale, and used Copic Marker E79 to color the stems. The Black Alder leaves are shiny, so I used some Nuvo Crystal Drops and painted the leaves to give them a shiny effect.

If you know me, you know that I love using jewels as berries, and that’s exactly what I did here! Yay for red jewels! In Susan’s video, she uses small foam balls that she colored, but I didn’t have any of those, so I used what was on hand! My background was created using the Argyle Plaid 3D Embossing Folder with a bit of gold splatter for added interest.

I adhered the panel to a card base and began adhering my leaves using liquid glue. I then adhered the berries in place and went to work on the sentiment, which is from the Mistletoe Greetings BetterPress set. I gold foiled the sentiment and trimmed it out using the included die, and I went ahead and also cut a gold banner and glued those together.

My sentiment was adhered to the panel with foam strips for some added dimension. I’m pretty pleased with how this card turned out! I love the glossy leaves, which is something that you don’t see too often.

That does it for this post! I hope you enjoyed it, and I hope it inspires you to get crafty in your space! Head on over to Spellbinders to check out all of the new September releases, you won’t be disappointed! Thanks again for joining me, and have a fabulous day!

Supply List

Affiliate links used at no cost to you. What does this mean? If you use the links within this post to make a purchase, I receive a small commission, which allows me to continue to post crafty content for your enjoyment. I truly appreciate your support!

Latest Posts

Latest Instagram Posts

Simon Says Stamp Simple Thanks Floral Spray

Hello Friends, and thanks so much for stopping by! The STAMPtember release is in full swing, and I’m back today with a project featuring several new products. I kind of went crazy with the new products on this one because it’s featuring the new Rustic Layering Flower, the Double Plaid Cover, the Simple Thanks and the Crimped Floral Embossing Folder & Die. So, let’s go through the details for this one!

NOTE: all supplies are linked in the thumbnails at the end of this blog post.

I said that I used the Crimped Floral Embossing Folder & Die, but I did not use the entirety of the folder itself. I used it to create the smaller flowers in my spray. Another thing to note, this card is giving an illusion of the Double Plaid Cover. I saved the left over squares and triangles from a previous project and ink blended the edges of those using Earl ink for a shadowed effect.

To begin, I used the Double Plaid Cover to emboss a panel of Neenah 110lb cardstock and then adhered the grey ink blended pieces using foam squares. I thought this was a super interesting way to utilize those leftover pieces. For some color inspiration, I pulled a card from the Color Cubes, and die cut the smaller flowers from colored cardstock, using the included die from the Crimped Floral Folder. For some depth, I did some ink blending on those using C&9 Peacock and Sorbet inks, and added a black crystal to the centers of the flowers.

I then cut the larger flower using the Rustic Layering Flower and ink blended that using that same Peacock ink before assembling the pieces. As always, I need leaves to go with my flowers, so I used the Arching Leaf Border set and cut those from a sage and pine colored cardstock. While die cutting, I went ahead and die cut the Simple Thanks four times from black cardstock, and adhered all of those together with liquid glue.

I began gluing the leaves in place first, as those were the bottom layers, and then I glued the larger flower in place next, and tucked in the other flowers where needed for fullness. The sentiment was glued directly to the panel to finish up.

That does it for this one! I hope you enjoyed it as much as I did! Don’t forget to head on over to Simon’s website to check out the entire STAMPtember release, and stay tuned all month long for the long awaited collaboration sets! Thanks again for hanging with me, and I hope you have a wonderful day!

Supply List

Affiliate links used at no cost to you. What does this mean? If you use the links within this post to make a purchase, I receive a small commission, which allows me to continue to post crafty content for your enjoyment. I truly appreciate your support!

Latest Posts

Latest Instagram Posts

Spellbinders Rainy Birthday Wishes

Hello Crafty Friends, and welcome back to my blog! I appreciate you joining me for today’s project featuring the new Spellbinders Autumn Rain BetterPress Plate. How fun is this plate?!?!? I mean for real! Let’s not waste any time and get into the details!

NOTE: all supplies are linked to multiple sources in the thumbnails at the end of this blog post.

For this project, I wanted a dreary grey background with brighter umbrellas, so I inked the Autumn Rain plate with VersaFine Clair Morning Mist ink. If you’re looking for a great grey ink, then you should definitely check this one out! I did ink the plate a couple times and run it through the machine for better coverage.

Once the background was complete, I used the Autumn Rain stencils to add color to the leaves and umbrellas. The ink that i used was SSS Pawsitively Saturated Inks in Bubblegum, Carnation, Sweets, Celery and Melon. I also used a Zig Wink of Stella pen to add a touch of shimmer to the raindrops, although it’s hard to see that in the pictures.

The panel was then trimmed down using the Nested Postage Labels & Tag set and then adhered to the card base. I gold foiled the sentiment, which is from the You Are Everything Sentiments BetterPress Plate set, onto black cardstock and trimmed it with the coordinating die. I did cut it three times for a stacked look and adhered the sentiment to the panel using foam strips to finish up.

That does it for this project! I hope you enjoyed it as much as I did! Head on over to the Spellbinders website to check out all of the new September releases. There’s so much awesome stuff in this release! Thanks again for joining me, and have a wonderful day!

Supply List

Affiliate links used at no cost to you. What does this mean? If you use the links within this post to make a purchase, I receive a small commission, which allows me to continue to post crafty content for your enjoyment. I truly appreciate your support!

Latest Posts

Latest Instagram Posts