Simon Says Stamp Harlequin Heart

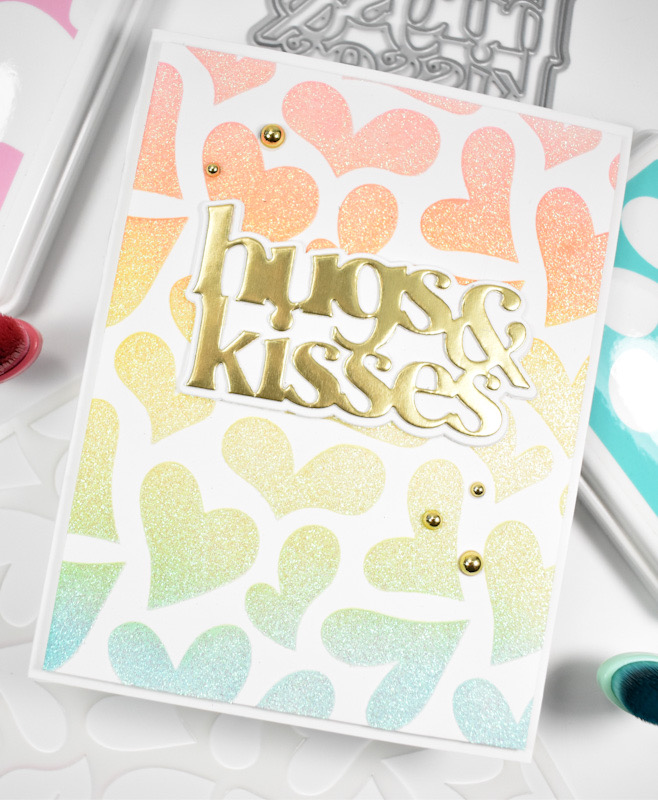
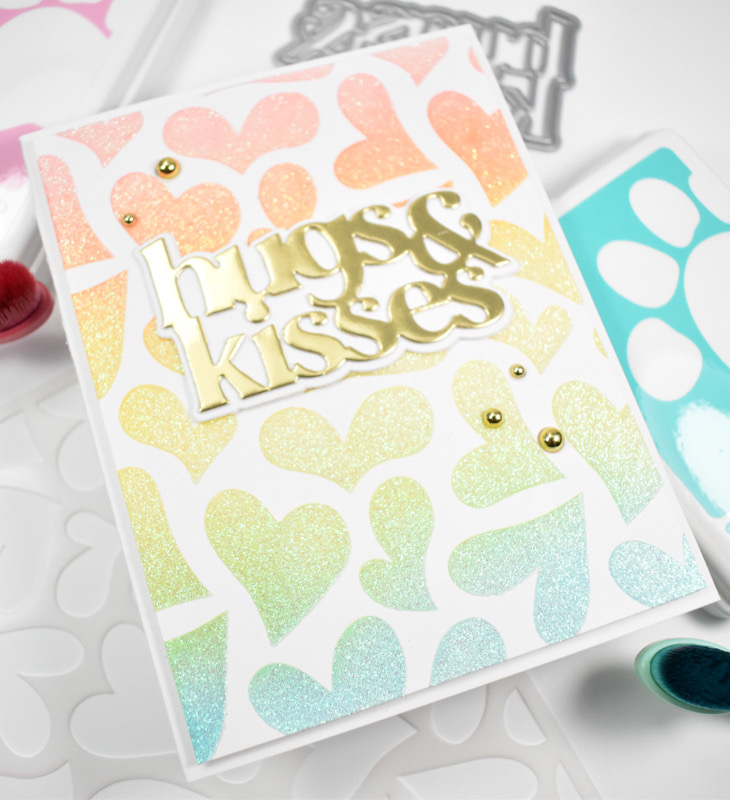
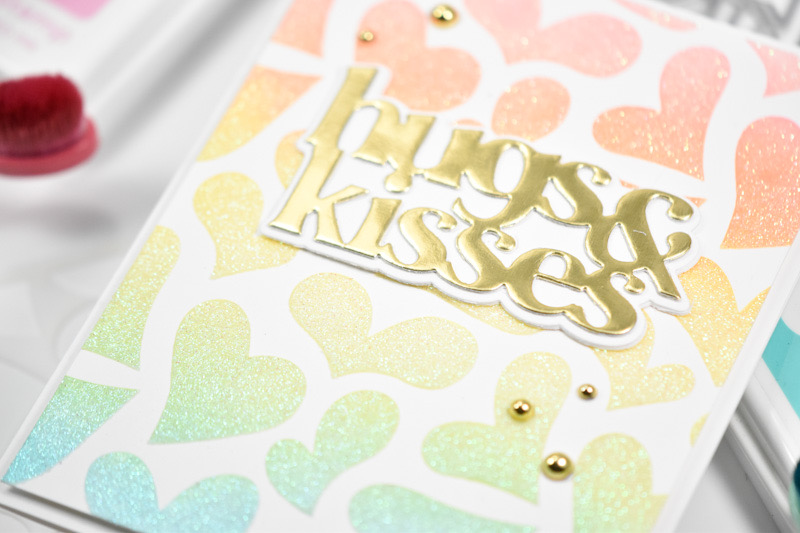
Hello Friends and welcome back! I’m back today with a project featuring the new Harlequin Heart stamp from one of Simonn’s latest releases, To Love. Let’s go ahead and get right into it!

NOTE: all supplies are linked in the thumbnails at the end of this blog post.

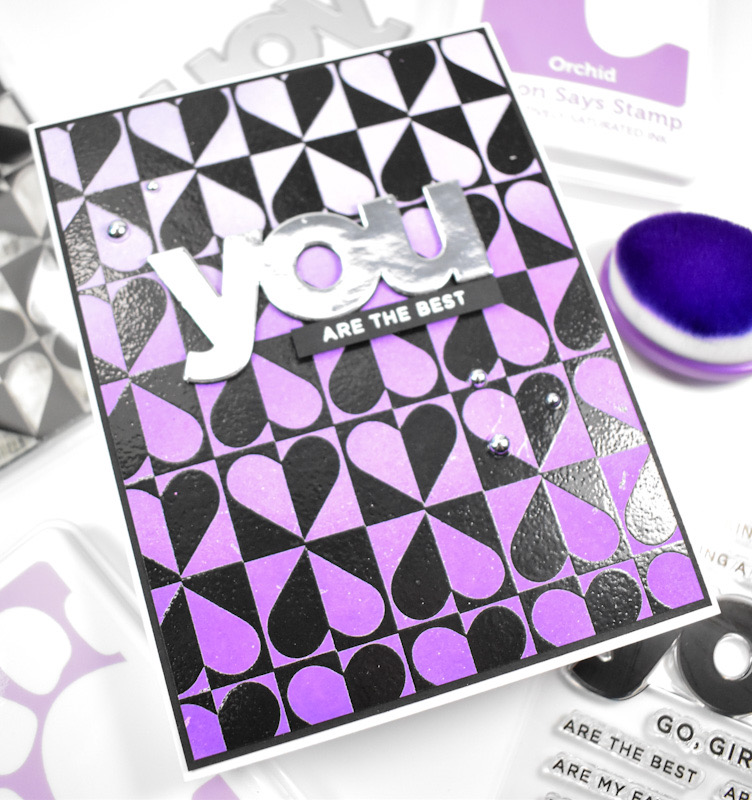
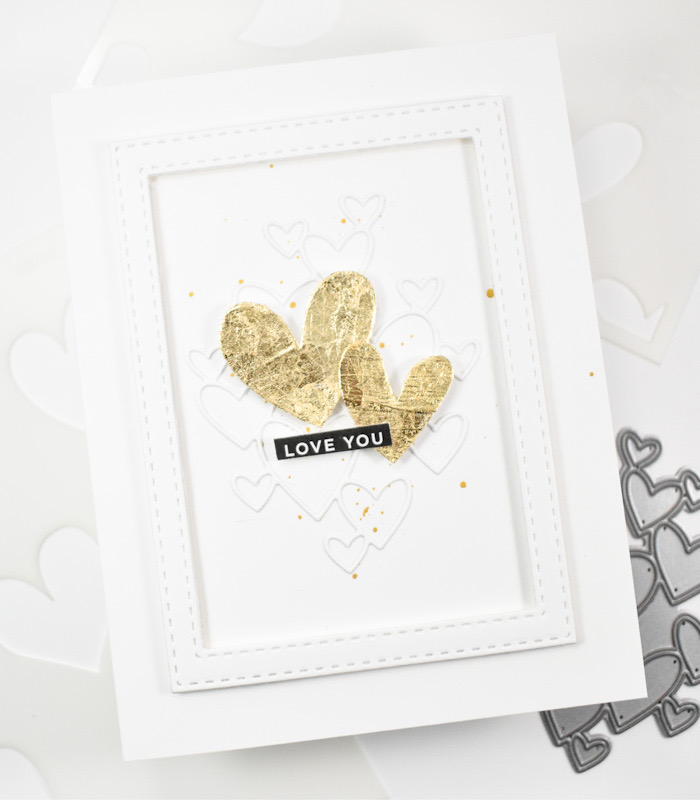
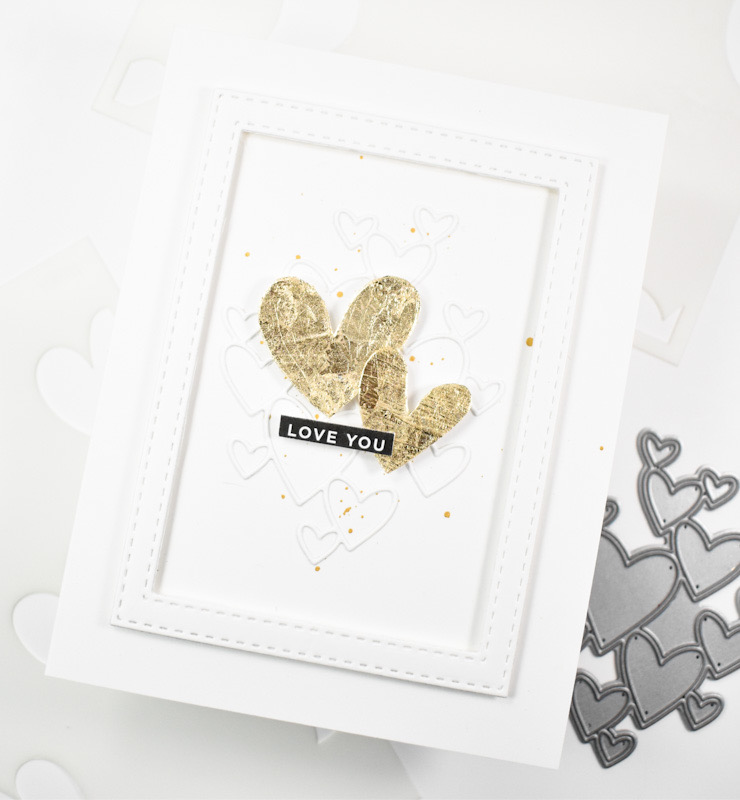
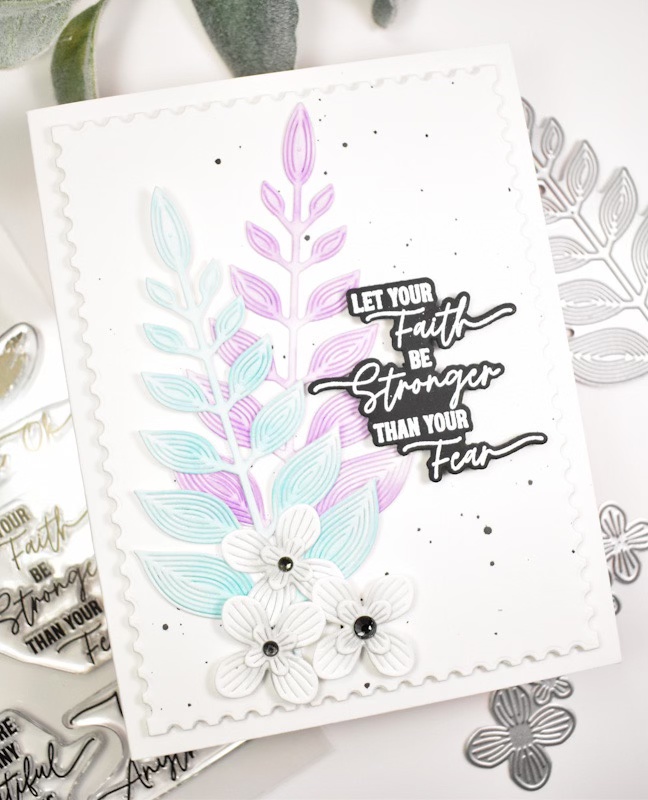
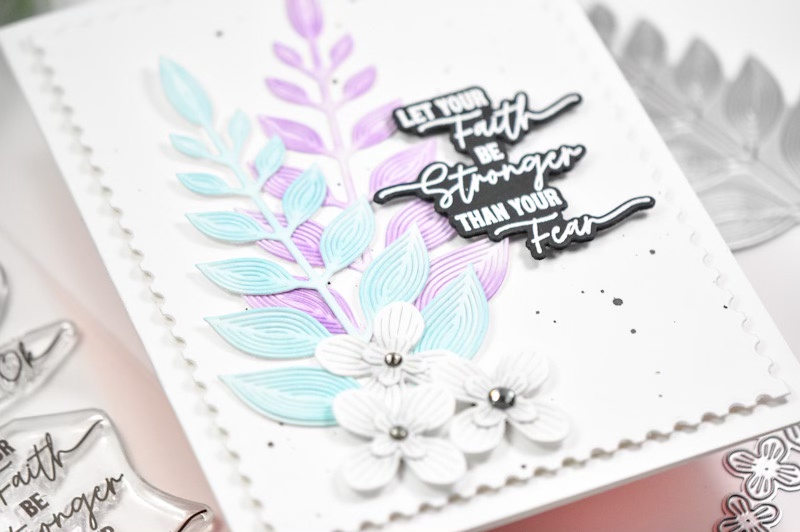
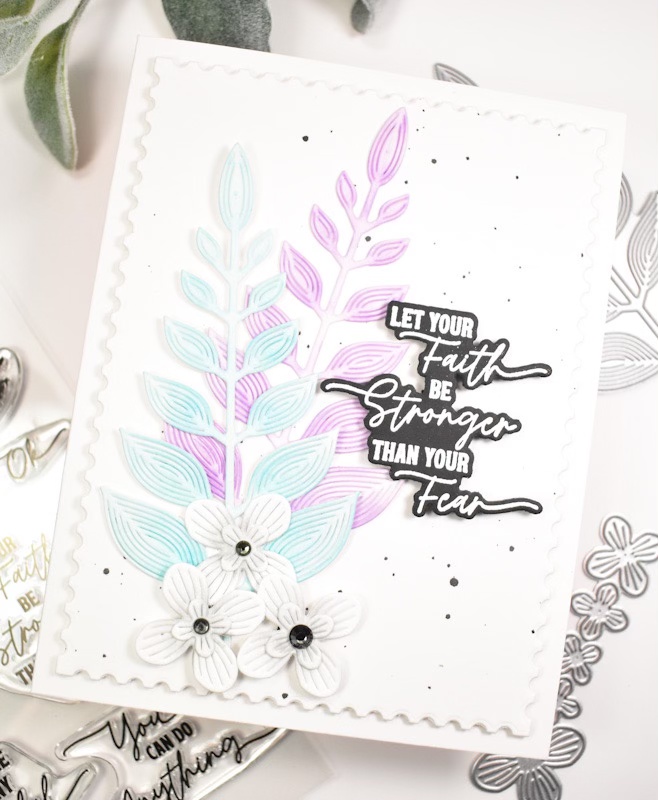
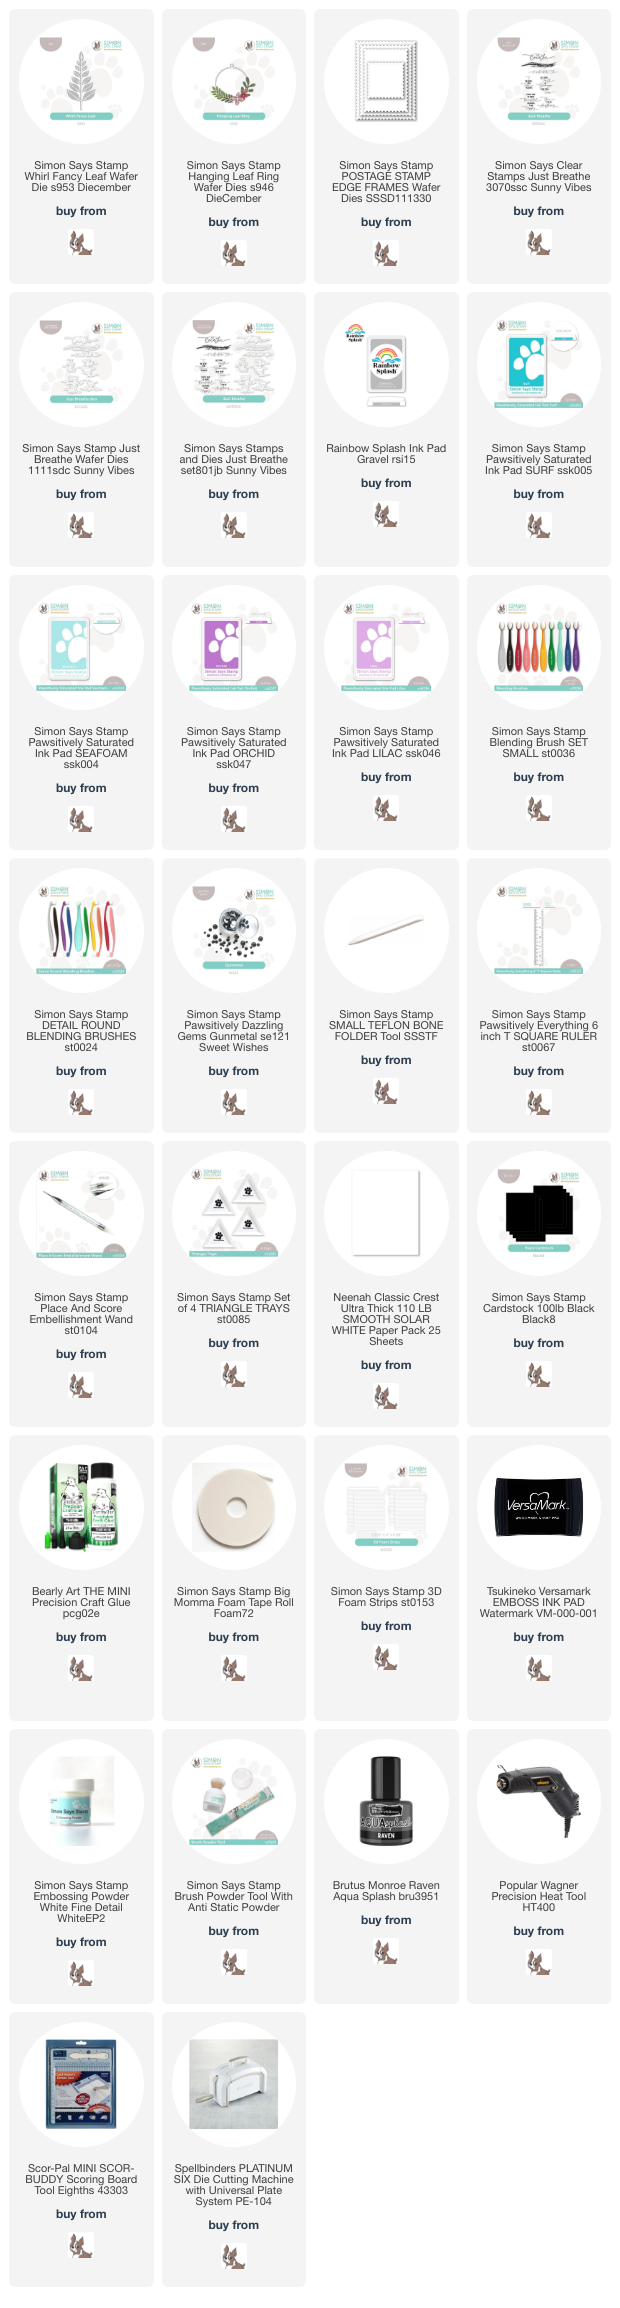
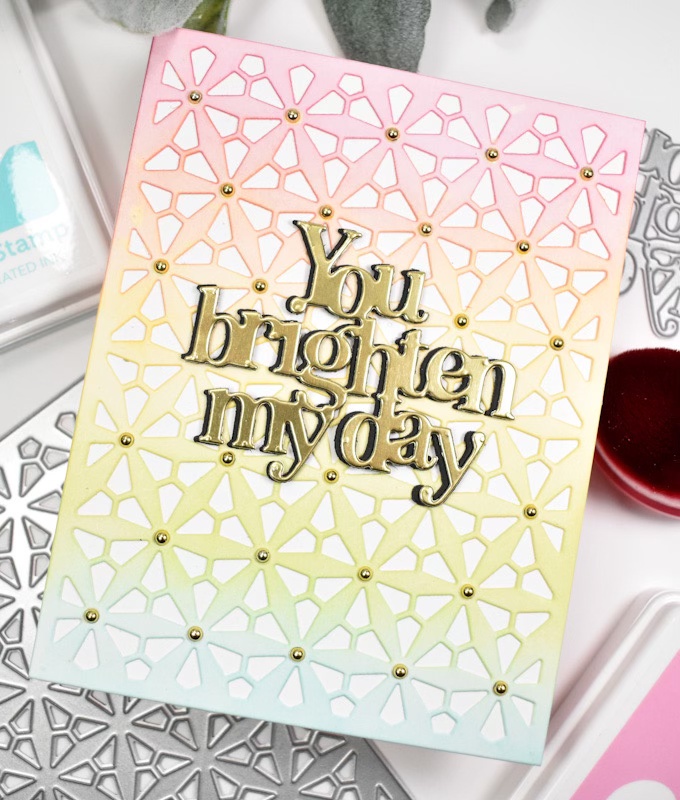
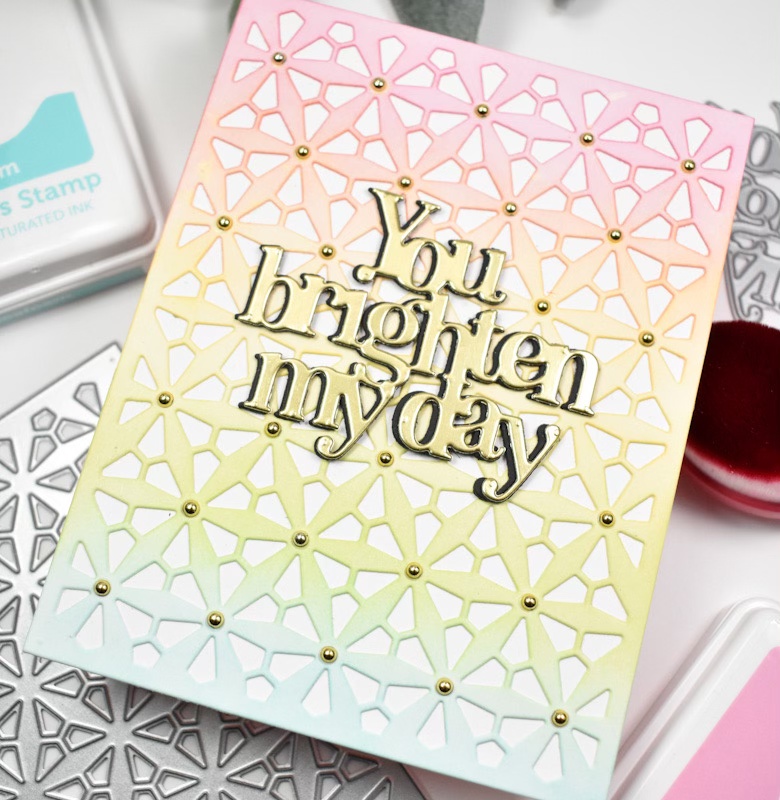
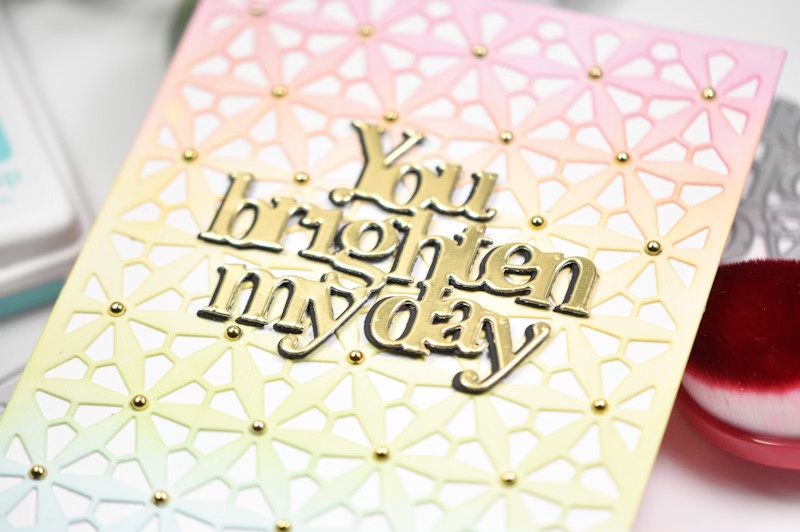
I began this project by stamping the Harlequin Heart onto a panel of Neenah 110lb cardstock using VersaFine Onyx Black ink and heat setting that using Ranger Clear Embossing Powder. Next, I did some ink blending on the panel using Lilac, Orchid and Amethyst inks.

The panel was trimmed down and adhered to a black panel for contrast, before being adhered to the card base. I die cut the You sentiment once from silver cardstock and three times from black and adhered all of those together for a stacked sentiment. I stamped the sub-sentiment, which is from the You stamp set, using VersaMark ink and heat set that using Detail White Embossing Powder.

I adhered the sub-sentiment using foam strips and added some silver metallic pearls to pull it all together and add some bling.

I hope you enjoyed this project! Don’t forget to check out the entire release, as there are lots of good things for those Valentine cards. Thanks again for joining me, and have a wonderful day!

Supply List

Affiliate links used at no cost to you. What does this mean? If you use the links within this post to make a purchase, I receive a small commission, which allows me to continue to post crafty content for your enjoyment. I truly appreciate your support!

Latest Posts

Latest Instagram Posts

Simon Says Stamp Simple Love You

Hello and welcome back! Simon’s brand new release, To Be Loved, is live today and I’m back with a project featuring the new Funky Hearts Stencil. It may not look like I used the stencil on this card, but I assure you that I did! It’s just a little reminder that there are many ways to use a stencil! Let’s go into it, shall we?

NOTE: all supplies are linked in the thumbnails at the end of this blog post.

I began this card by placing the stencil onto a scrap panel of Neenah 110lb cardstock and applying a layer of Tacky When Dry paste. I actually did this twice, because I wasn’t sure if I wanted to use one heart or two. I set that aside to dry while I worked on the rest of the card.

I wanted this to be a more clean and simple design, so I went ahead and splattered my card base with gold acrylic ink and put that over with the hearts to dry. I used the Clipping Heart and die cut that once from Neenah, and I went ahead and cut a frame using the Stitched Rectangles. Once the hearts were dry, I applied some gold gilding flakes and rubbed those in to make sure that I have good coverage. Those were then fussy cut for their use on the card.

The frame was adhered to the card base using foam strips, and the white hearts were adhered inside the frame using liquid glue. The gold hearts were adhered in the middle using the same foam strips, as well as the tiny sentiment, which is from the Reverse Love Sentiment Strips.

That does it for this one! It’s a super simple card, but I quite like how it turned out! Thanks again for stopping by, and don’t forget to check out the entire To Be Loved release over on Simon’s website. Have yourself a wonderful day!

Supply List

Affiliate links used at no cost to you. What does this mean? If you use the links within this post to make a purchase, I receive a small commission, which allows me to continue to post crafty content for your enjoyment. I truly appreciate your support!

Latest Posts

Latest Instagram Posts

Simon Says Stamp Birthday Rosettes

Hello Friends! I hope you’re doing well! I appreciate you stopping by to check out today’s project featuring the Layered Rosette die and stencil combo! Let’s not waste time and jump right into it!

NOTE: all supplies are linked in the thumbnails at the end of this blog post.

I began this project by cutting the Layered Rosettes from Neenah 110lb cardstock and then used the stencils for the ink blending. The colors used were Guava, Watermelon, Cantaloupe, Melon, Surf and Ocean. Once the ink blending was complete, I adhered the layers of the Rosettes together using liquid glue along with silver centers.

For the background, I used the A2 Marquee die and splattered that with black acrylic ink before adhering the silver Streamer Ribbons die cuts. The Rosettes were then adhered using liquid glue and trimmed off before adhering this panel to a black panel for contrast.

The Happy Birthday sentiment was cut from black cardstock twice, the shadow portion was cut from Neenah 110lb twice and all of the pieces were adhered together before being added to the card with foam strips.

That does it for this one! I hope you enjoyed it, and I hope it inspires you to get crafty in your space! Thanks again for joining me, and I hope you have a fabulous day! Stay awesome, Friend!

Supply List

Affiliate links used at no cost to you. What does this mean? If you use the links within this post to make a purchase, I receive a small commission, which allows me to continue to post crafty content for your enjoyment. I truly appreciate your support!

Latest Posts

Latest Instagram Posts

Simon Says Stamp Good Cheer Ornament

Hello Crafters, and welcome back to my blog! Thanks so much for stopping by to check out today’s project featuring the Tim Holtz Be of Good Cheer set! Let’s run through the details for this one!

NOTE: all supplies are linked in the thumbnails at the end of this blog post.

I began this project by die cutting the snowman pieces from the set with color coordinating cardstock. I then adhered the pieces of the snowman and went to work on the Layered Rosette from Simon’s latest DieCember release. I die cut the pieces of the rosette from Neenah 110lb cardstock and did some ink blending using Cabbage and Artichoke ink. You can tell from the images that I die cut the smaller rosette from gold cardstock as well, for layering purposes. Before adhering the pieces, I did some white ink splatter for a bit of added interest.

Since I made this into an ornament, I die cut the larger rosette four times, used a hole punch so that I could tie ribbons, and adhered all of those together with liquid glue. To give it a bit of aging, I rubbed some Gathered Twigs Oxide ink along the edges as well. The snowman was then adhered using foam tape for added dimension.

To finish up, I used some gold thread for the hanging portion of the ornament, and used some red and white twine to make a bow as well. That does it for this project! I hope you enjoyed it as much as I did. You can receive your own Be of Good Cheer set free with an $25 Tim Holtz purchase. Thanks again for joining me, and have a wonderful day!

Supply List

Affiliate links used at no cost to you. What does this mean? If you use the links within this post to make a purchase, I receive a small commission, which allows me to continue to post crafty content for your enjoyment. I truly appreciate your support!

Latest Posts

Latest Instagram Posts

Simon Says Stamp Falling in Love

Hey There Friends! Thanks so much for stopping by to check out today’s project featuring the Falling in Love stencil from Simon’s latest release, To Love. I love good rainbow cards, so let’s go through the deets!

NOTE: all supplies are linked in the thumbnails at the end of this blog post.

I began this project by ink blending over the stencil using Bubblegum, Sunbeam, Celery and Surf inks. I went and washed the stencil and put it back over the panel and applied Snow Angel Paste over that.

While that was drying, I die cut the Hugs & Kisses sentiment once from gold cardstock, twice from Neenah 110lb and cut the shadow twice as well. Those were all adhered together for that stacked sentiment that I love so very much!

Once my panel was completely dry, I adhered it to the card base using foam tape and glued the sentiment directly atop that. A few gold embellishments were added to finish up.

Super simple project for today! Head on over to Simon’s website to catch the full To Love release! Thanks again for joining me, and don’t forget to stay awesome, friend!

Supply List

Affiliate links used at no cost to you. What does this mean? If you use the links within this post to make a purchase, I receive a small commission, which allows me to continue to post crafty content for your enjoyment. I truly appreciate your support!

Latest Posts

Latest Instagram Posts

Simon Says Stamp Thanks Exotic Blooms

Hello Crafty Friends and welcome back! Simon has a new To Love release, and I’m back today with a project featuring the Exotic Blooms. We all know that I love the florals, so let’s go ahead and get into the details for this one!

NOTE: all supplies are linked in the thumbnails at the end of this blog post.

I began this project by die cutting the Exotic Blooms several times from Neenah 110lb cardstock. I also cut a few flowers from the Hanging Leaf Ring set as well, and did some light ink blending on all of those flowers using Melon, Cantaloupe, Sherbet and Honey. The leaf portions were ink blended using Sage and Pine. Once I was set on all of the ink blending, I assembled the flowers, and added Opal Dazzling Gems to some of the flowers.

My background was created using the Double Plaid Cover and the Stitched Squares. The cover die was glued to the card base, while the gold square was adhered using foam tape. I began arranging my flowers and leaves and gluing those down as I went. I decided that some gold leaves would be nice to pull the floral arrangement together with the gold square.

The sentiment, which is from the Friendship Leafy Cluster set, was stamped onto black cardstock using VersaMark ink and heat set using Detail White Embossing Powder. The coordinating die was used to trim that out along with two additional cuts for a stacked look. The sentiment was glued directly to the panel to finish up.

I hope you enjoyed this project as much as I did! As I said earlier, I love florals so this was a fun one for me! Thanks again for joining me and don’t forget to head on over to Simon’s website to check out the entire To Love release! Have a wonderful day!

Supply List

Affiliate links used at no cost to you. What does this mean? If you use the links within this post to make a purchase, I receive a small commission, which allows me to continue to post crafty content for your enjoyment. I truly appreciate your support!

Latest Posts

Latest Instagram Posts

Simon Says Stamp Floral Whirl Leaf

Hello and welcome back, Friends! I’m back today with another project featuring the awesome Whirl Fancy Leaf from Simon’s latest DieCember release! I had a lot of fun with this leaf, and really love today’s project, so let’s go ahead and run through the details, shall we?

NOTE: all supplies are linked in the thumbnails at the end of this blog post.

I began this project by die cutting the leaf twice from Neenah 110lb cardstock and did some light ink blending on them using Lilac, Orchid, Seafoam and Surf inks. I had a few leftover flowers from the Hanging Leaf Ring set that I decided to add to this project as well.

Those flowers have some light Gravel ink blending on them, along with some Gunmetal Dazzling Gems. I love the Just Breathe set, so I stamped one of the sentiment onto black cardstock using VersaMark ink and heat set it using SSS Detail White Embossing Powder. That was trimmed out using the coordinating die, along with two additional cuts for added strength and dimension.

I used the Postage Stamp Edge Frames to trim a panel of Neenah 110lb cardstock and splattered that with some black ink before proceeding. This panel was adhered to the card base using foam tape, the leaves were glued into place and the flowers were secured with foam tape. The sentiment was secured with foam strips to finish this project up!

I hope you enjoyed this project as much as I did! I really love the simplicity of it, as well as the colors! Thanks for stopping by to check out today’s project! I hope you have a wonderful day, and don’t forget to stay awesome!

Supply List

Affiliate links used at no cost to you. What does this mean? If you use the links within this post to make a purchase, I receive a small commission, which allows me to continue to post crafty content for your enjoyment. I truly appreciate your support!

Latest Posts

Latest Instagram Posts

Simon Says Stamp Rainbow Starburst

Hello Crafty Friends and welcome back to my blog! Today’s project is a super simple one, but it’s pretty nonetheless. It’s featuring the new Starburst Plate from Simon’s latest DieCember release, so let’s get right into the details!

NOTE: all supplies are linked in the thumbnails at the end of this blog post.

I began by die cutting the Starburst Plate from Neenah 110lb cardstock and added some ink blending using Bubblegum, Sunbeam, Celery and Seafoam inks. Once that was complete, I went ahead and adhered it to the card base using liquid glue.

The You Brighten My Day sentiment was cut once from gold cardstock and four times from black cardstock. I adhered those pieces together while offsetting the gold layer slightly to give a shadow appearance. That was then adhered directly to the panel, and I added small gold pearls to the intersections of the die cut to finish up.

Like I said, a super simple card, but I like the way it turned out! Don’t forget to head on over to Simon’s website to check out the entire DieCember release! Thanks again for stopping by, and I hope you have a fabulous day!

Supply List

Affiliate links used at no cost to you. What does this mean? If you use the links within this post to make a purchase, I receive a small commission, which allows me to continue to post crafty content for your enjoyment. I truly appreciate your support!

Latest Posts

Simon Says Stamp Merry Whirl Leaf

Hello Friends and welcome back! Simon’s latest DieCember release is live, and it’s a fun one! My project today is featuring the new Whirl Fancy Leaf, and I can’t even tell you how much I love this project! I love it so much that I’ve decided that it will be the design for my personal Christmas cards this year! Let’s go ahead and get into the details!

NOTE: all supplies are linked in the thumbnails at the end of this blog post.

I began this project by die cutting the Whirl Fancy Leaf from a green cardstock and did some ink blending along the edges using Kale ink. I then adhered red crystals at the intersections of the stem and leaves. I ordered these gems from Amazon, but use whatever you have! I also die cut the Merry, which is from the Holiday Typewriter Trio, once from Simon Red Matte Metallic Cardstock and twice from Neenah 110lb cardstock. Those pieces were then adhered together using liquid glue.

I then used the Postage Stamp Edge Frames to trim a panel from Neenah 110 and then splattered it using Rainbow Splash Scarlet ink. I just smooshed some ink on my glass mat and added some water next to it and mixed a tiny bit of water with the ink.

The leaf was adhered to the panel using liquid glue, which was just placed along the stem, and the merry was adhered atop that. That panel was then adhered to the card base using foam tape for added dimension to finish up.

That does it for this one! I hope you enjoyed it! This is a very clean and simple design, but I love the way it turned out! And, clean and simple is good when you decide to mass produce for your own holiday cards! Don’t forget to swing over and check out the entire DieCember release! Thanks again for stopping by, and I hope you have a wonderful day!

Supply List

Affiliate links used at no cost to you. What does this mean? If you use the links within this post to make a purchase, I receive a small commission, which allows me to continue to post crafty content for your enjoyment. I truly appreciate your support!

Latest Posts

Latest Instagram Posts

Simon Says Stamp DieCember 2024 Blog Party

Hello Friends and welcome to the SSS DieCember Blog Party! We have a EPIC party going on today with tons of inspiration to get your creative juices flowing! There’s also a free gift with a $100 DieCember purchase! No code necessary, it will automatically be added to your cart once the dollar amount is met. Please see the attached graphic below for all of the details. You can begin the hop at Simon’s website to soak up all of the inspiration from Simon’s awesome designers! My project today is featuring the new Hanging Leaf Ring, so let’s go ahead and get into the details!

NOTE: all supplies are linked in the thumbnails at the end of this blog post.

In October I made a shadow box frame and since then, I’ve been itching to make another! The cute flowers and leaves from the Hanging Leaf Ring set seemed to be begging for their place in a frame, so that’s what I set out to do! I die cut around thirty five of the various sizes of flowers for this project and did some light ink blending on most, while a small few had some darker ink blending. The colors that I used were Bubblegum, Carnation, Seafoam, Ocean, Cantaloupe and Sherbet.

Once all of the ink blending was complete, I assembled the pieces of the largest flowers and added an Opal Dazzling Gem to the center of each flower. It’s a lot of flowers, but it actually went fairly quickly! I die cut a few of the leaves from this set using Smoke cardstock, along with a few leaves using the Budding Branches die.

While I was die cutting, I went ahead and cut the sentiment twice from Neenah 110lb cardstock and cut the shadow twice from black cardstock. All of the pieces were adhered together using liquid glue, and I went ahead and put foam strips on the back.

Now that all of the components were ready, I cut a panel of Neenah 110lb cardstock and splattered it with some black acrylic ink before beginning the assembly process. I began by figuring out the center and glued the leaves in place before adhering the sentiment. I then adhered the eight larger flowers and then adhered the remaining smaller flowers around everything.

To finish up, I added more Opal gems to the berry portion of the Budding Branches and put the panel back into the frame. That does it for this project! I hope you enjoyed it as much as I did! I really love how this turned out and am wanting to make one for myself.

Don’t forget to head over to Simon’s storefront to check out the entire DieCember release! And .. don’t forget to head over to Simon’s website for the Blog Party. Thanks for stopping by, and I hope you have an absolutely wonderful day!

Supply List

Affiliate links used at no cost to you. What does this mean? If you use the links within this post to make a purchase, I receive a small commission, which allows me to continue to post crafty content for your enjoyment. I truly appreciate your support!

Latest Posts

Latest Instagram Posts