Simon Says Stamp Patterned Birthday Floral

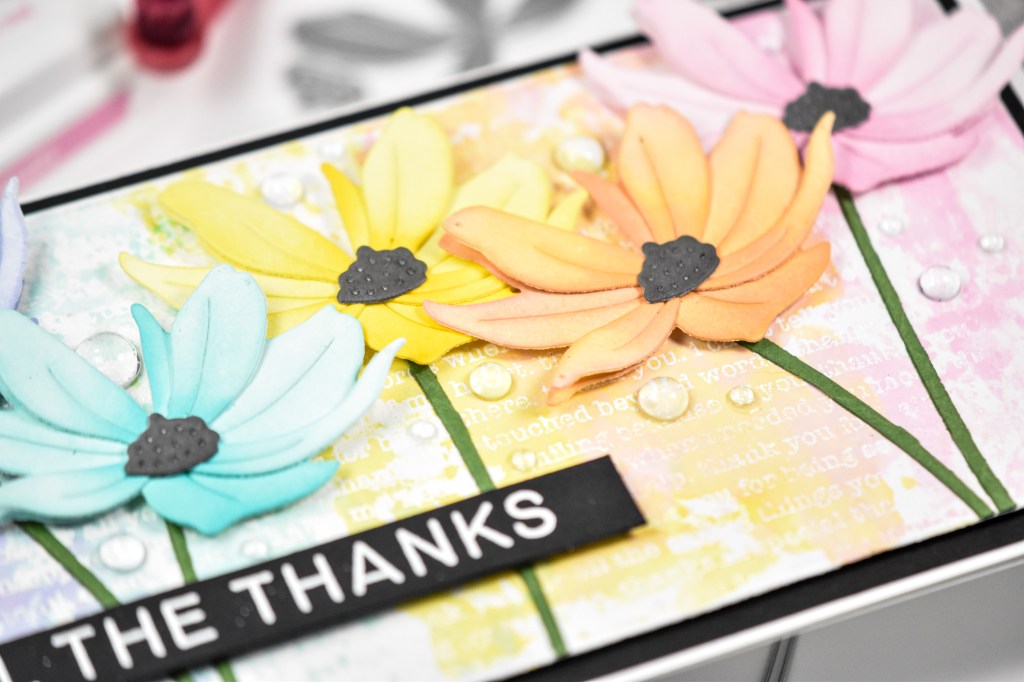
Hello Friends and welcome back! Today’s post is once again featuring the Tattered Daisy from Simon’s latest release, Moments In Time. It also includes this new Giggle Happy Birthday sentiment! I had a lot of fun with this die cut and made too many projects, but florals make me happy, so there’s that! Let’s get into the details, shall we?

NOTE: all supplies are linked in the thumbnails at the end of this blog post.

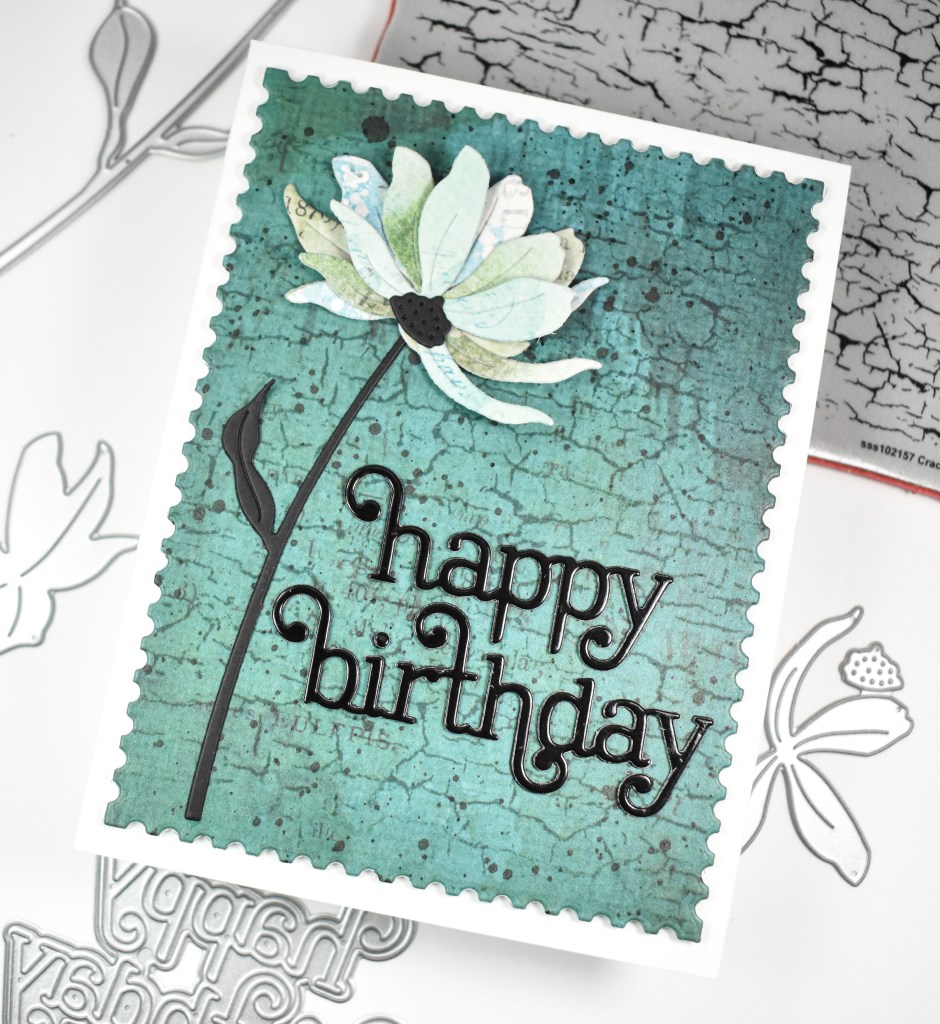
I knew that I wanted to make a patterned paper daisy, so I rummaged through all of my papers and finally settled on the Viken design from 49 and Market. I really do apologize for using products that aren’t on the Simon website any longer. I do tend to hoard my patterned papers for extended periods of time and then they go out of stock or become discontinued. However, there are many companies that carry papers that would work for this design, if you choose to recreate it. If you’re anything like me, I’m sure you probably have some stashed away somewhere just looking for a project to call home!

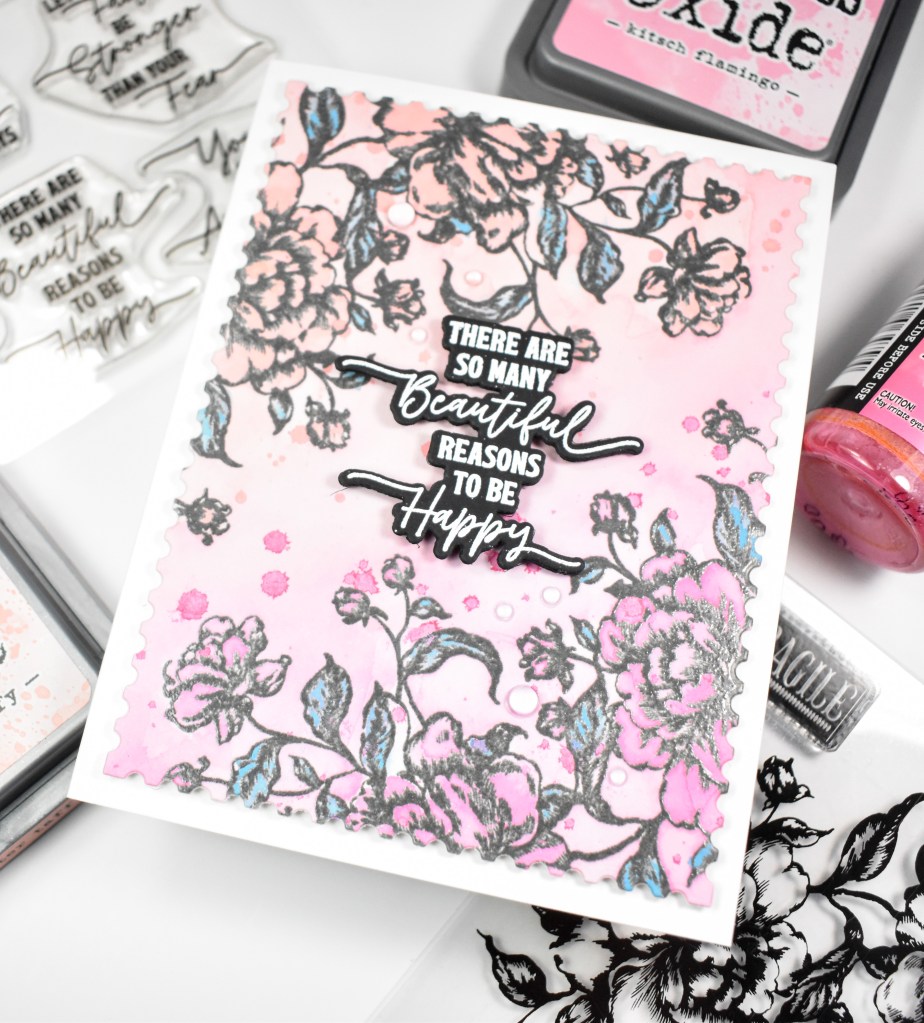
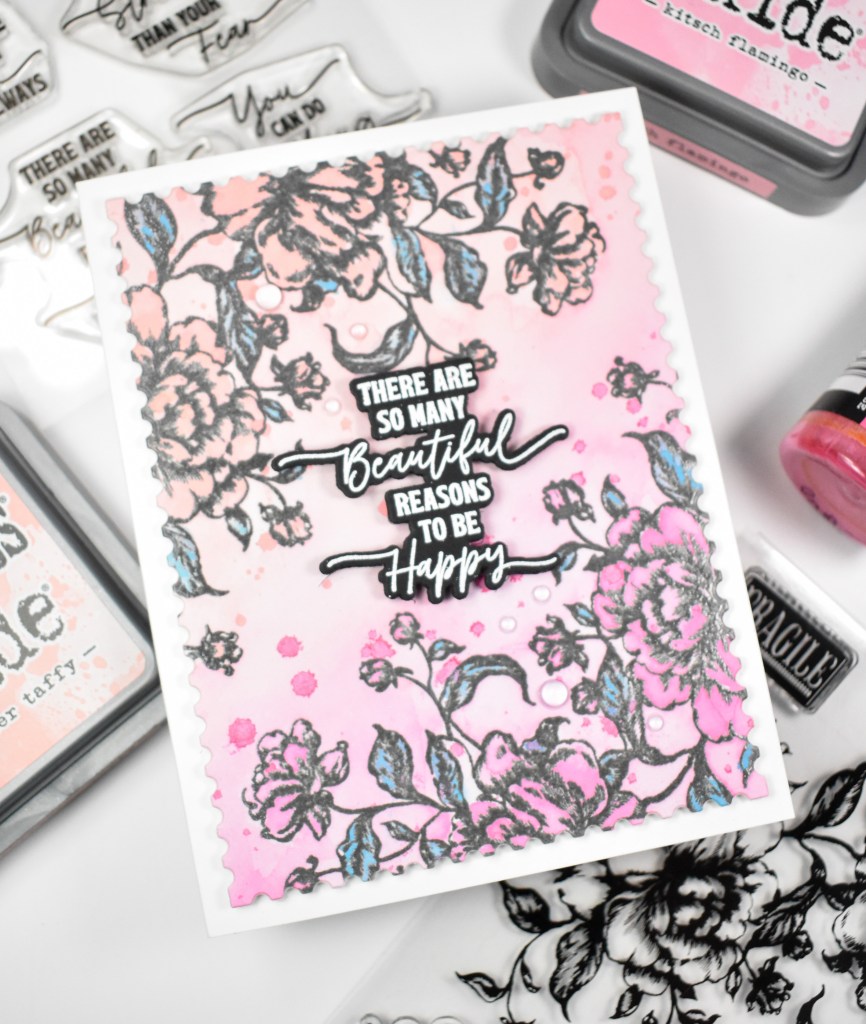
Moving on .. I die cut the daisy several times from several papers and glued them all together, including a black stem and center. My background paper is also from this collection that I stamped the Crackle Background onto using VersaFine Clair Morning Mist ink, black splattered and then trimmed down using the Postage Stamp Edge Frames die.

The new Giggle Happy Birthday sentiment was cut once from black glossy cardstock and twice from regular black and glued together for a stacked sentiment. The panel was adhered to the card base using foam tape, while the flower and sentiment were adhered using liquid glue to finish up.

That does it for this project! I hope you enjoyed it as much as I did! Thanks for stopping by, and have yourself a wonderful day!

Supply List

Affiliate links used at no cost to you. What does this mean? If you use the links within this post to make a purchase, I receive a small commission, which allows me to continue to post crafty content for your enjoyment. I truly appreciate your support!

Latest Posts

Latest Instagram Posts

Simon Says Stamp Bird Branches

Hello Friends! I’m so glad that you stopped by to check out today’s project featuring the new Bold Bird Branches Embossing Folder from Simon’s latest release Moments In Time. Let’s go ahead and get into the details.

NOTE: all supplies are linked in the thumbnails at the end of this blog post.

I began this project by embossing the folder onto a panel of Fern cardstock and rubbing Kale ink over the raised portions of the panel. That left the leaves, flowers and birds the original color. I then took a scrap of Neenah 110lb cardstock and used the included die cut to cut the birds, and then run them through with the folder to get the texture.

The birds were ink blended using Seafoam, Surf and Heather inks. I decided that the flowers on the panel needed some color, so I colored those using Salvaged Patina Distress Paint and a paintbrush. I adhered a black jewel for the eyes on the birds and secured them to the panel using foam strips.

The sentiment is from the new I See You EZ Strips set that I gold foiled and trimmed down. This was adhered with foam strips as well and I added some gold gems to the centers of the flowers to finish up.

Another simple project for today. I really like the look of this technique of adding color to the raised portions of an embossed panel. Have you tried it yet? Don’t forget to stop by and check out the entire Moments In Time release. Thanks again for stopping in, and I hope you have a fabulous day!

Supply List

Affiliate links used at no cost to you. What does this mean? If you use the links within this post to make a purchase, I receive a small commission, which allows me to continue to post crafty content for your enjoyment. I truly appreciate your support!

Latest Posts

Latest Instagram Posts

Simon Says Stamp Relax Snake Plant

Hello Crafty Friends and welcome back! Today’s project is featuring the new Snake Plant Stencil and Die from Simon’s latest release, Moments In Time. Let’s jump right into it.

NOTE: all supplies are linked in the thumbnails at the end of this blog post.

I began this project by gathering a panel of Neenah 110lb cardstock, my inks and a Craft Tacky Mat. This stencil set has five stencils, so the inks that I used were Celery, Limelicious, Fairway, Pearfection and Emerald.

Once the ink blending was complete, I used the coordinating die to cut out the leaves. I also cut the leaves from Fern and black cardstock and adhered all of those together, offsetting them slightly. This was then adhered to a Forest panel that I had previously gold splattered.

The sentiment, which is included with the die set, was cut once from gold cardstock and once from black cardstock, while the shadow portion was cut twice from the same Forest cardstock. This was then glued directly atop the leaves to finish up.

That does it for this one! The snake plant always reminds me of my Mom, as she always had one on the front porch. I would love to have one, but the google machine says that they are toxic to cats, and I’m a cat person. Oh well. Thanks again for joining me, and I hope you have a wonderful day!

Supply List

Affiliate links used at no cost to you. What does this mean? If you use the links within this post to make a purchase, I receive a small commission, which allows me to continue to post crafty content for your enjoyment. I truly appreciate your support!

Latest Posts

Latest Instagram Posts

Simon Says Stamp You Are Amazing Vintage Bloom

Hey There, Friends! Thanks so much for stopping by! Today’s project is featuring the new Vintage Blooms from Simon’s latest release, Moments In Time. This is a super simple project, but I always love dark and dramatic cards, so let’s go ahead and go through the details for this one!

NOTE: all supplies are linked in the thumbnails at the end of this blog post.

This Vintage Blooms stamp set has two larger floral images, and I decided to just use one of them on the corner of a black panel. I stamped the floral using VersaFine Onyx Black Ink and heat set it using Ranger Clear Embossing Powder. I then took a deckle edged ruler and ripped off the remaining portion of the panel.

I wanted that rough edge to have some detail, so I rubbed the VersaMark Ink pad along the edge and heat set it using Ranger Princess Gold Embossing Powder. Before adhering the stamped panel to another black panel with foam tape, I gold splattered that for some additional interest.

The sentiment is from a discontinued Simon set, but in looking on their website, Papertrey Ink has some similar items that would work great too. I die cut the sentiment once from gold cardstock and twice from black cardstock for a stacked sentiment and then glued that along the torn edge.

That does it for this project! A dark, clean and simple design! This design would be great for any occasion, but I also can see it as a wedding card as well. Don’t forget to check out the entire Moments In Time release over on Simon’s website. I hope you have an absolutely wonderful day!

Supply List

Affiliate links used at no cost to you. What does this mean? If you use the links within this post to make a purchase, I receive a small commission, which allows me to continue to post crafty content for your enjoyment. I truly appreciate your support!

Latest Posts

Latest Instagram Posts

Simon Says Stamp Mini Slimline Daisies

Hey There, and welcome back to my blog. I’m so glad you stopped in to check out today’s project featuring the new Tattered Daisy and Thank you Text background stamp from Simon’s latest release, Moments In Time. Let’s get into the details for this one!

NOTE: all supplies are linked in the thumbnails at the end of this blog post.

I began by die cutting the daisy five times from Neenah 110lb cardstock, and cutting the stems from Fern cardstock. I then did some ink blending on the flowers using Bubblegum, Sunbeam, Honey, Seafoam, Surf and Heather inks and then assembled the flowers. I was too lazy to go back and cut the centers from black cardstock, so I just used my Rainbow Splash Black ink pad to color those.

The background was created by stamping the Thank You Text onto a panel of Neenah and heat embossing it using Detail White Embossing Powder. I then used the same inks from the ink blending and smooshed them one at a time onto my glass mat with a spritz of water and did some smooshing onto the panel using a piece of left over plastic from packaging. Because I had white on white embossing, it was quite hard to tell which direction the text went until I added the ink, of course! I had originally wanted the rainbow to go from left to right, but that didn’t work out, so I sucked it up and just went with it, because again, I was lazy.

The sentiment, which is from the Thank You Basics set, was stamped onto black cardstock using VersaMark Ink and heat set using the same white embossing powder as before. I trimmed that down and began assembling the card.

I decided on placement and glued the stems to the panel while the flowers were adhered using foam strips. I trimmed off the stems and adhered the sentiment with foam strips as well. This was then adhered to a black panel before being adhered to the card base, and some clear drops were added to finish this project up.

I don’t normally do mini slimline cards, but this design warranted a larger canvas to achieve the rainbow pattern. I hope you like it! It certainly was a fun project to work on! Don’t forget to check out the entire Moments In Time release, and have yourself a fabulous day!

Supply List

Affiliate links used at no cost to you. What does this mean? If you use the links within this post to make a purchase, I receive a small commission, which allows me to continue to post crafty content for your enjoyment. I truly appreciate your support!

Latest Posts

Latest Instagram Posts

Simon Says Stamp Happy Vintage Blooms

Hello and welcome back, Friends! Today’s project is featuring the new Vintage Blooms from Simon’s latest release, Moments In Time. This set has two larger blooms, but I opted to use just one for this project. Let’s run through the details!

NOTE: all supplies are linked in the thumbnails at the end of this blog post.

I began by gathering a panel of watercolor paper and the inks that I wanted to use. This background was created by smooshing the ink onto my glass mat and adding a touch of water and painting it onto the panel. I wanted a nice wash of color that blended from a peachy color to a pink color. The inks that I used were Distress Oxide Saltwater Taffy and Kitsch Flamingo. I worked one color at a time, drying between the layers.

Once I was satisfied with the wash of color, I went ahead and stamped the florals onto the panel using VersaFine Clair Morning Mist. I really like this ink, because it’s dark, but not too dark like the Onyx Black. I heat set the images using Ranger Clear Embossing Powder and took the panel back to my work area. I wanted to darken the flowers and leaves so that they stood out a little more so I pulled out Distress Oxide Sprays in Broken China, Picked Raspberry, and Saltwater Taffy. I just put a few drops on my glass mat, and painted using a water brush this time. I also wanted some splatter so used the same sprays for that.

I dried the panel and trimmed it out using the Postage Stamp Edge Frames and adhered it to the card base using foam tape. The sentiment, which is from the Just Breathe set, was stamped onto black cardstock using VersaMark Ink and heat set using Detail White Embossing Powder. That was then trimmed out using the coordinating die, along with two more cuts. That was adhered with foam strips, and some clear drops were added to finish up.

That does it for this one! I don’t pull out my Tim Holtz inks too much, but I really enjoy it when I do! Maybe that should tell me something! Thanks for stopping by to check out this project, and I hope you have an amazing day! Don’t forget to stay awesome!

Supply List

Affiliate links used at no cost to you. What does this mean? If you use the links within this post to make a purchase, I receive a small commission, which allows me to continue to post crafty content for your enjoyment. I truly appreciate your support!

Latest Posts

Latest Instagram Posts

Simon Says Stamp Thank You Daisy Bundle

Hello Crafty Friends, and welcome back! The latest Simon release, Moments in Time, is live and today’s project is featuring the new Tattered Daisy along with the Thank You Text background stamp. I kind of went crazy with this flower die cut, so you’ll be seeing it a bunch! Let’s go ahead and go through the deets for this project.

NOTE: all supplies are linked in the thumbnails at the end of this blog post.

I began this project by die cutting the daisy five times from Neenah 110lb cardstock and did some ink blending using Seafoam, Surf, Marine, Cadette, Heather and Field. I did also use the Rainbow Splash Black ink pad to color the centers of the flowers, because I was feeling a bit lazy and didn’t feel like going back to cut those from black cardstock. Just keeping it real for you .. I do get lazy from time to time. Once the ink blending was complete on all of the pieces, I assembled the flowers and set those aside while I worked on the other elements of the card.

I have a bunch of gold splattered panels sitting around from a class that I taught, so I went ahead and used one of those and stamped the Thank You Text onto that using Misty Coast ink. I chose this ink, because it’s a very light ink and does really well when you’re wanting a barely there type of image. While I was stamping, I went ahead and stamped the sentiment onto black cardstock and heat set that using Detail White Embossing Powder. I trimmed it out using the coordinating die, along with two additional cuts for that stacked sentiment that I love.

For the assembly, I arranged and determined placement and then secured the stems in place using liquid glue, while the flowers and sentiment were added with foam strips. The panel was adhered to the card base and some clear drops were added to finish up.

That does it for this one, and I really like how it came out! I hope you do too! Don’t forget to check out the entire Moments in Time release over on Simon’s website. Thanks again for stopping by, and I hope you have an awesome day!

Supply List

Affiliate links used at no cost to you. What does this mean? If you use the links within this post to make a purchase, I receive a small commission, which allows me to continue to post crafty content for your enjoyment. I truly appreciate your support!

Latest Posts

Latest Instagram Posts