Simon Says Stamp Sympathy Flowers

Hello Crafty Friends, and thanks for stopping by! I’ve been busy working on projects for Simon’s latest release, Be Bold. Have you checked it out yet? I’d love to know your favorites from this release! Today’s project is featuring a new floral stamp set called Wild & Free Flowers. While this is a gorgeous set, it will not be the focal point for this project. I opted to use it as a background instead. Let’s run through the details, shall we?
Main Products:
- SSS Wild & Free Flowers Stamp, Die, Bundle
- SSS Etched Magnolia Blossom
- SSS Fine Floral Stem
- SSS Mini Flowers & Leaves
- SSS Budding Branches
- SSS Handlettered Greetings
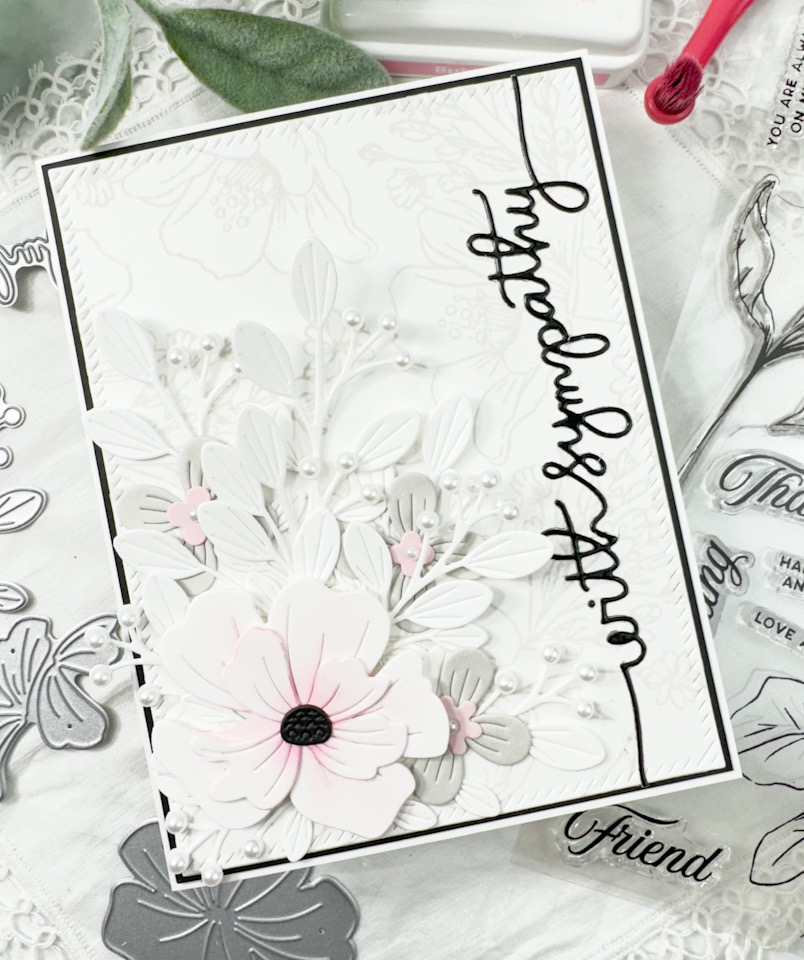
I began this project by stamping one of the florals from the SSS Wild & Free Flowers onto a panel of Neenah 110lb cardstock using PFS Misty Coast ink. I then used the PFS Stitched Rectangles to trim it down. Then, I went to work on the focal point for this card.

I die cut the SSS Etched Magnolia Blossom and a few SSS Budding Branches from scraps of Neenah 110lb cardstock, and did some very light ink blending on the magnolia using SSS Pawsitively Saturated Ink in Bubblegum. Once the ink blending was complete, I adhered the pieces together with liquid glue, after cutting the center of the flower from black cardstock.
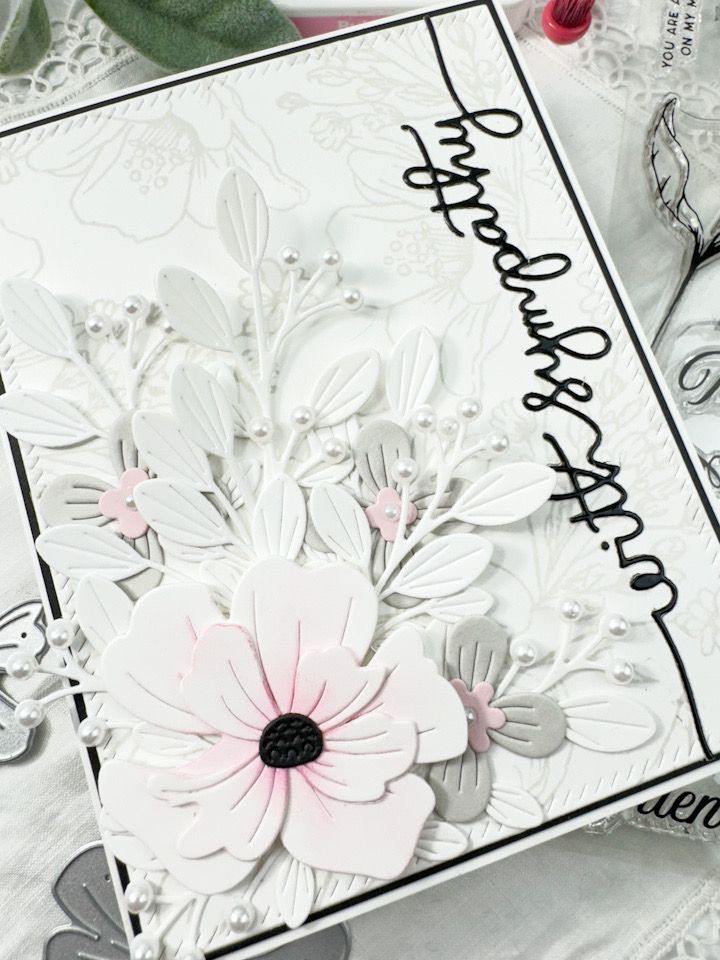
I also used SSS Fog cardstock to cut a few flowers using the SSS Fine Floral Stem, and used some pink cardstock to cut a few flowers using the SSS Mini Flowers & Leaves set. Those were adhered together and set aside while I continued to work on the remaining pieces of the card. I die cut the sentiment from the SSS Handlettered Greetings set using SSS Black Glossy cardstock, and adhered that directly to the stamped panel.
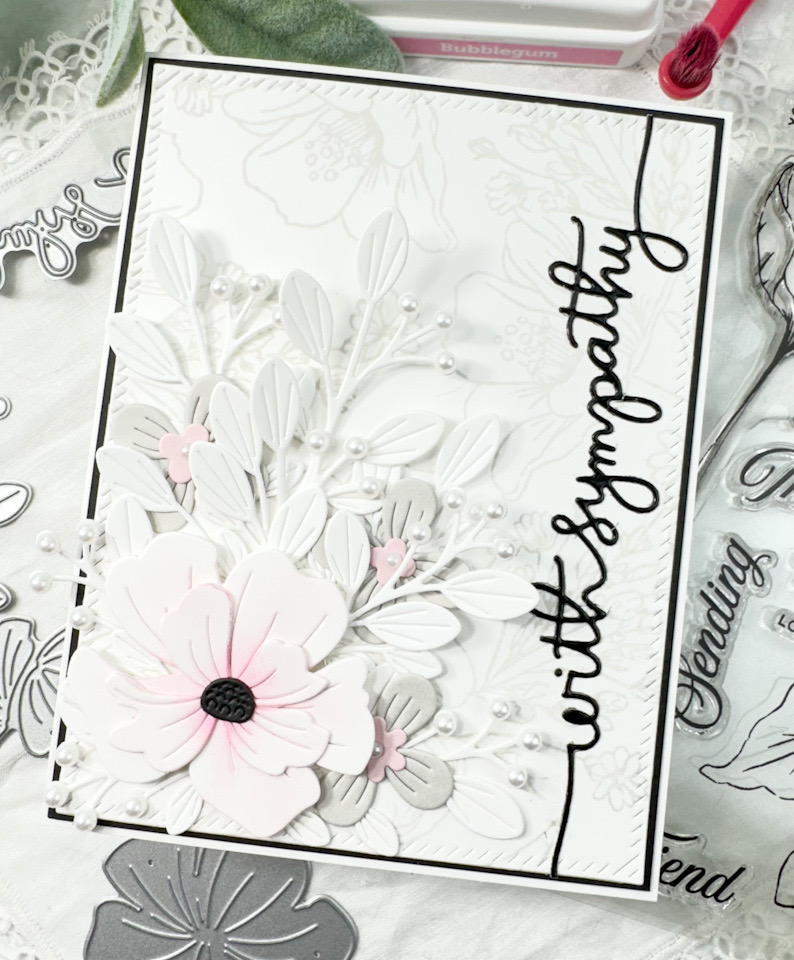
Next, I played around with the placement of the flowers and leaves and began gluing the leaves in place first, then the grey flowers were next, and the magnolia was adhered atop all of that using SSS 3D Foam Strips. Some of the leaves were cut and tucked in where needed, and I glued white pearls to all of the areas with a little stem. The panel was then adhered to a black panel before being adhered to the card base.

That finishes up this project! I hope you enjoyed it, and I hope it inspires you to get crafty in your space! Don’t forget to check out the entire Be Bold release! Thanks again for stopping by, and have a wonderful day!
Other Products Used:
- SSS Fog Cardstock
- SSS Black Glossy Cardstock
- SSS Blender Brushes
- SSS Pawsitively Saturated Ink: Bubblegum
- SSS Triangle Trays
- SSS 3D Foam Strips
- SSS Place and Score Embellishment Wand
- SSS Bone Folder
- PFS Misty Coast Ink
- PFS Diagonal Stitched Rectangles
- Neenah Classic Crest Solar White 110lb Cardstock
- Pink Cardstock
- Black Cardstock
- Bearly Art Glue
- Tim Holtz Scissors
- White Pearls
- Misti
- Scor-Buddy
- Spellbinders Platinum 6
* Affiliate links used at no cost to you! Thanks so much for your support.
Latest Posts
- Simon Says Stamp Braided Greetings

- Together By Design Color Cube Floral

- Simon Says Stamp Cute Duckling

- Simon Says Stamp Watercolor Wild Rose

- Simon Says Stamp Striped Missing You