Waffle Flower Leafy Birthday

Hello Crafty Friends! Hope you are doing well and having a fabulous day! I’m back once again with a card for the Waffle Flower September challenge, week one, which is leaves! For this project, my leaves focused on the Waffle Flower Sprigs Die set! So let’s get into the details!

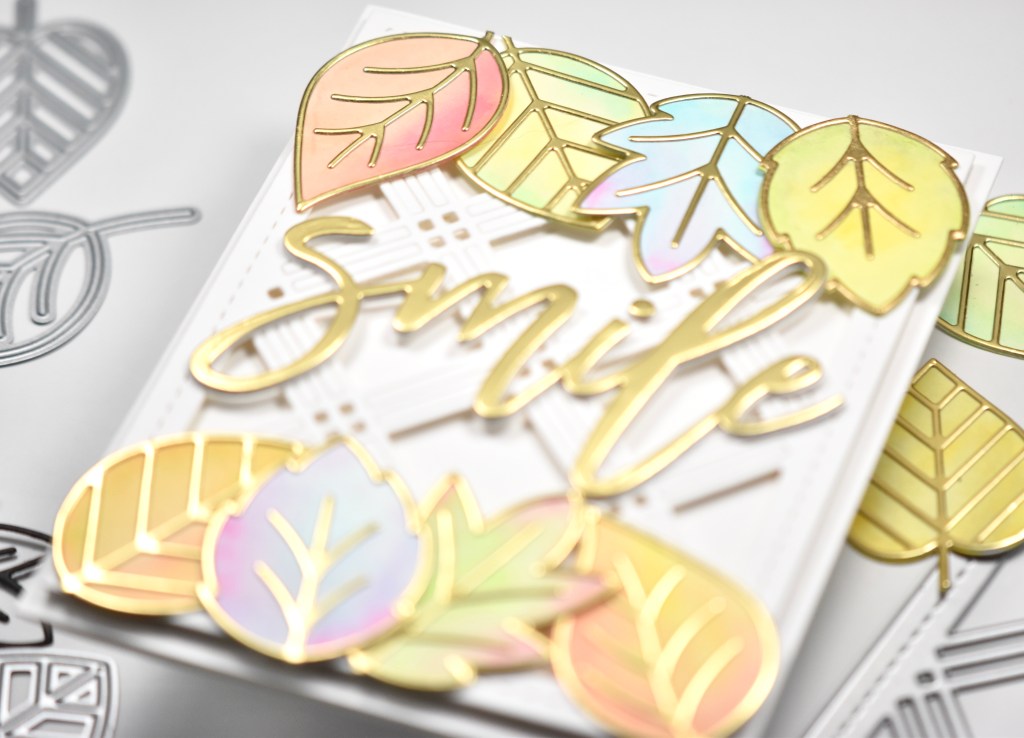
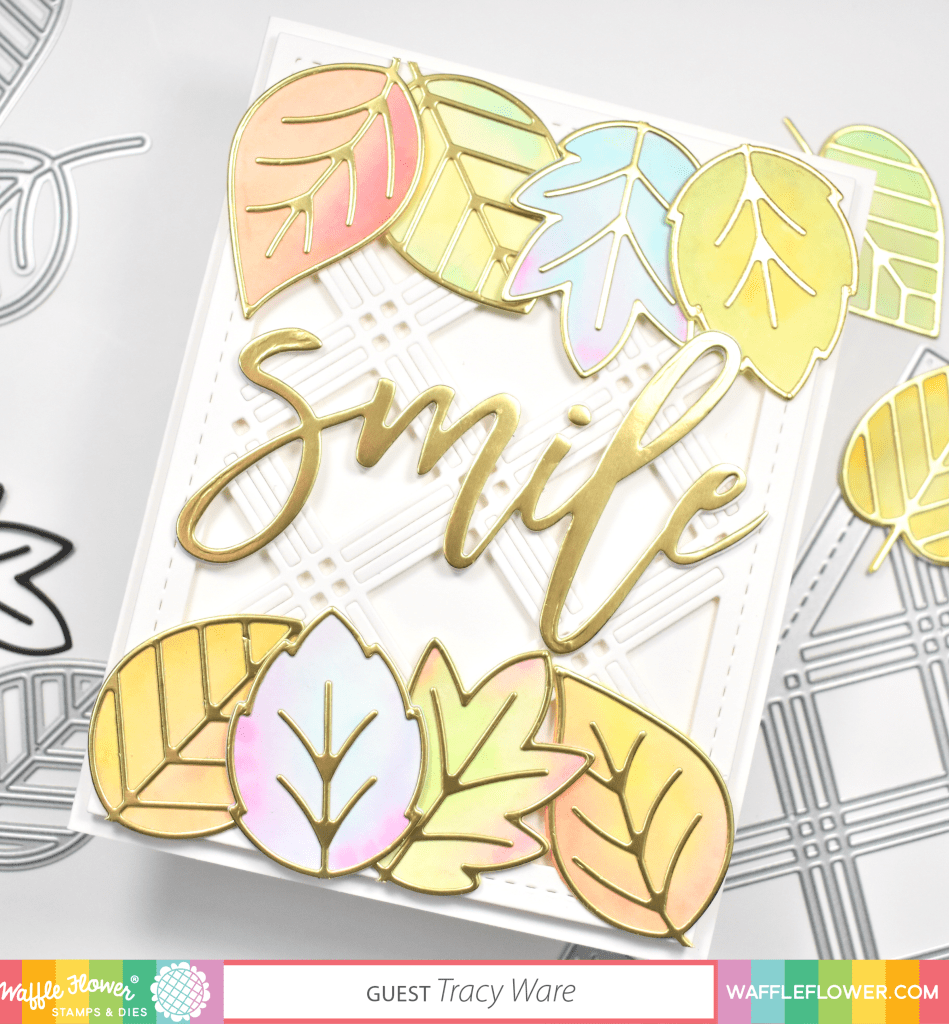
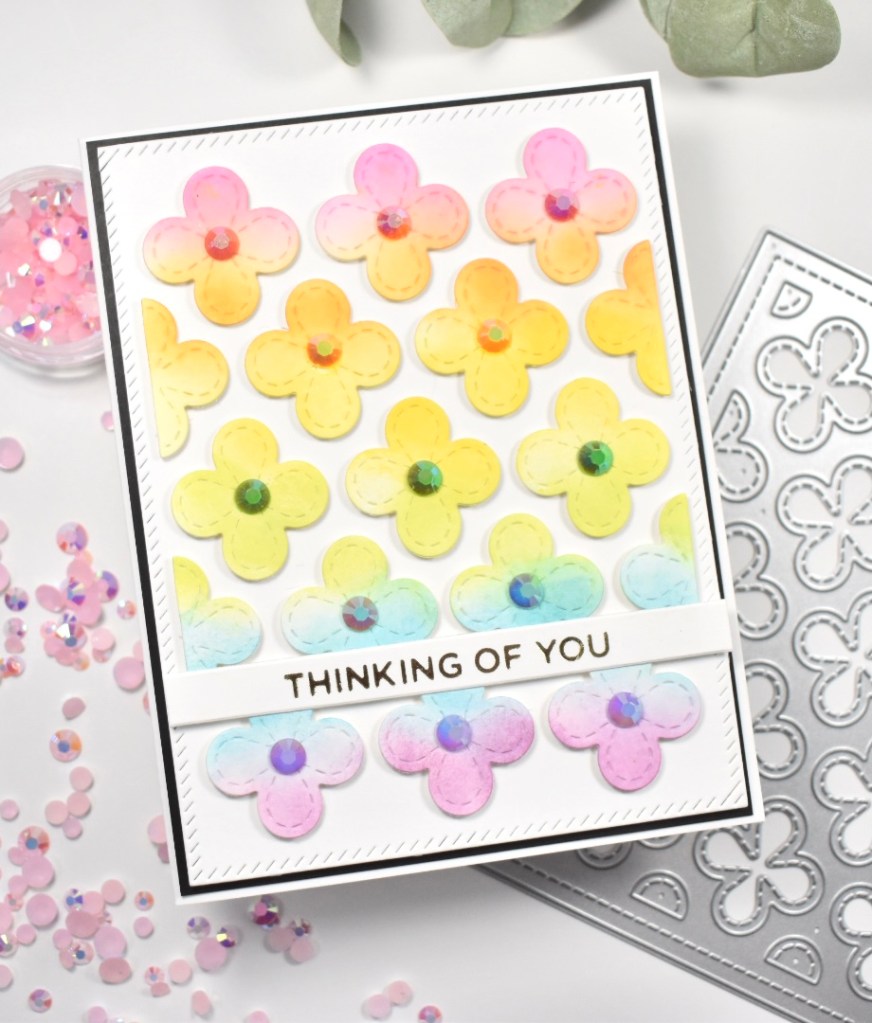
To begin the project, I picked out one leaf from the WF Sprigs Die set and cut it twice from six different colors of cardstock from The Stamp Market. I then used the WF Big Dots Die to cut a panel of Neenah Classic Crest 110lb cardstock.

Once the Big Dots panel was cut, I attached a panel of acetate using glue. Then I began the tedious task of placing foam tape on the back of the panel, so as to create a shaker card. I placed foam tape around all of the edges and in between each row of dots. I cut another panel of Neenah 110lb to use as the backer, and I poured my cute little pink shaker bits in the wells. Once I removed all of the backing from the foam tape, I carefully laid my cardstock backer atop that.

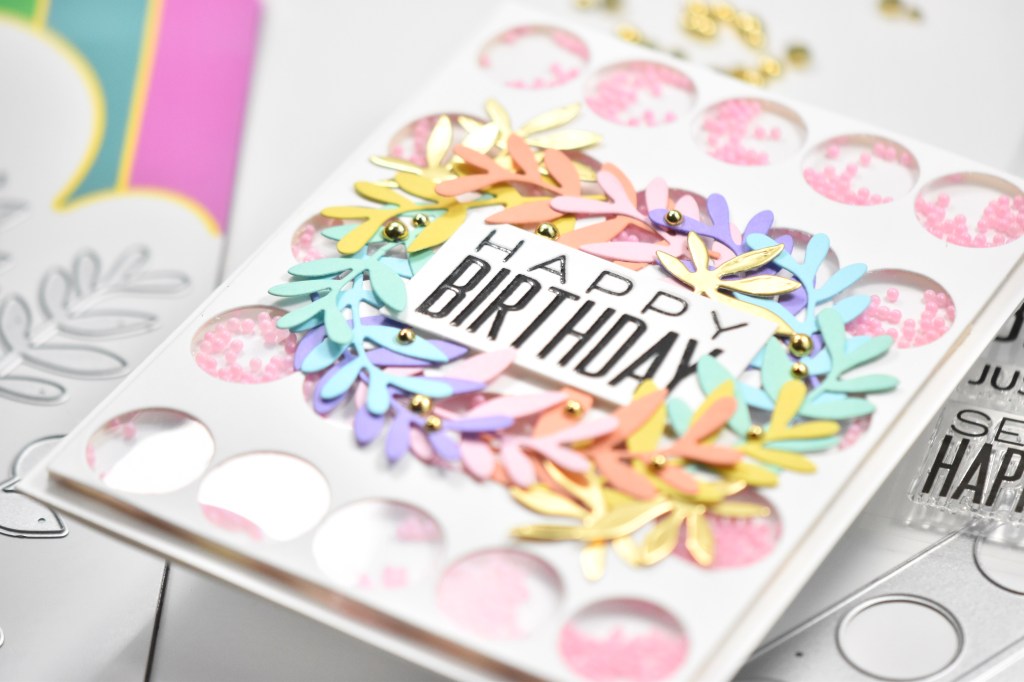
For the sentiment, I stamped the Happy Birthday, which is from the WF Big Dots Sentiments, using VersaFine Onyx Black Ink and heat embossed it using Ranger Clear Embossing Powder. I stamped and embossed it two more times, but using VersaMark ink for those. I trimmed that down and adhered it to the center of the panel using foam tape.

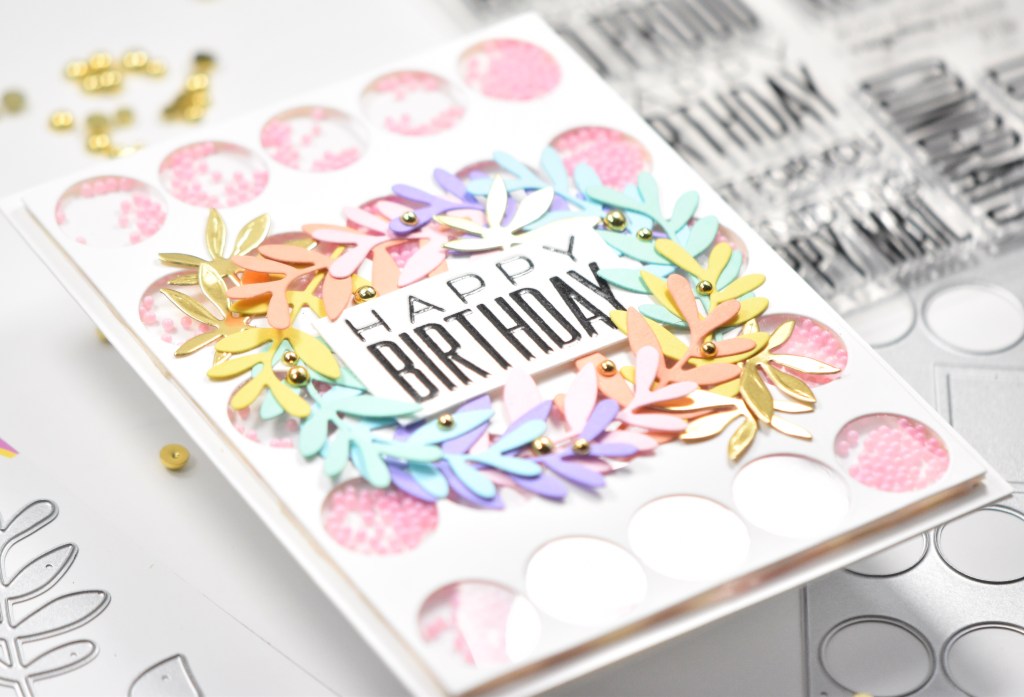
Next, I began arranging the leaves around the sentiment in rainbow order and gluing down just the bottom portion of each leaf, while tucking the next leaf underneath it, making my way around the sentiment. I thought this card could use a little addition of gold, so I chose another leaf from the WF Sprigs Die set and cut that five times from mirror gold cardstock. I adhered those around along with some PinkFresh Studio Gold Metallic Pearls. Everything was then adhered to the card base, which is also Neenah 110lb.

That finishes up this project! I hope you enjoyed it, and I’ll hope you hop over to the Waffle Flower Challenges and join the September challenge! Have a wonderful day and don’t forget to stay awesome!

Supply List:

* Affiliate links used at no cost to you. Thank you so much for your support!

Latest Instagram Posts

Waffle Flower Leafy Smile

Hello Crafters and welcome back! Waffle Flower has monthly challenges and I’m super excited to be co-hosting week one with my special friend Rachel! This week’s theme is Leaves, which is just perfect for the upcoming fall weather. You can head over to Waffle Flower for all the challenge details! So let’s get into my project!

For my project, I opted to use the Fall Leaves Die set, along with a couple of other Waffle Flower products. I began by cutting the solid leaf dies from watercolor paper twice. I got out a water brush and my Karin Brushmarkers to do a little bit of watercoloring on them. Very quick and simple technique of adding water to the leaves and dropping in color from the markers. Once satisfied with the colors, I set them aside to dry.

While those were drying, I went ahead and cut the leaf detail for all of the leaves from mirror gold cardstock. I also went ahead and cut the Triple Line Diamond Panel Die from Neenah Classic Crest 110lb cardstock, and placed foam tape strategically on the back of it.

I adhered the gold leaf detail to the solid leaves using liquid glue. Now that I had the panel cut and the leaves ready to do, I needed to decided on a sentiment. The Oversized Smile Word Die fit within the space that I had to work with, so I cut it once from that same mirror gold cardstock and three more times from Neenah 110lb cardstock and glued all of those together.

I began adhering the leaves to the die cut panel using glue, creating a row at the top and the bottom. Once those were all done, I trimmed off the stems. Since I had previously put foam tape on the back of the die cut panel, I went ahead and adhered that to the card base, which is Neenah 110lb as well.

The only thing left to do was glue the sentiment in the center of the panel. I didn’t even add bling to this card! Can you believe that? I can’t, actually! I hope you enjoyed this project, and I hope you’ll join us in the challenge! Leaves is such a great theme for this month! Have a wonderful day and don’t forget to stay awesome friend!

Supply List:

* Affiliate links used at no cost to you. Thank you for your support!

Latest Instagram Posts

Waffle Flower Thinking of You Stitched Flower

Hello Crafty Friends! How’s it going? How’s your weekend going? Today, I’m participating in an IG Hop with some awesome friends to show support for our friend Andy Granick. He’s been going through, and is still going through some rough stuff, and we just wanted to let him know that he is loved!

For today’s project, I’m once again featuring the Waffle Flower Stitched Flower Panel Die. A few days ago, I did a post using the white frame portion and other colored cardstock pieces from this die. Well today, I’m using the white stitched flowers that were the by-product of using the white frame on the other cards!

To begin, I used the PinkFresh Studio Diagonal Stitched Rectangles to cut a panel of Neenah Classic Crest 110lb cardstock. I took a leftover colored frame from the previous set of cards and trimmed it down to 4.0 x 5.25″ and taped it to a separate white panel using masking tape. I then used a tape runner with removable tape to put a little strip in all the flower openings, and affixed the flowers atop that.

Once the flowers were nestled in the frame, I used Distress Oxide inks Picked Raspberry, Spiced Marmalade, Mustard Seed, Twisted Citron, Broken China and Seedless Preserves to ink blend them. I then removed the flowers and placed foam tape on the back of them. I used another frame as a guide for flower placement and taped it to the Diagonal Stitched panel (using masking tape) and nestled the ink blended flowers atop that. Once that was done, I removed the frame that I was using as a guide, and there you have beautifully placed flowers!

I chose a Thinking of You sentiment, which is from the Spellbinders Everyday Sentiments II, and hot foiled it using Champagne foil and glued that to my panel using Craft Tacky Glue. I attached that panel to a black cardstock panel using 3M Foam Tape for added dimension, and then adhered that to my card base, which is also Neenah 110lb. To finish up this card, I used PinkFresh Studio Jewel Mix to add a bunch of bling in rainbow colors as well.

That does it for this card! By using all of the white Stitched Flowers from my previous projects, this allowed me to make seventeen more cards!! For a little bit of effort, I’ve been able to make thirty-four cards using all the pieces! I hope you enjoyed this project! I certainly enjoyed making it, especially for my friend Andy! Check out his Instagram for lots of crafty inspiration, and stop by my Instagram to check out the hop!

Don’t forget to stay awesome friends!

Supply List:

*Affiliate links used at no cost to you. Thank you so much for your support!

Latest Instagram Posts

Waffle Flower Stitched Flower Panel Trio

Hello Friends, and welcome back! How’s your week going? Today I’m sharing a trio of cards that I created using the Waffle Flower Stitched Flower Panel Die. I’m really having fun with it, because I used different colored cardstock which has given me the ability to make lots of cards. So, let’s get into the project.

I began the project by cutting the panel die once from Neenah Classic Crest 110lb cardstock. I then used seventeen different colors of Sizzix cardstock and cut the panel die from ALL of those. Yes, that was quite tedious, but in the end, it has given me enough stitched flowers to make seventeen cards, right!?!? Actually, it has given me the ability to make even more because I had to cut a white panel for each card, so the white stitched flowers are being used to make seventeen other cards that I’ll share in a few days!!

Anyhoo, so once everything was cut, I flipped the white panel over, so the back is facing up, and I inlaid the stitched flowers, face down in rainbow order (for most of them), and applied foam tape in big strips across the back of the whole panel. By doing it in large strips, it was much faster and it holds all of the flowers in place. I removed the foam tape backing and adhered the whole panel to my card base, which is also Neenah 110lb.

Now, it’s just a matter of choosing sentiments! For this trio, I chose to use the Oversized Hugs Die from Waffle Flower, Happy Birthday from PinkFresh Studio Perfect Sentiments, and Happy Everything from Simon Says Stamp. All of the sentiments were cut several times and adhered together using Craft Tacky Glue. To dress up one of the cards, I also used PinkFresh Studio Jewels Mix to add some bling. This is just three cards, I still have fourteen more that are assembled, I just need to put sentiments on those and they’ll be ready to go.

That does it for this trio of cards! I hope you enjoyed this project and that it inspires you to get crafty! Making cards like this is a bit tedious, I won’t lie about that, but I love the impact that you get from all of the rainbow colors! And .. I love that I now have seventeen cards added to my stash, with more on the way using all of the white stitched flowers from the frames used on these cards!

Stay awesome friends!

Supply List:

*Affiliate links used at no cost to you. Thank you for your support!

Latest Instagram Posts

Waffle Flower Spotlight Triangle

Hello and welcome back crafty friends! I’m still celebrating the Waffle Flower April 2021 release with another project using the Spotlight Triangle Stencil! Let’s not waste any time and get right into it!

I began my project by cutting a panel of Neenah Classic Crest 110lb cardstock to 4″ x 5.25″ and taping the stencil to the paper using masking tape. I chose a few PinkFresh Studio inks to use, which include Sparkling Rose, Apricot, Sunshine, Fresh Pear, Sky Blue, Lavender, Ballet Slipper and Ocean Breeze. I began inking the triangle in rainbow order until I had covered a good bit of my panel.

The white space on the card was bothering me for whatever reason, so to take care of that, I lightly ink blended Ballet Slipper over the entire panel. This still wasn’t tickling my fancy .. Do you ever have projects that don’t come together like they did in your head?! Gah .. so frustrating! I then took my stencil and ink blended Ocean Breeze over some of the triangles that I had already done. This was much better!

When I began this project, I really didn’t know what direction it was headed! I took the stencil again and applied some Gina K Glitz Glitter Gel Iridescent to some of the triangles. This ended up being tedious, because I could only do one triangle at a time. While that was drying, I cut a frame from black cardstock using the PinkFresh Studio Diagonal Stitched Rectangles, and die cut the Oversized Hope three times from black cardstock as well and adhered those together using Craft Tacky Glue.

After seeing the frame and sentiment on my panel, I decided to take a turn and make this into a fun shaker card. I applied Scor-Tape 1/8″ around my black frame and trimmed a piece of acetate just smaller than the frame and adhered those together. I then trimmed 3M Foam Tape to fit the frame and provide space for my shaker bits.

I stamped my sub-sentiment from the Oversized Hope stamp set in VersaMark ink on black cardstock and heat embossed that using Simon Says Stamp Detail White Embossing Powder, and trimmed it out using the Simon Says Stamp Sentiment Label Dies. I glued the Hope sentiment directly to my colored panel and placed foam tape bits on the smaller sentiment for support. I added my shaker bits and adhered the frame. That was then attached to my card base, which is Neenah Classic Crest 110lb cardstock.

That does it for today! I hope you enjoyed this shaker card project, and I hope it inspires you to get crafty! There’s still time to join the blog hop to celebrate this release! Check out my post from Monday or head to the Waffle Flower Blog for all the details!

Thanks so much for stopping by and don’t forget to stay awesome!

Supply List:

*Affiliate links used at no cost to you. Thank you for your support!

Latest Instagram Posts

Waffle Flower Simple Stem Sending Hugs

Hello! Hello! And welcome back! I’m sharing another card that I created using the new Waffle Flower Simple Stem Combo from their April 2021 release! Yes, I had to place an order myself for that new Stitched Flower Panel and the Oversized Smile Combo! Gah .. I’m dying over the inspiration projects using that flower panel! So beautiful! Anyhoo, let’s get into today’s project.

I started by stamping a bunch, and I mean a bunch of leaves from the Simple Stems set on Neenah Classic Crest 110lb cardstock using VersaFine Onyx Black ink, and then heat embossing the images using Ranger Clear Embossing Powder. I then set out to color all of my leaves with Copic markers. And, I knew the exact color combo that I wanted to use! This is one of my favorite combinations that an Instagram friend, Bonnie Crane, told me about a while back and I’ve loved it ever since. You should definitely check out Bonnie’s Instagram, you won’t be disappointed. The Copic combo that I used was BG70, BG72 and BG75. The other one that goes well is BG78, however I did not use that one on this project.

Once everything was colored, I die cut all the pieces using the coordinating dies, and then began the tedious task of cutting all those little slivers of 3M Foam Tape to put on the back of them. I die cut a black cardstock panel using the Honey Bee Deckle Edge A2 dies and splattered it with Royal Talens Amsterdam Titanium White Acrylic Paint. I love this little jar of paint because the consistency is fabulous for splatter!

I began adhering all of my leaves to my black panel, and decided that a holographic sentiment would look nice with these shades of blue green. I die cut the Oversized Hugs once with holographic cardstock and twice with 110lb cardstock and adhered those together using Craft Tacky Glue. I then adhered the sentiment directly to my leaf panel using the same glue. I wanted a sub-sentiment but didn’t actually have a Waffle Flower sentiment, so I oped to bust out the Dymo 3D Label Maker and make one myself, and there you have the “sending.” I glued that directly to my panel as well.

My favorite bling choice is PinkFresh Studio Jewels Mix, so I added a few of those and mounted my panel on a Neenah Classic Crest 110lb card base.

That finishes today’s project! I hope you found some creative inspiration! There’s still time to join the blog hop celebrating Waffle Flower’s April 2021 release to win some prizes! You can check out my post from Monday, or you can head to the Waffle Flower Blog for all the details!

Thanks so much for stopping by and stay awesome!

Supply List:

Latest Instagram Posts

Waffle Flower Jumbo Flower Pot Hugs

Hey there! How are my crafty friends doing today? Thanks so much for stopping by! I’m playing around with some more products from the Waffle Flower April 2021 release. Have you checked it out yet? There’s a blog hop that started yesterday to celebrate this release, with prizes! Prizes are always cool, right?! You can check out my post from yesterday for details or head to the Waffle Flower Blog. So .. let’s get into today’s project!

Sometimes I forget that stamps don’t have to be used in the way they are presented. Take today’s project for example .. I ended up not using the flower pot in this set and opted for an all over floral design. Anyhoo, just a reminder to think outside the box! To begin my project, I stamped the large floral image from the Jumbo Flower Pot set twice on Neenah Classic Crest 110lb cardstock using VersaFine Onyx Black ink and embossed those with Ranger Clear Embossing Powder. I also stamped another smaller floral image from this set a few times in the same way to use as additions to fill the space.

Once everything was stamped, I began coloring the images using Copic Markers RV10, RV11, RV13, Y08, Y11, Y13, YG17, YG25, YG61, G21, G94 and G99. I then cut those images using the Jumbo Flower Pot coordinating die. For a backdrop to showcase all these florals, I chose a page from the Waffle Flower Dot and Lines Sampler Pack.

I trimmed down that piece of patterned paper using the Postal Frames Die from The Greetery, and began adhering my floral pieces using 3M Foam Tape, trimming off the excess as needed. Moving along to my sentiment .. I chose the Waffle Flower Oversized Hugs die, because I love this sentiment, and large sentiment are my jam! I cut the Hugs once from gold cardstock and twice from Neenah 110lb and adhered those together using Craft Tacky Glue.

I adhered the Hugs sentiment directly to my floral panel using glue and added some bling! My bling of choice is the PinkFresh Studio Jewels Mix, but really, let’s be honest, ALL bling is fabulous! I glued some jewels down and attached my panel to a Neenah Classic Crest 110lb card base.

That does it for today’s project! I hope you enjoyed it and thanks so much for stopping by! Don’t forget to think outside the box! For me, the box is comfortable and getting outside the box is a challenge sometimes, but it can be done. Thanks so much to Waffle Flower for inviting me to play with their April 2021 goodies! I’ve had so much fun! Also, don’t forget to check out my post from yesterday for blog hop details, or head to the Waffle Flower Blog.

Have a wonderful day and stay awesome!

Supply List:

*Affiliate links used at no cost to you. Thank you for your support!

Latest Instagram Posts

Waffle Flower Simple Stem Hugs

Hello Crafty Friends! I can’t even tell you how excited and honored I am to be joining Waffle Flower for their April 2021 Release Day! I had an absolute blast playing with the products! This month, the Waffle Flower release is full of stamps, dies, and stencils that celebrate the hope and joy of Spring! For my project, I’m featuring the Simple Stems stamp and coordinating die, along with the Triple Line Diamond Panel Die. For today’s hop, Waffle Flower is giving away a $25 gift certificate to THREE lucky winners! Details at the bottom of this post, so keep your eyes peeled for that! Let’s get started!

To begin, I stamped almost all of the images from the Simple Stems set onto Neenah Classic Crest 80lb cardstock using Distress Oxide Antique Linen. I then got busy coloring the flowers and the leaves using Copic Markers BV0000, BV000, BV00,BV01, YG11 and YG13. Once all the coloring was done, I used a Copic Multiliner 0.3 in black to add back in the center flower detail.

I then used the Simple Stem coordinating die to cut all of my pieces out. While I was already over at the machine, I went ahead and cut the Triple Line Diamond Panel Die once from Neenah Classic Crest 110lb cardstock. I love cover dies so much, because they add so much to your card design, and this one is super beautiful!

I wanted to add just a smidge of color to the cover die, so I lightly ink blended some PinkFresh Studio Lavender ink just around two edges. It might even be hard to see in the pics. I trimmed another piece of 80lb cardstock just smaller than the cover die and adhered those together using 3M Foam Tape. You all know how I love foam tape and dimension!

Once those were adhered together, I began playing with the placement of the flowers and leaves, and deciding on a sentiment based on the amount of space that I had to work with. I decided on the Hugs sentiment from the Waffle Flower Simply Said 1 stamp and die set. I stamped the Hugs on 110lb cardstock using VersaFine ink and heat embossed it using Ranger Clear Embossing Powder. I then put that back in the Misti and stamped it again using VersaMark ink and heat embossed it another time using the same powder to achieve that high gloss sheen. I cut the Hugs sentiment two more times from 110lb cardstock and stacked all of those together. You might be wondering why I stamped the Hugs the second time in VersaMark ink .. I do this because the paper warps a little after the first heat embossing, and if I stamped it again in black, it might not line up EXACTLY the same. You wouldn’t necessarily see that it didn’t line up perfectly if it’s stamped with the VersaMark. I hope that makes sense.

I began attaching the flowers and leaves using both foam tape and Craft Tacky Glue. Some needed the support of the foam tape to prevent bending. I glued my sentiment directly on top of the leaves and cover die. That whole panel was then adhered to my card base, which is Neenah Classic Crest 110lb, using glue as well.

And as I always say, no card is complete without some bling! Am I right?! I popped out my PinkFresh Studio Jewels Mix and added some purple jewels, and they matched perfectly! It was meant to be!

That does it for today’s project! I hope you enjoyed it, and I hope it inspires you to get crafty! Thank you so much to Waffle Flower for inviting me to join them for this super awesome release!

Don’t forget to stay awesome friends!

Giveaway Details:

For today’s hop, Waffle Flower is giving away $25 gift certificate to THREE lucky winners. You can leave a comment on this blog and along the hop by 11:59pm EDT on Monday April 12th, 2021 for your chances to win. Winners will be chosen at random from the comments left on any of the posts in this blog hop and will be announced on the Waffle Flower Blog on 2/14/2021. There are more giveaways to enter on our Instagram! Follow us at @waffleflowercrafts so you don’t miss out! 

Specials: From now until April 7th, 2021, all orders placed at waffleflower.com will receive a mysterious gift (No code required!).
For those of you who are new to Waffle Flower, they have a Last Chance section on their website that lists many goodies for 25% off until they are gone! This would be a great place to start your collection!

Blog Hop:
Supply List:

*Affiliate links used at no additional cost to you. Thank you for your support!

Latest Posts
Latest Instagram Posts