PinkFresh Studio Folk Garden Birthday

Hey Guys! Ok, I have to say it .. I’m in love with this PinkFresh Studio Folk Garden set! I ordered the foil plate, die cut and stencils, and it’s a great combination. I’m sure I’ll end up getting the stamp at some point, but am super happy with my purchase! So, let’s get into today’s project, which I love!

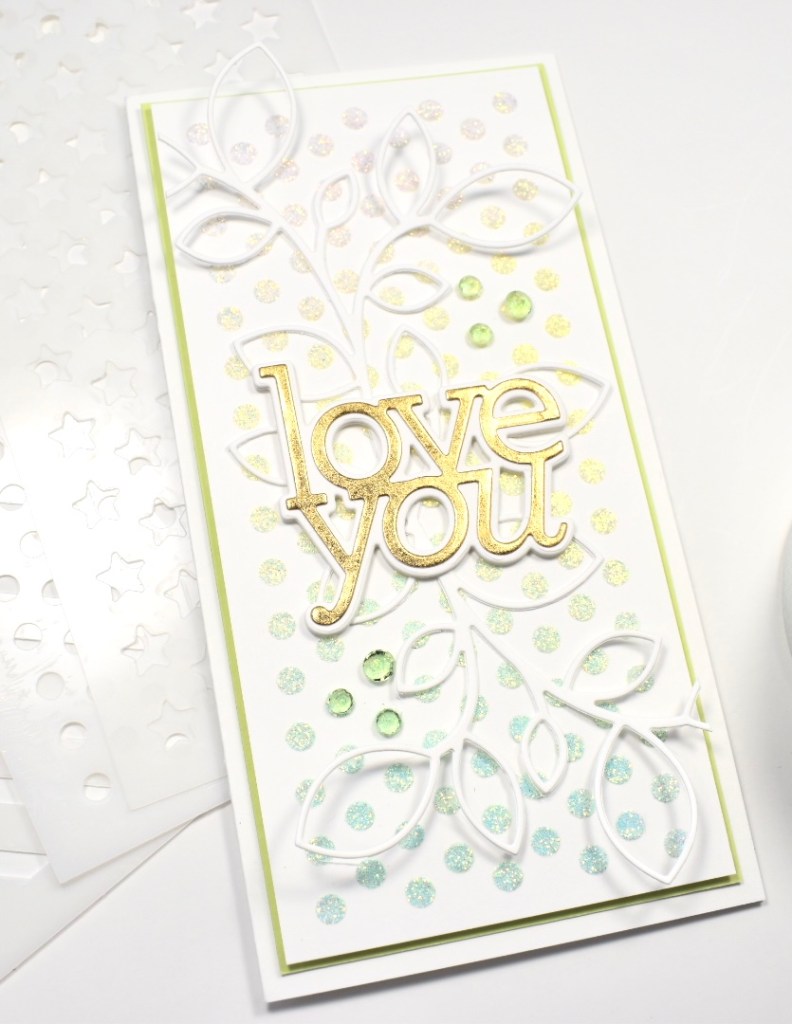
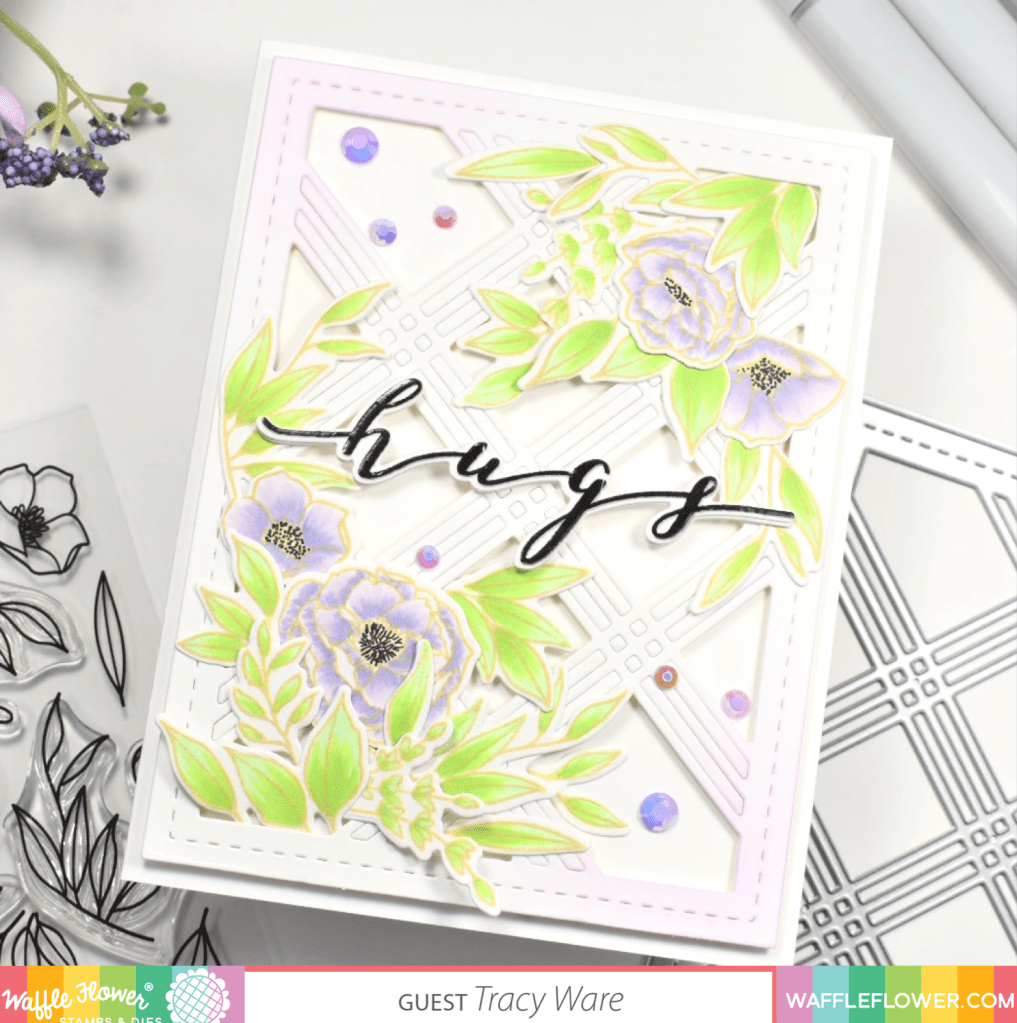
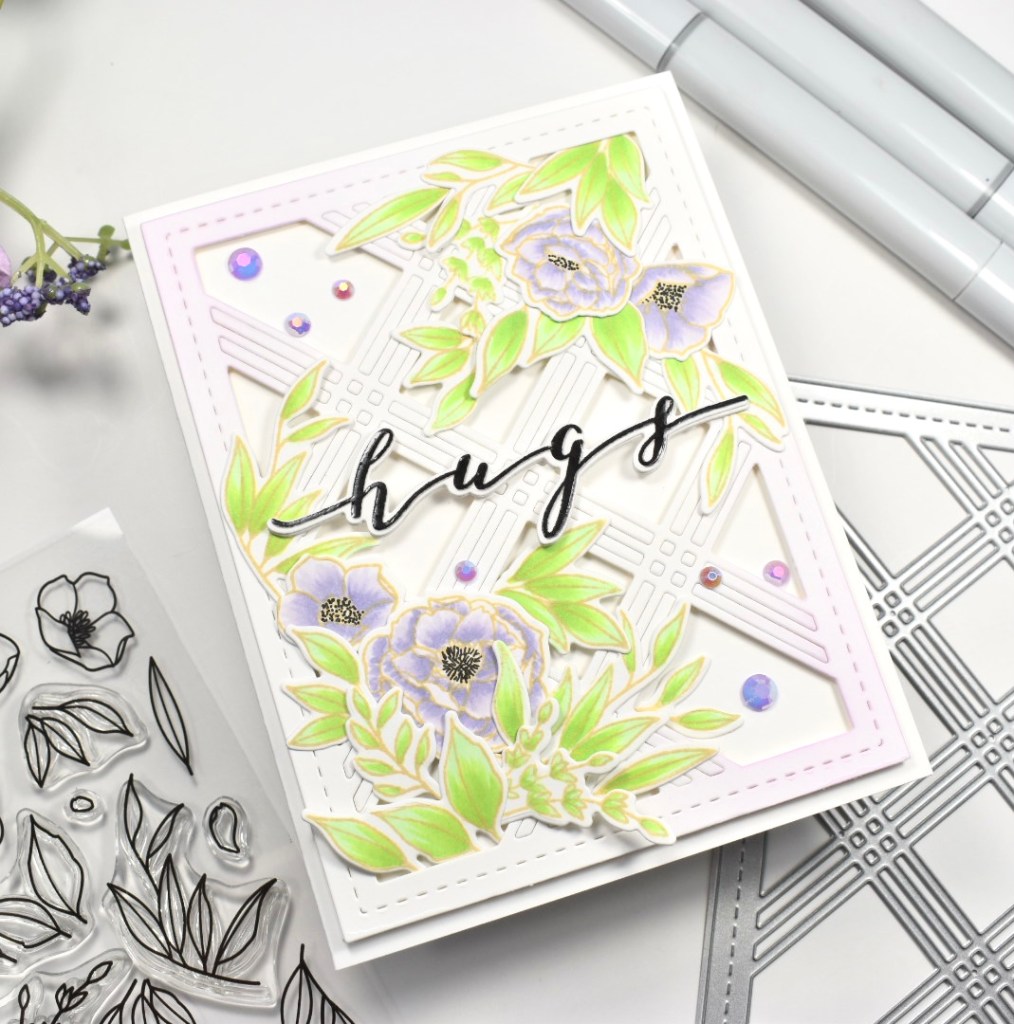
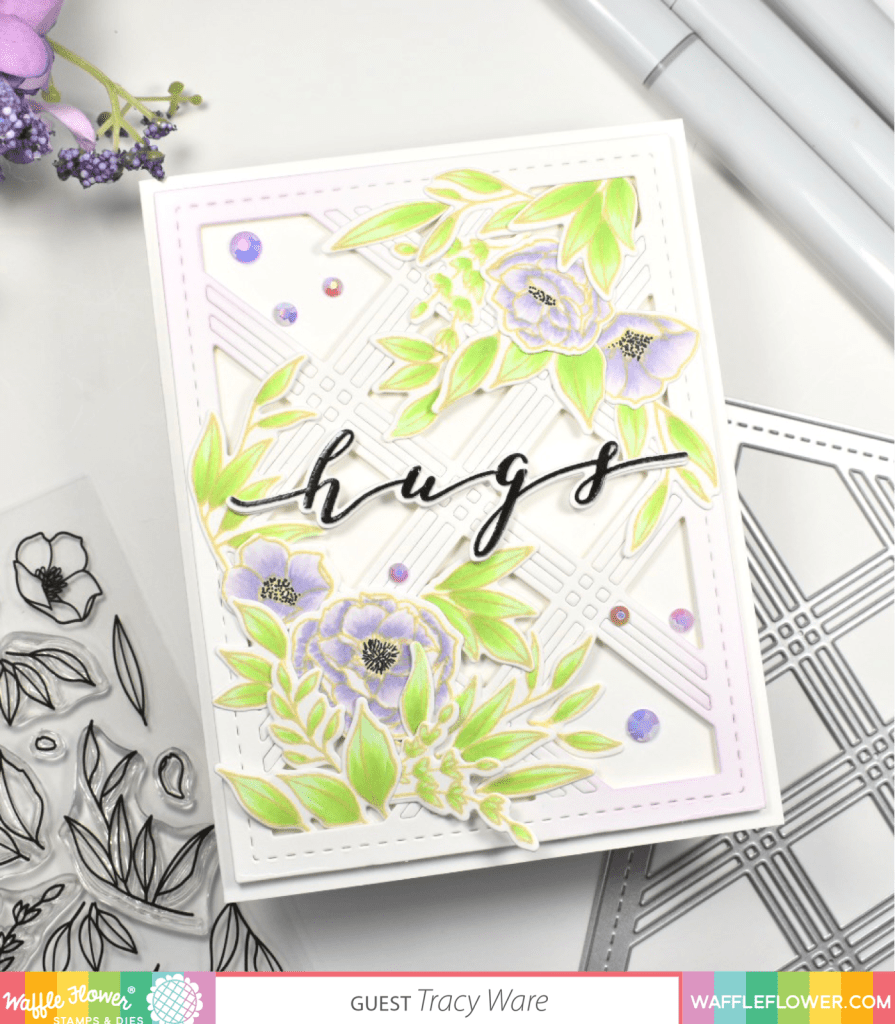
I began my project by foiling the Folk Garden plate on a panel of Neenah Classic Crest 110lb cardstock using the Spellbinders Glimmer Hot Foil System. I then used the coordinating stencils to add color using PinkFresh Studio Inks Ocean Breeze, Aquamarine, Ballet Slipper and Sparkling Rose and cut that panel using the coordinating die.

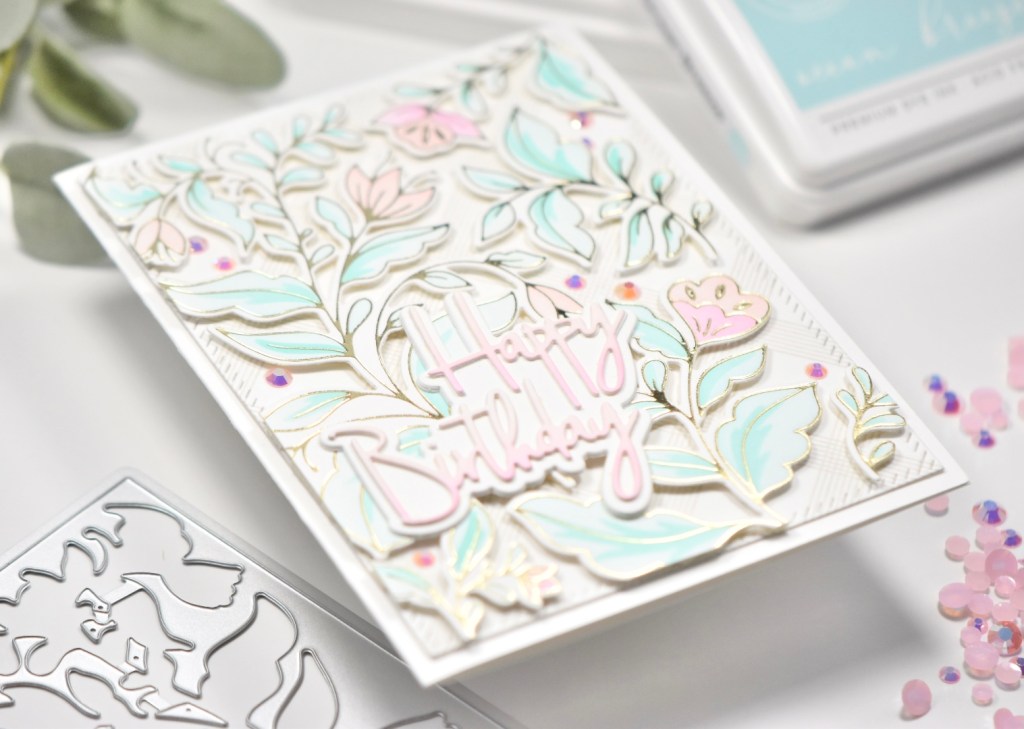
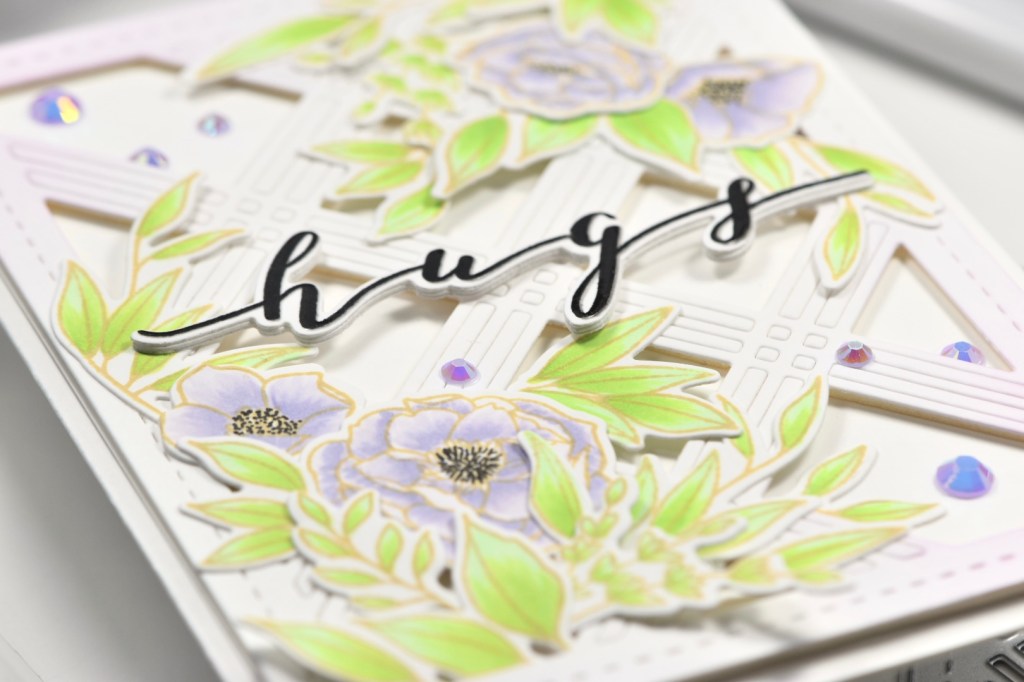
I needed a background for all of my leaves, so I stamped the Diamond Tiles on Neenah 110lb using Misty Coast Ink, and used the Diagonal Stitched Rectangles to trim it out. The longest part of this project was cutting all the little pieces of 3M Foam Tape to put on the back of the leaves! I placed those on my panel and trimmed off the excess.

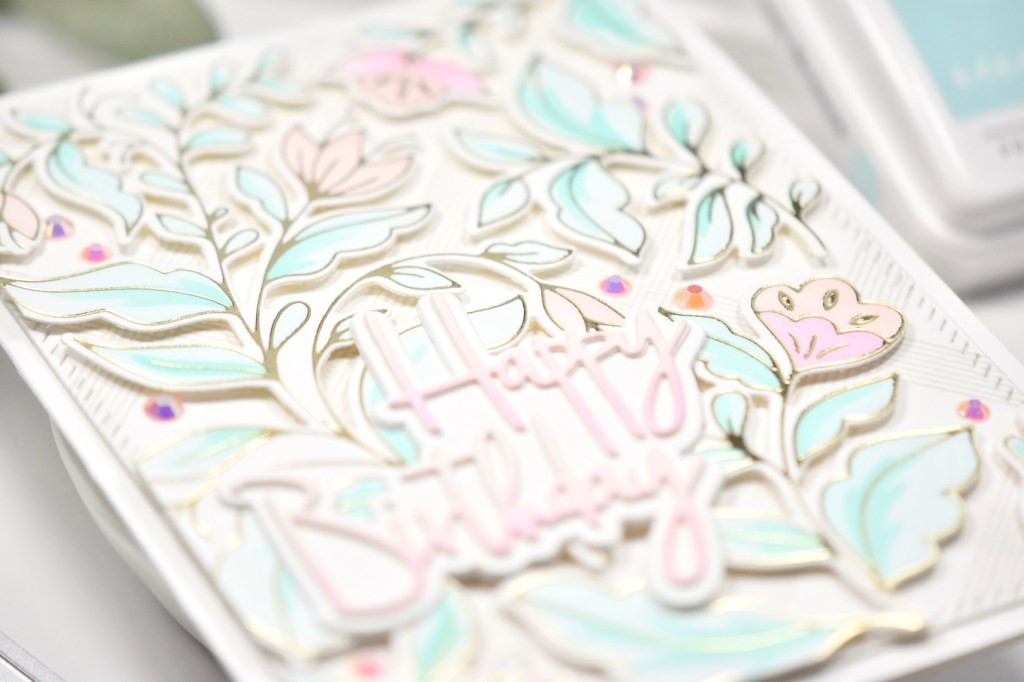
I had in my mind that I wanted to add a really pretty gold sentiment .. guess what? I was out of gold cardstock! How does that even happen?! With that being said, I had to switch directions. My birthday card stash is seriously lacking, so I obviously went with that. I die cut the Happy Birthday sentiment from the Classic Words Die set twice from Neenah 110lb and I cut the shadow twice from the same. I needed to add color to one of the layers, and the easiest way to do that was to lay the die cut back into the negative piece and lightly ink blend over the bottom portion of my die. Once that was done, I adhered all of my layers together using Craft Tacky Glue.

My sentiment was adhered directly to the leaves and I added my required bling using the PinkFresh Studio Jewels Mix. My panel was then adhered to my card base, which is also Neenah 110lb.

I think this project came out really pretty, and I’m super happy with it! I’m so glad that you stopped by today, and I hope this project inspires you to get creative too! Don’t forget to stay awesome!

Supply List:

*Affiliate links used at no cost to you. Thank you for your support!

Latest Instagram Posts

Simon Says Stamp You’re So Kind Halftone Square Background

All the Feels Release

I’m having such a blast with the products from this release, and today’s project is one of my favorites! Mixed Media really isn’t in my wheel house, but I enjoy the mix of products and textures. You can check out the full All the Feels release HERE. Let me know what your favorites are!

Let’s get into today’s fun project where I’m featuring the new Halftone Square Background stamp. To begin, I put a piece of Fluid Hot Press Watercolor paper in my Misti and positioned my stamp. To achieve this look, I basically scribbled Karin Brushmarkers! Super fun, super easy! I chose a few rainbow colors from my set, and I scribbled one color at a time, spritzed it with water, and stamped! What did I say? Super easy, yet I think the results were kind of cool! I repeated that process with the remaining colors.

I left my watercolor panel to dry overnight .. under some books to help with the warping. I really wanted to use some Ranger Distress Crackle Paste on this, because I had decided that I was going to try a mixed media project. I used the circle stencil from the Mini Slimline Patterns 1 set, which is also a newbie in the All the Feels release. So, I used my spatula thingie to run some paste through the stencil and left that to dry. When it was dry, I took a waterbrush and lightly touched the crackle paste with water and lightly touched that with my Karin Brushmarker. Why? Because the crackle wasn’t showing up that well, so adding just a hint of color helped .. but it still isn’t very visible.

After that was dry .. again, I whipped out some Tim Holtz Stampers Anonymous stamps, because you really can’t have a mixed media piece without Tim Holtz! Am I right?!?! I ended up using stamps from the sets Documented and Ultimate Grunge. I also used the Simon Says Stamp Old Letter Background stamp. For the background stamping, I used some Memento Tuxedo Black ink, as well as some VersaFine Onyx Black ink.

Moving on to my focal point and sentiment .. I die cut the Simon Says Stamp Cosmos Stem three times for each flower from Neenah Classic Crest 110lb cardstock. And .. I cut that little center piece from black cardstock. I thought that would tie all of my black elements together. I added color to one layer for each of the flowers using Distress Oxide Kitsch Flamingo and Distress Oxide Mowed Lawn. I adhered my flower stems together with the colored piece being on top with Craft Tacky Glue. I then die cut the Simon Says Stamp You’re so Kind sentiment three times from black cardstock, and glued those together. Why all this die cutting? Because dimension is life, and die cutting is my jam!

My next step was just dorking around with the placement of everything on my panel. Once I figured it out, I adhered my sentiment to my panel with Craft Tacky Glue, and I had to trim some of my stems before gluing those as well.

Now we all know about the bling situation! There has to be bling! Always! I opted for Simon Says Stamp Moonshine Confetti for this project. It gave just a little bit of shine, but wasn’t too distracting. I adhered my panel to a black panel using 3M Foam Tape and then glued that to my card base, which happens to be Neenah 110lb cardstock.

And there you have it! Like I said, mixed media isn’t my thing, but I do really enjoy it! It’s just so much fun to bring so many different things together on one project! I hope this inspires you to try something new or something that isn’t necessarily your thing either!

Don’t forget to check out the new release, All the Feels!

Thanks so much for stopping by and don’t forget to stay awesome!

Supply List:

*Affiliate links used at no cost to you. Thank you for your support!

Latest Instagram Posts

Simon Says Stamp Mini Slimline Patterns

All the Feels Release

Hello and welcome back! Today I’m featuring a super fun product from the new Simon Says Stamp All the Feels release, Mini Slimline Patterns 1. This is a set of three stencils that consists of circles, stars and stripes, perfect for all of those cute mini slimline cards!

Let’s get into today’s project! To begin, I cut three panels that were the same size as the stencils from Neenah Classic Crest 110lb cardstock, and taped those to the stencils using masking tape. Since I created three cards, I’ll go through each one separately.

For the circle stencil, I ink blended PinkFresh Studio Sparkling Rose, Sunshine and Ocean Breeze. I then went over the ink with Gina K Glitz Glitter Gel – Iridescent, and set that aside to dry while I worked on my sentiment. I die cut the Simon Says Stamp Love You once from gold cardstock and three times from Neenah 110lb cardstock and adhered those together using Craft Tacky Glue. I also die cut the Simon Says Stamp Outline Clustered Leaves once from Neenah 110lb. Once my panel was dry, I glued the leaves down only using the center stem. I then glued my sentiment atop that, along with some PinkFresh Studio Crystals Mix. I adhered my panel to another panel of Concord and 9th Sprout cardstock using 3M Foam Tape. That was then adhered to my card base which happens to be Neenah Classic Crest 110lb.

For the star stencil, I ink blended PinkFresh Studio Mint, Ocean Breeze and Soft Lilac. And again, I went over that with the Gina K Glitz Glitter Gel – Iridescent. I used the Simon Says Stamp Friends die for my sentiment and cut that three times from Neenah 110lb. I adhered those together using Craft Tacky Glue and snipped the “S” off of Friends. I used the new Mini Starts Party die to cut stars from white and glitter cardstock. I used the same inks to do a little ink blending on the white stars. I glued my friend sentiment directly to my card panel and attached the “shine brightly,” which is from Tim Holtz Idea-ology Sentiment Label Stickers, using 3M Foam Tape, along with the stars. I mounted my panel to another panel of Simon Says Stamp Sea Glass cardstock using foam tape, and that was then adhered to my card base finishing up this project.

Now for the striped stencil .. I ink blended Distress Oxide Chipped Sapphire, Tumbled Glass and Spun Sugar and went over that with the same glitter gel. I die cut the Simon Says Stamp Just Because sentiment three times from Neenah 110lb and adhered those together using Craft Tacky Glue. I also used the Simon Says Stamp Cosmo Flower Frame for this one and trimmed the flower out of the frame.

I adhered my sentiment directly to my card panel, and adhered the flower using foam tape. I once again adhered this panel to another panel of Simon Says Stamp Sea Glass cardstock before adhering that to my card base. I ended up using PinkFresh Studio Jewels Mix for my necessary bling!

There’s three projects using the three stencils from the new Mini Slimline Patterns 1! These were super fun to make because I always forget about busting out my gels and pastes! Don’t forget to check out the new release, All the Feels! So much stuff to inspire you!

Thanks so much for stopping by today and stay awesome my friend!

Supply List:

*Affiliate links used at no cost to you. Thank you for your support!

Latest Instagram Posts

Simon Says Stamp Beautiful Definition

All the Feels Release

Hey Guys! How’s everyone doing? Simon Says Stamp is continuing the All the Feels celebration with an Instagram Hop today! You should swing over there to check it out! They are giving away a $25 gift card at every stop on the hop! Wow! You can check out my Instagram or Simon’s Instagram for all the details and a full hop list!

So let’s get into today’s project. I love how this card turned out! I rarely say that about my own cards, because I’m my own worst critic ya know. Today’s card is featuring the Mini Slimline Patterns 1 stencil set, along with the Mini Stars Party Die. To begin, I cut a panel of Neenah Classic Crest 110lb cardstock the same size as the star stencil and taped those together using masking tape. I did some light ink blending using PinkFresh Studio Raspberry Bliss, Sweet Mustard, Grassy Knoll and Slumber.

I die cut the Etched Eucalyptus Wreath twice from Neenah 110lb and adhered those together in a few spots using Craft Tacky Glue. I also die cut the Beautiful sentiment twice from Neenah 110lb and once from glitter cardstock and adhered those together. While I was cutting, I went ahead and cut the Mini Stars Party die from the same glitter cardstock.

I trimmed my ink blended panel to 3×6 and adhered the Eucalyptus Wreaths using glue and adhered the Beautiful sentiment atop that. I adhered the Sentiment Strip to the panel across the wreath using 3M Foam Tape and went ahead and added some glitter stars with foam tape as well. I added my panel to some black cardstock, because I always like the contrast that it provides. Lastly, I adhered everything to my card base, which is Neenah Classic Crest 110lb.

That wraps up today’s project! I hope you enjoyed it, and I hope you’ll stop by my Instagram to check out the hop! Don’t forget, lots of prizes to be won!

Have a wonderful and stay awesome friends!

Supply List:

*Affiliate links used at no cost to you. Thank you for your support!

Latest Instagram Posts

Waffle Flower Spotlight Triangle

Hello and welcome back crafty friends! I’m still celebrating the Waffle Flower April 2021 release with another project using the Spotlight Triangle Stencil! Let’s not waste any time and get right into it!

I began my project by cutting a panel of Neenah Classic Crest 110lb cardstock to 4″ x 5.25″ and taping the stencil to the paper using masking tape. I chose a few PinkFresh Studio inks to use, which include Sparkling Rose, Apricot, Sunshine, Fresh Pear, Sky Blue, Lavender, Ballet Slipper and Ocean Breeze. I began inking the triangle in rainbow order until I had covered a good bit of my panel.

The white space on the card was bothering me for whatever reason, so to take care of that, I lightly ink blended Ballet Slipper over the entire panel. This still wasn’t tickling my fancy .. Do you ever have projects that don’t come together like they did in your head?! Gah .. so frustrating! I then took my stencil and ink blended Ocean Breeze over some of the triangles that I had already done. This was much better!

When I began this project, I really didn’t know what direction it was headed! I took the stencil again and applied some Gina K Glitz Glitter Gel Iridescent to some of the triangles. This ended up being tedious, because I could only do one triangle at a time. While that was drying, I cut a frame from black cardstock using the PinkFresh Studio Diagonal Stitched Rectangles, and die cut the Oversized Hope three times from black cardstock as well and adhered those together using Craft Tacky Glue.

After seeing the frame and sentiment on my panel, I decided to take a turn and make this into a fun shaker card. I applied Scor-Tape 1/8″ around my black frame and trimmed a piece of acetate just smaller than the frame and adhered those together. I then trimmed 3M Foam Tape to fit the frame and provide space for my shaker bits.

I stamped my sub-sentiment from the Oversized Hope stamp set in VersaMark ink on black cardstock and heat embossed that using Simon Says Stamp Detail White Embossing Powder, and trimmed it out using the Simon Says Stamp Sentiment Label Dies. I glued the Hope sentiment directly to my colored panel and placed foam tape bits on the smaller sentiment for support. I added my shaker bits and adhered the frame. That was then attached to my card base, which is Neenah Classic Crest 110lb cardstock.

That does it for today! I hope you enjoyed this shaker card project, and I hope it inspires you to get crafty! There’s still time to join the blog hop to celebrate this release! Check out my post from Monday or head to the Waffle Flower Blog for all the details!

Thanks so much for stopping by and don’t forget to stay awesome!

Supply List:

*Affiliate links used at no cost to you. Thank you for your support!

Latest Instagram Posts

Waffle Flower Simple Stem Sending Hugs

Hello! Hello! And welcome back! I’m sharing another card that I created using the new Waffle Flower Simple Stem Combo from their April 2021 release! Yes, I had to place an order myself for that new Stitched Flower Panel and the Oversized Smile Combo! Gah .. I’m dying over the inspiration projects using that flower panel! So beautiful! Anyhoo, let’s get into today’s project.

I started by stamping a bunch, and I mean a bunch of leaves from the Simple Stems set on Neenah Classic Crest 110lb cardstock using VersaFine Onyx Black ink, and then heat embossing the images using Ranger Clear Embossing Powder. I then set out to color all of my leaves with Copic markers. And, I knew the exact color combo that I wanted to use! This is one of my favorite combinations that an Instagram friend, Bonnie Crane, told me about a while back and I’ve loved it ever since. You should definitely check out Bonnie’s Instagram, you won’t be disappointed. The Copic combo that I used was BG70, BG72 and BG75. The other one that goes well is BG78, however I did not use that one on this project.

Once everything was colored, I die cut all the pieces using the coordinating dies, and then began the tedious task of cutting all those little slivers of 3M Foam Tape to put on the back of them. I die cut a black cardstock panel using the Honey Bee Deckle Edge A2 dies and splattered it with Royal Talens Amsterdam Titanium White Acrylic Paint. I love this little jar of paint because the consistency is fabulous for splatter!

I began adhering all of my leaves to my black panel, and decided that a holographic sentiment would look nice with these shades of blue green. I die cut the Oversized Hugs once with holographic cardstock and twice with 110lb cardstock and adhered those together using Craft Tacky Glue. I then adhered the sentiment directly to my leaf panel using the same glue. I wanted a sub-sentiment but didn’t actually have a Waffle Flower sentiment, so I oped to bust out the Dymo 3D Label Maker and make one myself, and there you have the “sending.” I glued that directly to my panel as well.

My favorite bling choice is PinkFresh Studio Jewels Mix, so I added a few of those and mounted my panel on a Neenah Classic Crest 110lb card base.

That finishes today’s project! I hope you found some creative inspiration! There’s still time to join the blog hop celebrating Waffle Flower’s April 2021 release to win some prizes! You can check out my post from Monday, or you can head to the Waffle Flower Blog for all the details!

Thanks so much for stopping by and stay awesome!

Supply List:

Latest Instagram Posts

Waffle Flower Jumbo Flower Pot Hugs

Hey there! How are my crafty friends doing today? Thanks so much for stopping by! I’m playing around with some more products from the Waffle Flower April 2021 release. Have you checked it out yet? There’s a blog hop that started yesterday to celebrate this release, with prizes! Prizes are always cool, right?! You can check out my post from yesterday for details or head to the Waffle Flower Blog. So .. let’s get into today’s project!

Sometimes I forget that stamps don’t have to be used in the way they are presented. Take today’s project for example .. I ended up not using the flower pot in this set and opted for an all over floral design. Anyhoo, just a reminder to think outside the box! To begin my project, I stamped the large floral image from the Jumbo Flower Pot set twice on Neenah Classic Crest 110lb cardstock using VersaFine Onyx Black ink and embossed those with Ranger Clear Embossing Powder. I also stamped another smaller floral image from this set a few times in the same way to use as additions to fill the space.

Once everything was stamped, I began coloring the images using Copic Markers RV10, RV11, RV13, Y08, Y11, Y13, YG17, YG25, YG61, G21, G94 and G99. I then cut those images using the Jumbo Flower Pot coordinating die. For a backdrop to showcase all these florals, I chose a page from the Waffle Flower Dot and Lines Sampler Pack.

I trimmed down that piece of patterned paper using the Postal Frames Die from The Greetery, and began adhering my floral pieces using 3M Foam Tape, trimming off the excess as needed. Moving along to my sentiment .. I chose the Waffle Flower Oversized Hugs die, because I love this sentiment, and large sentiment are my jam! I cut the Hugs once from gold cardstock and twice from Neenah 110lb and adhered those together using Craft Tacky Glue.

I adhered the Hugs sentiment directly to my floral panel using glue and added some bling! My bling of choice is the PinkFresh Studio Jewels Mix, but really, let’s be honest, ALL bling is fabulous! I glued some jewels down and attached my panel to a Neenah Classic Crest 110lb card base.

That does it for today’s project! I hope you enjoyed it and thanks so much for stopping by! Don’t forget to think outside the box! For me, the box is comfortable and getting outside the box is a challenge sometimes, but it can be done. Thanks so much to Waffle Flower for inviting me to play with their April 2021 goodies! I’ve had so much fun! Also, don’t forget to check out my post from yesterday for blog hop details, or head to the Waffle Flower Blog.

Have a wonderful day and stay awesome!

Supply List:

*Affiliate links used at no cost to you. Thank you for your support!

Latest Instagram Posts

Waffle Flower Simple Stem Hugs

Hello Crafty Friends! I can’t even tell you how excited and honored I am to be joining Waffle Flower for their April 2021 Release Day! I had an absolute blast playing with the products! This month, the Waffle Flower release is full of stamps, dies, and stencils that celebrate the hope and joy of Spring! For my project, I’m featuring the Simple Stems stamp and coordinating die, along with the Triple Line Diamond Panel Die. For today’s hop, Waffle Flower is giving away a $25 gift certificate to THREE lucky winners! Details at the bottom of this post, so keep your eyes peeled for that! Let’s get started!

To begin, I stamped almost all of the images from the Simple Stems set onto Neenah Classic Crest 80lb cardstock using Distress Oxide Antique Linen. I then got busy coloring the flowers and the leaves using Copic Markers BV0000, BV000, BV00,BV01, YG11 and YG13. Once all the coloring was done, I used a Copic Multiliner 0.3 in black to add back in the center flower detail.

I then used the Simple Stem coordinating die to cut all of my pieces out. While I was already over at the machine, I went ahead and cut the Triple Line Diamond Panel Die once from Neenah Classic Crest 110lb cardstock. I love cover dies so much, because they add so much to your card design, and this one is super beautiful!

I wanted to add just a smidge of color to the cover die, so I lightly ink blended some PinkFresh Studio Lavender ink just around two edges. It might even be hard to see in the pics. I trimmed another piece of 80lb cardstock just smaller than the cover die and adhered those together using 3M Foam Tape. You all know how I love foam tape and dimension!

Once those were adhered together, I began playing with the placement of the flowers and leaves, and deciding on a sentiment based on the amount of space that I had to work with. I decided on the Hugs sentiment from the Waffle Flower Simply Said 1 stamp and die set. I stamped the Hugs on 110lb cardstock using VersaFine ink and heat embossed it using Ranger Clear Embossing Powder. I then put that back in the Misti and stamped it again using VersaMark ink and heat embossed it another time using the same powder to achieve that high gloss sheen. I cut the Hugs sentiment two more times from 110lb cardstock and stacked all of those together. You might be wondering why I stamped the Hugs the second time in VersaMark ink .. I do this because the paper warps a little after the first heat embossing, and if I stamped it again in black, it might not line up EXACTLY the same. You wouldn’t necessarily see that it didn’t line up perfectly if it’s stamped with the VersaMark. I hope that makes sense.

I began attaching the flowers and leaves using both foam tape and Craft Tacky Glue. Some needed the support of the foam tape to prevent bending. I glued my sentiment directly on top of the leaves and cover die. That whole panel was then adhered to my card base, which is Neenah Classic Crest 110lb, using glue as well.

And as I always say, no card is complete without some bling! Am I right?! I popped out my PinkFresh Studio Jewels Mix and added some purple jewels, and they matched perfectly! It was meant to be!

That does it for today’s project! I hope you enjoyed it, and I hope it inspires you to get crafty! Thank you so much to Waffle Flower for inviting me to join them for this super awesome release!

Don’t forget to stay awesome friends!

Giveaway Details:

For today’s hop, Waffle Flower is giving away $25 gift certificate to THREE lucky winners. You can leave a comment on this blog and along the hop by 11:59pm EDT on Monday April 12th, 2021 for your chances to win. Winners will be chosen at random from the comments left on any of the posts in this blog hop and will be announced on the Waffle Flower Blog on 2/14/2021. There are more giveaways to enter on our Instagram! Follow us at @waffleflowercrafts so you don’t miss out! 

Specials: From now until April 7th, 2021, all orders placed at waffleflower.com will receive a mysterious gift (No code required!).
For those of you who are new to Waffle Flower, they have a Last Chance section on their website that lists many goodies for 25% off until they are gone! This would be a great place to start your collection!

Blog Hop:
Supply List:

*Affiliate links used at no additional cost to you. Thank you for your support!

Latest Posts
Latest Instagram Posts