Simon Says Stamp Elegant Birthday

Hello Friends and welcome back! Thanks so much for stopping by! I’m back today with a card featuring the new Elegant Modern Greetings from Simon Says Stamp’s latest release, Dear Friend. I always love getting to see all the awesome things in new releases, along with all of the amazing inspirations from the rest of the team. Let’s run through the details of this card.

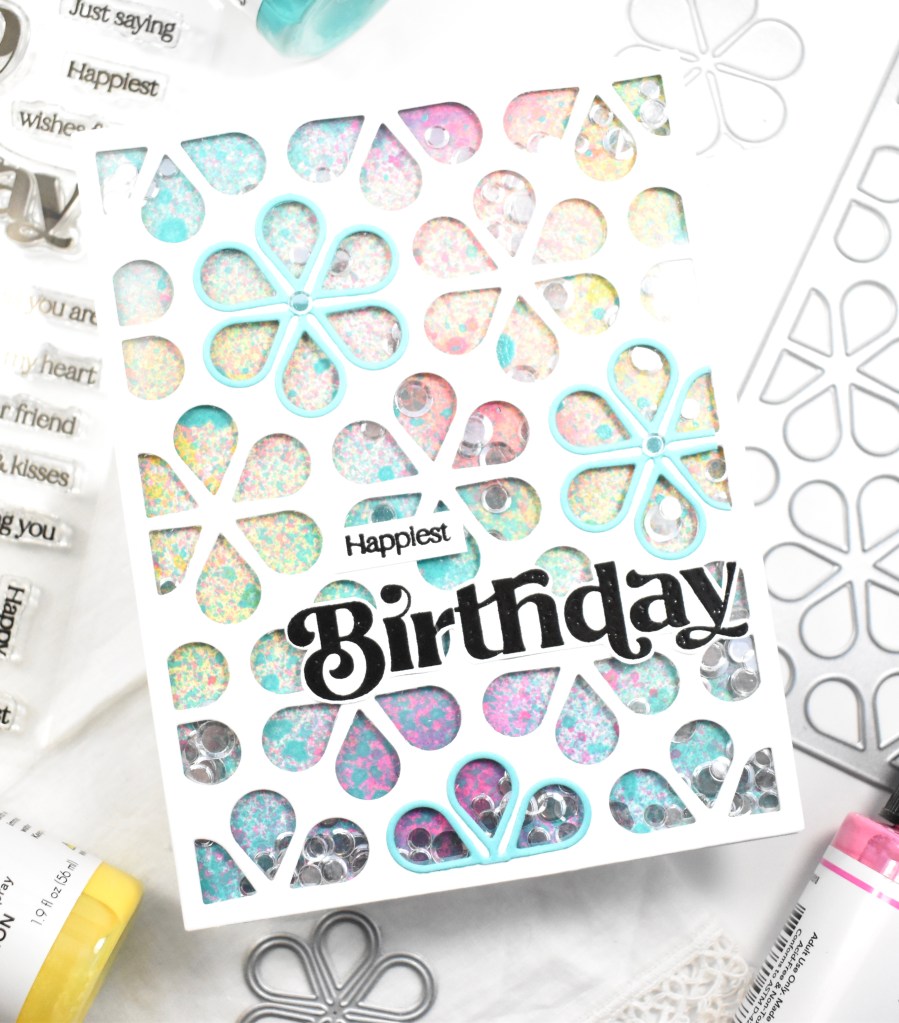
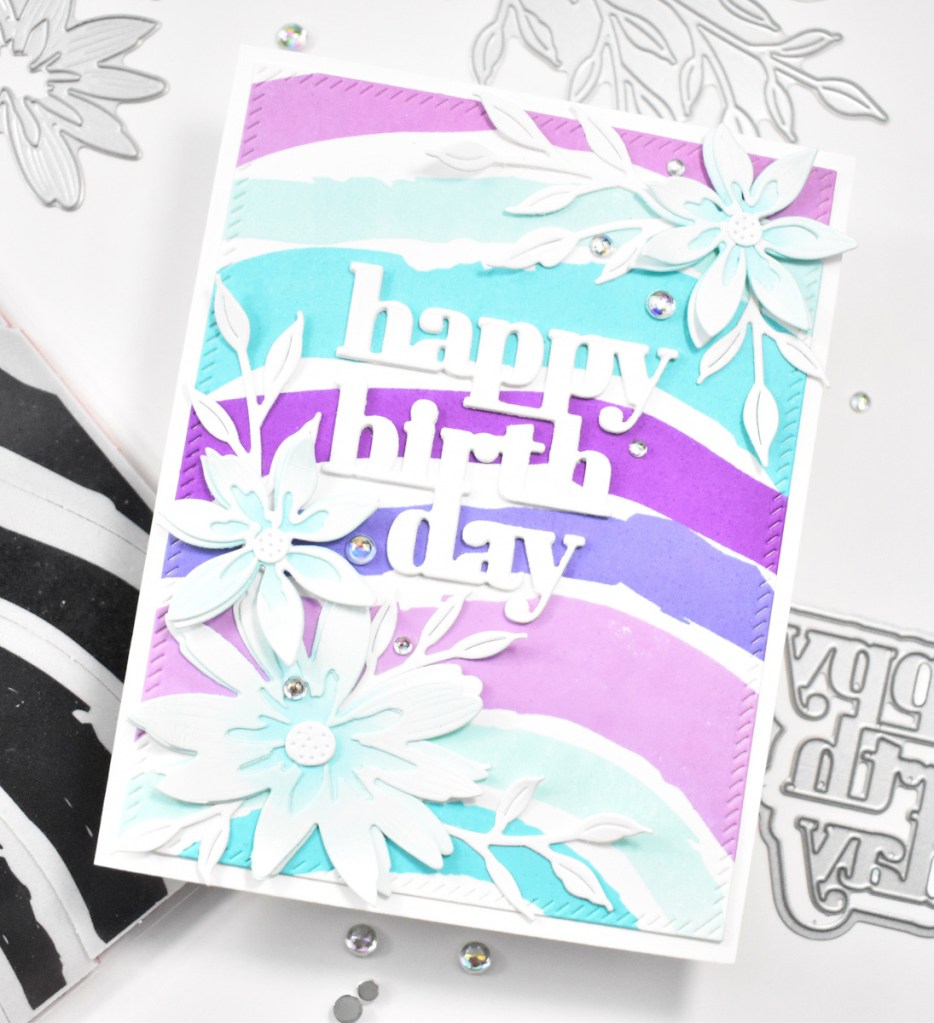
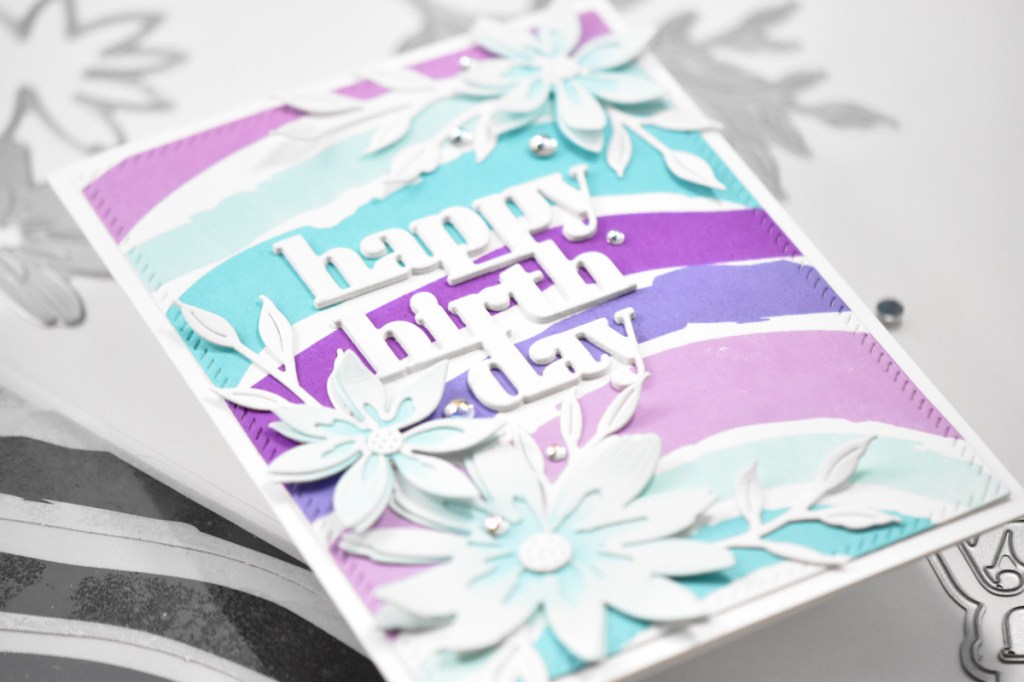
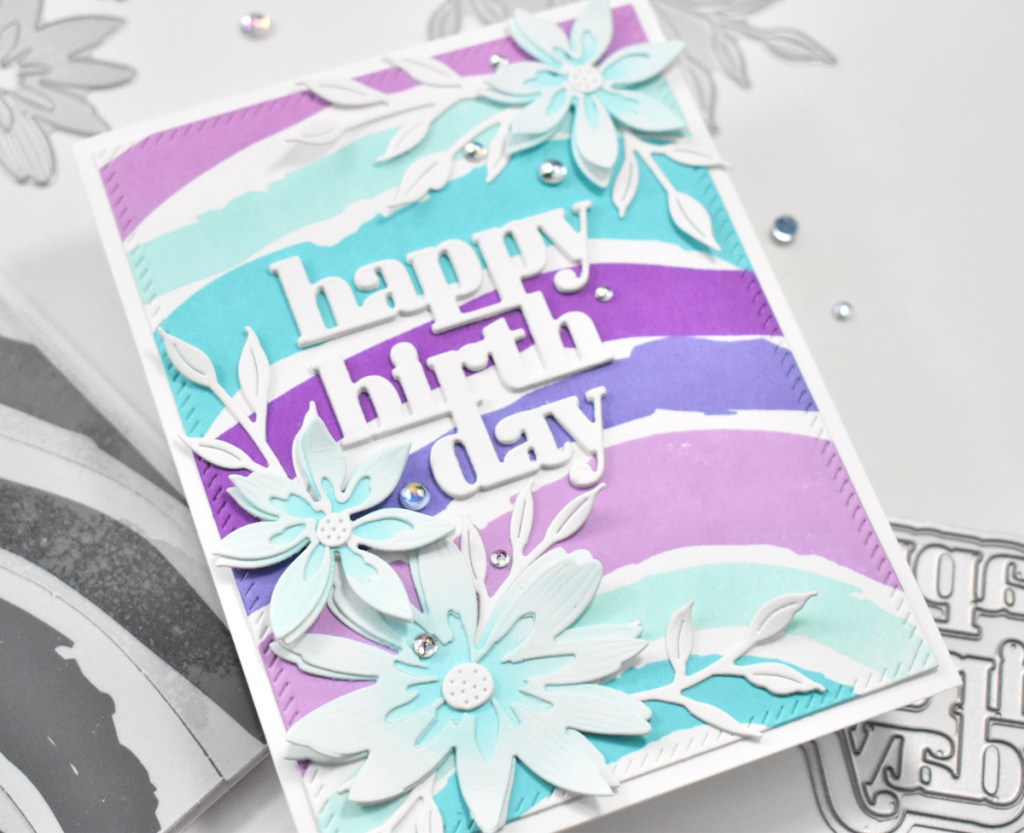
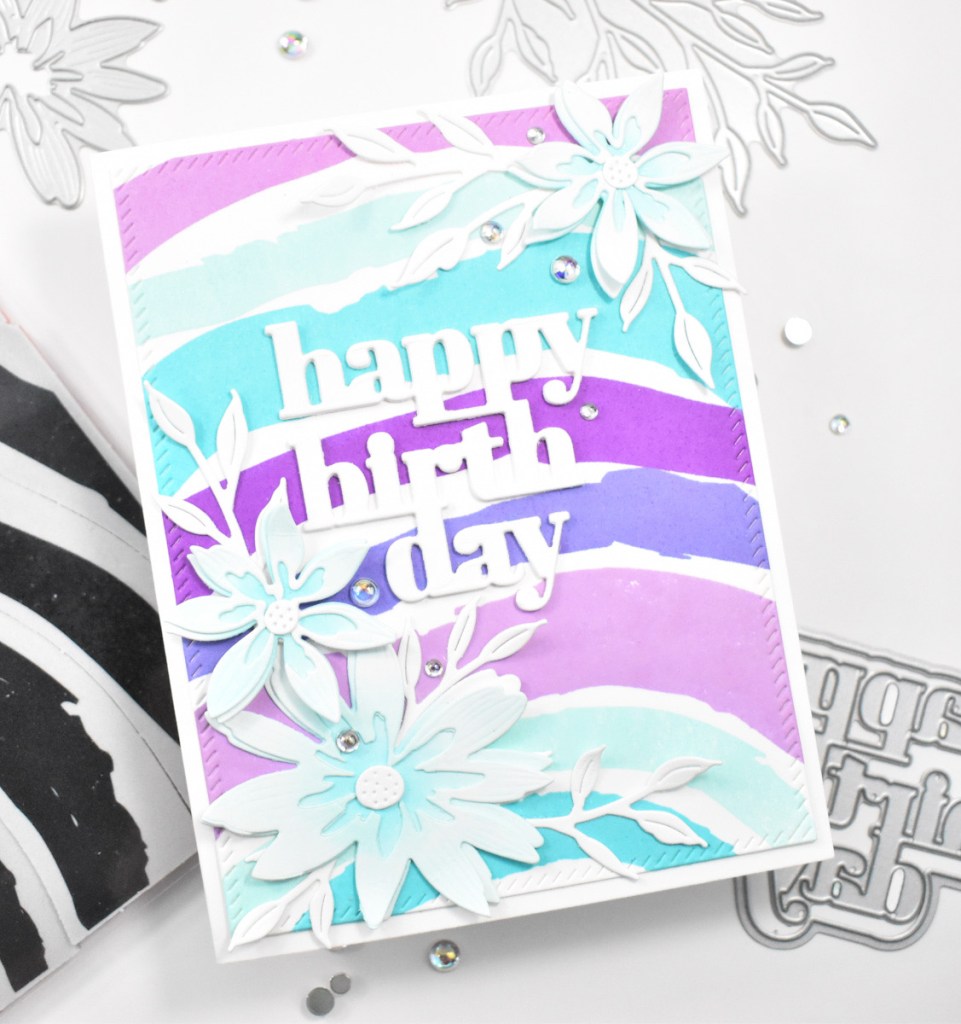
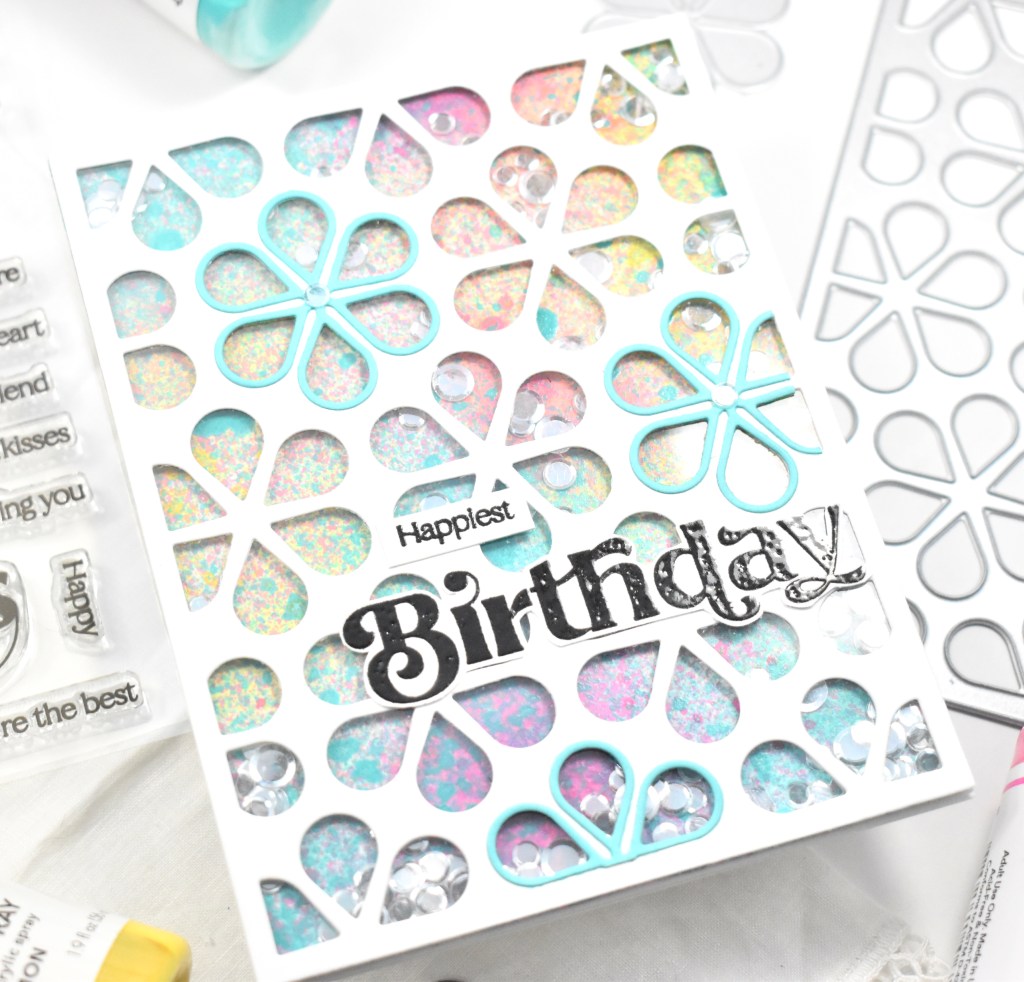
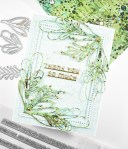
To begin, I got to work on the background and pulled out some Dina Wakely Gloss Sprays in Magenta, Lemon and Turquoise. I played around with that until I was satisfied with the look and colors, letting it dry between applications because I didn’t want it to get muddy looking.

Next, I used the SSS Fab Floral Plate and cut that from a panel of Neenah 110lb cardstock. I also used the SSS Fab Flower die and cut three flowers from some coordinating cardstock. I applied some liquid glue on the edges and around the flowers of the cover panel and adhered the acetate. I then applied some small strips of foam tape around the edges of that.

I sprinkled in some confetti mix and adhered my background panel to the cover. I adhered the turquoise flowers as well and added an embellishment to the middle of those.

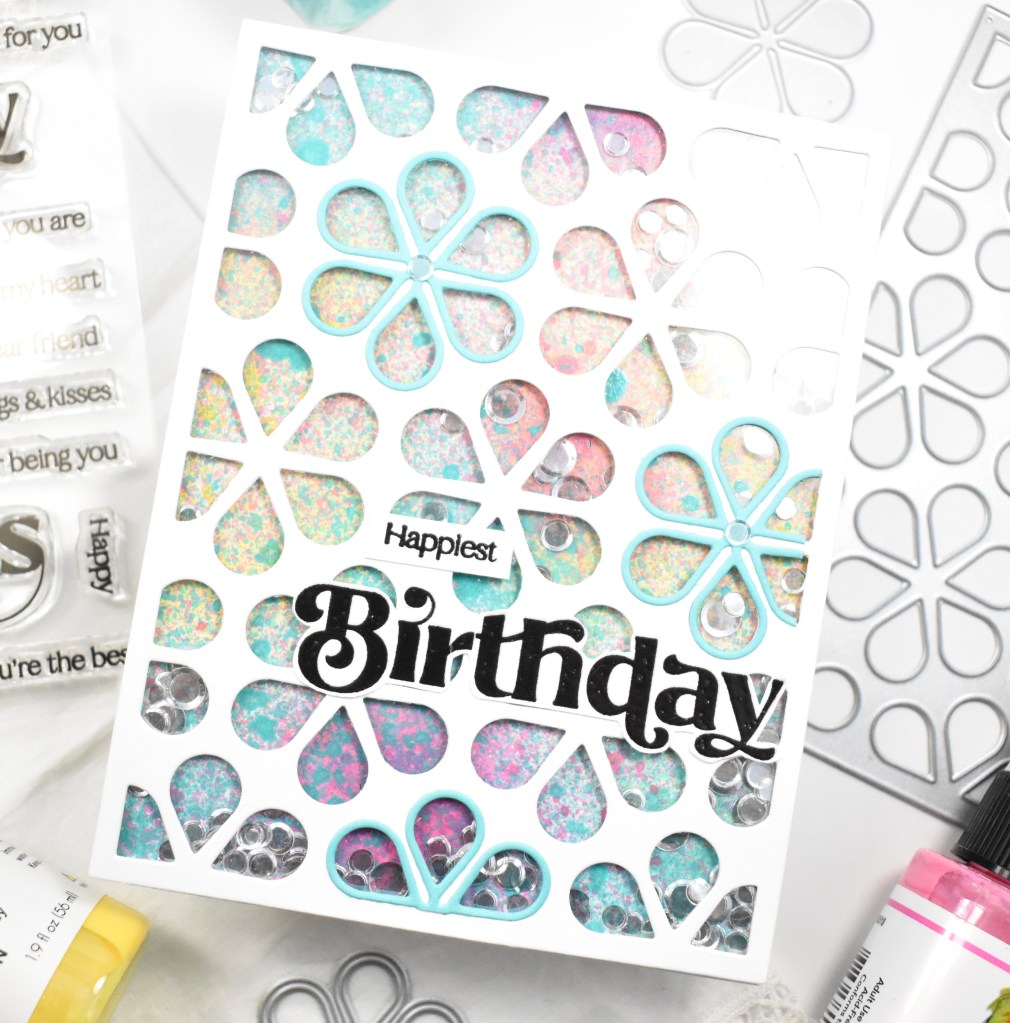
I stamped the birthday sentiments from the SSS Elegantly Modern Greetings onto Neenah 110lb cardstock using VersaFine Onyx Black ink and heat embossed that using Ranger Clear Embossing Powder. I fussy cut those and adhered to the panel before adhering everything to the card base.

That does it for this project! I hope you enjoyed it! Don’t forget to click over and check out the entire Dear Friend release, and let me know your favorites! I hope you have a wonderful day, and stay awesome friend!

Supply List:

* Affiliate links used at no cost to you. Thanks so much for your support!

Latest Posts

Latest Instagram Posts

Simon Says Stamp Painted Rainbow Birthday

Hello Friends, and thank you so much for stopping by. Are you getting lots of inspiration from Simon Says Stamp’s latest release, Dear Friend? What are your favorites from this release? I’ve really enjoyed playing with the Painted Rainbow background stamp, and today’s post features another project using that stamp. So, let’s run through the details!

To begin, I popped a panel of Neenah 110lb cardstock in the Misti and stamped the different pieces of stamp using SSS Pawsitively Saturated Inks in an assortment of Bubblegum, Cheeky, Melon, Lemonade, Seafoam and Lilac. I stamped one portion of the stamp, cleaned it, and moved on to the next portion with the next color. Once the background was completed, I trimmed it down using the PFS Diagonal Stitched Rectangles.

I stamped the birthday sentiment from the SSS Clean Line Stacks set onto black cardstock using VersaMark ink and heat set that using SSS Detail White Embossing Powder. I used the coordinating die to trim out the sentiment, cutting it an additional two more times and adhering all of those together using liquid glue.

The sentiment was then adhered in the center of the panel, and I added some coordinating PinkFresh Studio Jewels along the arches of the rainbow for added interest and bling. Because, every card needs just a little bit of bling! Well, I guess this is a lot of bling!

The panel was then adhered to the card base using foam tape for some extra dimension, because dimension is life!

That does it for this project! Super simple, but I love the way it turned out! The jewels coordinate so well with the Simon ink colors! I hope you enjoyed it, and I hope it inspires you to get crafty! Don’t forget to check out the entire Dear Friend release over on Simon’s website. Have a wonderful day and stay awesome!

Supply List:

* Affiliate links used at no cost to you. Thanks so much for your support!

Latest Posts

Latest Instagram Posts

Simon Says Stamp Dreamy Daisy Birthday

Hello Crafty Friends, and welcome back to my blog! Today’s card is featuring the new Painted Rainbow background stamp from Simon Says Stamp’s latest release, Dear Friend. This is such a fun release and I had lots of fun playing with different color combos using this stamp. Let’s get to the details!

This is a pull apart stamp, so you can stamp the arches of the rainbow as close or as far apart as you’d like them. I did do a card that has the spacing as the stamp is put together, and you’ll see that another day. Anyhoo, I began by placing a panel of Neenah 110lb cardstock in the Misti and stamping the arches in the selected colors of SSS Pawsitively Saturated Ink, which are Seafoam, Surf, Violet, Amethyst and Lilac.

Once I had stamped enough to cover a panel, I trimmed it down using the PFS Diagonal Stitched Rectangles. I then cut several flowers using the SSS Dreamy Daisy Layers and did some light ink blending on them using the Seafoam ink. I also cut some leaves using the SSS Winsome Branch. I adhered the flowers together using Bearly Art Glue and set everything aside while I worked on the sentiment.

I’m running short on birthday cards, so I opted to use the SSS Basic Box Card Happy Birthday die and cut it three times, adhering all of those together for added dimension. I began the placement and assembly of the card by gluing the leaves under the flowers and gluing the larger daisy directly to the panel. The other two flowers were adhered using SSS 3D Foam Squares.

I nestled the sentiment in the middle using glue and added some PFS Iridescent Clear Drops for that little bit of bling and shine. Everything was then adhered to the card base, which is Neenah 110lb cardstock.

That does it for this project! I hope you enjoyed it, and I hope it inspires you to get crafty! Thanks so much for joining me, and my apologies for the extended break. Don’t forget to check out the entire Dear Friend release and let me know your favorites! Have a wonderful day and stay awesome!

Supply List:

* Affiliate links used at no cost to you. Thank you for your support!

Latest Instagram Posts

Honeycomb and Triangle Birthday

Hello Crafty Friends and thanks for joining me toady! It’s been a minute since I’ve posted here, but it’s good to be back in the studio creating and having fun! Today’s card set is featuring several products, some new and some older favorites. So, let’s go through the details!

To begin, I cut several backgrounds from Neenah 110lb cardstock using the new-ish Concord and 9th Honeycomb Quilt Top die and the Triangle Background. These are so much fun and there are so many possibilities for awesome cards using different designs, as well as different color combinations. Once the backgrounds were cut, I pulled out two different sets of color combos using Concord and 9th cardstock and used the included dies to cut the triangles and hexagons.

For the first card, I stamped the sentiment from the SSS Clean Line Stacks onto black cardstock using VersaMark Ink and heat embossed it using SSS Detail White Embossing Powder. I used the coordinating die set to trim it out along with two additional die cuts and adhered those together using glue. I determined the placement of the triangles and adhered the sentiment to the panel and began adhering the triangles using SSS 3D Foam Squares. The panel was then adhered to a black panel for contrast, and then to the card base. Once completed, I added some PFS Matte Gold Metallic Pearls for some added bling.

On the second card, I die cut the SSS Basic Box Card Happy Birthday sentiment three times from black cardstock, and adhered all of those together using liquid glue. Again, I adhered the sentiment and began adhering the triangles using foam squares for dimension. For this one, I added some shiny PFS Gold Metallic Pearls.

For the third card, I switched to the Honeycomb Quilt Top dies. Once again, I die cut the sentiment three times and glued those together and then glued it directly to the panel and adhered the hexagons using foam squares. For that added bling, I added some PFS Twilight Ombre Glitter Drops to finish it off before adhering everything to the card base.

I actually ended up making eleven cards using these two cover plate dies from Concord and 9th, most of them being birthday cards since my stash has kind of dwindled over time. It was super easy to do the cutting, and then sit and assemble.

I hope you enjoyed these cards, and I hope they inspire you to get crafty. Thanks again for stopping by today, and don’t forget to stay awesome!

Supply List:

* Affiliate links used at no cost to you. Thanks so much for your support!

Latest Posts

Latest Instagram Posts