Simon Says Stamps Golden Snowflakes

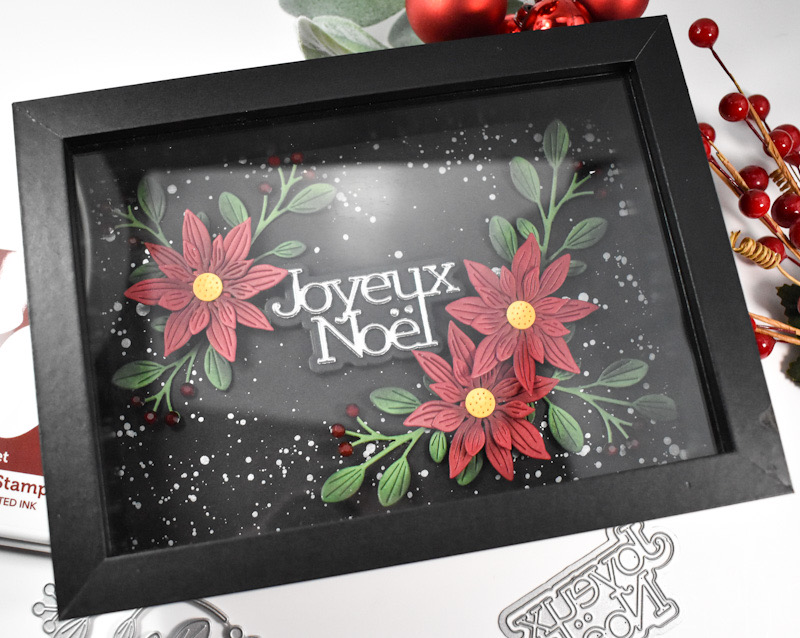
Hello Friends, and welcome back to my blog! Thanks so much for stopping by to check out today’s project featuring the new Falling Snowflakes Acetate Foil Transfer Sheets from Simon’s latest release, Festive Fun. Let’s jump right into the details!

NOTE: all supplies are linked in the thumbnails at the end of this blog post.

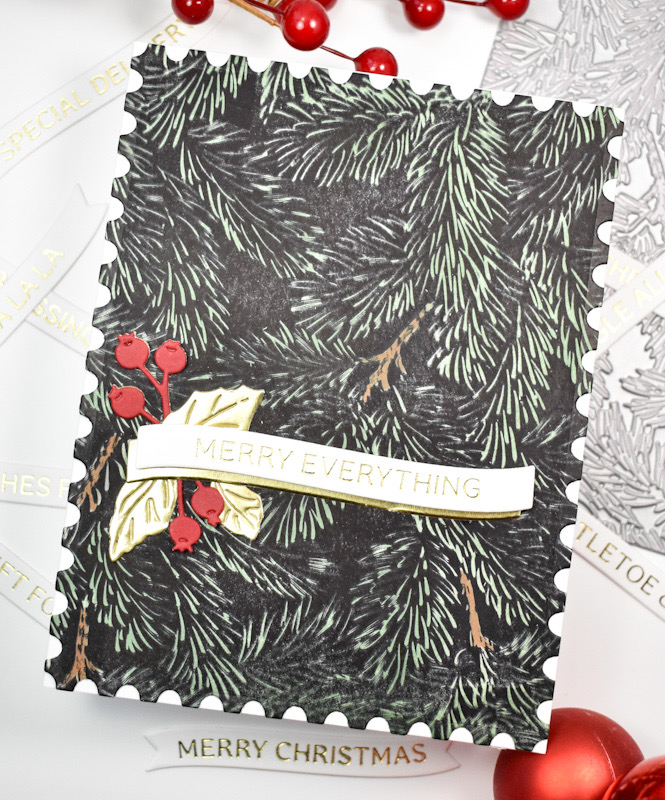
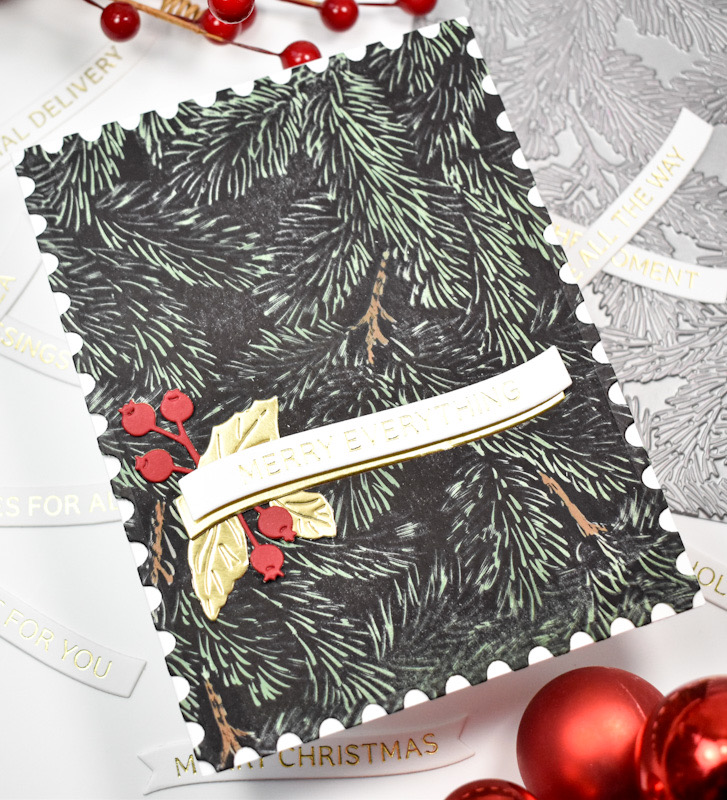
I began this project by gold foiling one of the Falling Snowflakes acetate sheets. These sheets are A2 sized, but I trimmed mine down, because I wanted to make a snowy shaker card. I cut a black panel, adhered 1/8″ Scor Tape to the edges of the acetate panel, and closed it up on three sides around the black panel. At this point, I added a bunch of glitter, maybe too much glitter, but oh well! Once all of the glitter was added, I sealed up the last side to keep it all contained.

The Joy sentiment was die cut once from gold cardstock and twice from black cardstock, and the shadow portion was cut twice. The pieces were all adhered together using liquid glue, and the sentiment was adhered to the acetate using foam strips. The shaker panel was then adhered to the card base to finish up.

That does it for this one! A super, simple one for today, but I love how it turned out! I really wasn’t sure about the black, white and gold at first, but it definitely grew on me. Have you checked out the Festive Fun release yet? I’d love to know your favorites in the comments below. Thanks again for stopping by, and I hope you have a fabulous day!

Supply List

Affiliate links used at no cost to you. What does this mean? If you use the links within this post to make a purchase, I receive a small commission, which allows me to continue to post crafty content for your enjoyment. I truly appreciate your support!

Latest Posts

Latest Instagram Posts

Simon Says Stamp Joyeux Noel Shadow Frame

Hello Friends, and welcome back! I’m back today with a non-card project featuring the new Joyeux Noel die from the latest Sweet Wishes release. Let’s go ahead and get into the details!

NOTE: all supplies are linked in the thumbnails at the end of this blog post.

I have been wanting to do a shadow box frame project for a while now, and when I received this die, I thought that I could make a holiday type home decor project. I went to a big box craft store and purchased two shadow frames, one black and one white, because I wasn’t sure which color that I would want to use. Plus, they were 50% off, so I was basically getting two for the price of one, and who doesn’t love a good deal, right?!

My first step in this project was cutting the sentiment once from silver cardstock and three times from black cardstock. I also went ahead and cut the shadow portion twice and adhered all of those pieces together using liquid glue.

Next, I cut the Rustic Layering Flower from red cardstock, and cut the centers of the flowers from yellow cardstock. While I was cutting, I went ahead and cut the Budding Branches several times from green cardstock. I did some ink blending on all of these pieces using Cabernet, Honey and Kale inks. Once the ink blending was complete, I assembled the pieces of the flowers and set those aside.

If you know me, you know that I like to add gems in the place of berries, so I added red gems on all of my branches. So, normally you attach things in a shadow frame using pins, but that wasn’t going to work for me, so I cut a black panel the size of the opening and splattered that using silver acrylic ink.

Once that was dry, I began adhering the elements of the frame. The sentiment was adhered in the center using foam strips, the branches were glued in place and the flowers were adhered with foam squares.

That does it for this project. Please note that I did have to remove the glass for some of the photos, because there was too much glare. I hope you enjoyed this project as much as I did! I had been wanting to make a shadow frame for quite some time, and I’m so glad that I finally got around to doing it! I’m ready to make another one! Don’t forget to check out the entire Sweet Wishes release! Thanks for joining me, and I hope you have a fabulous day!

Supply List

Affiliate links used at no cost to you. What does this mean? If you use the links within this post to make a purchase, I receive a small commission, which allows me to continue to post crafty content for your enjoyment. I truly appreciate your support!

Latest Posts

Latest Instagram Posts

Spellbinders October 2024 Large Die of the Month Cozy Toes Slippers

Hello Crafty Friends, and welcome back! Thanks so much for stopping by! The October Large Die of the Month from Spellbinders is titled Cozy Toes Slippers, and this is such a cute set! It includes elements to make slippers that feature a bunny, a reindeer, a penguin, Santa and even a monster! I chose to do the Santa slippers, so let’s go ahead and run through the details, shall we?

If you are not familiar with the Spellbinders Clubs, here’s a little bit about how it works ..

  • On the 6th of the month, Non-Club members can join the club and get this month’s Club product(s) at the reduced Club Member price with free shipping.
  • On the 27th of the month, registration for this month’s club products closes.
  • On the 10th of the next month, Club products become available to everyone without requiring a Club membership; however, they are available at regular price and there is no free shipping. If a product is sold out, it will be re-ordered.

NOTE: all supplies are linked to multiple sources in the thumbnails at the end of this blog post.

I began this project by sorting through the dies and identifying those that pertained to the Santa. I then began cutting from colors of cardstock that coordinated with the pieces. I cut the pajama pants from patterned paper from my stash, and cut the slippers from black, and so on. You get the idea!

Once all of the pieces were cut, I began assembling them. I’m not even going to lie, I do have to refer to the images on the website sometimes to figure out what I’m supposed to be doing with the pieces! I decided that I needed a background, so I used the Argyle Plaid 3D Embossing Folder for that.

I adhered the pants and slippers using foam tape for added dimension, and applied glue and glitter to Santa’s hat for some sparkly additions. I also decided to apply some Glossy Accents to Santa’s nose as well. The sentiment is from the Mistletoe Greetings BetterPress set, and that was created using BetterPress Black ink, and then glued directly atop the pajama pants to finish up.

That does it for this project! I hope you enjoyed it as much as I did! There are so many fun options with this set for some super, cute Christmas or wintery cards! Thanks again for stopping by, and have a wonderful day!

Supply List

Affiliate links used at no cost to you. What does this mean? If you use the links within this post to make a purchase, I receive a small commission, which allows me to continue to post crafty content for your enjoyment. I truly appreciate your support!

Latest Posts

Latest Instagram Posts

Simon Says Stamp Merry Everything Stylized Tree

Hello Crafty Friends, and welcome back! The latest release from Simon, Sweet Wishes, is live, and it has some amazing things in it! My project for today is featuring a couple of new items, so let’s go ahead and get into the details!

NOTE: all supplies are linked in the thumbnails at the end of this blog post.

The new products that I’m using for this project are the Merry Everything stamp, the Stylized Tree die and the Schoolhouse Red Pre-Scored Cards. I began this project by putting one of the cards in the Misti and repeatedly stamping the Merry Everything stamp using VersaMark Ink. I love creating background with words, whether it’s a stamp or a die!

While the background was drying, I cut the Stylized Tree once from green cardstock and twice from black cardstock and adhered all of those together with liquid glue. I also cut the baubles from gold cardstock and adhered those as well. I added a bunch of glue to the branches of the tree and added glitter atop that. The glitter wasn’t giving quite the definition that I was looking for, so I repeated the process a second time, but I added Mica Flakes for that go around.

To finish up, the snow laden tree was glued directly to the card base. This was a relatively quick and simple card, but I love how it turned out! Don’t forget to head on over to Simon’s website to check out the entire Sweet Wishes release! Thanks again for joining me, and I hope you have a wonderful day!

Supply List

Affiliate links used at no cost to you. What does this mean? If you use the links within this post to make a purchase, I receive a small commission, which allows me to continue to post crafty content for your enjoyment. I truly appreciate your support!

Latest Posts

Latest Instagram Posts

Simon Says Stamp STAMPtember Tim Holtz Collaboration

Hello Crafty Friends, and welcome back! YES, it’s the day that we’ve all been waiting for, the Tim Holtz Collaboration set for STAMPtember! You guys, this is such a fun set! It has two die sets, one set is a postage stamp set, and the other is the set that die cuts all of the fun images! Let’s go ahead and go through the details for this project!

NOTE: all supplies are linked in the thumbnails at the end of this blog post.

I began this project by stamping all of the images from the set. I just peeled the set from the plastic and plopped the whole thing into the Misti! I figured that I could figure out what I was going to use later. I used VersaFine Onyx Black ink for the stamping and Ranger Clear Embossing Powder to heat set.

I then went to work coloring the images that I wanted to use with Copic Markers. I’ll link to those colors in the thumbnails below. Once the coloring was complete, I used the coordinating dies to trim the images out. I knew that I wanted to create a grid for my card, so I also cut nine of the small postage squares from black cardstock.

For some of the images on my card, I added some elements of interest. I added red gems to the Christmas tree, glitter to Santa’s hat and Glossy Accents to several of the images. Once those were dry, I adhered the images to the black squares using foam tape. My center square needed a sentiment, so I stamped this one using VersaMark Ink and heat set it using white embossing powder.

I created a background panel to work on using the SSS Postage Stamp Edge Frames and glued my images in place, while the middle sentiment was adhered using foam tape so that it would match the dimension of the other squares. The panel was then adhered to the card base to finish up.

That does it for this project! I hope you enjoyed it as much as I did! Be sure to grab your TH STAMPtember Collaboration set before it sells out, because once it’s gone, it’s gone forever! Thanks again for stopping by, and don’t forget to stay awesome!

Supply List

Affiliate links used at no cost to you. What does this mean? If you use the links within this post to make a purchase, I receive a small commission, which allows me to continue to post crafty content for your enjoyment. I truly appreciate your support!

Latest Posts

Latest Instagram Posts

Spellbinders Holly Holiday Background

Hello Friends and thanks for joining me! Today’s project is featuring the new Holiday Background Panel, as well as the Festive Circle Sentiments from the Spellbinders September release! Let’s go ahead and go through the details, shall we?

NOTE: all supplies are linked to multiple sources in the thumbnails at the end of this blog post.

I began this project by gold foiling one of the panels from the Holiday Background Panels BetterPress set. There are four panels in this set, so you have lots of options for creating beautiful backgrounds. While I was foiling, I went ahead and gold foiled the Festive Circle Sentiments as well and used the coordinating die to trim those out.

I knew that I wanted some florals and some holly, so I used the Sealed Holly Sprigs and Petite Blooms and Sentiments for that and cut those from red and green cardstock. To add some depth to the leaves, I used Field ink and did some ink blending on the edges of those. The foiled panel was adhered to the card base using foam tape, and the sentiment was glued in the center of that.

The leaves and flowers were adhered with liquid glue as well, and I added some red jewels to add a bit more interest and shine for berries.

That does it for this project! It’s nice to be adding some holiday cards to my stash this early! When do you typically start on your holiday cards? I usually begin my personal Christmas cards in October, which is quickly approaching! Thanks again for joining me, and I hope you have a fabulous day!

Supply List

Affiliate links used at no cost to you. What does this mean? If you use the links within this post to make a purchase, I receive a small commission, which allows me to continue to post crafty content for your enjoyment. I truly appreciate your support!

Latest Posts

Latest Instagram Posts

Spellbinders Black Alder Christmas

Hello Friends and thanks so much for stopping by! I’m back today with a project featuring the new Black Alder dies from the Spellbinders Winter’s Grace Garden Collection. This is a die set from Susan Tierney-Cockburn and it’s absolutely beautiful! She has a wonderful video over on the Spellbinders product page, so definitely check that out! Let’s go ahead and go through the details for my card!

NOTE: all supplies are linked to multiple sources in the thumbnails at the end of this blog post.

I began my card by doing all of my die cutting using green and red cardstock. Once that was done, I did some ink blending on the leaves using SSS Pawsitively Saturated Ink in Kale, and used Copic Marker E79 to color the stems. The Black Alder leaves are shiny, so I used some Nuvo Crystal Drops and painted the leaves to give them a shiny effect.

If you know me, you know that I love using jewels as berries, and that’s exactly what I did here! Yay for red jewels! In Susan’s video, she uses small foam balls that she colored, but I didn’t have any of those, so I used what was on hand! My background was created using the Argyle Plaid 3D Embossing Folder with a bit of gold splatter for added interest.

I adhered the panel to a card base and began adhering my leaves using liquid glue. I then adhered the berries in place and went to work on the sentiment, which is from the Mistletoe Greetings BetterPress set. I gold foiled the sentiment and trimmed it out using the included die, and I went ahead and also cut a gold banner and glued those together.

My sentiment was adhered to the panel with foam strips for some added dimension. I’m pretty pleased with how this card turned out! I love the glossy leaves, which is something that you don’t see too often.

That does it for this post! I hope you enjoyed it, and I hope it inspires you to get crafty in your space! Head on over to Spellbinders to check out all of the new September releases, you won’t be disappointed! Thanks again for joining me, and have a fabulous day!

Supply List

Affiliate links used at no cost to you. What does this mean? If you use the links within this post to make a purchase, I receive a small commission, which allows me to continue to post crafty content for your enjoyment. I truly appreciate your support!

Latest Posts

Latest Instagram Posts

Spellbinders Merry Everything

Hello Crafty Friends, and welcome back! I’m glad that you stopped by to check out today’s project featuring the new Spellbinders Night & Day Pines Press Plates, along with the Mistletoe Greetings Press Plates. Let’s not waste time and get into the details!

NOTE: all supplies are linked to multiple sources in the thumbnails at the end of this blog post.

I’ve used the Night & Day Pines Press Plates on a previous project, but I used the “day” plate, and today’s project features the “night” plate. I began this project by inking up the plate with BetterPress Black ink and running it through the machine. I did this a couple of times to make sure that I was getting good coverage. Once that was done, I did some ink blending on the panel using SSS Pawsitively Saturated Inks in Artichoke and Latte.

I trimmed the panel down using the Spellbinders Nested Postage Labels & Tag set and then went on to foil the sentiment. This is a great holiday sentiment set, because it foils multiple sentiments at once. It foils multiples and cuts multiples at once, which is such a time saver! I wanted some gold leaves so I used the Spellbinders Poinsettia Bloom to achieve this. I thought the berries looked nice as well, and decided to use those too. I did go back and cut the berries from red cardstock and adhered those atop the gold berries.

The leaves and berries were glued in place, and I adhered the white sentiment banner atop a gold banner using SSS 3D Foam Strips, and then glued that in place. Everything was the adhered to the card base to finish up.

That does it for this project! I hope you enjoyed it, and I hope it inspires you to get crafty in your space. Don’t forget to head on over to Spellbinders to check out all of the new release items and clubs for July! Thanks again for stopping by, and I hope you have an awesome day!

Supply List:

Affiliate links used at no cost to you. What does this mean? If you use the links within this post to make a purchase, I receive a small commission, which allows me to continue to post crafty content for your enjoyment. I truly appreciate your support!

Latest Posts

Latest Instagram Posts

Spellbinders Sending You Joy

Hello Crafty Friends! Thanks so much for stopping by to check out today’s projects featuring the new Spellbinders Night & Day Pines Press Plate. What a fun set this is! I love that you get two plates in this set that give two different looks! Let’s run through the details!

Main Products:

For this card, I used the “day” press plate, which gives a brighter, more airy image. I began by inking the press plate using PinkFresh Studio Evergreen ink, and running it through the machine. I then used the Spellbinders Nested Postage Labels & Tag set to trim that panel down. I decided that the panel was a little too bright, so I did some light ink blending using SSS Pawsitively Saturated Ink in Cabbage.

I used the Spellbinders Club Blooms and Floral Spray sets to create the cluster of flowers and leaves. These were die cut from red and various colors of green cardstock. I did do some ink blending on those using SSS Pawsitively Saturated Inks in Cabernet and Kale to add some shading and dimension. Once the ink blending was complete, I added some PFS Gold Metallic Pearls to the centers of the flowers for some added shine.

The leaves and smaller flowers were adhered to the panel using liquid glue, while the larger flower was adhered using SSS 3D Foam Strips. The sentiment is from the new Spellbinders Mistletoe Greetings Press Plate set, and that was foiled using gold foil and trimmed out using the included dies. This is one of those great sets that creates multiple sentiments at one time, which I absolutely love!

The sentiment was tucked into the flower slightly and adhered with foam strips as well. The panel was then adhered to the card base to finish up.

That does it for this project! I hope you enjoyed it! Don’t forget to head on over to the Spellbinders site to check out all of the new releases and club kits! Thanks again for stopping by, and I hope you have a wonderful day!

Other Products:

* Affiliate links used at no cost to you. What does this mean? If you use the links within this post to make a purchase, I receive a small commission, which allows me to keep bringing crafty content for your enjoyment. I truly appreciate your support!

Latest Posts

Latest Instagram Posts

Spellbinders Happy Christmas

Hello Crafty Friends, and welcome back to my blog! I’m back today with a project featuring the new Spellbinders Poinsettia Spray, along with the new Starshine Background as well. Both of these products are from their new Home for the Holidays Collection that is available now over on their website. So, let’s go ahead and run through the details, shall we?

The Poinsettia Spray, as the name suggests, does creates a spray, however, I wanted to make a wreath with the flowers instead. Just another way to stretch your supplies! I began this project by cutting the poinsettias from the set a bunch of times from pink cardstock. While I was cutting, I cut some of the holly leaves and the flower centers from green cardstock as well. Once those were all cut, I sat down to do some ink blending using SSS Pawsitively Saturated Inks in Bubblegum, Carnation and Pearfection.

I then assembled the flowers and set those aside while I worked on the rest of the card. I used the Spellbinders Starshine Background and cut that from a panel of Neenah 110lb cardstock and trimmed that down ever so slightly. I started arranging the poinsettias and holly leaves atop the background panel and, of course, decided that I needed more leaves. I cut some leaves from the Spellbinders Club Blooms from the same green cardstock and a few from gold cardstock as well. Those green leaves got the same ink blending before moving on with wreath assembly.

I adhered the leaves in place first using liquid glue, then glued the larger flowers in place and then secured the smaller flowers with foam tape for a little added dimension. I then went back through and glued the tiny holly leaves, as well as the gold leaves in place.

Tracy-Ware-2024-Home for the Holidays

The sentiment is from the new Spellbinders Mistletoe Greetings BetterPress set, and that foiled using gold foil. This is a great set, because it creates several sentiments with one pass, and I just love sets like that! The sentiment was adhered atop the flowers using SSS 3D Foam Strips, and the entire panel was adhered to the card base with foam tape. I added a few clear drops for a bit of interest to finish up.

That does it for this one! I hope you enjoyed it, and I hope it inspires you to get crafty in your space! Don’t forget to check out the entire Home for the Holidays Collection over on the Spellbinders website! Thanks again for stopping by, and I hope you have a wonderful day!

Supplies

* Affiliate links used at no cost to you. What does this mean? If you use the links within this post to make a purchase, I receive a small commission, which allows me to continue to bring you crafty content for your enjoyment. I truly appreciate your support!

Latest Posts

Latest Instagram Posts