Spellbinders Truly Yours Collection

Hello Crafters and welcome back to my blog! I was super excited when I was asked to create a few projects using the Spellbinders Truly Yours Collection! This is such an awesome collection because it features Glimmer plates, dies and even a great sentiment stamp set! So let’s get into today’s four projects!
For my first project, Sending Hugs Floral, I’m featuring the Rings Around the Circle Die set, a sentiment from the Mini Sincere Sentiments Glimmer Hot Foil Plate and Die set, as well as some flowers from the Heart Swans Die set. To begin my project, I die cut the Rings Around the Circle dies from Neenah Classic Crest 110lb cardstock and some yellow cardstock.

I adhered the white circles to my card panel in a random pattern, and inlaid the small yellow circles into the big circles using glue. I then die cut the flowers and leaves from the Heart Swans Die set using blue, green and yellow cardstock, and adhered the centers of the flowers. The flowers were then adhered to the middle of the circles using a combination of glue and 3M Foam Tape.

Using gold foil, I hot foiled the Sending Hugs sentiment from the Mini Sincere Sentiments Glimmer Hot Foil Plate and Die set and adhered that to my panel using foam tape. My panel was then adhered to my card base, which is also 110lb cardstock.
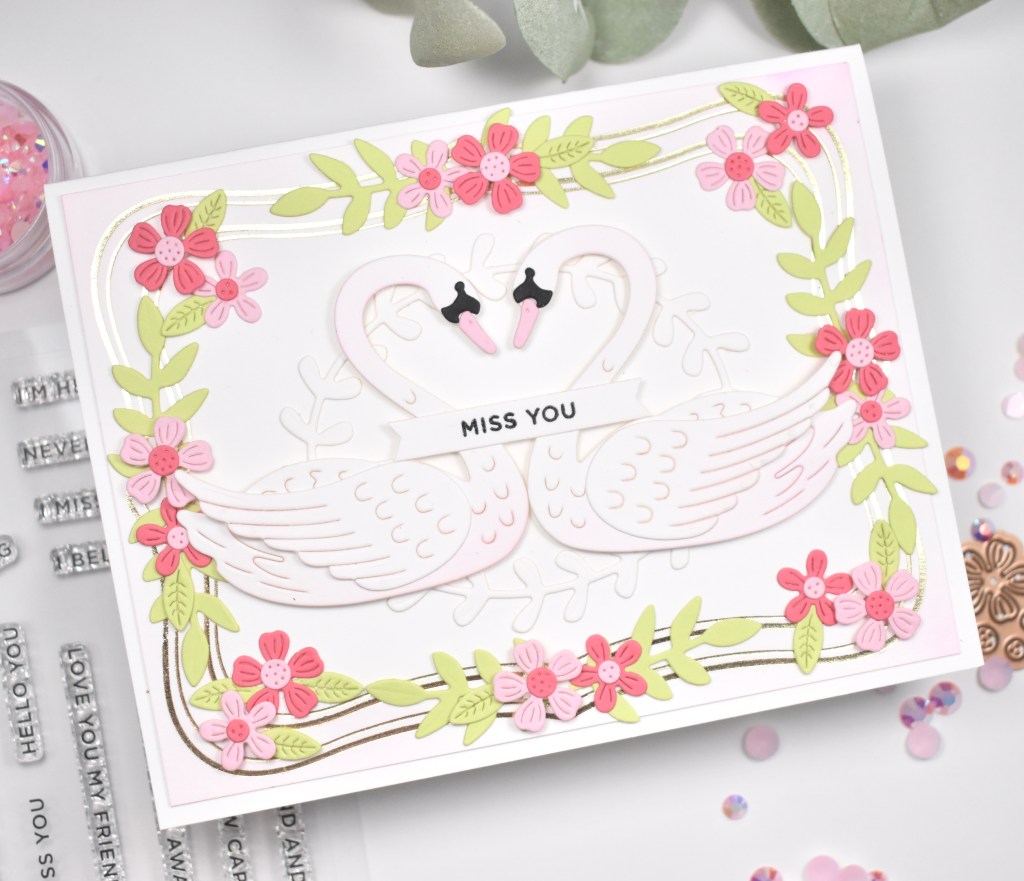
On my next project, Miss You Heart Swans, using gold foil, I doubled foiled the two largest plates from the Essential Glimmer Label Glimmer Hot Foil Plates on a panel of Neenah Classic Crest 110lb cardstock. I then die cut the wreath from the Cameo Etched Dies set from the same cardstock and adhered it to my foiled panel using glue. I die cut the swans from the Heart Swans Die set and lightly ink blended some PinkFresh Studio Sparkling Rose around the edges, and adhered those over the wreath using foam tape.

I die cut the flowers from the swan set using pinks and green cardstock and adhered the centers of the flowers. I then adhered the flowers around the the gold foil using glue and foam tape for dimension. I stamped the Miss You sentiment from the I’m Here for You Stamp and Die set using VersaFine Onyx Black Ink and heat embossed it using Ranger Clear Embossing Powder. I glued the sentiment directly to the swans in the center. My panel was then adhered to my card base.
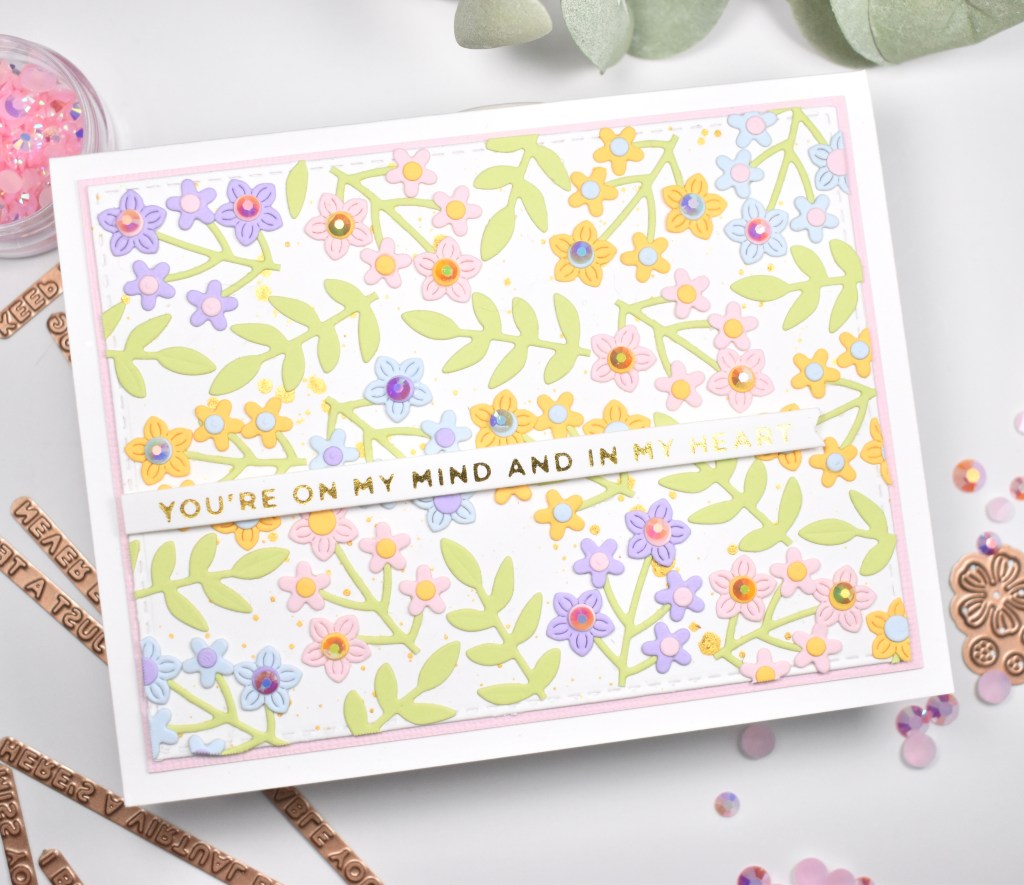
My third project, You’re on My Mind Floral, ended up being my favorite project of them all! I loved these little flowers so much that I decided to make my own background using them. For this one, I die cut a bunch of flowers and leaves from the Bouquet of Flowers Die set using blue, pink, purple, yellow and green cardstock and adhered the stems and flower centers using glue. I then arranged and glued them atop a gold splattered panel, trimming off the excess as needed.
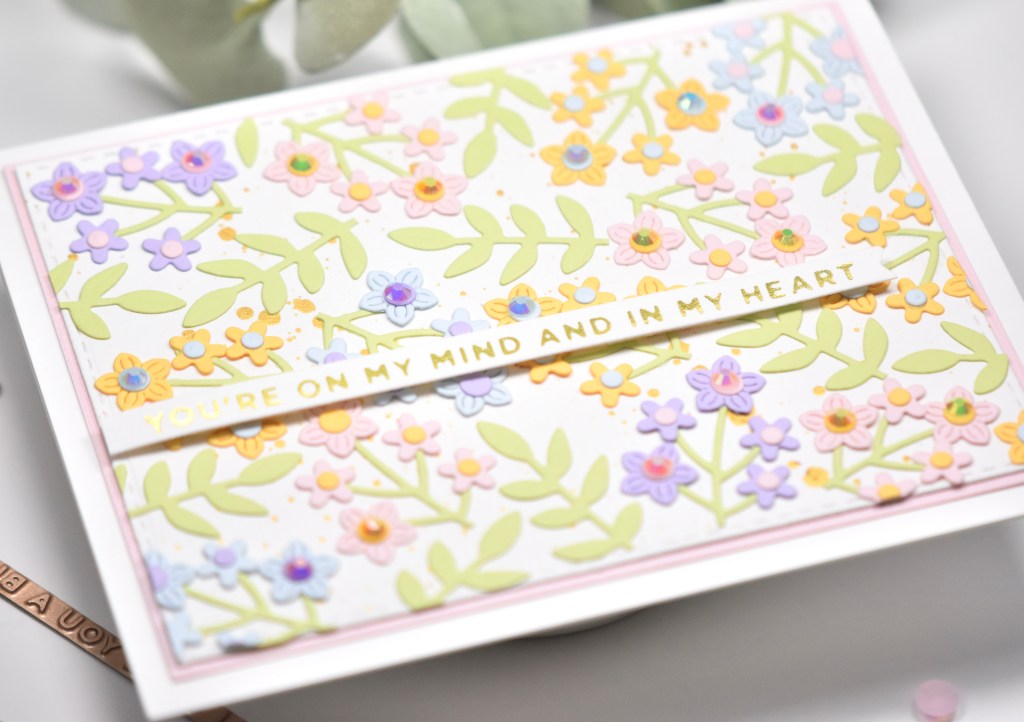
I then adhered my panel to a pink panel, and then to my card base, which is 110lb cardstock. Using gold foil, I foiled the sentiment from the Mini Sincere Sentiments Glimmer Hot Foil Plate and Die set, trimmed it out, and adhered it to my card using foam tape for dimension. To finish up, I added some PinkFresh Studio Jewels Mix to the larger flowers, because I thought some bling was in order!

For my last project, I die cut the two largest Elliptical Ovals Dies from black and white cardstock and glued those together, and then glued those to a black splattered panel. I then die cut the dress portions of the Paper Coutour Dress Dies from black cardstock, and the bow and hanger portions using glitter cardstock, and adhered those together. I again used the flowers and leaves from the Heart Swans Die set to cut those out of white cardstock.

I adhered the dress to the ovals using foam tape, and adhered the white flowers around the ovals using a combination of glue and foam tape. I then attached my panel to a panel of black cardstock to pull all of the black elements together, and then to a card base. Using silver foil, I hot foiled the sentiment from the Mini Sincere Sentiments Glimmer Hot Foil Plate and Die set, trimmed it down and glued it to the bow of the dress. To finish this card, I added some silver embellishments to the flowers for some added bling.
That does it for my projects featuring the Truly Yours Collection from Spellbinders! I hope you enjoyed them, and I hope they inspire you to get crafty!
Supply List:
- Spellbinders I’m Here for You Sentiments Clear Stamp and Die Set
- Spellbinders Mini Sincere Sentiments Glimmer Hot Foil Plate and Die Set
- Spellbinders Essential Glimmer Label Glimmer Hot Foil Plate Set
- Spellbinders Bouquet of Flowers Dies
- Spellbinders Paper Coutour Dress Dies
- Spellbinders Heart Swans Dies
- Spellbinders Elliptical Ovals Dies
- Spellbinders Rings Around the Circles Dies
- Spellbinders Cameo Dies
- Spellbinders Gold Foil
- Spellbinders Silver Foil
- Spellbinders Glimmer Hot Foil System
- Neenah Classic Crest 110lb Cardstock
- Black Cardstock
- Pink Cardstock
- Blue Cardstock
- Purple Cardstock
- Yellow Cardstock
- Green Cardstock
- 3M Foam Tape
- Craft Tacky Glue
- VersaFine Onyx Black Ink
- Ranger Clear Embossing Powder
- Tim Holtz Scissors
- PinkFresh Studio Jewels Mix
- PinkFresh Studio Sparkling Rose Ink
- Studio Katia Silver Foil Pearls
*Affiliate links used at no cost to you. Thank you for your support!
- Simon Says Stamp Braided Greetings

- Together By Design Color Cube Floral

- Simon Says Stamp Cute Duckling

- Simon Says Stamp Watercolor Wild Rose

- Simon Says Stamp Striped Missing You