Waffle Flower Thinking of You Stitched Flower

Hello Crafty Friends! How’s it going? How’s your weekend going? Today, I’m participating in an IG Hop with some awesome friends to show support for our friend Andy Granick. He’s been going through, and is still going through some rough stuff, and we just wanted to let him know that he is loved!

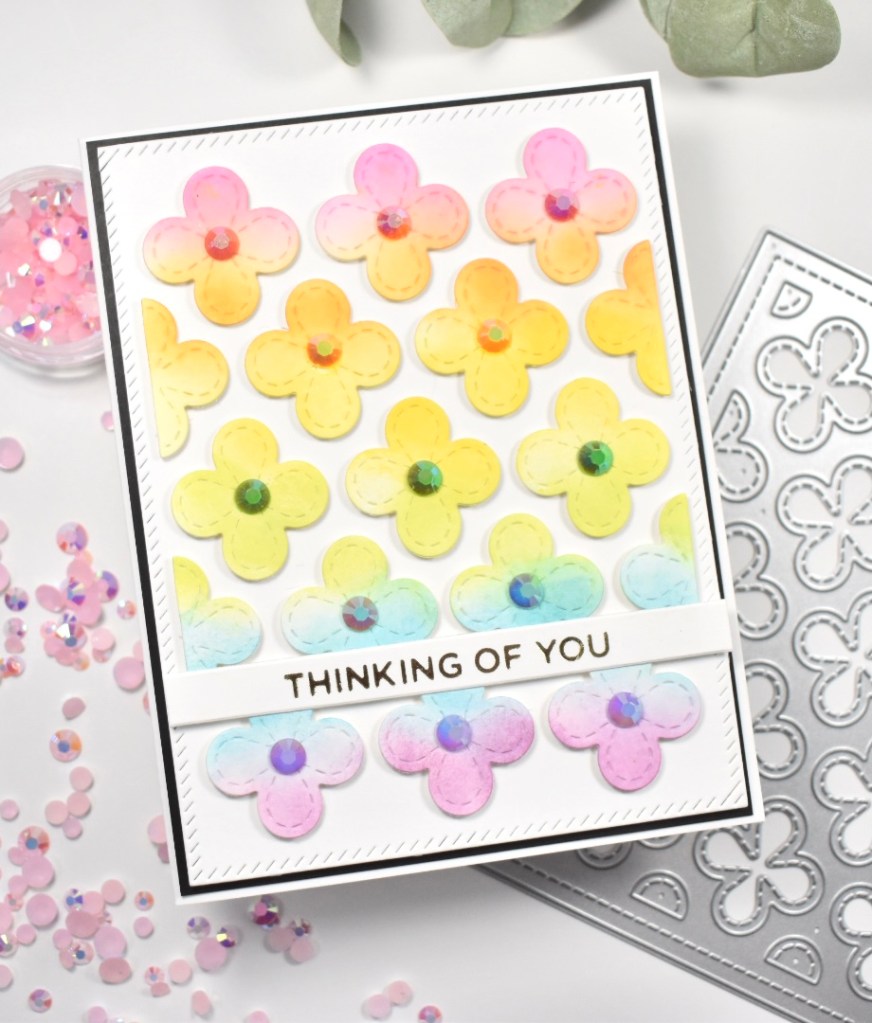
For today’s project, I’m once again featuring the Waffle Flower Stitched Flower Panel Die. A few days ago, I did a post using the white frame portion and other colored cardstock pieces from this die. Well today, I’m using the white stitched flowers that were the by-product of using the white frame on the other cards!

To begin, I used the PinkFresh Studio Diagonal Stitched Rectangles to cut a panel of Neenah Classic Crest 110lb cardstock. I took a leftover colored frame from the previous set of cards and trimmed it down to 4.0 x 5.25″ and taped it to a separate white panel using masking tape. I then used a tape runner with removable tape to put a little strip in all the flower openings, and affixed the flowers atop that.

Once the flowers were nestled in the frame, I used Distress Oxide inks Picked Raspberry, Spiced Marmalade, Mustard Seed, Twisted Citron, Broken China and Seedless Preserves to ink blend them. I then removed the flowers and placed foam tape on the back of them. I used another frame as a guide for flower placement and taped it to the Diagonal Stitched panel (using masking tape) and nestled the ink blended flowers atop that. Once that was done, I removed the frame that I was using as a guide, and there you have beautifully placed flowers!

I chose a Thinking of You sentiment, which is from the Spellbinders Everyday Sentiments II, and hot foiled it using Champagne foil and glued that to my panel using Craft Tacky Glue. I attached that panel to a black cardstock panel using 3M Foam Tape for added dimension, and then adhered that to my card base, which is also Neenah 110lb. To finish up this card, I used PinkFresh Studio Jewel Mix to add a bunch of bling in rainbow colors as well.

That does it for this card! By using all of the white Stitched Flowers from my previous projects, this allowed me to make seventeen more cards!! For a little bit of effort, I’ve been able to make thirty-four cards using all the pieces! I hope you enjoyed this project! I certainly enjoyed making it, especially for my friend Andy! Check out his Instagram for lots of crafty inspiration, and stop by my Instagram to check out the hop!

Don’t forget to stay awesome friends!

Supply List:

*Affiliate links used at no cost to you. Thank you so much for your support!

Latest Instagram Posts

Simon Says Stamp Welcome to the Neighborhood

Hello Beautiful Release

Hello Friends! Isn’t the new Hello Beautiful release gorgeous? There’s literally something for everyone! I’m super excited to be sharing the Welcome die cut with you! I had a ton of fun creating this card and thought that it turned out kinda cute!

To begin, I cut an A2 card panel from Neenah Classic Crest 80lb, and ink blended Distress Oxide Mowed Lawn using the SSS Clouds for Days stencil. Unfortunately, the cloud detail doesn’t really show in the pics. Anyhoo, moving on .. Next I stamped the houses from the Home Sweet Home set in VersaFine Onyx Black ink and embossed it with Ranger Clear Embossing Powder. I actually stamped and embossed the houses twice because I was pretty sure that I was going to need two strips of houses to cover my card panel. I also stamped my little sub-sentiment with VersaMark Ink on black cardstock and embossed with SSS Detail White Embossing Powder.

Now that everything is stamped, it’s time to get coloring all of my cute little houses. The Copic Markers used were: YG03, YG13, YG17, YG67, N0, N2, N3, N4, RV00, RV02, RV10, RV11, E04, E70, E71, E74, Y08, Y15, B34, B41, B45, B91, B93 and BV23. I know that’s a lot of markers, but I wanted all the houses to be unique!

Now for some die cutting! I used the Home Sweet Home coordinating die to cut out the houses, and I used the SSS Sentiment Labels Die to cut my sub-sentiment. On a side note, I use that Sentiment Labels Die ALL THE TIME! I wasn’t sure that I would, but it’s been a great investment! Back to it .. I die cut the Welcome sentiment three times from black cardstock and adhered those together using Craft Tacky Glue, and I cut the shadow once from Neenah Classic Crest 110lb cardstock and adhered those together.

Now for the hard part! Figuring out the placement of everything! I say hard part only because I knew that I was going to be cutting my little strips of houses, and I REALLY didn’t want to mess those up .. that coloring took me quite a bit of time! Even after I had figured everything out, I was STILL nervous about cutting my houses!

As you can see from the pics, I ended up with four rows of houses around my sentiments. The bottom and two top rows of houses were adhered to my card panel using 3M Foam Tape. The row above my sentiment was adhered directly to the panel with glue, as well as the Welcome sentiment. I did however, pop my sub-sentiment up with foam tape because dimension is life!

To finish up my card, I adhered my card panel to a black panel for some contrast, and I adhered those to my card base, which is Neenah Classic Crest 110lb cardstock. No card is complete without some bling, am I right?! I added some green jewels from the PinkFresh Studio Jewels Mix.

I hope you’ve enjoyed this project, and I hope you’ll check out this new release! You can catch the whole release HERE. Also, don’t forget to check out #ssshellobeautiful over on Instagram for lots of inspiration from the team! Thanks so much for stopping by!

Stay awesome!

Supply List:

Latest Instagram Posts

Mixed Media Love You Card

Hey there crafty friends! I hope everyone has had a great weekend! We’ve had a snow storm here in Northern Virginia over the weekend. I hate the cold, but don’t mind it if it’s snowing!

Anyhoo, let’s get into today’s card. This card has so many layers going on! I first started with some Distress Oxide Spray Stains on some heavy weight watercolor paper. I then added some Crackle Paste through a Stamper’s Anonymous stencil. Once that was dry, I added some watercolors to intensify my colors a bit.

Once all of the wet elements were added to the card panel and dry, I added some stamping with the Simon Says Stamp You Are Background stamp, Tim Holtz Stitches and Tim Holtz Mixed Media Marks.

For the focal point of my card, I used the new Simon Says Mini Interactive Envelope die, the hearts from the Mini Hearts Party die and an older I love you die.

Of course I had to pop my hearts up with foam tape, because who doesn’t love dimension!?!? Am I right? My sentiment was cut three times and adhered together for further dimension. I adhered my card panel to a black cardstock panel with foam tape as well, before adhering to my card base.

I hope you’ve enjoyed this mixed media-ish card featuring Simon Says Stamp products for the new Love You release. I really had fun creating this card, and I hope it inspires you to get creating as well. Thanks so much for stopping by.

Stay awesome!

Supply List:

Latest Instagram Posts