Reverse Confetti Celebrate

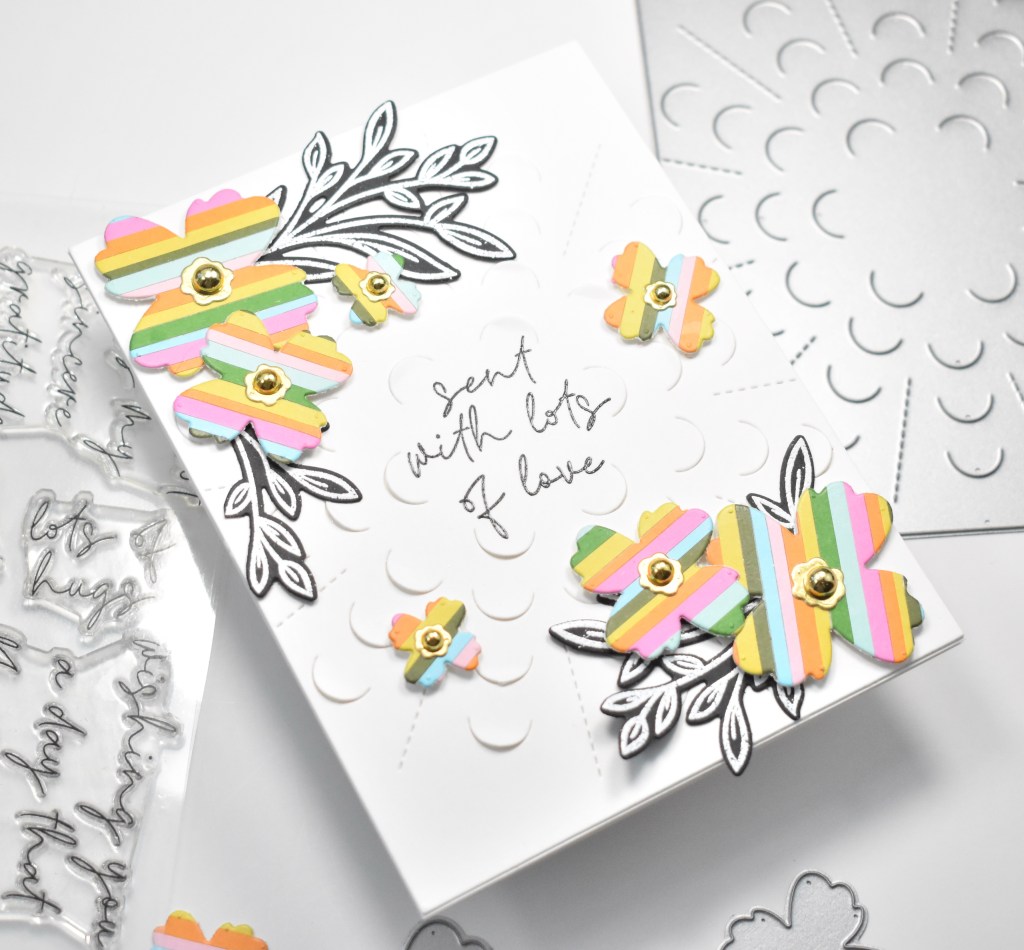
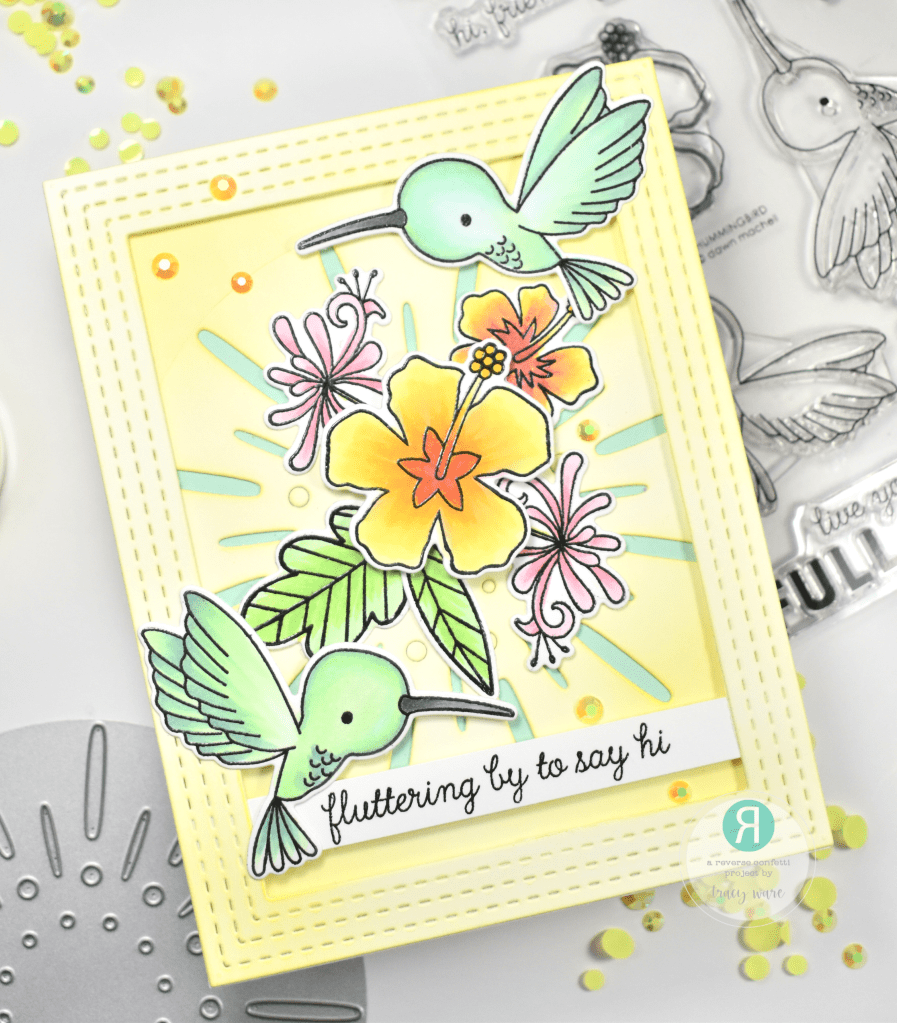
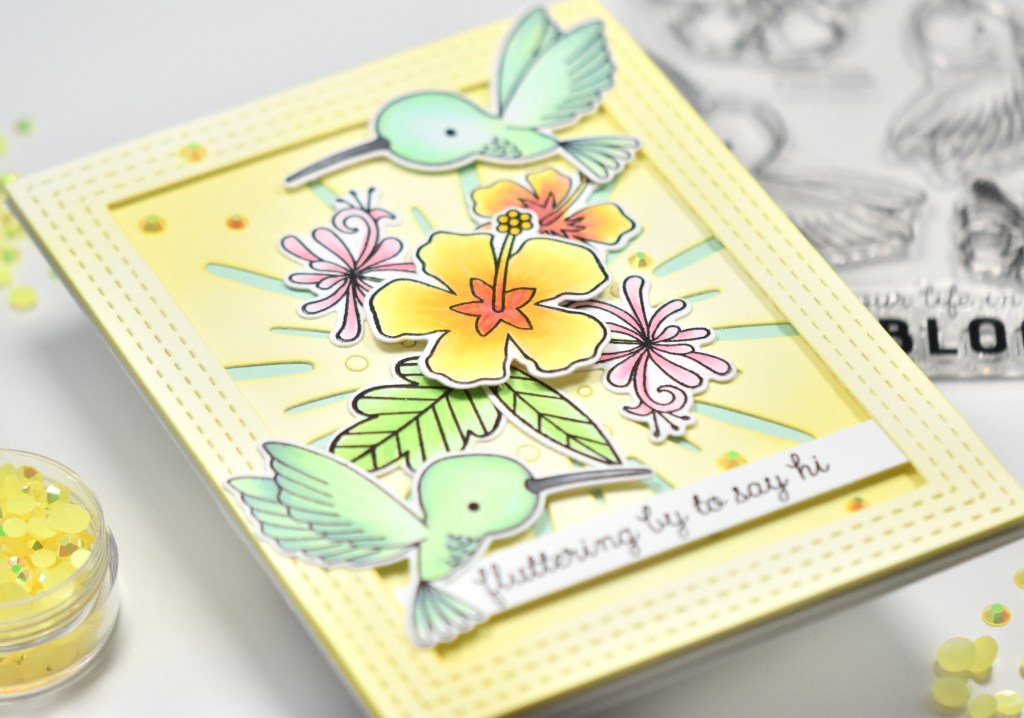
Hello Friends and welcome back! Thanks for stopping by! Today’s card is featuring the new Tropical Leaves from Reverse Confetti’s July release! It’s a super simple card, but I love the greens and yellows! Let’s get into it!

I’m going to start off by saying that the gel print that these leaves were made from was created a REALLY long time ago! This particular gel print was made using regular, inexpensive acrylic paint on thin white paper. The only other tools used were a gel plate, obviously, and a brayer.

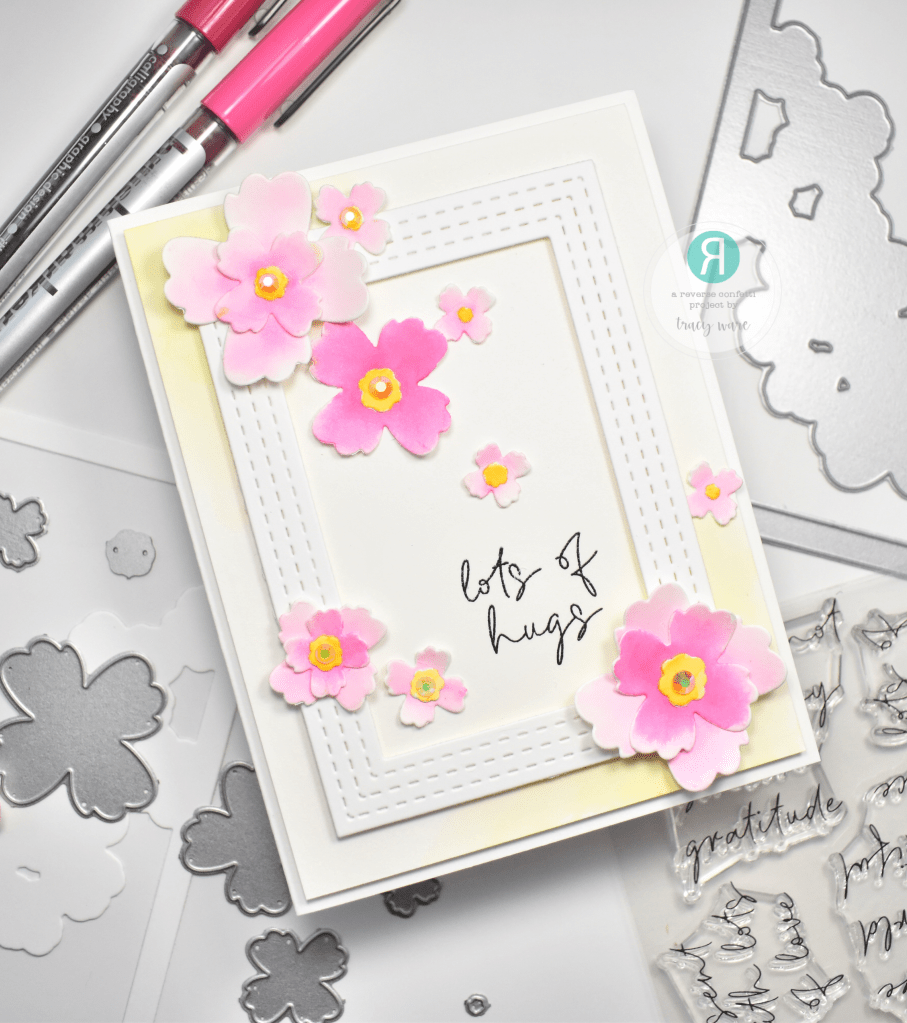
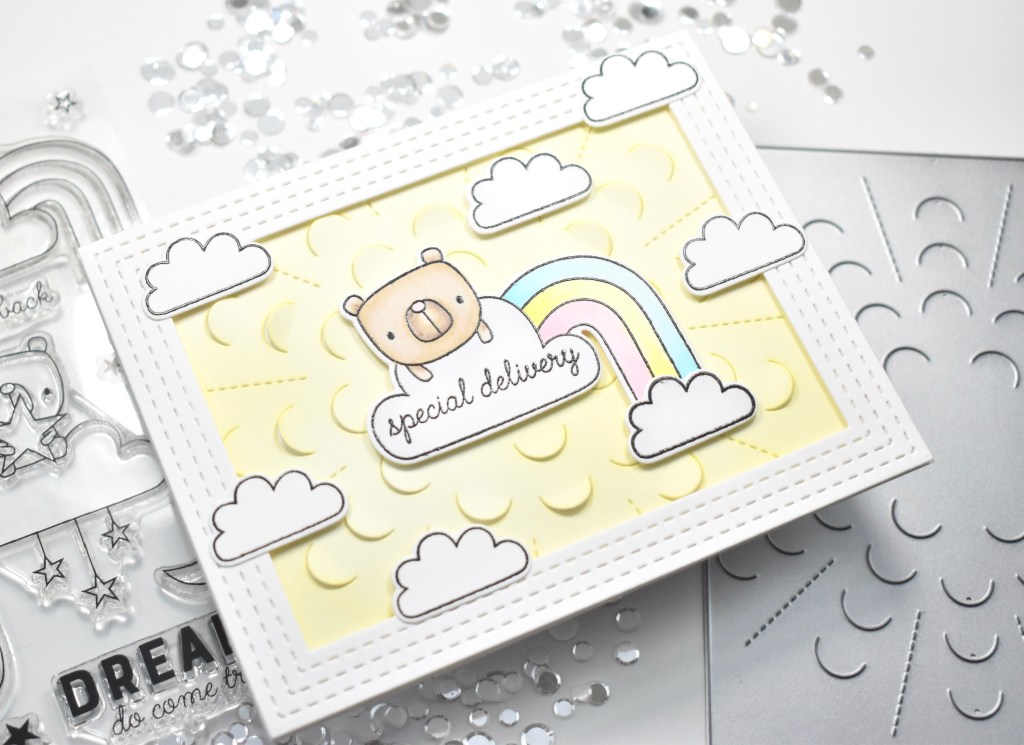
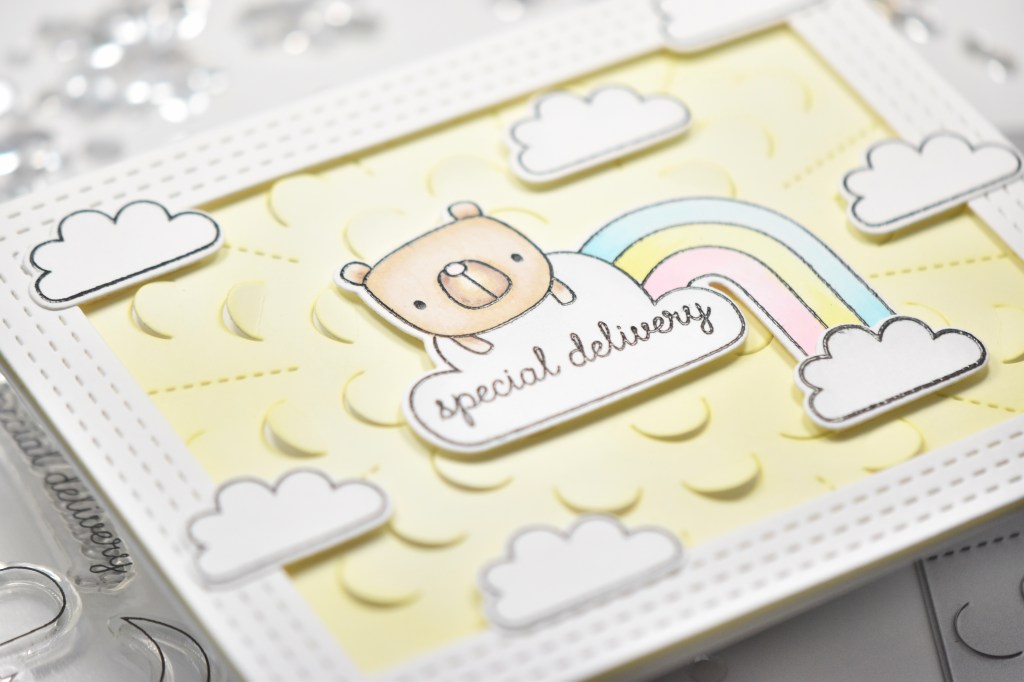
To begin this project, I cut an A2 card base using Neenah Classic Crest 110lb cardstock and added some ink blending using PinkFresh Studio Fresh Pear and Lemon Whip inks, along with some white splatter using Royal Talens Amsterdam Titanium White Acrylic Ink. I love this ink for splatter because it stays bright white, and it has the perfect splatter consistency! I used the Reverse Confetti Stitched Note and Frames Confetti Cuts to cut a panel of Neenah 110lb, and adhered the outside frame to my card base using foam tape.

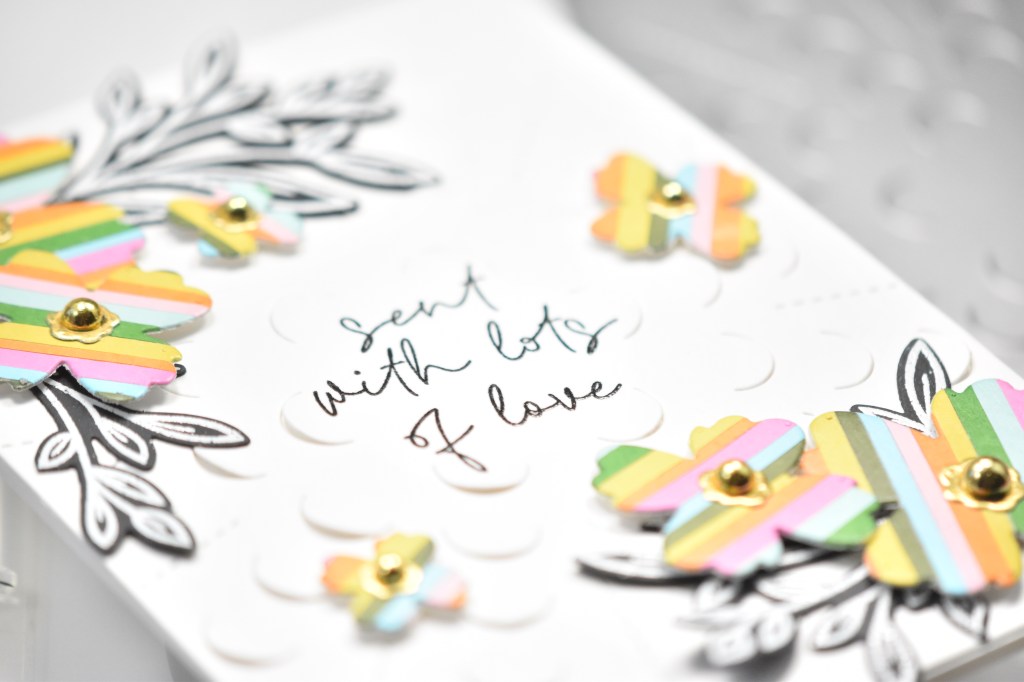
I used the RC Celebrate Tag Confetti Cuts to cut the shadow portion from patterned paper from Vicki Boutin, and the letters from black cardstock twice. I adhered all of those together using glue. I then glued the sentiment to the note portion of the frames, and adhered that in the center of my card using foam tape.

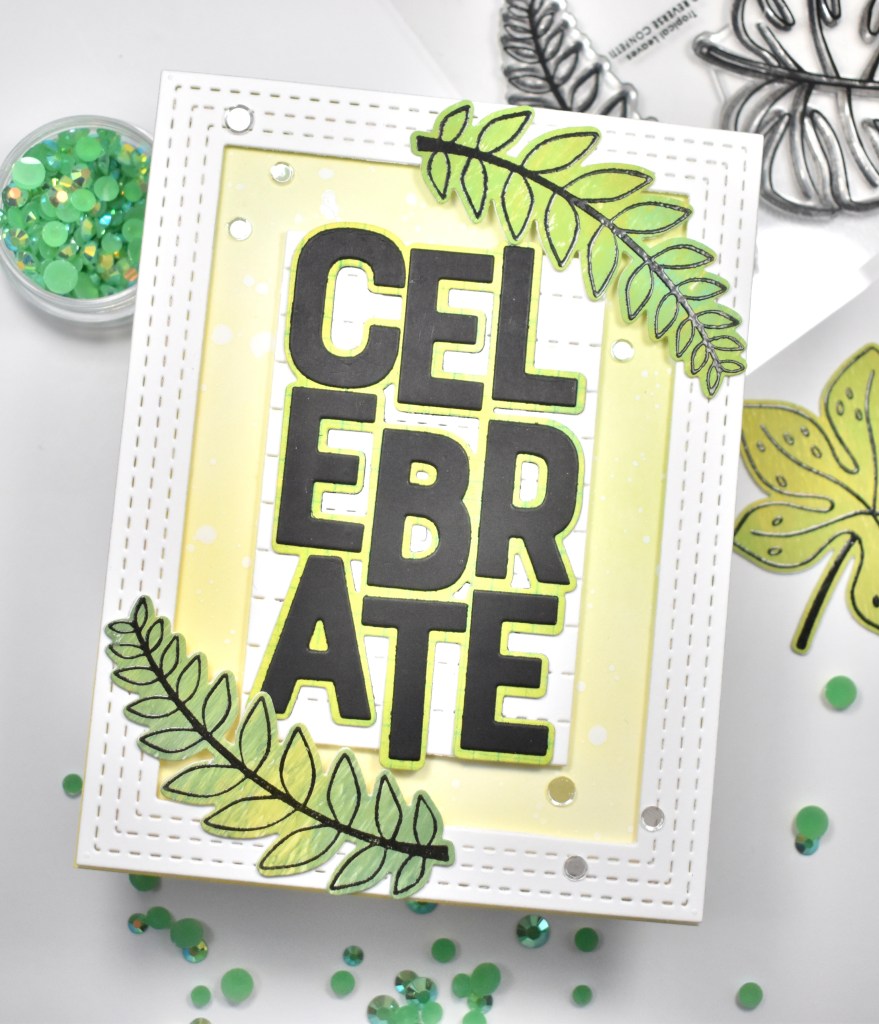
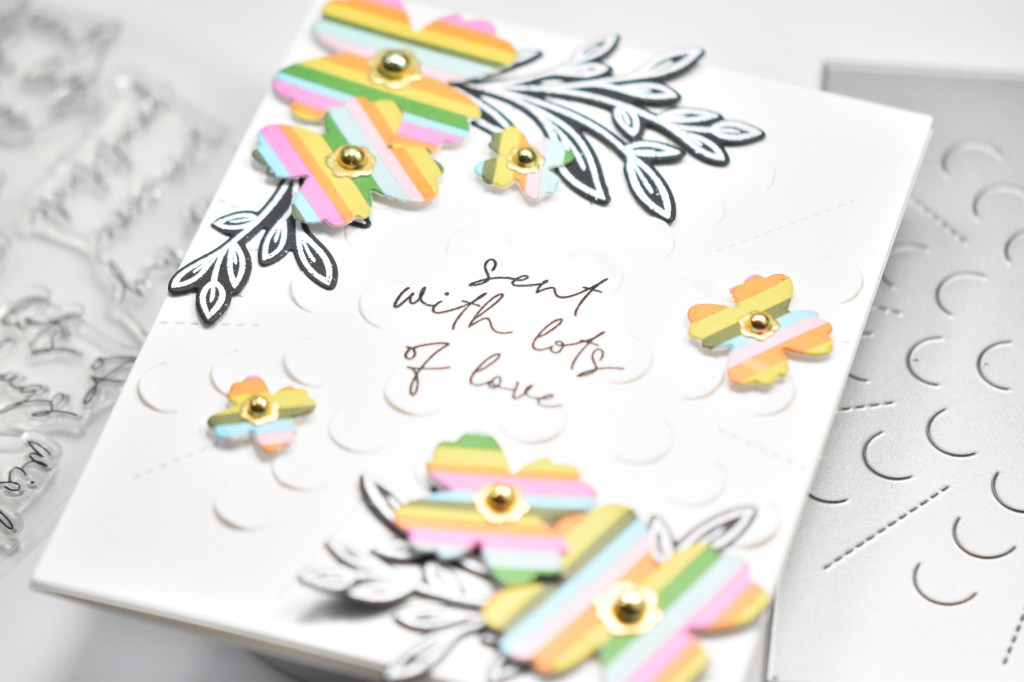
I stamped the Tropical Leaves on my gel print using VersaFine Onyx Black ink and heat embossed them using Ranger Clear Embossing Powder. Once that was done, I used the Tropical Leaves Confetti Cuts die to run those through my die cutting machine. Remember earlier when I said that this gel print was created on thin white paper? Well, my leaves needed some extra thickness, so I ran the leaf die cuts through the machine again using Neenah 110lb and glued those together for sturdiness. Those were then glued to the corners of my card.

To finish up, I added some sparkling clear confetti, because bling! See, super simple card! I just loved how that patterned paper matched my gel print leaves so well! If you haven’t checked out the Reverse Confetti July release, whatchoo waiting for?!?!

Thanks again for stopping by today, and don’t forget to stay awesome!

Supply List:

*Affiliate links used at no cost to you. Thank you so much for your support!

Latest Instagram Posts

Reverse Confetti Forever and Always

Hello and welcome back! The latest Stock Your Stash Challenge is happening over on the Reverse Confetti blog, and this month’s theme is Wedding. I hope you’ll join in on the fun! Let’s get right in to the details of my wedding card!

I began my project by stamping a floral and several leaves from the Reverse Confetti Peony Stamp set on Neenah Classic Crest 110lb cardstock using VersaFine Onyx Black ink. Once stamped, I heat set them using Ranger Clear Embossing Powder. Then I added color using Copic markers RV00, RV10, RV11, RV32, R85, G20, G21 and G24.

When I had finished the coloring, I used the coordinating Peony Confetti Cuts to trim those out. I also used the Reverse Confetti Stitched Circles Cover Panel to to cut a panel from Neenah 110lb, because the background needed some interest.

I stamped the sentiment, which is from the Reverse Confetti Word Up stamp set, on black cardstock using VersaMark Ink and heat embossed it using SSS Detail White Embossing Powder. I had to play around with the placement of the flower, leaves and sentiment before I could adhere anything.

I added foam tape to the back of the floral and tucked the leaves behind it, securing those with glue. I added the remaining leaves to the panel using foam tape, along with the sentiment. Everything was then adhered to the card base, which is Neenah 110lb. I had to add embellishments, right?! No card is complete without embellishments! I opted for some pearls from Little Things from Lucy’s Cards.

That finishes up this card! I hope you enjoyed it, and I hope you’ll head over to the Reverse Confetti blog to participate in this month’s challenge. Don’t forget to stay awesome friend!

Supply List:

*Affiliate links used at no cost to you. Thank you so much for your support!

Latest Instagram Posts

Reverse Confetti August Release Blog Hop

Hello, Hello and welcome back! Today’s the day! The new Reverse Confetti August mini release is live! To celebrate, we are having a blog hop with tons of inspiration from the team! You don’t want to miss it! The hop list will be posted below! I’ve got two cards for you today featuring the Floral Chain Cover Panel and the Scripty Sentiments stamp set! Let’s not waste any more time and jump right into the details!

For both of these cards, I opted not to use the frame portion of the die, and just use the flowers. By not using the die as it was intended, it’s a great way to stretch your supplies. For the first card, I pulled out a sheet of watercolor paper and die cut several of the flowers, along with their centers. I also pulled out my Karin Brushmarkers and a water brush. I wet the flowers and dropped in the color using the markers, thinning out for lighter colors and adding more for darker colors. I set those aside to dry while I worked on the rest of the card.

I cut a panel of Neenah Classic Crest 110lb cardstock just smaller than an A2 card base and did some light ink blending on the corners using Distress Oxide Mustard Seed. I knew that I wanted to add a frame to the card, so I die cut the Reverse Confetti Stitched Note and Frames from Neenah 110lb and placed foam tape on the back of it.

I popped the ink blended panel in the Misti and stamped the sentiment from the new Scripty Sentiments set using VersaFine Onyx Black ink and heat embossed it using Ranger Clear Embossing Powder. I adhered the frame to the panel and began adhering the flowers together using liquid glue.

I adhered the flowers atop the frame and the card panel using glue as well, before attaching the panel to the card base using foam tape. To finish up, I added a few PinkFresh Studio Jewels to some of the flowers for some added bling!

For my second card, I used the same floral dies to make striped flowers this time. I cut a bunch of strips in varying sizes using cardstock from The Stamp Market, and adhered those in rainbow order to a scrap of Neenah 80lb cardstock using double-sided tape. When all of that was complete, I die cut a few of the flowers using the striped panel.

I went ahead and die cut a panel using the Reverse Confetti Peekaboo Cover Panel and popped it in the Misti and stamped the sentiment from the Scripty Sentiments set, using the same black ink and embossing powder.

The card felt like it needed some leaves so I used one of the leaves from the Reverse Confetti Peony stamp set and stamped that using VersaMark Ink on black cardstock and heat embossed them using SSS Detail White Embossing Powder. I also used the coordinating die to cut those out.

I played with the placement of the leaves and flowers before adhering them down using a combination of foam tape and glue. Once that was done, I added some PinkFresh Studio Gold Metallic Pearls and popped up some of the peekaboo elements on the panel.

To finish up this card, I adhered it to a card base, which is Neenah 110lb, using liquid glue.

That does it for these two projects! I hope you enjoyed them, and I hope it inspires you to get crafty in your space! I had a lot of fun making these, mainly because I really enjoy flowers and leaves, but it’s such a versatile set with the frame! I hope you’ll stop by the Reverse Confetti website to check out the new release!

Don’t forget to hop along for tons of inspiration from the team using these new products! The hop list is below! Have a wonderful day and don’t forget to stay awesome!

Reverse Confetti Blog

Amy Kolling

Tricia Barber

Amy Rohl

Lisa Henke

Becky Roberts

Tracy Ware

Cheiron Brandon

Dilay Nacar

Jeanne Jachna

Heather Ruwe

Audrey Tokach

Jenny Colacicco

Candice Fisher

Rachel Alvarado

Amy Tsuruta

Joe Sysavath

Supply List:

*Affiliate links used at no cost to you. Thank you so much for your support!

Latest Instagram Posts

Reverse Confetti Countdown to Confetti Day Two

Hello Fetti Friends and welcome back! So glad that you stopped by for the Reverse Confetti Countdown to Confetti Day two! This is such a cute release with beautiful floral cover panels and a sweet sentiment stamp set! To celebrate the release, we are having a blog hop, so hop along and leave comments for your chance to win a gift certificate! More details and the hop list are below. Please note that new product links will not be active until the release goes live on August 8th. Let’s get into the details for today’s card.

This card is using the new Hello Daisy Cover Panel, and I opted to use it as it was intended. To begin the card, I pulled out a panel of Fluid Hot Press Watercolor Paper and some Distress Oxide Spray in Spun Sugar. I sprayed the ink on my glass mat and spritzed it with water and proceeded to do some ink smooshing. Once I was satisfied with how it looked, I set it aside to dry and began some die cutting.

I die cut the cover panel from Neenah Classic Crest 110lb cardstock and did some light ink blending using Distress Oxide inks Spun Sugar, Mustard Seed, Twisted Citron, Tumbled Glass and Dusty Concord. I went ahead and die cut a bunch of the included flowers using Sizzix cardstock in various colors and adhered those together using liquid glue.

Once the ink smooshed panel was dry, I popped it in the Misti and stamped the sentiment, which is from the new Scripty Sentiments Stamp Set, using VersaFine Onyx Black ink and heat embossed it using Ranger Clear Embossing Powder. I then adhered the frame to that using foam tape for dimension. I began adhering the colored flowers using a combination of foam tape and glue.

I adhered the flowers in their designated spaces on the cover panel, as well as, adding some around the panel and on the frame itself. To finish up, I adhered the panel to a Neenah 110lb card base, and added some PinkFresh Studio Jewels to some of the flowers.

That does it! I hope you enjoyed this project, and I hope it inspires you to get crafty! Don’t forget to hop along and leave comments by noon central time on August 7th for your chance to win a Reverse Confetti $15 gift certificate! The hop list is below! Happy hopping!

Reverse Confetti Blog

Amy Kolling

Tricia Barber

Lisa Henke

Tracy Ware

Dilay Nacar

Jeanne Jachna

Audrey Tokach

Candice Fisher

Rachel Alvarado

Amy Tsuruta

Joe Sysavath

Supply List:

*Affiliate links used at no cost to you. Thank you so much for your support!

Latest Instagram Posts

Reverse Confetti Countdown to Confetti Day One

Hello Fetti Friends and welcome back! So glad that you stopped by today for the Reverse Confetti Countdown to Confetti Day One! There is an August mini release and it’s a sweet one with beautiful cover panels with florals, along with a beautiful sentiment stamp set! To celebrate, we are having a blog hop! So hop along and leave comments for your chance to win a gift certificate! More details below. Please note that the new product links will not be available until the release goes live on August 8th. So let’s get into the details for my card!

I made a few cards using products from this release, as you’ll see in the upcoming days, while trying to use the products in different ways, rather than their intended use. For today’s card, I used the new Hello Daisy Cover Panel. This die includes a large Hello die, with the included frame and floral dies and I decided to make that Hello the focal point! I began by cutting the Hello die from black cardstock. I believe that I ended up cutting it five times to cover this A2 panel.

I also cut the Hello five times from black fun foam for dimension. I adhered all of the cardstock die cuts to the fun foam die cuts using liquid glue. I wanted a panel for assembly to work on, so I cut an A2 panel of Neenah Classic Crest 80lb cardstock for this.

The easiest way for me to get good placement of the Hello die cuts was to start in the middle of the panel with the full Hello word. I adhered that with glue and began placing the remaining die cuts, trimming of the excess, until my panel was completely covered.

I die cut a bunch of the included flowers using various colors of Sizzix cardstock, and adhered those around using a combination of glue and foam tape. To finish, I adhered the panel to a card base, which is Neenah Classic Crest 110lb cardstock.

That does it! I hope you enjoyed these projects, and I hope it inspires you to get crafty! As I mentioned earlier, we are having a blog hop with tons of inspiration projects from the team! Hop along and leave comments by noon central time on August 7th for your chance to win a Reverse Confetti $15 gift certificate! You don’t want to miss it! Hop list below.

Reverse Confetti Blog

Amy Kolling

Tricia Barber

Lisa Henke

Tracy Ware

Dilay Nacar

Jeanne Jachna

Audrey Tokach

Candice Fisher

Rachel Alvarado

Amy Tsuruta

Joe Sysavath

Supply List:

*Affiliate links used at no cost to you. Thank you so much for your support!

Latest Instagram Posts

Reverse Confetti I appreciate you

Hello Friends! Thanks for joining me today! I’m back with another card using Reverse Confetti products. I recently purchased the You Coordinates, Confetti Cuts and the Big Flower Cover Panel Confetti Cuts, and wanted to use those together to make a card. Let’s get into the details!

I started this project by using the Big Flower Cover Panel to cut a panel from Neenah Classic Crest 110lb cardstock. I also went ahead and cut another panel from SSS Holographic Rainbows cardstock. I removed the white negative pieces from the panel and adhered that to a Neenah 110lb card base, using liquid glue.

I placed foam tape on the back of the negative pieces from the holographic panel and inlaid those atop the white panel. I die cut the You shadow twice from white cardstock, and die cut the main You piece twice from black cardstock, adhering those together with glue. That was then glued in the center of the panel.

I stamped the I Appreciate sentiment, from the You Coordinates, using VersaFine Onyx Black ink and heat embossed that using Ranger Clear Embossing Powder. I then trimmed it out and glued it atop the You.

Super simple card for today, but I love both of these sets so much! I love the flowers using holographic cardstock as well. I think it gives it a lot of interest and catches the light really well. Thanks for stopping by today, and don’t forget to stay awesome!

Supply List:

*Affiliate links used at no cost to you. Thank you so much for your support!

Latest Instagram Posts

Reverse Confetti Special Delivery

Hey! Hey! Hey! Thanks for joining me today! For this post, I’m sharing a project for the Reverse Confetti Stock Your Stash Challenge! This month’s card making theme is, Oh Baby! I hope that you’ll play along for your chance to win a $20 gift certificate to the Reverse Confetti store! More details to follow! For my project, I had to use The Bear Up There set, because it’s just too darn cute! Let’s get into the details.

To begin, I used Neenah Classic Crest 110lb cardstock and cut a panel using the new Peekaboo Cover Panel Confetti Cuts die. I then did some light ink blending on the panel, using leftover ink on my brush, which happened to be Distress Oxide Mustard Seed. I also used the Stitched Note and Frames Confetti Cuts die to cut a frame for the panel. I adhered the frame to the panel using foam tape for dimension.

I stamped the rainbow bear and cloud from The Bear Up There set using VersaFine Onyx Black ink and heat embossed them using Ranger Clear Embossing Powder. I stamped and embossed a few more clouds as well. I used Copic markers RV00, RV10, Y00, Y02, BG000, BG01, C00, E00, E40, E42, E43 and E70 to color the images. Once those were done, I used the coordinating Confetti Cuts to run them through the die cutting machine.

I adhered the bear and a cloud directly in the center of the Peekaboo Panel using foam tape, and positioned the remaining clouds around the panel and frame, adhering those with a combination of liquid glue and foam tape. I then slightly bent the peekaboo areas so that they would pop up, if you will. This was then adhered to my card base, which is also Neenah 110lb.

That finishes this project! I hope you enjoyed it, and I hope you’ll join our Stock Your Stash Challenge this month! You can head to the Reverse Confetti Blog for more details and the link to join in on the challenge! And a chance to win a $20 gift certificate!

Stay awesome sweet friend!

Supply List:

*Affiliate links used at no cost to you. Thank you so much for your support!

Latest Instagram Posts

Reverse Confetti July Release Blog Hop

Hello Crafty Friends and welcome to the Reverse Confetti Blog Hop! The July release is live today!! The full hop list will be listed below for you to check out all my teamies projects! You don’t want to miss it! For today’s project, I revisited the Circle of Waves Cover Panel Confetti Cuts, along with the Lovely Day Sentiments! So, let’s jump right in!

Today’s project was super fun! I really enjoyed making the rainbow circle of waves to adorn my card! To begin my project, I pulled out five rainbow colors from my Concord and 9th cardstock pile, and ran those through the die cutting machine using the Circle of Waves Cover Panel. I traced the die on piece of Neenah Classic Crest 110lb cardstock, and cut that out, using that as the base to glue my wave pieces.

I then took one of the rainbow circles and popped it in the Misti and stamped the You are Absolutely Wonderful sentiment, from the Lovely Day Sentiments, in the center using VersaFine Onyx Black ink and heat embossed it using Ranger Clear Embossing Powder. I cut a panel of black cardstock just smaller than an A7 card base, and splattered it, using Royal Talens Amsterdam Titanium White Acrylic Ink. This is my favorite splatter medium because it stays bright white, and it’s a great splatter consistency.

I positioned the rainbow circles atop the splattered panel, deciding on placement. I then adhered the outermost rainbow circles using liquid glue, trimmed the excess and adhered the main circle in the center using foam tape. I decided that I would add some additional circles, to mimic the splatter, using the Stitched Circles Cover Panel Confetti Cuts. I die cut a scrap of Neenah 110lb and added some of the larger circles using foam tape, and gluing the smaller circles.

That finished up this project! I hope you enjoyed it, and I hope it inspires you to get crafty in your space! I love how you can change up the feel of a die just by switching the colors used! Thanks so much for stopping by today!

As I mentioned earlier, there’s a bog hop today to celebrate the release! Hop around and check out all of the inspirations from my teammates! The full hop order is below!

Reverse Confetti Blog

Kelly Lunceford

Amy Kolling

Tricia Barber

Amy Rohl

Lisa Henke

Deanne Kuntz

Becky Roberts

Tracy Ware

Ali Farmer

Cheiron Brandon

Dilay Nacar

Jeanne Jachna

Heather Ruwe

Kelly Griglione

Audrey Tokach

Jenny Colacicco

Olga Moss

Candice Fisher

Michelle Short

Olga Matyushevskaya

Amy Tsuruta

Joe Sysavath

Supply List:

*Affiliate links used at no cost to you. Thank you so much for your support!

Latest Instagram Posts

Reverse Confetti Countdown to Confetti Day Three

Hello Crafters and welcome back to day three of the Reverse Confetti Countdown to Confetti! The release will be going live tomorrow, woohoooo! Please note that new product links will not be active until then. To celebrate the countdown, we are having a blog hop, with a gift certificate up for grabs! Details below! For today’s projects, we are featuring the Oceans of Love and Hummingbirds sets! So, let’s jump right in to the projects!

For my first project, Oceans of Love, I began by grabbing the new Circle of Waves Confetti Cuts and cutting five different colors of blue cardstocks. Most of the blue cardstock is from Concord and 9th, and one is from Simon Says Stamp. I traced the circular die and fussy cut a solid circle and glued the “waves” to that.

I used the Oceans of Love set to stamp some of the elements using VersaFine Onyx Black Ink on Neenah Classic Crest 110lb cardstock, and heat embossed them using Ranger Clear Embossing Powder. Before cutting those out using the coordinating die, I used Copic Markers BG70, BG72 and BG75 to color the images. I took the “waves” circle and stamped the sentiment on it using VersaMark Ink and heat embossed that using SSS Detail White Embossing Powder.

I cut a panel of Neenah Classic Crest 110lb using the Reverse Confetti Stitched Circles Cover Panel Confetti Cuts and poked out all of the larger circles and a few of the smaller circles. I used a scrap of the blue cardstock to run that through using that same cover panel, because I wanted these to be the “bubbles” on the card. I adhered the Stitched Circles panel to my card base, which is also Neenah 110lb using liquid glue.

Then, I inlaid some of the blue “bubbles” for interest. I adhered the circular waves panel using foam tape and adhered the colored underwater elements using glue, adding some of the “bubbles” atop that as well. That finishes up this project!

For my second project, I’m featuring the Hummingbird set along with the new Circle Element! To begin this project, I stamped the Hummingbird set using VersaFine Onyx Black Ink on Neenah 110lb and heat embossed those using Ranger Clear Embossing Powder. I colored the images using Copic Markers Y08, Y11, Y13, Y15, RV10, RV11, RV13, RV32, RV34, RV66, YG11, YG13, N4, N6, G00, G20, BG70 and BG72.

Once those were all colored, I used the coordinating die to cut them out. I used the Circle Element Cover Panel to cut a piece of Neenah Classic Crest 110lb, and I used another panel to cut a frame using the Stitched Note and Frames Confetti Cuts. I used PinkFresh Studio Sunshine ink to do some light ink blending on the panel and the frame.

I stamped the sentiment from the Hummingbird set using VersaFine Onyx Black Ink and heat embossed it using the same clear embossing powder. I trimmed that down and placed it behind the frame, and then added foam tape to the frame for dimension. I then adhered the frame to the Circle Element panel. I wanted a little added interest behind that Circle Element panel, so I cut piece of Concord and 9th Sea Glass cardstock and adhered that behind.

I then began adhering the Hummingbird elements to my framed panel using a combination of glue and foam tape. My panel was then adhered to my card base, which is also Neenah 110lb. To finish up this project, I added some PinkFresh Studio Jewels, because every project needs some bling in my opinion!

That does it for day three of the Countdown! I hope you enjoyed these projects, and I hope it inspires you to get crafty! Please note that the new product links will not be active until the release day and time.

As I mentioned earlier, to celebrate the countdown, we are having a blog hop! Leave comments along the hop for your chance to win a $15 gift certificate! You can also comment on Reverse Confetti’s Facebook page for another chance to win a gift certificate! Comments close at noon CST on July 7th and the winner will be announced at 5pm on July 7th over on the RC blog and FB page. The full hop list is below.

Reverse Confetti Blog

Amy Kolling

Tricia Barber

Lisa Henke

Deanne Kuntz

Tracy Ware

Ali Farmer

Dilay Nacar

Jeanne Jachna

Kelly Griglione

Audrey Tokach

Olga Moss

Candice Fisher

Olga Matyushevskaya

Amy Tsuruta

Joe Sysavath

Supply List:

*Affiliate links used at no cost to you. Thank you so much for your support!

Latest Instagram Posts

Reverse Confetti Lovely Day

Hello Friends and welcome back to my blog! Thanks so much for stopping! It’s day two of the Reverse Confetti Countdown to Confetti! The release will go live on July 8th, so please note that new product links won’t be active until release day and time! To celebrate the Countdown, we are having a blog hop! I hope you’ll hop around and leave comments along the way for your chance to win a gift certificate! Details below! Today’s project is featuring the Lovely Day Sentiments stamp set along with the Bloom set, and Peekaboo Cover Panel Confetti Cuts from the new July release! I enjoy coloring, so this was a super fun card for me! Let’s jump right in!

I began this project by stamping the elements from the Bloom stamp set using VersaFine Onyx Black ink and heat embossing those using Ranger Clear Embossing Powder, on Neenah Classic Crest 110lb cardstock. While I was already stamping, I went ahead and stamped my sentiment from the Lovely Day Sentiments set using the same ink and powder. I used Copic Markers Y08, Y11, Y13, Y15, YG07, YG11, YG13, YG17, YG61, RV00, RV10, RV11, RV32, RV34, BG70, BG72, BG75, BV00, BV01, BV02 and YR24 to color the flowers and leaves before using the Bloom Confetti Cuts to run those through my die cutting machine.

I cut a panel of Neenah 110lb cardstock using the Peekaboo Cover Panel Confetti Cuts and carefully pulled up some of the cut portions. Laura Bassen would have used the term “jooshed.” So yeah, I jooshed the little peekaboo areas on the panel. I applied foam tape to the back of the flowers and adhered those to my panel, tucking the leaves behind the single flower at the bottom and securing with glue. I trimmed off the excess and adhered this panel to a black cardstock panel.

I fussy cut my sentiment and popped it in the center of the card using foam tape again. I love foam tape, if you couldn’t tell! Anyhoo, my panels were then attached to my card base, which is also Neenah 110lb. To finish up the project, I added some PinkFresh Studio Jewels because you’ve gotta have bling!

That does it! I hope you enjoyed this project, and I hope it inspires you to get crafty! I hope you’ll hop over and check out the new July release from Reverse Confetti! It’s such a beautiful release!

As I mentioned earlier, we are celebrating this release with a blog hop! You can comment along the hop for your chance to win a $15 gift certificate. Comments close on July 7th at noon CST, and the winner will be announced at 5:00pm on the Reverse Confetti Blog and Facebook page. Speaking of Facebook, you can also leave a comment over there for another chance to win a gift certificate! You can head to the RC Blog for more details! Here is the full hop line-up!

Reverse Confetti Blog

Amy Kolling

Tricia Barber

Lisa Henke

Deanne Kuntz

Tracy Ware

Ali Farmer

Dilay Nacar

Jeanne Jachna

Kelly Griglione

Audrey Tokach

Olga Moss

Candice Fisher

Olga Matyushevskaya

Amy Tsuruta

Joe Sysavath

Supply List:

*Affiliate links used at no cost to you. Thank you so much for your support!

Latest Instagram Posts