Simon Says Stamp Floral Birthday Love STAMPtember Blog Party

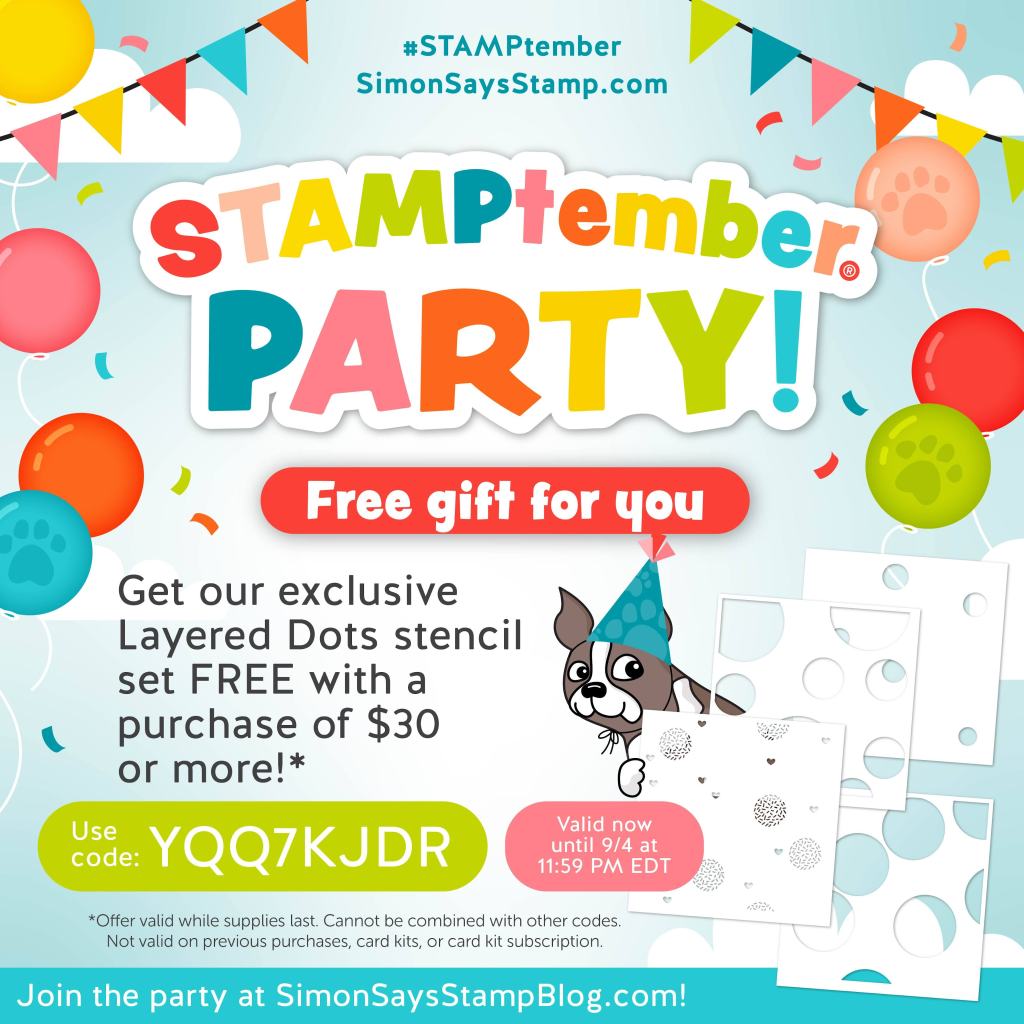
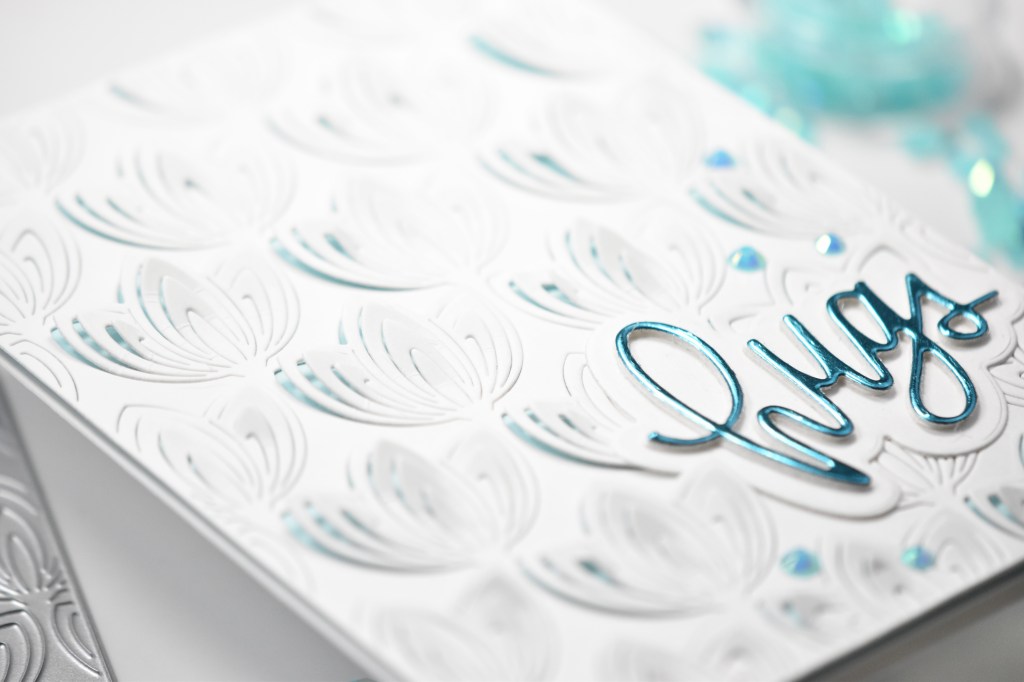
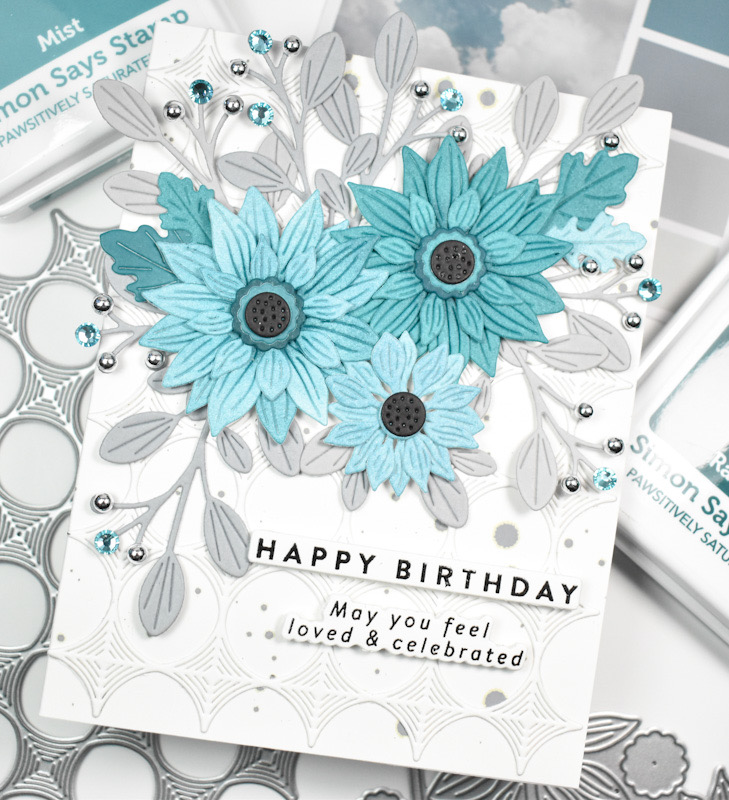
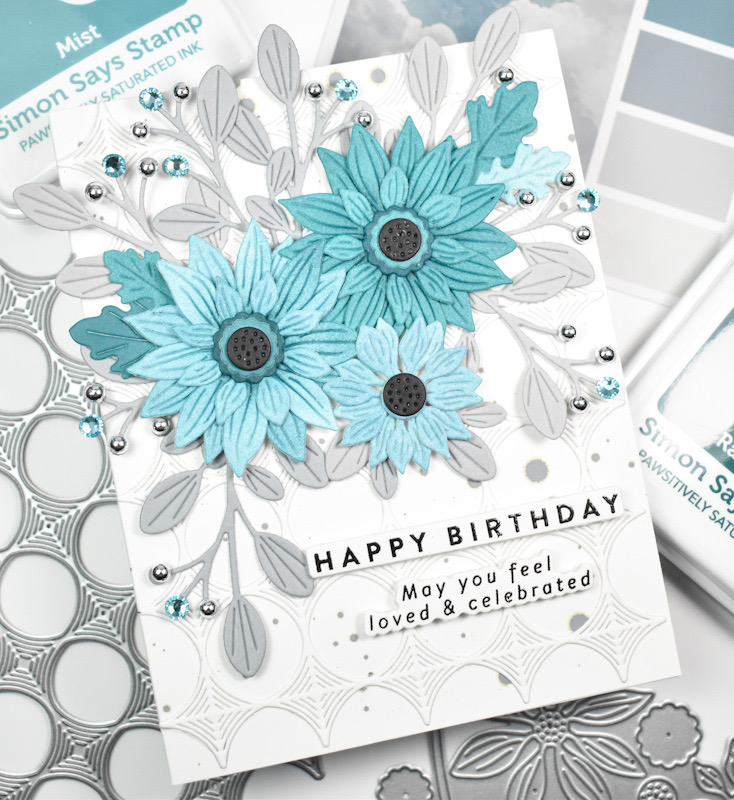
Hello Crafty Friends, and welcome back! I’m so happy that you joined me for today’s HUGE STAMPtember blog party! Each stop throughout the party has a STAMPtember promotion, so you’ll want to check those out for sure! You can start your party experience here or by heading to Simon’s blog. My project is featuring the new Rustic Layering Flower in aqua tones with a hint of grey. This is such an awesome release, with so many more things coming during the month, so stay tuned for all of the excitement! Let’s go ahead and go through the details for my project!

NOTE: all supplies are linked to multiple sources in the thumbnails at the end of this blog post.

I began this project by pulling an inspiration card from The Color Cubes, and then I ink blended a panel of Neenah 110lb cardstock using SSS Pawsitively Saturated Ink in Mist and Raindrop. Those two colors seemed to match the color palette best. Once the ink blending was complete, I cut the Rustic Layering Flower twice from that panel. I do a little more ink blending in the center of the flowers for more depth before assembling the flowers using liquid glue.

Now that I had the flowers, I had to decide on the rest of the card! I opted to go with the Whirl Diamond Plate for my background, and I cut a bunch of leaves from grey cardstock using the Budding Branches. In laying out the card, I decided that I needed one more small flower, so I cut that and assembled it as well.

I splattered my card base using TH Distress Oxide Spray in Hickory Smoke before adhering the background panel. I began adhering the grey leaves in place first using liquid glue, trimming down as necessary. Once I was happy with the leaf placement, I adhered the flowers using foam strips.

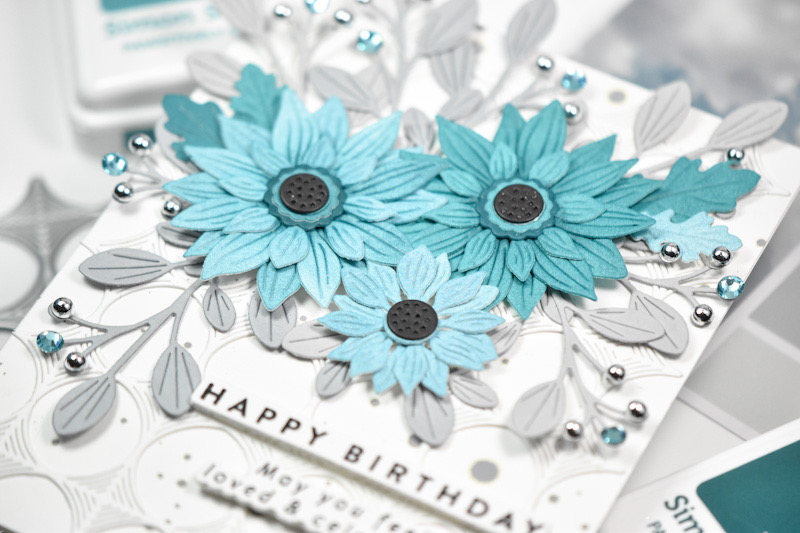
For the sentiment, I used the Mix & Match Butterflies set and stamped that using VersaFine Onyx Black and heat set it using Ranger Clear Embossing Powder. I trimmed it out using the coordinating dies, and made two additional cuts for a stacked sentiment. That was then adhered using foam strips as well. To finish up, I added some Surf Dazzling Gems and some silver metallic pearls to the “buds” of the branches.

That does it for this one! I hope you enjoyed it as much as I did! I always love working with die cut flowers, so this card was totally in my wheelhouse! Don’t forget to head on over to Simon’s website to check out the entire STAMPtember release! Thanks again for stopping by, and have a wonderful day!

Supply List

Affiliate links used at no cost to you. What does this mean? If you use the links within this post to make a purchase, I receive a small commission, which allows me to continue to post crafty content for your enjoyment. I truly appreciate your support!

Latest Posts

Latest Instagram Posts


Simon Says Stamp Fresh Roasted Coffee

Hello Crafty Friends and welcome back! I’m once again playing with the Coffee Time set from Simon’s latest STAMPtember release. This is a CZ Design card if I ever did see one! Cathy is just so freaking talented! Let’s not waste time and go through the details.

NOTE: all supplies are linked to multiple sources in the thumbnails at the end of this blog post.

This card is a double stencil technique. I used the SSS A2 Mask Stencils on a panel of Neenah 110lb cardstock and then secured the new SSS Fresh Roast Stencil atop that. I did some light ink blending using SSS Pawsitively Saturated Inks in Latte and Cappuccino. Once the ink blending was complete, I used the rectangle portion of the mask stencil to cover my ink blending and then splattered it with TH Distress Mica Spray in Crooked Broomstick.

I stamped the coffee mug and the sentiments using VersaFine Onyx Black in and heat set those using Ranger Clear Embossing Powder. I wanted two mugs, so I did a mirror stamping for the second one. In all honesty, I did have to watch a Jennifer McGuire video to learn how to do it! I then used the coordinating dies to trim those out. I did cut the sentiments two additional times for that stacked sentiment look.

I colored the mugs using Copic Markers in C1, C2, C3, E23 and E47, and those, along with the sentiments were adhered to the panel using foam strips. That panel was then adhered to a black panel with foam tape for added dimension, because what do we say? Dimension is life!

And, that does it for this one! I hope you enjoyed it, and I hope it inspires you to get crafty in your space. Don’t forget to check out the entire STAMPtember release over on Simon’s website, and stay tuned all month long for the collaboration sets! Have a wonderful day!

Supply List

Affiliate links used at no cost to you. What does this mean? If you use the links within this post to make a purchase, I receive a small commission, which allows me to continue to post crafty content for your enjoyment. I truly appreciate your support!

Latest Posts

Latest Instagram Posts

STAMPtember Butterfly Rose Bouquet

Hello, and welcome to my blog! I’m so happy that you dropped by! It’s that time of year again when STAMPtember is upon us. One of the best months of the year! There’s so many new products, and so much inspiration to draw from, not to mention all of the collaboration sets that will debut soon. With the release of all the STAMPtember products, Simon Says Stamp is hosting a huge blog party with codes for free gifts and gifts with purchase! So, be sure to check out all of the blog posts in the party! You can begin the party by starting at Simon’s blog! Check the bottom of this post for my STAMPtember code! For my card today, I’m featuring the new Billow Butterfly, so let’s run through the details.

To begin, I stamped the floral image from the SSS Orchid Rose Bouquet on a panel of Neenah 110lb cardstock using PFS Misty Coast Ink. I chose this ink, because I wanted a very light background that didn’t distract from the focal point of the card. I then trimmed the panel down using the PFS Diagonal Stitched Rectangles, and cut so that the floral image was on the bottom portion of my card panel.

I used the SSS Etched Eucalyptus Wreath and cut three of those from Neenah 110lb cardstock, and adhered them together using liquid glue. Next, I used the new SSS Billow Butterfly to cut some of the butterflies from some scrap Tim Holtz patterned paper that I had hanging around in my stash. This die is super cool, because it’s one piece that cuts several different butterflies, including solid butterflies as well as, outline butterflies. I opted for the solid for this particular project, because I wanted to be able to see the print of the patterned paper. Once the butterflies were cut, I adhered the bodies using liquid glue and moved on to working on the sentiment.

For the sentiment, I used the thank you die, which is from the SSS Handlettered Greetings set. I die cut the sentiment once from Burnished Rose cardstock, and four times from Neenah 110lb, and adhered all of those together. I wanted the sentiment to be thick, so that it would be sturdy.

To assemble the card, I glued the wreath to the stamped panel, and then glued the patterned butterflies atop the wreath. The butterflies are only glued down at the bodies, so that their wings could be curled for added dimension. Once those were in place, I adhered the sentiment only where it comes into contact with the wreath, hence wanting a thicker sentiment for sturdiness. I trimmed off the excess portions of the sentiment and added some clear drops for a little shine. The panel was then adhered to the card base using foam tape.

That does it for this project! I hope you enjoyed it, and I hope it inspires you to get crafty as well. Don’t forget to check out the entire STAMPtember release along with all of the blog posts celebrating this awesome release! Each blog post will have a different code for gifts! Thanks again for stopping by! Have a wonderful day and stay awesome friend!

Supply List:

* Affiliate links used at no cost to you. Thanks so much for your support!

Latest Posts

Latest Instagram Posts

Birthday Checking In

Hello Crafty Friends and thanks for stopping by! STAMPtember has arrived! Are you excited? Have you checked out the release yet? What are your favorites? I would love to know in the comments! I’m here today with a card featuring the brand new Checking In stamp set from Simon Says Stamp. So, let’s go through the details, shall we?

I began by stamping the floral image from the SSS Checking In set onto a panel of Neenah Desert Storm cardstock in the corners using VersaMark Ink and heat setting that using SSS Detail White Embossing Powder. Once the stamping was done, I used the PFS Diagonal Stitched Rectangles to trim the panel down.

To add color to the flowers, I used a white colored pencil, as well as a graphite pencil and a blending stump. After the coloring was completed, I splattered the panel using White Acrylic Ink.

For the sentiment, I opted for the SSS Happy Birthday Brush Script and cut that three times from black cardstock, adhering them all together using liquid glue. I then adhered the sentiment to my panel between the florals and added some pearls for a little added interest.

To finish up, the stamped panel was adhered to a black panel for contact using foam tape, and that was then adhered to the card base.

Super simple card, but I like the monochromatic tone of the finished project. I hope you enjoyed it as well. Don’t forget to check out the entire STAMPtember release, and buckle up for an exciting month! The collaboration sets will start rolling out soon! Thanks again for stopping by and have yourself a wonderful day!

Supply List:

* Affiliate links used at no cost to you. Thanks so much for your support!

Latest Posts

Latest Instagram Posts

Simon Says Stamp Black Eyed Susans Birthday

Hello Crafty Friends and welcome back! How’s your STAMPtember going so far? What are your favorites from the new release? Yeah, I’m nosey! There are so many cool things that it’s hard for me to narrow down my favorites! Anyhoo, today’s project is featuring the new Black Eyed Susans stamp set, so let’s run through the details!

To begin, I stamped the floral images from the SSS Black Eyed Susans set onto a panel of Neenah Classic Crest 110lb cardstock using VersaFine Onyx Black ink and heat set that using Ranger Clear Embossing Powder. I pulled out some Copic markers and began coloring using Y06, Y08, Y18, YR23, E39, E79, E99, G24, G82, YG61, N0 and N1.

Once all of the coloring was complete, I used a Copic Multi Liner 0.5 to add some additional black dot detail to the centers of the flowers. Next, I stamped a bee from the set twice in the same way and colored those using one of the yellow markers along with the Copic 110 Special Black marker. For a bit more added detail, I went over the wings using a Wink of Stella marker as well before fussy cutting them.

I trimmed the floral panel using PFS Diagonal Stitched Rectangles and adhered it to a black panel using SSS Dot Tape Runner. I used the Happy Birthday sentiment from the same set and stamped that onto black cardstock using VersaMark Ink and heat set it using SSS Detail White Embossing Powder. Once that was done, I trimmed it down and adhered it to the panel using SSS Foam Tape.

I adhered the bees to the panel as well using SSS Foam Squares, before adhering everything to the card base. No card is complete without some bling, so I added some PFS Iridescent Clear Drops to finish up this one.

That does it for this project! I hope you enjoyed it, and I hope it inspires you to get crafty! Don’t forget to swing by and check out the entire STAMPtember release! Have yourself a wonderful day and stay awesome!

Supply List:

* Affiliate links used at no cost to you. Thanks so much for your support!

Latest Posts
Latest Instagram Posts

Simon Says Stamp Thankful Layered Pumpkin

Hello Lovelies and thanks for stopping by! It’s STAMPtember and you know what that means .. a super, awesome release from Simon Says Stamp! We are celebrating today with a blog party, so be sure to start at Simon’s blog for links to everyone’s posts! There’s tons of inspiration, as well as exclusive promotions, so you’ll want to check those out for sure! Check the bottom of this post, for my STAMPtember promotion! For today’s project, I’m featuring the new Layered Pumpkin die. This project was super fun to put together, so let’s go through the details!

To begin, I pulled out five different yellow and orange scraps of patterned paper from my stash and cut each of them using the SSS Layered Pumpkin die. There is a solid pumpkin die in this set, and I cut that from a brown cardstock so that I would have a base for assembling the pumpkin.

I adhered the pieces of the pumpkin in their spots using liquid glue and then used some Copic Markers in Y02, Y17, YR24 and YR27 to add a bit of shading for a little more added interest. Once the pumpkin was assembled, I got to work of the rest of the card.

For the background, I used the SSS Stitched Whirl Background die on a panel of kraft cardstock, and I used the SSS Ornate Leaves set to cut one of the leaves twice from two different colors of green cardstock. Some of the pieces of the leaves fell out after die cutting, and I left them as they were, and adhered them together using liquid glue.

I arranged the leaves on the background and secured with glue, while adhering the pumpkin atop the leaves using SSS White Foam Tape for added dimension. I trimmed two SSS Sentiment Strips and adhered those with foam tape as well. The panel was then adhered to the card base using SSS Dot Tape Runner, and I finished up by adding some PFS Gold Metallic Pearls.

That does it for this project! I hope you enjoyed it, and I hope it inspires you to get crafty! Don’t forget to stop by and check out the entire STAMPtember release! You won’t be disappointed! Have a wonderful day and stay awesome! As mentioned above, here is my exclusive promotion for this awesome release!

Supply List:

* Affiliate links used at no cost to you. Thanks so much for your support!

Latest Posts
Latest Instagram Posts

Simon Says Stamp You Mean the World

Hello Crafty Friends and thanks for joining me! Happy STAMPtember! It’s the best month of the year, in my opinion! What an amazing release! As exciting as today is, there’s a huge blog party happening tomorrow with exclusive promotions, so stay tuned for that! Today’s project is featuring the new Overlapping Drops background stamp. So, let’s go through the deets!

To begin this project, I stamped the SSS Overlapping Drops onto a panel of Neenah Classic Crest 110lb cardstock using VersaFine Onyx Black ink. Once I got a good impression, I heat set it using Ranger Clear Embossing Powder.

The panel was then trimmed down using the PFS Diagonal Stitched Rectangles. I pulled out my Copic Markers BG72 and BG75 and did some coloring of the pattern, and then used the 110 Special Black to color in the background.

I used the SSS You Mean the World to Me die and cut that from SSS Matte Silver cardstock once and then cut it two additional times from black cardstock. I also cut the shadow die from black cardstock as well. I adhered all of those together using liquid glue.

My stamped panel was adhered to a black panel using SSS Dot Tape Runner and that was then adhered to the card base. The sentiment was adhered to the panel using SSS Foam Squares, and I added a few PFS Silver Metallic Pearls.

That finishes up this project. It was a relatively simple card, but I like how it came out just the same. I hope you’ll stop by and check out the entire STAMPtember release, and let me know your favorites! Have a wonderful day, and don’t forget to stay awesome!

Supply List:

* Affiliate links used at no cost to you. Thanks so much for your support!

Latest Posts
Latest Instagram Posts

Simon Says Stamp Fine Petals Hugs

Hello, Hello and welcome back! Thanks for stopping by! Yup, I’m still on a StampTember kick! There’s just so many good things in this release, it’s hard to stop! For today’s project, I’m featuring another card using the new Fine Petal Background Plate. This is such a gorgeous die when it’s cut! Let’s get into the details!

I began by cutting a panel of Neenah Classic Crest 110lb cardstock using the Fine Petal Background Plate. I did have to run this through about four times to get a really good cut, but hopefully your machine cuts better! Once the panel was cut, I zhooshed most of the petals giving them plenty of definition and dimension. I did leave some un-zhooshed at the bottom for my sentiment.

I had some blue mirror cardstock that I wanted to use, so I adhered the petal panel to a color coordinating blue cardstock using liquid glue.

I cut the SSS Hugs sentiment once from this blue mirror cardstock and twice from Neenah 110lb. I also cut the shadow twice from Neenah 110lb and glued all of those layers together.

My sentiment was then glued to the bottom of the petal panel where I left the petals un-zhoosed. Everything was then adhered to the card base, which is also Neenah 110lb. Lots of dimension on this card for sure!

Here’s a reverse view of the card, so you can see the blue peeking through more clearly

To finish up, I added a few PinkFresh Studio Jewels, because every card deserves to sparkle!

That finishes this one up! Super simple and quick! That’s the wonderful thing about background plates! I hope you’ll stop by and check out the entire StampTember line up! Lots of great things to choose from! Have a wonderful day and don’t forget to stay awesome!

Supply List:

* Affiliate links used at no cost to you. Thank you so much for your support!

Latest Instagram Posts

Simon Says Stamp Praying for Peace

Hello Crafty Friends and welcome back! In today’s post, I’m featuring a new stamp set from the StampTember release called, Raindrops. What a cute set this is! I’ve also made another card using the raindrops as flowers! That was super fun! So let’s get into the details!

I don’t do mixed media cards very often, but I have to say that I really enjoy the process when I do take time to do them! So, for this card, I started with a panel of watercolor paper and Ranger Crackle Paste through the SSS Falling Snow Stencil. Once the paste was dry, I pulled out the Distress Oxide inks in Hickory Smoke, Black Soot and Chipped Sapphire. I smooshed the ink on my glass work surface and spritzed it with water and smooshed my paper in it. I did only do one color at a time though.

The blue wasn’t quite bright enough so I spritzed some Distress Spray Stain Chipped Sapphire on the panel, working with it until I was satisfied. When the panel was dry, I used the PinkFresh Studio Diagonal Stitched Rectangles to trim it down. I then popped it in the Misti and stamped the sentiment from the SSS Raindrops stamp set on the bottom using VersaFine Onyx Black ink and heat embossing it using Ranger Clear Embossing Powder. I repeated that stamping again, but using VersaMark ink for the second time and heat embossed again. By heat embossing it twice, it gave the sentiment a nice glossy shine.

I pulled out some of the raindrops from the set and stamped some of them using Distress Oxide Chipped Sapphire ink and some using VersaMark ink to heat emboss those with Ranger Holographic Embossing Powder. Once the raindrops were stamped, I did fussy cut all of those.

The background was ready for some stamping and more stenciling now! I used the Tim Holtz Stencil 102 and more crackle paste and left that white. For the background stamping, I used the SSS Crackle Background stamp, along with some elements from the Tim Holtz Ultimate Grunge stamp set with Ranger Archival Black ink. I used the wand of the Distress Oxide Chipped Sapphire Spray to add some splatter to the panel as well.

Once I was satisfied with how the panel looked, I arranged and added the raindrops diagonally across the panel using foam tape. This panel was then adhered to a black panel using foam tape again, before being adhered to the card base, which is Neenah Classic Crest 110lb.

That finishes up this mixed media project for today! I hope you enjoyed it, and I hope it inspires you to get crafty as well! Stop by and check out the entire StampTember release, and don’t forget about all of the amazing collaboration sets that will be released all month long! Have a wonderful day!

Supply List:

* Affiliate links used at no cost to you. Thank you for your support!

Latest Instagram Posts

Simon Says Stamp Leafy Warm Hugs

Hello Crafters, and welcome back! Thanks so much for stopping by! Yay for StampTember, right?! What are your favorites from the release? I can honestly say that I have too many! Who’s with me? There’s just so much to choose from! I had to order a few of the new ink pads to try them out! They are all just so yummy! For today’s project, I’m featuring the new Leaves Wreath Stencil once again with fall colors. So let’s jump right into the details!

To begin this project, I trimmed a panel of Neenah Classic Crest 110lb cardstock just smaller than an A2 card and secured the first Leaves Wreath Stencil to it using masking tape. For the ink blending, I used Distress Oxide Festive Berries, Spiced Marmalade and Fossilized Amber.

I removed the first stencil and attached the second stencil. I smooshed a VersaMark ink pad over this, making sure to get a good coating. Once the second stencil was removed, I used Ranger Princess Gold Embossing Powder to heat set the detail of the leaves. My next step was to splatter the panel, and for this I used Royal Talens Amsterdam Light Gold Acrylic Ink. This was then set aside to dry.

I went ahead and worked on the sentiment using the SSS Warm Hugs die. I cut the detail die once from Gold Mirror cardstock and twice from Neenah 110lb. The shadow was then cut twice using black cardstock, and all of those were then adhered together using liquid glue.

I die cut the panel using the PinkFresh Studio Diagonal Stitched Rectangles for some added interest. I then adhered the sentiment to the center of the wreath using glue, and added PinkFresh Studio Gold Metallic Pearls for my embellishments. Because every card has to have embellishments, am I right!? The panel was then added to a black cardstock panel with foam tape before being adhered to the card base, which is also Neenah 110lb.

That finishes up this project! I hope you enjoyed it, and I hope you’re enjoying seeing all of the inspiration from the SSS design team! Stop by and check out the entire StampTember release, and let me know your favorites! Have a wonderful day and don’t forget to stay awesome!

Supply List:

*Affiliate links used at no cost to you. Thank you so much for your support!

Latest Instagram Posts