Simon Says Stamp You Did It Alcohol Ink

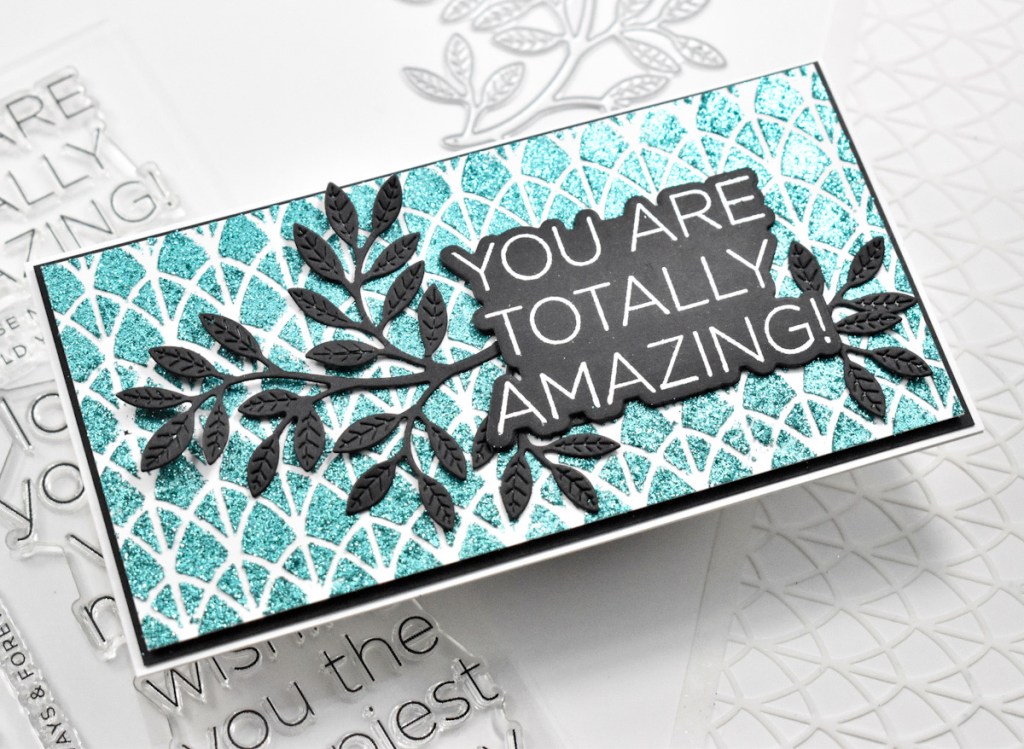
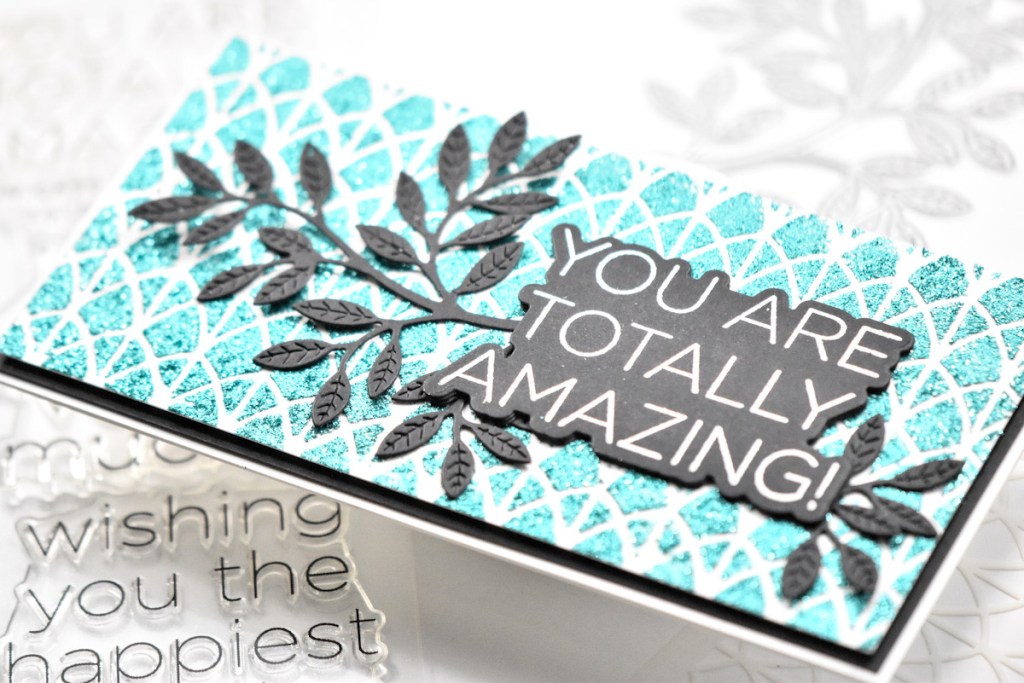
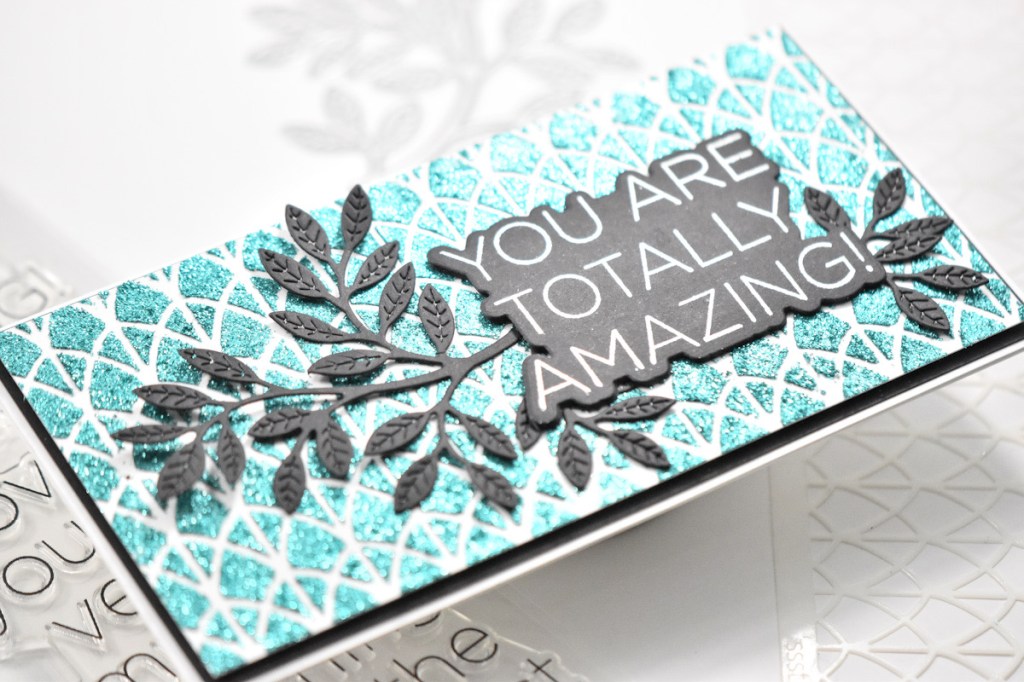
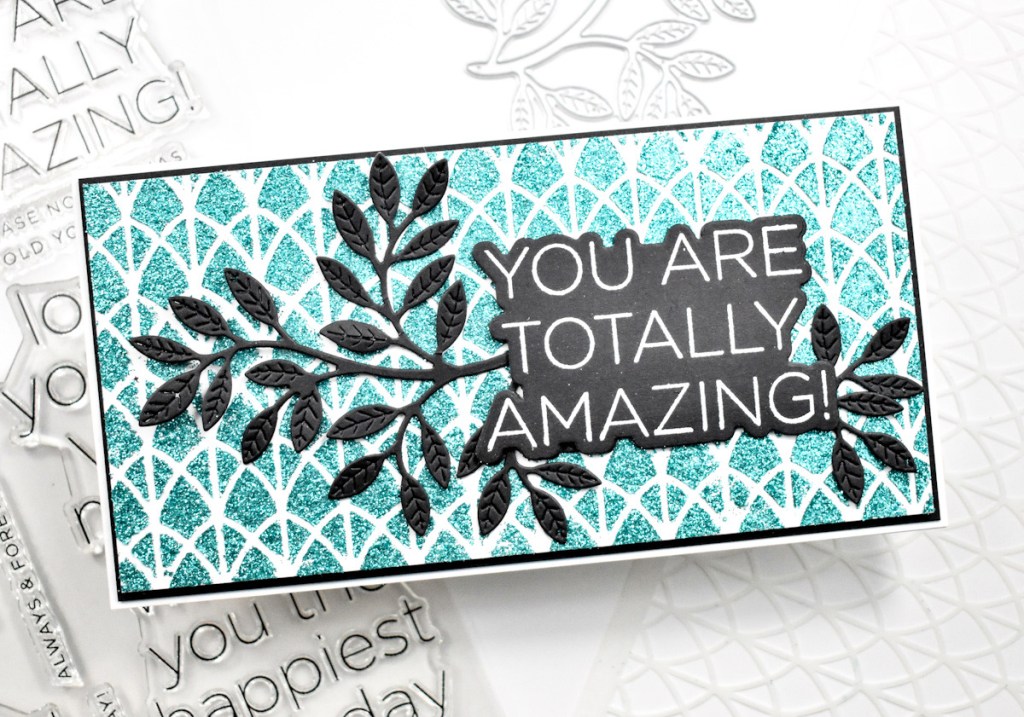
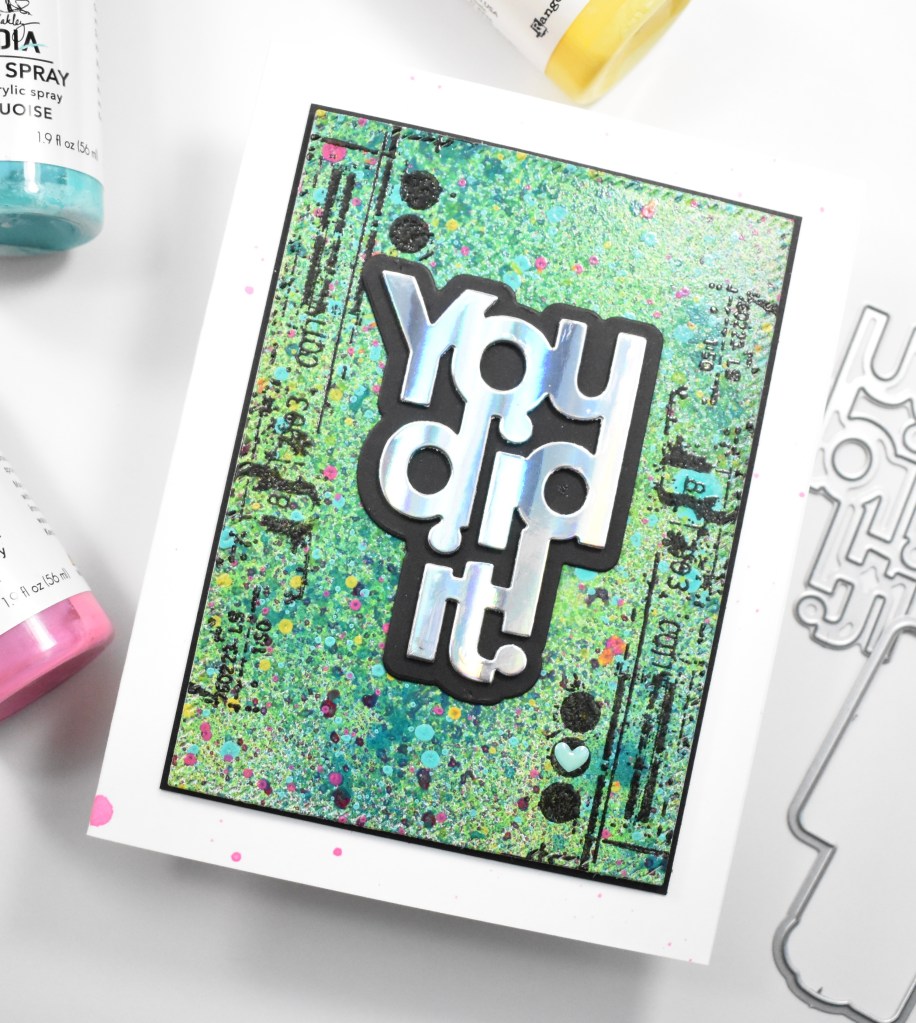
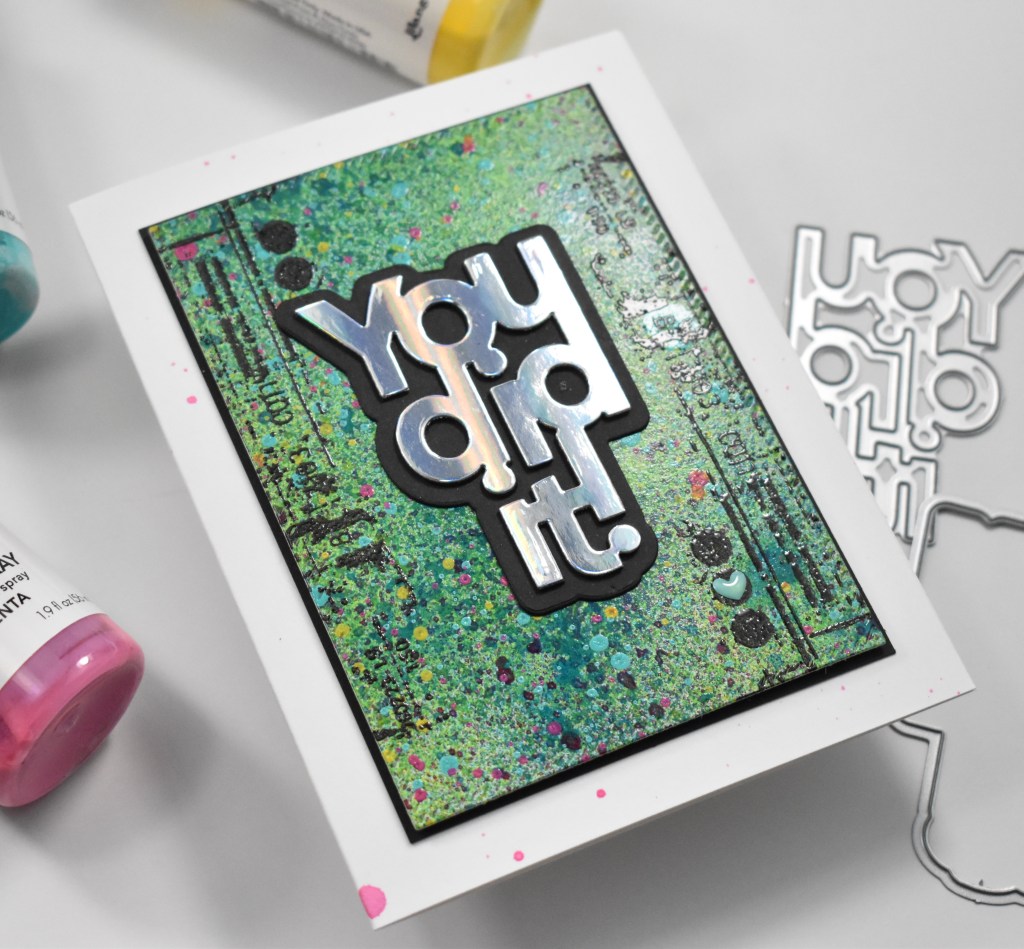
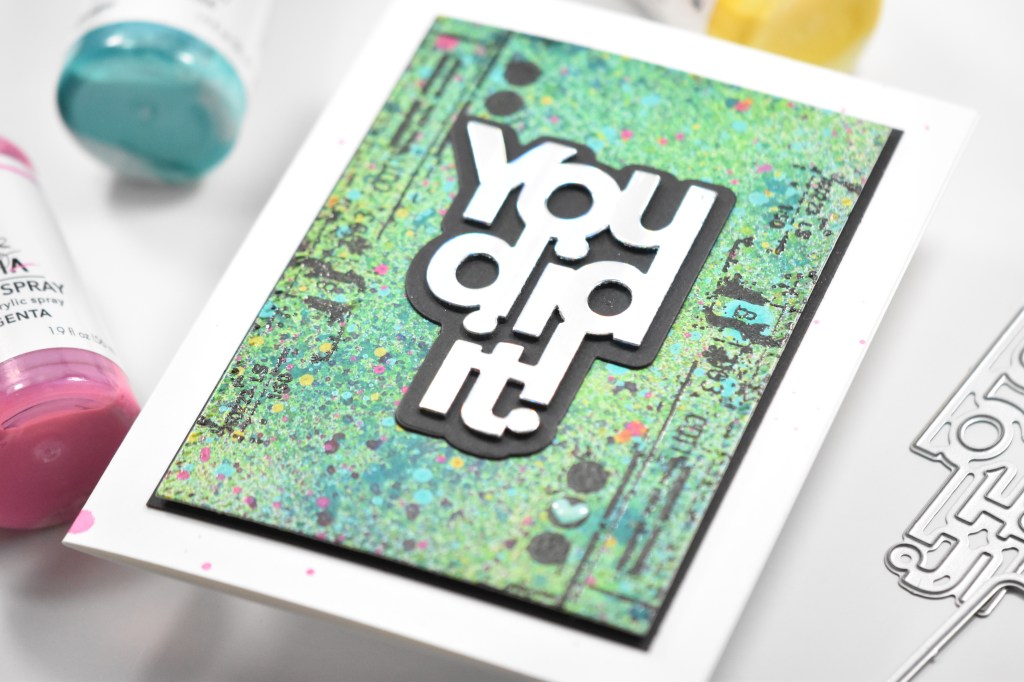
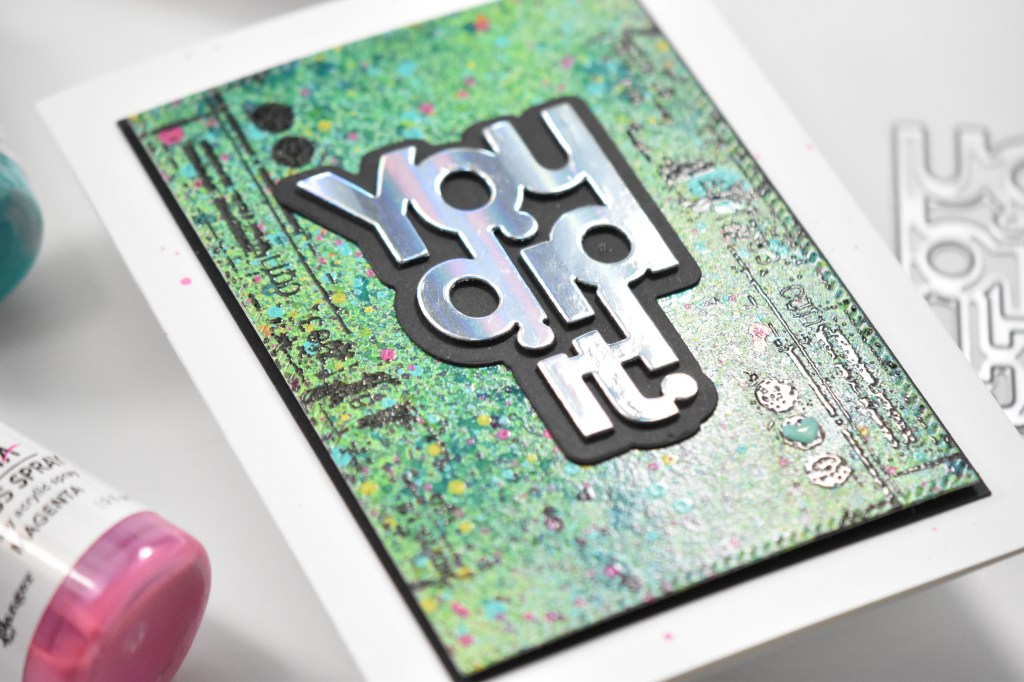
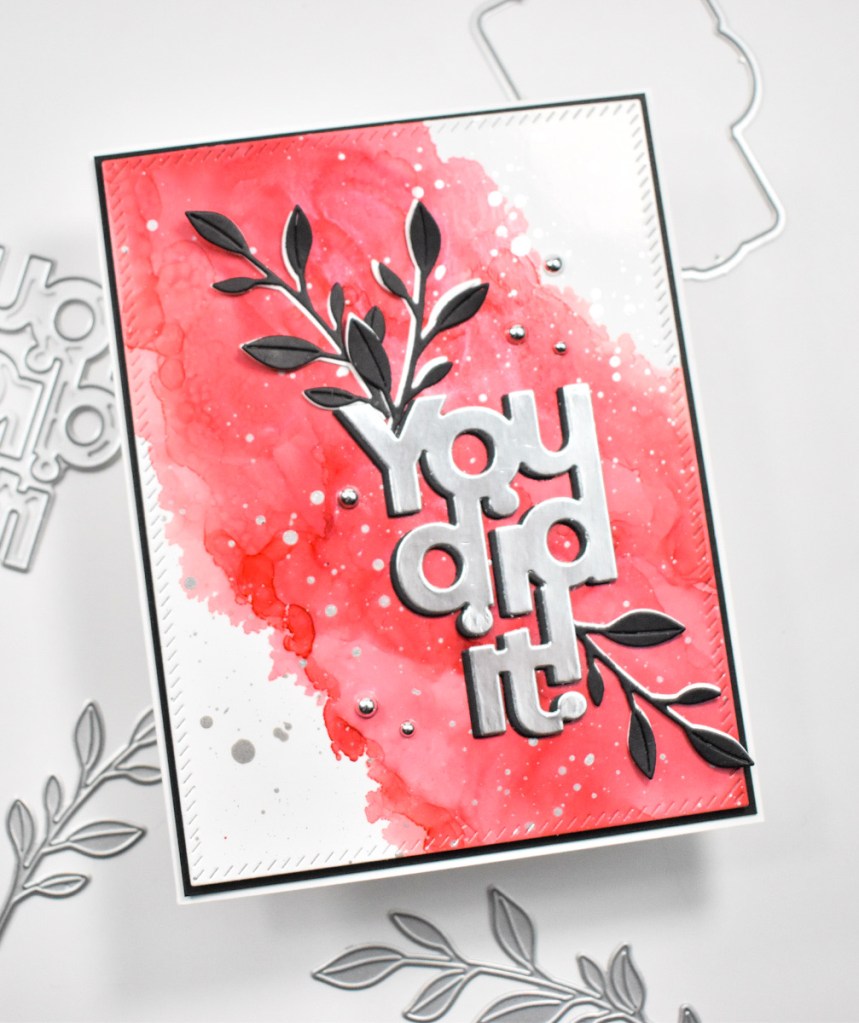
Hello! Hello! Thanks so much for stopping by! I hope you’re having a wonderful day so far! I’m back with another card featuring goodies from the latest Simon release, Yay You! If you know me, you know that I love stand-alone die cut sentiments, and today’s card is featuring just that! The new You Did It die cut! So, let’s go through the deets for this one!

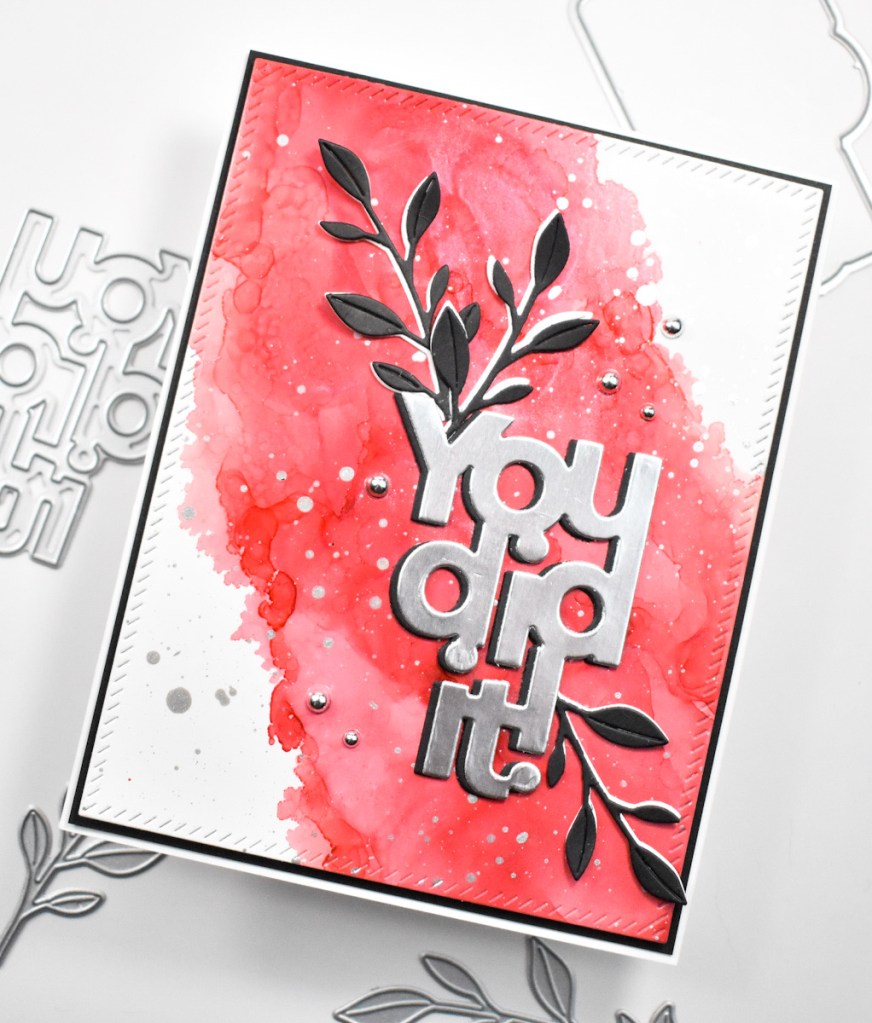
I wanted a super simple card so that the sentiment would stand out and be the focal point, so I rummaged through my background box and found an alcohol ink background that I thought would be perfect. This particular background is using glossy cardstock along with Ranger Deception Alcohol Pearl Ink.

Once I decided on a background, I used the PinkFresh Studio Diagonal Stitched Rectangles to trim it down and give it a little interest along the edges. I also splattered the panel with Liquitex Iridescent Bright Silver Acrylic Ink.

I die cut the SSS You Did It once from SSS Matte Silver cardstock and twice from black cardstock and adhered those together using liquid glue, but offsetting them just slightly to create a shadow effect. As I always say, every card seems to need leaves and this one was no exception. I used the SSS Etched Meadow Flower and Leaves to cut a few leaves from black cardstock, as well as Neenah Classic Crest 110lb cardstock.

I trimmed the leaves down and adhered them underneath the sentiment using liquid glue, and adhered the sentiment with glue as well. I also had to add some PinkFresh Studio Silver Metallic Pearls for some added bling and interest. The alcohol panel was adhered to a black panel using foam tape and then to the card base using SSS Dot Tape Runner.

That does it for this one! Alcohol ink backgrounds are great, because I feel like you really only need a good sentiment and some small design elements to make a gorgeous card. Thanks again for stopping by! Have a great one and don’t forget to stay awesome!

Supply List:

* Affiliate links used at no cost to you. Thanks so much for your support!

Latest Posts
Latest Instagram Posts

Simon Says Stamp Totally Amazing

Hello Friends! I hope you are doing well! I appreciate you stopping by today to check out my card featuring the new Arches Stencil from Simon’s latest release, Yay You. I’ve had so much fun playing with goodies from this release! Let’s get into the details for this one!

I began by trimming a panel of Neenah Classic Crest 110lb cardstock to a mini slimline size and adhering the stencil to it using masking tape. I used Turquoise Sea Glitz Glitter Gel from Gina K on this one. Once I got a good layer, I set that aside to dry while I worked on the rest of the card.

For the sentiment, I stamped the You are Totally Amazing, which is from SSS Clean Line Stacks set, on black cardstock using VersaMark Ink and heat embossed it using SSS Detail White Embossing Powder. I also used the coordinating die to trim it out, along with two more and adhered all of those together using liquid glue.

While I was die cutting, I die cut the SSS Delicate Leafy Branch a couple of times from black cardstock as well. I love the contrast that black elements provide on a card.

Now that the stenciled panel was dry, I decided the placement of the design elements and glued the black leaves underneath the sentiment and adhered the sentiment using glue as well. That panel was then adhered to a black panel using foam tape before being adhered to the card base using SSS Dot Tape Runner.

That finishes up this card! It’s always fun to use gels and pastes on cards, but I need to be better about sealing mine up, because they are becoming dried out. I hope you have a wonderful day and don’t forget to stay awesome!

Supply List:

* Affiliate links used at no cost to you. Thanks so much for your support!

Latest Posts
Latest Instagram Posts

Simon Says Stamp Grungy You Did It

Hello Crafty Friends and thanks so much for stopping by! I’m participating in an Instagram Hop today to celebrate the newest Simon Says Stamp release, Yay You. There’s loads of inspiration and lots of chances to win a gift card by commenting along the hop, so be sure to check that out! I’m referring to today’s card as grungy because it mixes a lot of different elements, with a focus on the You Did It sentiment. So let’s get into the details!

I knew that I was wanting a funky background for this one, so I pulled out a panel of Mixed Media paper along with some Ranger Gloss Sprays in Lime, Lemon, Ocean, Turquoise, Fuchsia and Magenta and got to work adding colors and splatters while letting it dry between applications. Needless to say, this background took quite a while to make. I let it dry between applications because I found that if I didn’t, I was getting more muddy colors.

Anyhoo, once I was satisfied with the look of the background, I used the PinkFresh Studio Diagonal Stitched Rectangles to trim it down to smaller than an A2 card. I then popped it in the Misti for a little stamping using the Stampers Anonymous Glitch 2 set and VersaFine Onyx Black ink. Once the stamping was done, I heat embossed that using Ranger Clear Embossing Powder.

I die cut the SSS You Did It once from SSS Holographic cardstock and twice from black cardstock. I cut the shadow once from black cardstock as well, and adhered all of those together using liquid glue. That was then glued directly to the panel. For a little extra added interest, I added a tiny heart from Doodlebug Designs.

The assembled panel was then adhered to a black panel using foam tape before being adhered to the card base using SSS Dot Tape Runner. I had also splattered the card base using some of the gloss sprays.

That finishes up this project! I always love making mixed media type projects even though I don’t do them very often. It just feels so carefree and that’s super awesome! Be sure to check out the Instagram Hop for your chance to win a gift card! Who doesn’t love gift cards? Thanks again for stopping by and keep being awesome!

Supply List:

* Affiliate links used at no cost to you. Thanks so much for your support!

Latest Posts
Latest Instagram Posts

Simon Says Stamp Mother’s Day Peony

Hello Crafty Lovelies and thanks for stopping by! Have you checked out the newest Simon release, Yay You? What are your favorites? If you know me, I always love florals and sentiments! So, today I’m playing with the Sketched Peony Blossom Foil and Cut set. Let go through the details, shall we?

I ended up making this card for my Mom for Mother’s Day, and of course, she loved it! I began by foiling the Sketched Peony Blossom on a panel of hot press watercolor paper using Spellbinders Champagne Hot Foil. I always end up foiling a few, but only used one in this case, so I have some to use on another project in the future. While I had the machine hot, I also used the PinkFresh Studio Solid Hot Foil Plate to foil the negative of the flower as well.

Once the foiling was complete, I used Zig Markers in 025, 032 and 040 to do some watercoloring. I also used Copic Markers in Y00 and Y08 to add some yellow to the center of the flower. I then used the included, coordinating die to trim the flower out along with the solid foiled flower as well. Those were then adhered together, slightly off center, using liquid glue.

For the background, I used the SSS Stitched Whirl Background and trimmed that from a panel of Neenah Classic Crest 110lb cardstock. I also used the SSS Olive Leaves to cut a couple of those from Neenah 110lb, as well as some gold cardstock.

I went ahead and worked on the sentiment and use the Happy Mother’s Day sentiment, which is from the SSS Better With Mom set. I stamped the sentiment using VersaMark Ink on a scrap of Neenah 110lb and heat embossed it using Ranger Princess Gold Embossing Powder. When that was complete, I used the coordinating die to trim it out.

To assemble the card, I adhered the whirl background to the card base using SSS Dot Tape Runner and glued the leaves to the panel, while adhering the flower using foam tape for dimension. The sentiment was also adhered with foam tape. And, of course there has to be bling, so I used some PinkFresh Studio Gold Metallic Pearls for that.

That finishes this one up! I hope you enjoyed it and I hope it inspires you to get crafty! Have a wonderful day and don’t forget to stay awesome!

Supply List:

* Some affiliate links used at no cost to you. Thanks so much for your support!

Latest Posts
Latest Instagram Posts

Simon Says Stamp Good Day Peony Blossom

Hello Friends and thanks for stopping by! The newest Simon Says Stamp release, Yay You, is a gorgeous one, and I’m playing with the new Sketched Peony Blossom Foil and Cut set! Have you jumped on the foiling band wagon yet? I did a while back, and I just love it! Let’s run through the details for today’s card, shall we?

To begin, I foiled the Sketched Peony Blossom several times on some Neenah Classic Crest 110lb cardstock using Spellbinders Rose Gold Foil and colored them using Copic Markers R00, R11, R20 and E02 and a Multiliner to add the black detail to the centers of the flowers. While I was foiling, I went ahead and used the PinkFresh Studio Solid Hot Foil Plate to foil the negative pieces as well. Once all the peonies were done, I used the included, coordinating die to trim them all out.

I used the SSS Privet Branch and cut some of those from blue cardstock, as well as some vellum. The background needed some interest so I opted for the PinkFresh Studio Simply Diamonds and adhered that directly to the card base using liquid glue.

To assemble the card, I glued the solid foiled peonies to the colored peonies. I adhered the leaves to the card base using glue, and adhered the peonies atop those using foam tape for dimension.

The SSS Sentiment Strip was glued directly to the flower and I added some pearls to finish it up.

That does it for this card! I hope you enjoyed it, and I hope it inspires you to get crafty in your space! Don’t forget to stop by and check out the entire Yay You release. Have a wonderful day and stay awesome!

Supply List:

* Affiliate links used at no cost to you. Thanks so much for your support!

Latest Posts
Latest Instagram Posts