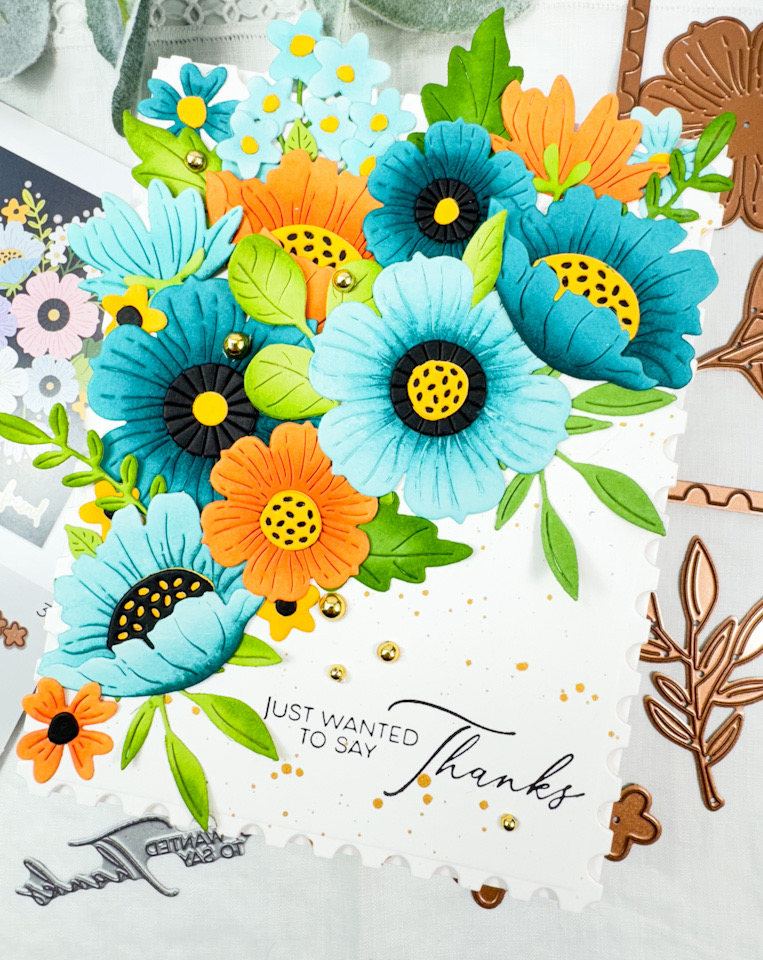
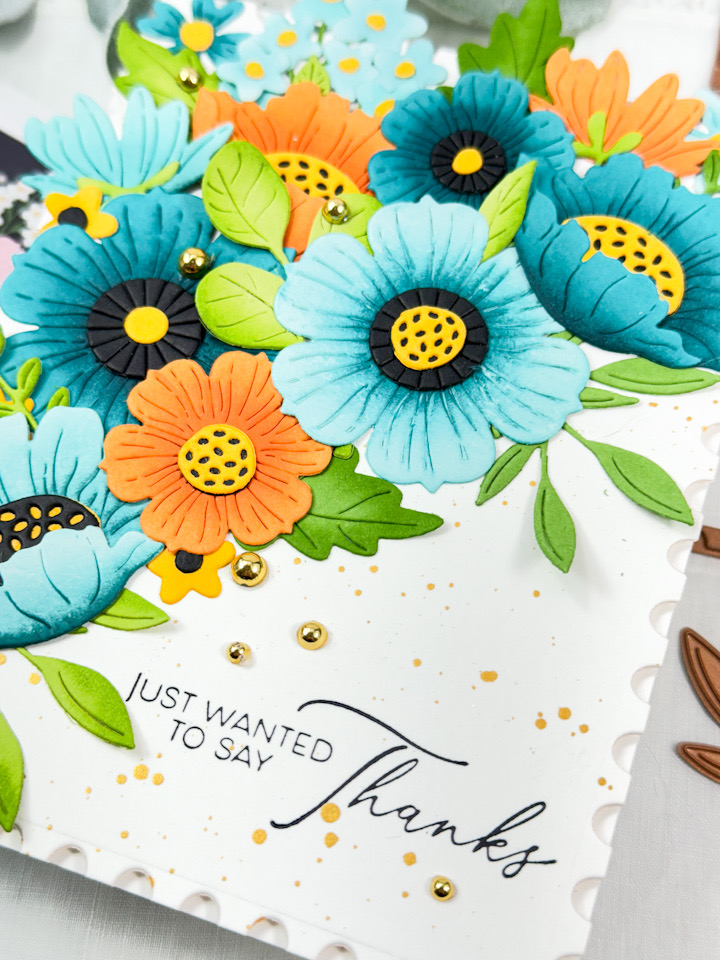
Simon Says Stamp Simple Thanks Floral Spray

Hello Friends, and thanks so much for stopping by! The STAMPtember release is in full swing, and I’m back today with a project featuring several new products. I kind of went crazy with the new products on this one because it’s featuring the new Rustic Layering Flower, the Double Plaid Cover, the Simple Thanks and the Crimped Floral Embossing Folder & Die. So, let’s go through the details for this one!

NOTE: all supplies are linked in the thumbnails at the end of this blog post.
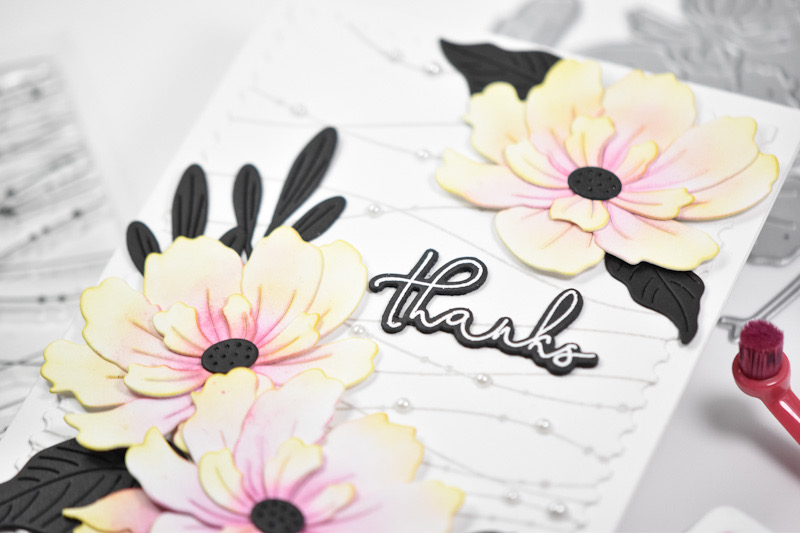
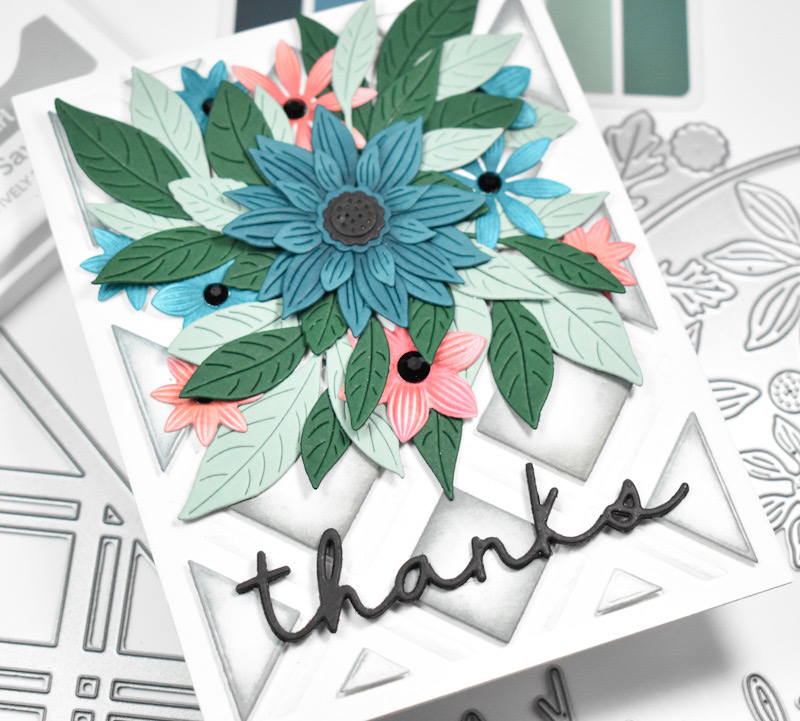
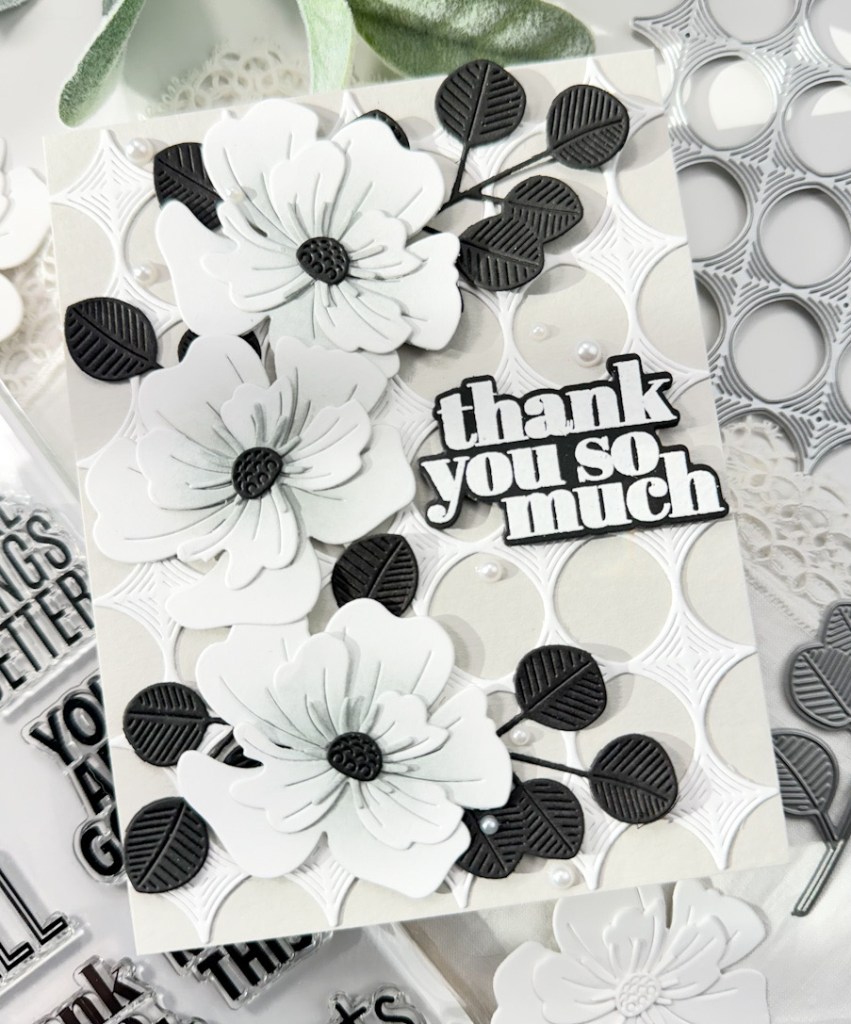
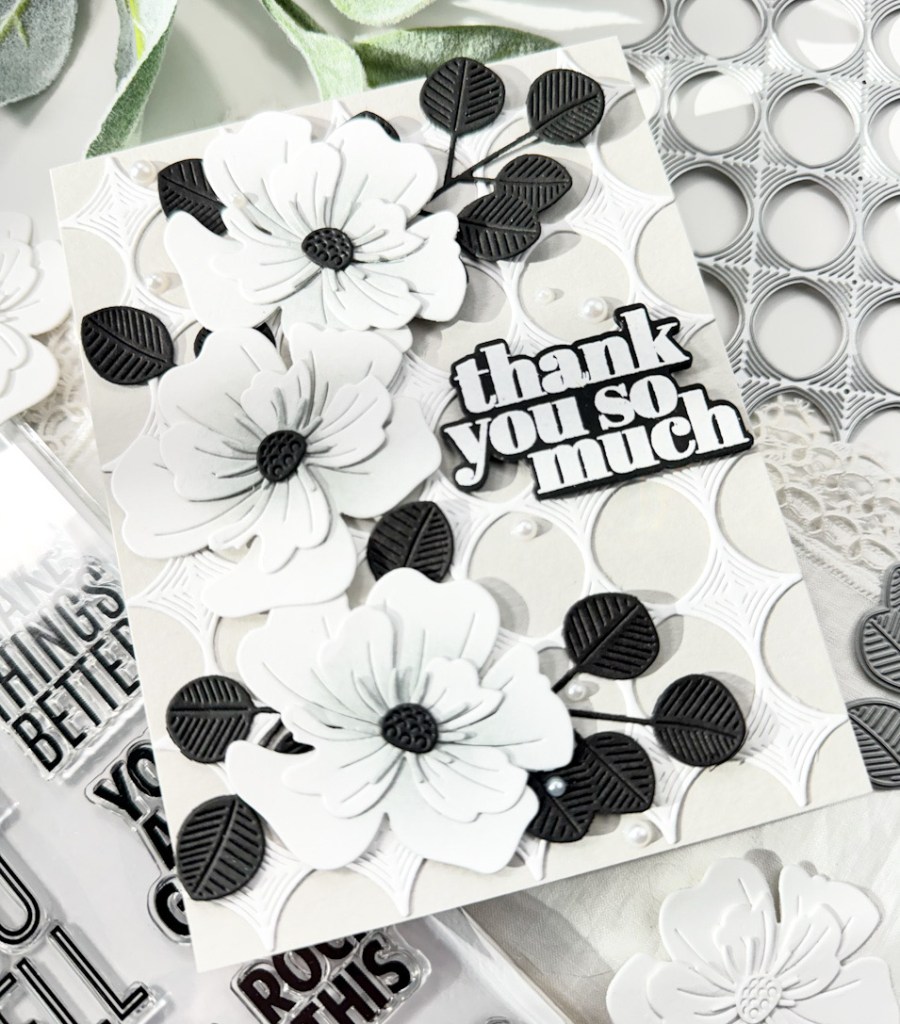
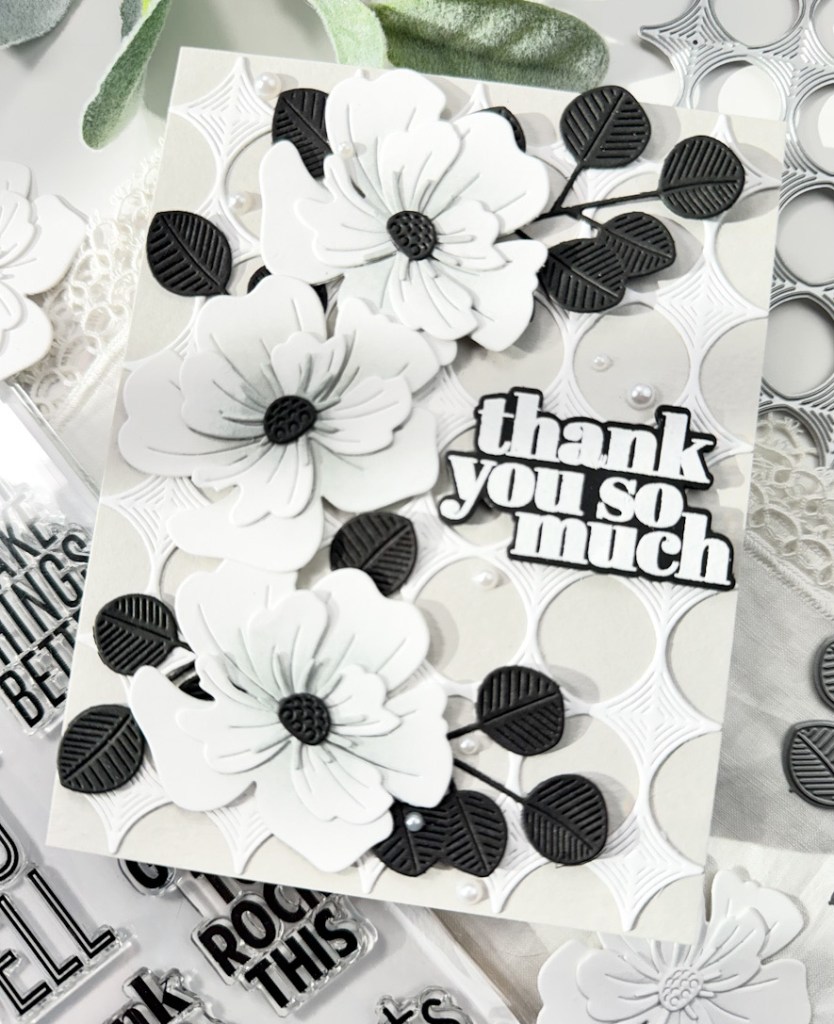
I said that I used the Crimped Floral Embossing Folder & Die, but I did not use the entirety of the folder itself. I used it to create the smaller flowers in my spray. Another thing to note, this card is giving an illusion of the Double Plaid Cover. I saved the left over squares and triangles from a previous project and ink blended the edges of those using Earl ink for a shadowed effect.

To begin, I used the Double Plaid Cover to emboss a panel of Neenah 110lb cardstock and then adhered the grey ink blended pieces using foam squares. I thought this was a super interesting way to utilize those leftover pieces. For some color inspiration, I pulled a card from the Color Cubes, and die cut the smaller flowers from colored cardstock, using the included die from the Crimped Floral Folder. For some depth, I did some ink blending on those using C&9 Peacock and Sorbet inks, and added a black crystal to the centers of the flowers.

I then cut the larger flower using the Rustic Layering Flower and ink blended that using that same Peacock ink before assembling the pieces. As always, I need leaves to go with my flowers, so I used the Arching Leaf Border set and cut those from a sage and pine colored cardstock. While die cutting, I went ahead and die cut the Simple Thanks four times from black cardstock, and adhered all of those together with liquid glue.

I began gluing the leaves in place first, as those were the bottom layers, and then I glued the larger flower in place next, and tucked in the other flowers where needed for fullness. The sentiment was glued directly to the panel to finish up.

That does it for this one! I hope you enjoyed it as much as I did! Don’t forget to head on over to Simon’s website to check out the entire STAMPtember release, and stay tuned all month long for the long awaited collaboration sets! Thanks again for hanging with me, and I hope you have a wonderful day!

Supply List

Affiliate links used at no cost to you. What does this mean? If you use the links within this post to make a purchase, I receive a small commission, which allows me to continue to post crafty content for your enjoyment. I truly appreciate your support!

Latest Posts

Latest Instagram Posts

Simon Says Stamp Crimped Floral Thanks

Hello Crafty Friends, and welcome back to my blog! Today’s project is featuring two new products from Simon’s STAMPtember release, the Crimped Floral Embossing Folder and the Simple Thanks. Let’s not waste any more time, and get right into the details!

NOTE: all supplies are linked to multiple sources in the thumbnails at the end of this blog post.

I began this project by embossing a panel of Neenah 110lb cardstock using the new Crimped Floral folder, and then went to work ink blending the panel on the de-bossed side. The inks used were SSS Pawsitively Saturated Inks in Lilac, Orchid and Amethyst. I’m not sure what this technique is called, but I then used a black ink pad to rub across the flat side of the panel, leaving the purple visible. Is it called like a “black-out” technique?! I have no idea!

I then trimmed the panel down and adhered it to a black panel using foam tape for added dimension. I cut the Simple Thanks once from silver cardstock, twice from black cardstock, and I cut the shadow portion twice as well. Those pieces were all adhered together using liquid glue before before being glued to the panel. I thought the card needed a little bling, so I added some PFS Purple Gems to the centers of the flowers.

That finishes up this one! It was a super simple card, but I like how it turned out! I haven’t tried the “black-out” technique before, but I’m pretty sure I’ll be doing it again. Don’t forget to check out the entire STAMPtember release over on Simon’s website. Thanks again for stopping by, and have yourself a wonderful day!

Supply List

Affiliate links used at no cost to you. What does this mean? If you use the links within this post to make a purchase, I receive a small commission, which allows me to continue to post crafty content for your enjoyment. I truly appreciate your support!

Latest Posts

Latest Instagram Posts

Spellbinders Floral Thanks

Hello Crafty Friends, and thank you so much for stopping by! I’m back today with a project featuring some Spellbinders products from the May 2024 release, along with an older floral set. Let’s go ahead and run through the details, shall we?

Main Products:

I recently created another card using this same color palette, and I loved it so much that I wanted to create another one! I began this card by using the Spellbinders Club Blooms Large Die of the Month from January 2023 and cutting the flowers and leaves from different shades of aqua, orange, green, yellow and black cardstock. I made quite a few flowers, and probably have enough to make one more card with those. Once the pieces were cut, I did some ink blending and assembled the flowers using liquid glue. These are great flowers, because you can assemble them in various ways.

For the background panel, I used the Spellbinders Nested Postage Labels and Tag set to trim that down, and then added some gold splatter for some added interest. Once the splatter was dry, I used the Spellbinders New Beginnings Timeless Sentiments Press Plates to add the sentiment directly to the panel using BetterPress Black ink. I arranged the florals atop the panel at an angle and then used some Press N Seal to lift them off so that I could apply some glue to the back and then adhere them to the panel.

The panel was then adhered to the card base using foam tape, and I added some Spellbinders Fashion Gold Embellishments for some additional shine.

That finishes up this project! I hope you enjoyed it, and I hope it inspires you to get crafty in your space! I thoroughly enjoy assembling flowers and floral sprays like this, so this card was right up my alley! Thanks again for stopping by! Stay awesome friend, and have a wonderful day!

Other Products:

* Affiliate links used at no cost to you. What does this mean? If you use the links within this post to make a purchase, I will receive a small commission, which allows me to be able to continue posting crafty content for your enjoyment. I truly appreciate your support!

Latest Posts

Latest Instagram Posts

Simon Says Stamp Sending Thanks Butterflies

Hello and welcome back! Thanks so much for stopping by. Today’s card is a mixed media project featuring the new Whirl Butterflies from Simon’s latest release, Celebrate. I rarely make mixed media cards, even though I love the look of them. There’s a lot going on for this one, so let’s get right in to the details.

Main Products:

I began this project by pulling out a card from The Color Cubes for a bit of inspiration, a piece of mixed media paper, and Distress Oxide ink pads in Saltwater Taffy, Crackling Campfire, Spiced Marmalade, Fossilized Amber and Evergreen Bough. I worked one color at a time by smooshing the ink pad onto my silicone mat, spritzing with water and swiping or dabbing my paper into the ink. I made my way through the colors, drying the paper in between each addition, so that the colors didn’t get muddled.

Once I was satisfied with the additions of color, I took the panel to my splat box and splattered it with Distress Oxide Sprays in Saltwater Taffy, Crackling Campfire and Fossilized Amber. I let the panel dry before proceeding with adding some texture paste through the SSS Fading Tiny Dots Stencil. When the paste was dry, I outlined the circles using a Copic Multiliner pen. I also did some stamping on the panel using SSS Crackle Background, TH The Professor, TH The Professor 2 and TH Ultimate Grunge using VersaFine Onyx Black ink.

When the ink was dry, I used the SSS Postage Stamp Edge Frames to trim it down. I used the SSS Whirl Butterflies and cut those from aqua and black cardstock and glued those together offset just slightly. I wanted something different in the centers of the butterflies, so I opted to use gears for that. It’s a little weird, but I thought it added interest.

My panel was still missing something, in my opinion, so I used some 49 and Market Fabric Washi Tape and put a few pieces here and there on the panel. The butterflies and the sentiment were adhered to the panel using SSS 3D Foam Strips, and the panel was then adhered to a black panel for some added contrast.

That finishes up this project! I hope you enjoyed it, and I hope it inspires you to get crafty in your space! Like I said, I never make mixed media projects, but always enjoy the process! Don’t forget to stop by Simon’s website to check out the entire Celebrate release. Thanks again for stopping by, and I hope you have a wonderful day!

Other Products:

* Affiliate links used at no cost to you. Thanks so much for your support!

Latest Posts

Latest Instagram Posts

Simon Says Stamp Floral Diamond Circles

Hello Crafty Friends, and welcome back! I’m so glad that you stopped by! I’m back today with a project featuring the new Diamond Circles
Foil Transfer Cards
from Simon’s latest release, Celebrate. Let’s get right in to it!

Main Products:

I began this card by foiling a SSS Diamond Circles Foil Transfer Card using gold foil and the Minc Mini. Once my foiling was done, I trimmed the panel down slightly, and went to work on all of the florals. I pulled a card from The Color Cubes for inspiration, and I loved the oranges and aqua together, so I went with that color palette. The florals that I used were SSS Etched Meadow Flower and Leaves, SSS Etched Magnolia Blossom, SSS Charming Daisy, SSS Sunrise Stem and the SSS Whirl Blossom.

Most of the flowers were cut from Neenah 110lb cardstock, while two of them were cut from orange cardstock. Once those were cut, I did some ink blending using SSS Pawsitively Saturated Inks in Cantalope, Melon, Peachy and Sherbet, along with C&9 ink in Grapefruit. The added leaves were cut from aqua and light blue cardstock, while the centers of some of the flowers were cut from gold cardstock. I assembled the flowers with liquid glue and added a gold gem to one of the flowers as well.

The background needed something else in my opinion, so I opted to use the SSS Stitched Squares for this. I ended up using two of the squares and adhered those to the foiled panel using SSS 3D Foam Strips and arranged my flowers and leaves around the left side, tucking in leaves between the flowers for added fullness.

I used the SSS Greetings Trio for the sentiment, and cut the Thanks from gold cardstock, along with two additional cuts and the shadow, adhering all of those together with liquid glue. The sentiment was adhered to the panel using foam strips. The entire panel was adhered to the card base using foam tape, and I added some PFS Gold Metallic Pearls to finish up.

That does it for this one! I absolutely love this color combo, and I’m so thrilled with The Color Cubes for those times when I need a little extra color inspiration! Thanks again for joining me, and don’t forget to check out the entire Celebrate release over on Simon’s website. Have a fabulous day and stay awesome, friends!

Other Products:

* Affiliate links used at no cost to you. Thanks so much for your support!

Latest Posts

Latest Instagram Posts

Simon Says Stamp Thanks Daisy

Hello, and welcome back! I’m so glad that you stopped by! I’m back today with a card featuring the new Beautiful Dove from Simon Says Stamp’s latest release, Splendor. This has been a fun release, and I’ve thoroughly enjoyed playing with the products that I received. Let’s run through the details, shall we?

To begin this card, I die cut the SSS Beautiful Dove from Neenah 110lb cardstock and pulled out some inks to do some ink blending. I settled on using SSS Pawsitively Saturated Inks in Lilac, Morning and Surf. Once the ink blending was completed, I adhered all of the pieces together using liquid glue, and went back over with the brushes to enhance the colors just a little bit more.

I set the dove aside, and began working on the flowers. For these, I die cut the SSS Charming Daisy three times from Neenah 110lb cardstock and ink blended those pieces using Sprout, Fairway and Citrine, along with C&9th Dove ink. The pieces of the flowers were then glued together. I did end up cutting off the leaves, because I wanted to add them back in where I had open spaces.

For the background, I stamped the SSS Crackle Background onto a panel of Neenah 110lb cardstock using PFS Misty Coast ink and trimmed it down using SSS Postage Stamp Edge Frames. The sentiment is from the BetterPress A Little Message Sentiments set, and I used BetterPress Black Ink to make the impression onto a BetterPress A2 Card Panel. I then used the included die to trim it out, along with two additional pieces and adhered those together using liquid glue.

To assemble the card, I determined the placement of the flowers and glued the stems down and then adhered the floral sections with SSS 3D Foam Strips. I then adhered the dove with Foam Strips, glued the sentiment in place, and then glued the leaves where I had space. The panel was then adhered to the card base with foam tape, and clear drops were added for additional interest.

That finishes up this one! I played around with so many doves and colors and finally decided that a colorful dove needed muted florals, otherwise, it was just too much. I’m an over thinker, and this is a classic example of my over thinking! Anyhoo, I like how this one turned out, and I hope that you do too. Don’t forget to stop by and check out the entire Splendor release over on the Simon website. Thanks again for stopping by, and I hope you have a wonderful day!

Supply List:

* Affiliate links used at no cost to you. Thanks so much for your support!

Latest Posts

Latest Instagram Posts

Simon Says Stamp Thank You Magnolias

Hello Friend, and thanks for stopping by today! I’m super excited and honored to be joining Simon Says Stamp for Day 2 of the blog hop to celebrate the Sweetheart and Smitten releases!

Simon is giving away a $25 coupon from every stop along the hop, so be sure to follow along and leave comments for your chance to win! You can also check out Day 1 of the hop here. There’s also a blog hop exclusive offer for a free Hearts and Stars stencil with any purchase. Just follow the directions on the graphic to redeem yours. Don’t delay, this offer expires on January 14th at 11:59pm ET. My project for the hop is featuring the new Whirl Diamond Plate, which I love! Let’s get to the details!

I love the color scheme of this card. I ended up using a thank you sentiment, but I think these colors would lend themselves well to a sympathy card as well. I began this card by cutting three flowers using the SSS Etched Magnolia Blossom set from Neenah 110lb cardstock. I did some ink blending on each layer of the blossom using PFS Misty Coast ink. Once the ink blending was complete, I adhered all of the layers together using liquid glue. In the process of assembling the flowers, I decided that the center of the blossoms would be better in black, so I cut a few of those.

Moving ahead, and working on the other elements of the card, I cut the SSS Whirl Diamond Plate from Neenah 110lb cardstock and glued that to a panel of SSS Fog cardstock. I played around with the placement of the florals and decided that I needed some black leaves and used the SSS Eucalyptus Leaves die for that. I adhered the florals to the panel using foam tape and glued the leaves underneath.

For the sentiment, I used the SSS XL Greetings 3 set and stamped it on black cardstock using VersaMark ink and heat set that using SSS Detail White Embossing Powder. I then used the coordinating die to trim it out, along with two others and adhered all of those together, for added dimension.

The sentiment was adhered to the panel using foam tape and the panel was adhered to the card base using foam tape as well. To finish up, I added some white pearls for a little bit of added interest.

That does it for this card! I hope you enjoyed it, and I hope it inspires you to get crafty in your space! Don’t forget to comment along the hop for Day 1 AND Day 2 for your chance to win! Simon will announce all of the winners on their blog on Wednesday, January 17th. Thanks again for stopping by. Have a wonderful day and stay awesome friend!

Hop Order:

Simon Says Stamp Blog 

Nina-Marie Trapani

Caly Person

Jennifer McGuire

Suzy Plantamura

Amy Rysavy

Debby Hughes

Emily Midgett

Lisa Addesa

Alberto Gava

Emma Williams

Heather Hoffman

Carly Minner

Tracy Ware

Jessica Vasher

Supply List:

* Affiliate links used at no cost to you. Thank you so much for your support!

Latest Posts

Latest Instagram Posts

STAMPtember Butterfly Rose Bouquet

Hello, and welcome to my blog! I’m so happy that you dropped by! It’s that time of year again when STAMPtember is upon us. One of the best months of the year! There’s so many new products, and so much inspiration to draw from, not to mention all of the collaboration sets that will debut soon. With the release of all the STAMPtember products, Simon Says Stamp is hosting a huge blog party with codes for free gifts and gifts with purchase! So, be sure to check out all of the blog posts in the party! You can begin the party by starting at Simon’s blog! Check the bottom of this post for my STAMPtember code! For my card today, I’m featuring the new Billow Butterfly, so let’s run through the details.

To begin, I stamped the floral image from the SSS Orchid Rose Bouquet on a panel of Neenah 110lb cardstock using PFS Misty Coast Ink. I chose this ink, because I wanted a very light background that didn’t distract from the focal point of the card. I then trimmed the panel down using the PFS Diagonal Stitched Rectangles, and cut so that the floral image was on the bottom portion of my card panel.

I used the SSS Etched Eucalyptus Wreath and cut three of those from Neenah 110lb cardstock, and adhered them together using liquid glue. Next, I used the new SSS Billow Butterfly to cut some of the butterflies from some scrap Tim Holtz patterned paper that I had hanging around in my stash. This die is super cool, because it’s one piece that cuts several different butterflies, including solid butterflies as well as, outline butterflies. I opted for the solid for this particular project, because I wanted to be able to see the print of the patterned paper. Once the butterflies were cut, I adhered the bodies using liquid glue and moved on to working on the sentiment.

For the sentiment, I used the thank you die, which is from the SSS Handlettered Greetings set. I die cut the sentiment once from Burnished Rose cardstock, and four times from Neenah 110lb, and adhered all of those together. I wanted the sentiment to be thick, so that it would be sturdy.

To assemble the card, I glued the wreath to the stamped panel, and then glued the patterned butterflies atop the wreath. The butterflies are only glued down at the bodies, so that their wings could be curled for added dimension. Once those were in place, I adhered the sentiment only where it comes into contact with the wreath, hence wanting a thicker sentiment for sturdiness. I trimmed off the excess portions of the sentiment and added some clear drops for a little shine. The panel was then adhered to the card base using foam tape.

That does it for this project! I hope you enjoyed it, and I hope it inspires you to get crafty as well. Don’t forget to check out the entire STAMPtember release along with all of the blog posts celebrating this awesome release! Each blog post will have a different code for gifts! Thanks again for stopping by! Have a wonderful day and stay awesome friend!

Supply List:

* Affiliate links used at no cost to you. Thanks so much for your support!

Latest Posts

Latest Instagram Posts

Strawberry Fields

Hello Friends and thanks so much for stopping by! I’m back today with a card featuring the new Strawberry Fields Embossing Folder from Simon Says Stamp’s latest release, Out of This World. I had a fun time working on this one, although it took me the better part of a day. That’s just me though, it takes me forever to color anything! Anyhoo, let’s roll through the details of this one.

I began by trimming a panel of Neenah 110lb cardstock and misting it with a bit of water before running it through the die cutter. Once the image was embossed, I sat down and got to coloring! The Copic Markers used were R27, R35, R37, R39, RV14, B0000, Y18, N1, C2, BG96, YG99, G21, G24, G85 and G94. If you don’t have a Copic Hex Chart, I highly recommend it. It’s super nice to be able to glance at the chart and know which colors will work nicely together.

Once all of the coloring was complete, I used a Copic Multiliner 0.03 to add some detail for the strawberry seeds. I then trimmed the panel down just a smidge and adhered it to a black panel for a little bit of contrast.

For the sentiment, I opted to use the SSS Thanks die. I cut the shadow three times and the sentiment once from Polished Gold cardstock and adhered all of those together using liquid glue. That was then placed in the center of the panel.

I adhered everything to the card base and added a few clear drops to complete this project.

That does it for this one. Don’t forget to check out the entire Out of This World release and let me know your favorites! Thanks again for stopping by and have a wonderful day!

Supply List:

* Affiliate links used at no cost to you. Thanks so much for your support!

Latest Posts

Latest Instagram Posts

Simon Says Stamp Floral Thank You

Hello Friends and thanks so much for stopping by! I’m still playing with goodies from Simon’s latest release, Happy and Joyful. There are so many beautiful florals in this release, and today’s card is featuring the new Lisianthus stamp set. Let’s run through the details for this card!

I began by stamping the floral image on a panel of Neenah Classic Crest 110lb cardstock using VersaMark Ink and then heat set it using SSS Detail White Embossing Powder.

I was going for an emboss resist technique so I used PinkFresh Studio inks in Soft Lilac and Lavender, as well as Simon’s Aspen Pawsitively Saturated Ink for the ink blending on this panel. When the ink blending was complete, I used the new SSS A2 Marquee die set to trim it down. I cut the marquee an additional two times and adhered all of those together using liquid glue for added dimension without the bulk. This is such a cool die, and I just love the detail that it adds! I also added some white splatter to the panel using Royal Talens Titanium White Acrylic Ink before moving on.

For the sentiment, I used the SSS Clean Line Gratitude stamp and die set. I stamped thanks using VersaFine Onyx Black ink and heat set that using Ranger Clear Embossing Powder. I trimmed it out using the coordinating die and placed foam tape on the back. I searched my SSS Sentiment Strips to find a sub-sentiment that worked well and added foam tape to that as well.

The sentiments were added to the panel along with some pearl accents before being added to the card base using SSS Dot Tape Runner.

Super simple card, but I love the soft airy feeling to it. I hope you enjoyed it, and I hope it inspires you to get crafty! Don’t forget to check out the entire Happy and Joyful release, and let me know your favorites! Have a wonderful stay and stay awesome!

Supply List:

* Affiliate links used at no cost to you. Thanks so much for your support!

Latest Posts
Latest Instagram Posts