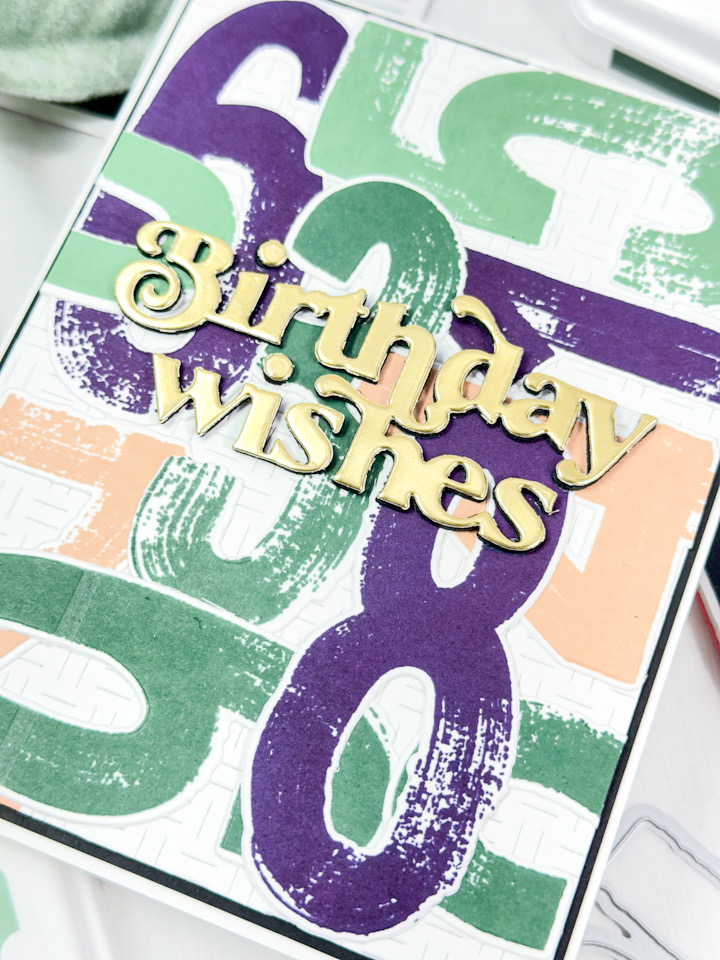
Simon Says Stamp Winter Wishes

Hey There! Thanks so much for stopping by to check out today’s project featuring the Tim Holtz Be of Good Cheer set! You can snag this set free with any $25 purchase of Tim Holtz products over on Simon’s website! Let’s go ahead and get into the details, shall we?

NOTE: all supplies are linked in the thumbnails at the end of this blog post.

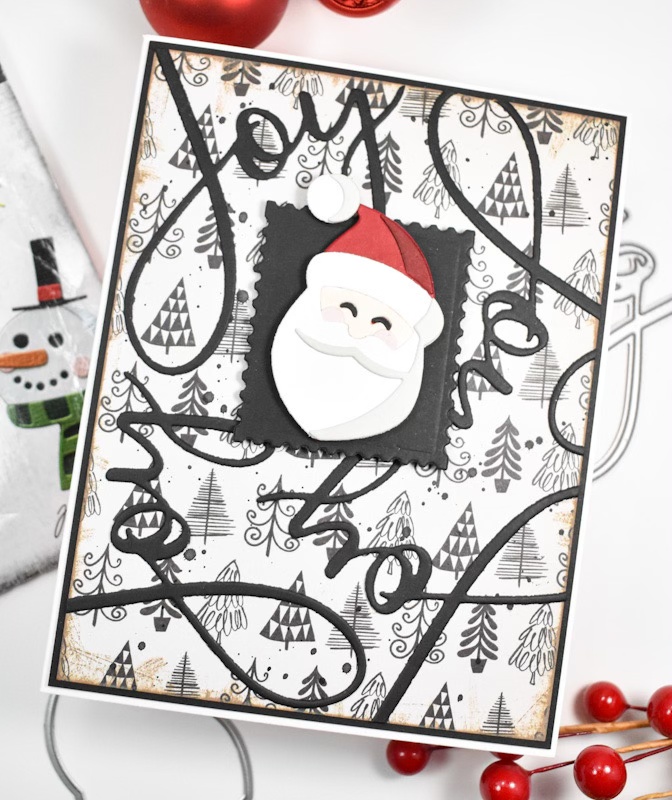
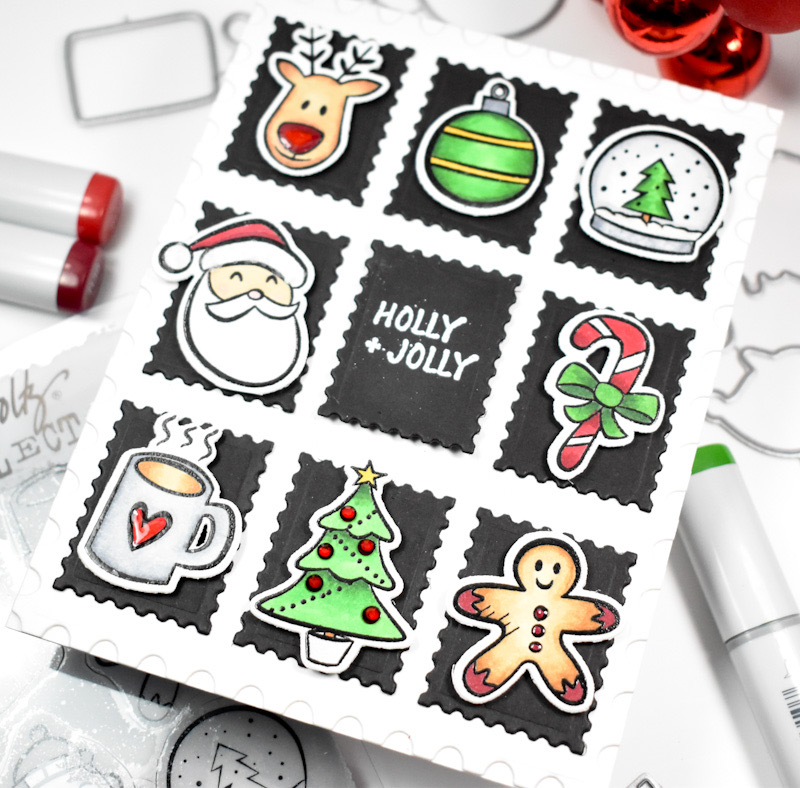
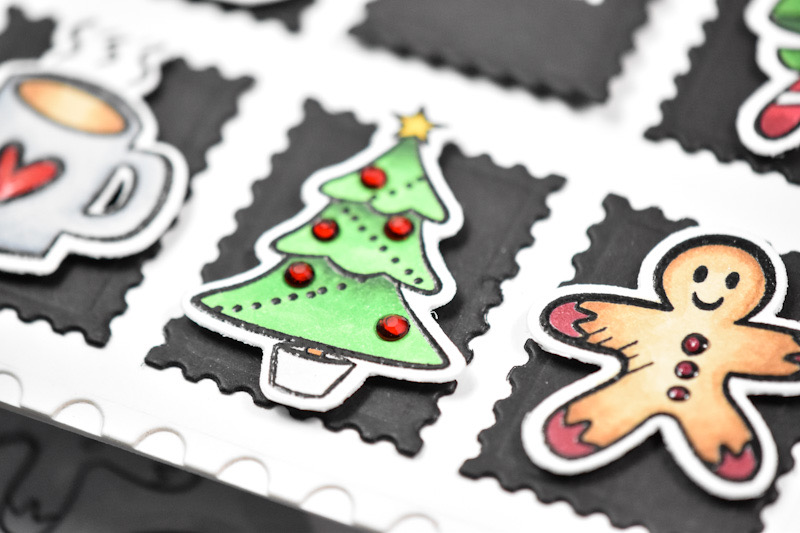
I began this project by die cutting the snowman from the set using color coordinating pieces of cardstock. Since I was going for a snowy card, I opted to use blues for mine. Once all the pieces were cut, I assembled the snowman and set that aside while I worked on the rest of the card.

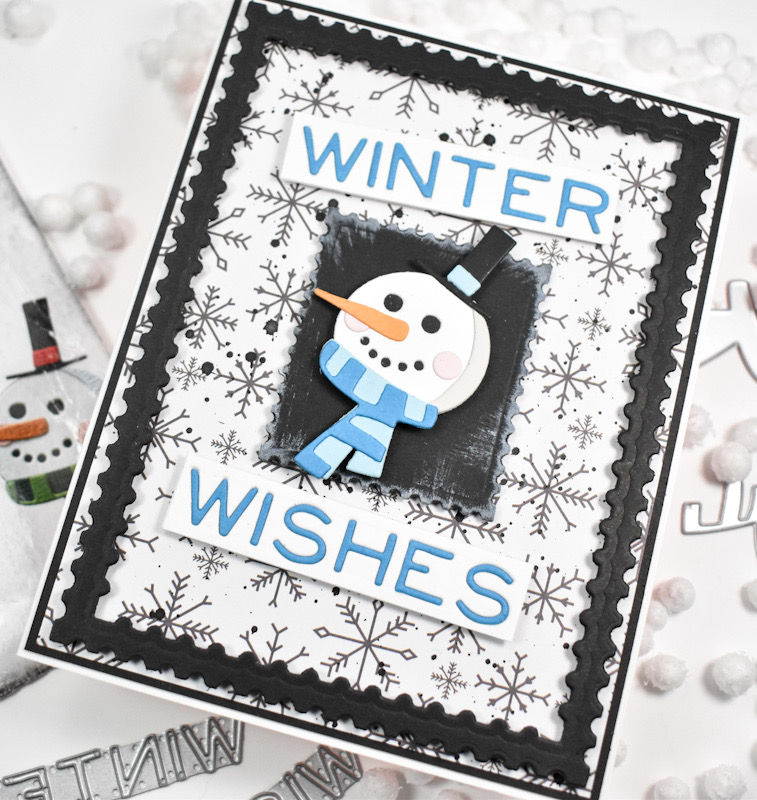
I found a piece of snowflake patterned paper and thought that would work well, so I trimmed it down to size and splattered it with some black acrylic ink. I created a frame with black cardstock using the Postage Stamp Edge Frames and also cut a black square as a backdrop for the snowman. To add a little distress, I rubbed the edges with Ranger Picket Fence ink as well. The sentiment was created using blue cardstock and the TH Sizzix 661600. I was unable to locate this set on Simon’s website or even Tim’s website, so I’m assuming that it has been discontinued. My apologies about that, but any sentiment in your stash would work perfectly fine!

The black frame was adhered to the snowflake paper using foam strips, as was the sentiment strips and the smaller black center square. Because I like dimension so much, I went ahead and adhered the snowman with foam tape as well. One can never have too much dimension!

That does it for this one! I hope you enjoyed it as much as I did! Have you snagged your Be of Good Cheer set yet?! If not, head on over to Simon’s website to do so before they’re gone! Thanks again for joining me today, and I hope you have a wonderful holiday season!

Supply List

Affiliate links used at no cost to you. What does this mean? If you use the links within this post to make a purchase, I receive a small commission, which allows me to continue to post crafty content for your enjoyment. I truly appreciate your support!

Latest Posts

Latest Instagram Posts

Simon Says Stamp Good Cheer Ornament

Hello Crafters, and welcome back to my blog! Thanks so much for stopping by to check out today’s project featuring the Tim Holtz Be of Good Cheer set! Let’s run through the details for this one!

NOTE: all supplies are linked in the thumbnails at the end of this blog post.

I began this project by die cutting the snowman pieces from the set with color coordinating cardstock. I then adhered the pieces of the snowman and went to work on the Layered Rosette from Simon’s latest DieCember release. I die cut the pieces of the rosette from Neenah 110lb cardstock and did some ink blending using Cabbage and Artichoke ink. You can tell from the images that I die cut the smaller rosette from gold cardstock as well, for layering purposes. Before adhering the pieces, I did some white ink splatter for a bit of added interest.

Since I made this into an ornament, I die cut the larger rosette four times, used a hole punch so that I could tie ribbons, and adhered all of those together with liquid glue. To give it a bit of aging, I rubbed some Gathered Twigs Oxide ink along the edges as well. The snowman was then adhered using foam tape for added dimension.

To finish up, I used some gold thread for the hanging portion of the ornament, and used some red and white twine to make a bow as well. That does it for this project! I hope you enjoyed it as much as I did. You can receive your own Be of Good Cheer set free with an $25 Tim Holtz purchase. Thanks again for joining me, and have a wonderful day!

Supply List

Affiliate links used at no cost to you. What does this mean? If you use the links within this post to make a purchase, I receive a small commission, which allows me to continue to post crafty content for your enjoyment. I truly appreciate your support!

Latest Posts

Latest Instagram Posts

Simon Says Stamp Joyful Santa

Hello Friends and welcome back! Have you snagged your free Be of Good Cheer set from Tim Holtz and SSS yet?! This is such a great deal! It’s automatically added to your cart when you spend $25 on TH branded products. These are products that we use anyway, so why not grab yours! My project today is featuring the Santa from the set, so let’s get into the details!

NOTE: all supplies are linked in the thumbnails at the end of this blog post.

I began this project by selecting a piece of patterned Holiday paper and trimming it down. I then inked the edges of the paper using Distress Oxide Gathered Twigs to give it an aged look, along with some black splatter. I cut several of the Large Joy die cuts from black cardstock and adhered those to the panel in a random pattern.

I die cut the pieces of the Santa from coordinating colors in Neenah Solar White, black, red, fog, pink and tan cardstock colors. Once those were cut, I assembled the Santa using liquid glue. I used the Postage Stamps die to cut a black square that would be used to mount the Santa on.

The black square was adhered to my panel using foam tape and the Santa was adhered atop that with more foam tape for lots of dimension. This was then adhered to a black panel for contrast before being adhered to the card base to finish up.

That finishes up this project! I thought this was a good card to utilize some of that patterned paper that I seem to hoard for whatever reason! Be sure to grab your Tim Holtz set before they’re gone! Thanks again for stopping by, and I hope you have a wonderful day!

Supply List

Affiliate links used at no cost to you. What does this mean? If you use the links within this post to make a purchase, I receive a small commission, which allows me to continue to post crafty content for your enjoyment. I truly appreciate your support!

Latest Posts

Latest Instagram Posts

Simon Says Stamp STAMPtember Tim Holtz Collaboration

Hello Crafty Friends, and welcome back! YES, it’s the day that we’ve all been waiting for, the Tim Holtz Collaboration set for STAMPtember! You guys, this is such a fun set! It has two die sets, one set is a postage stamp set, and the other is the set that die cuts all of the fun images! Let’s go ahead and go through the details for this project!

NOTE: all supplies are linked in the thumbnails at the end of this blog post.

I began this project by stamping all of the images from the set. I just peeled the set from the plastic and plopped the whole thing into the Misti! I figured that I could figure out what I was going to use later. I used VersaFine Onyx Black ink for the stamping and Ranger Clear Embossing Powder to heat set.

I then went to work coloring the images that I wanted to use with Copic Markers. I’ll link to those colors in the thumbnails below. Once the coloring was complete, I used the coordinating dies to trim the images out. I knew that I wanted to create a grid for my card, so I also cut nine of the small postage squares from black cardstock.

For some of the images on my card, I added some elements of interest. I added red gems to the Christmas tree, glitter to Santa’s hat and Glossy Accents to several of the images. Once those were dry, I adhered the images to the black squares using foam tape. My center square needed a sentiment, so I stamped this one using VersaMark Ink and heat set it using white embossing powder.

I created a background panel to work on using the SSS Postage Stamp Edge Frames and glued my images in place, while the middle sentiment was adhered using foam tape so that it would match the dimension of the other squares. The panel was then adhered to the card base to finish up.

That does it for this project! I hope you enjoyed it as much as I did! Be sure to grab your TH STAMPtember Collaboration set before it sells out, because once it’s gone, it’s gone forever! Thanks again for stopping by, and don’t forget to stay awesome!

Supply List

Affiliate links used at no cost to you. What does this mean? If you use the links within this post to make a purchase, I receive a small commission, which allows me to continue to post crafty content for your enjoyment. I truly appreciate your support!

Latest Posts

Latest Instagram Posts

Simon Says Stamp Paint By Number

Hello Friends, and welcome back! I’m home from the Simon Says Stamp CREATE event, and let me just say, if you’ve never been, you absolutely need to go! It’s so amazing to meet and hang out with like-minded people that you’ve met online! Anyhoo, I did a bunch of shopping, to include adding the newish set, Paint by Number. The stamp set is from Tim Holtz and Stampers Anonymous, but the coordinating die set is a SSS exclusive! Let’s run through the details, shall we?

Main Products:

I began this project by pulling out an inspiration card from The Color Cubes, and then pulled some inks to match. The inks used were SSS Pawsitively Saturated Inks in Sage and Kale, Concord & 9th Eggplant ink and Pinkfresh Studio Warm Buff ink. I stamped the different numbers with the different inks onto Neenah 110lb cardstock and then used the coordinating dies to trim them all out.

The background panel is using the Concord & 9th Basket Weave Card Front die for some added texture. I adhered the numbers atop the panel using liquid glue, overlapping some of the numbers to fill in the white space.

I used the SSS Birthday Wishes die, which is also included in the new June 2024 Card Kit, and cut that once from gold cardstock and three times from black cardstock. I adhered all of those together and secured it in the middle of my card. The panel was then adhered to a black panel for some contrast before being adhered to the card base.

That finishes up this project! I’m so glad that I picked this set up, because, oddly enough, I didn’t have any number stamps or dies. I definitely think this set will be a staple in my stash. Thanks again for stopping by, and I hope you have a wonderful day! Stay awesome friend!

Other Products:

* Affiliate links used at no cost to you. Thanks so much for your support!

Latest Posts

Latest Instagram Posts

Simon Says Stamp You’re So Kind Halftone Square Background

All the Feels Release

I’m having such a blast with the products from this release, and today’s project is one of my favorites! Mixed Media really isn’t in my wheel house, but I enjoy the mix of products and textures. You can check out the full All the Feels release HERE. Let me know what your favorites are!

Let’s get into today’s fun project where I’m featuring the new Halftone Square Background stamp. To begin, I put a piece of Fluid Hot Press Watercolor paper in my Misti and positioned my stamp. To achieve this look, I basically scribbled Karin Brushmarkers! Super fun, super easy! I chose a few rainbow colors from my set, and I scribbled one color at a time, spritzed it with water, and stamped! What did I say? Super easy, yet I think the results were kind of cool! I repeated that process with the remaining colors.

I left my watercolor panel to dry overnight .. under some books to help with the warping. I really wanted to use some Ranger Distress Crackle Paste on this, because I had decided that I was going to try a mixed media project. I used the circle stencil from the Mini Slimline Patterns 1 set, which is also a newbie in the All the Feels release. So, I used my spatula thingie to run some paste through the stencil and left that to dry. When it was dry, I took a waterbrush and lightly touched the crackle paste with water and lightly touched that with my Karin Brushmarker. Why? Because the crackle wasn’t showing up that well, so adding just a hint of color helped .. but it still isn’t very visible.

After that was dry .. again, I whipped out some Tim Holtz Stampers Anonymous stamps, because you really can’t have a mixed media piece without Tim Holtz! Am I right?!?! I ended up using stamps from the sets Documented and Ultimate Grunge. I also used the Simon Says Stamp Old Letter Background stamp. For the background stamping, I used some Memento Tuxedo Black ink, as well as some VersaFine Onyx Black ink.

Moving on to my focal point and sentiment .. I die cut the Simon Says Stamp Cosmos Stem three times for each flower from Neenah Classic Crest 110lb cardstock. And .. I cut that little center piece from black cardstock. I thought that would tie all of my black elements together. I added color to one layer for each of the flowers using Distress Oxide Kitsch Flamingo and Distress Oxide Mowed Lawn. I adhered my flower stems together with the colored piece being on top with Craft Tacky Glue. I then die cut the Simon Says Stamp You’re so Kind sentiment three times from black cardstock, and glued those together. Why all this die cutting? Because dimension is life, and die cutting is my jam!

My next step was just dorking around with the placement of everything on my panel. Once I figured it out, I adhered my sentiment to my panel with Craft Tacky Glue, and I had to trim some of my stems before gluing those as well.

Now we all know about the bling situation! There has to be bling! Always! I opted for Simon Says Stamp Moonshine Confetti for this project. It gave just a little bit of shine, but wasn’t too distracting. I adhered my panel to a black panel using 3M Foam Tape and then glued that to my card base, which happens to be Neenah 110lb cardstock.

And there you have it! Like I said, mixed media isn’t my thing, but I do really enjoy it! It’s just so much fun to bring so many different things together on one project! I hope this inspires you to try something new or something that isn’t necessarily your thing either!

Don’t forget to check out the new release, All the Feels!

Thanks so much for stopping by and don’t forget to stay awesome!

Supply List:

*Affiliate links used at no cost to you. Thank you for your support!

Latest Instagram Posts

Mixed Media Love You Card

Hey there crafty friends! I hope everyone has had a great weekend! We’ve had a snow storm here in Northern Virginia over the weekend. I hate the cold, but don’t mind it if it’s snowing!

Anyhoo, let’s get into today’s card. This card has so many layers going on! I first started with some Distress Oxide Spray Stains on some heavy weight watercolor paper. I then added some Crackle Paste through a Stamper’s Anonymous stencil. Once that was dry, I added some watercolors to intensify my colors a bit.

Once all of the wet elements were added to the card panel and dry, I added some stamping with the Simon Says Stamp You Are Background stamp, Tim Holtz Stitches and Tim Holtz Mixed Media Marks.

For the focal point of my card, I used the new Simon Says Mini Interactive Envelope die, the hearts from the Mini Hearts Party die and an older I love you die.

Of course I had to pop my hearts up with foam tape, because who doesn’t love dimension!?!? Am I right? My sentiment was cut three times and adhered together for further dimension. I adhered my card panel to a black cardstock panel with foam tape as well, before adhering to my card base.

I hope you’ve enjoyed this mixed media-ish card featuring Simon Says Stamp products for the new Love You release. I really had fun creating this card, and I hope it inspires you to get creating as well. Thanks so much for stopping by.

Stay awesome!

Supply List:

Latest Instagram Posts