Simon Says Stamp Thank You Vines

Hello Lovelies! I hope your day is going well! Thanks so much for stopping by to check out my project featuring the new Exotic Vines Embossing Folder from Simon Says Stamp’s newest release, And Back Again. Let’s go through the details!

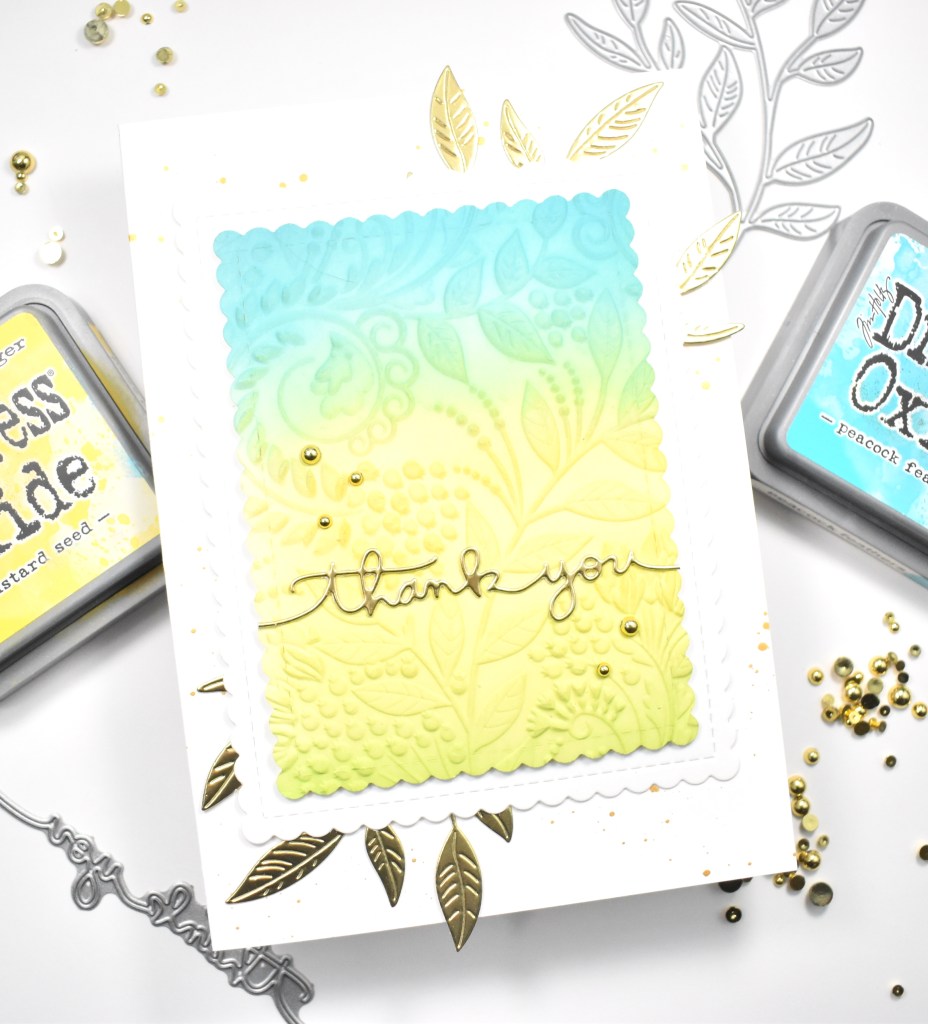
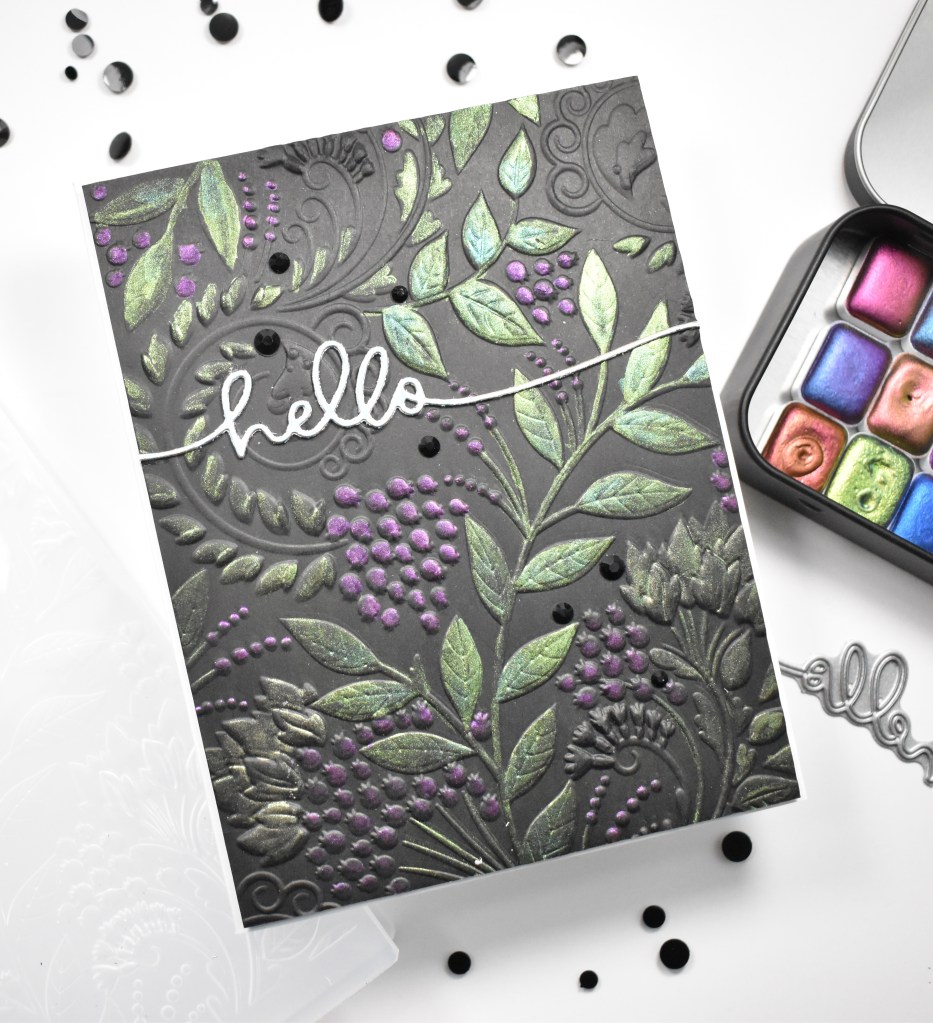
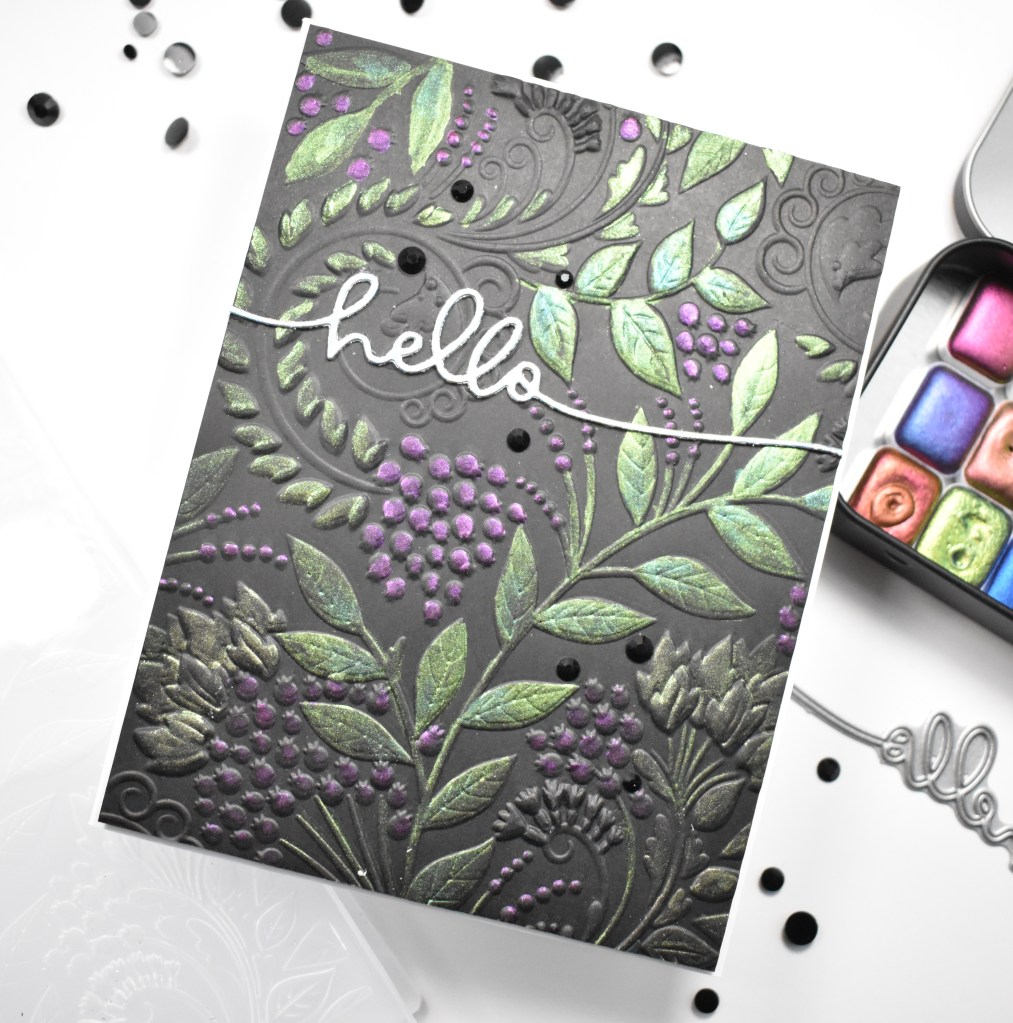
I began this project by spritzing a panel of Neenah Classic Crest 110lb cardstock with water before placing it in the SSS Exotic Vines Embossing Folder and running it through my die cutting machine. Be sure to check Simon’s website for appropriate sandwiches for the different machines. That was super helpful for me!

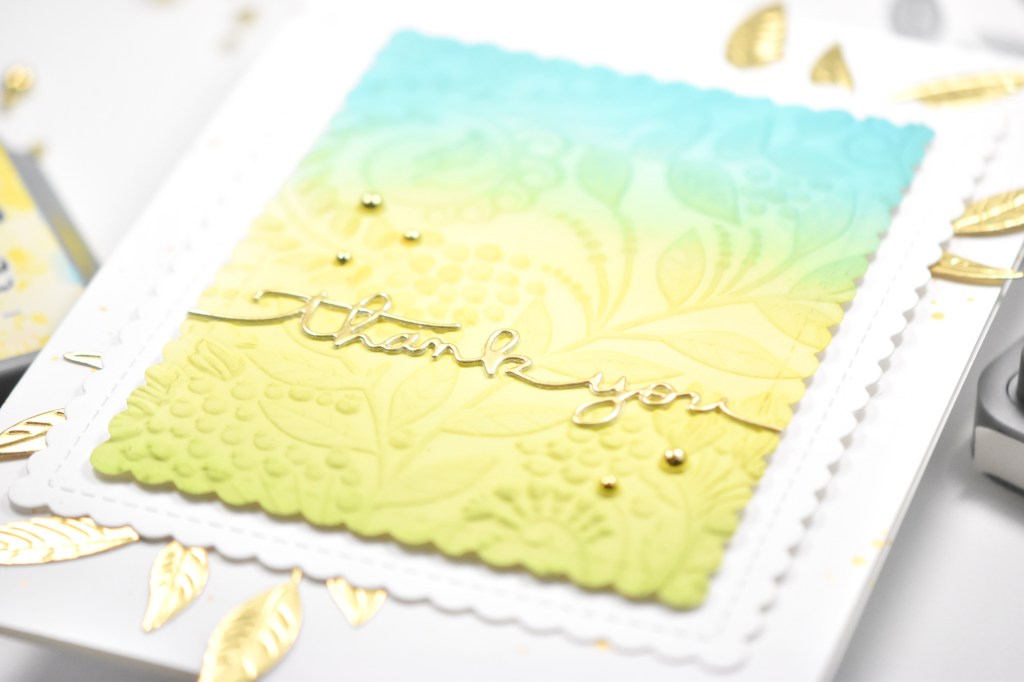
Once the panel was embossed, I trimmed it down using the Honey Bee Scallop A2 Card Frames and ink blended that using Distress Oxide Broken China, Peacock Feathers, Mustard Seed, Twisted Citron and Mowed Lawn. I then sat that aside while I worked on the rest of the card. I decided on an A7 card base, which I splattered using Royal Talens Light Gold Acrylic Ink.

I die cut the thank you sentiment, which is from SSS Handlettered Greetings, once from mirror gold cardstock and once from Neenah 110lb, and adhered both of those together using liquid glue. I also die cut the SSS Privet Branch twice from the same mirror gold cardstock. I needed another layer, so I cut another panel of Neenah 110lb using a larger die from the same Honey Bee frame set.

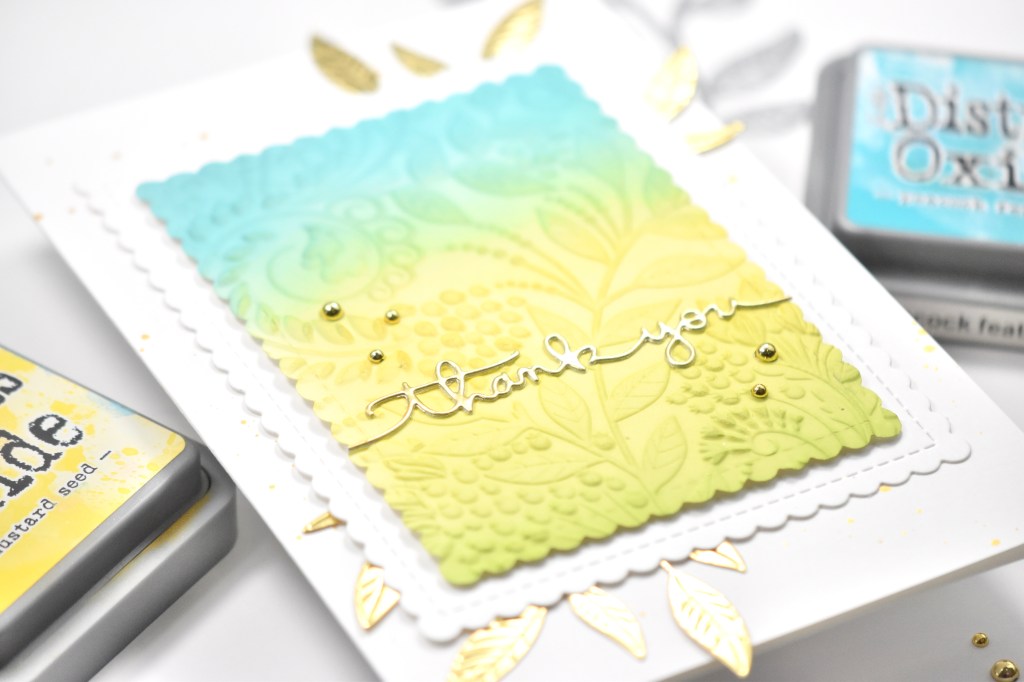
I adhered the sentiment to the embossed panel using liquid glue and trimmed off the excess. The embossed panel was then adhered to the white scalloped panel using foam tape for dimension. The leaves were glued underneath the scalloped panels with the leaves peeking out from the edges for added interest, and everything was then adhered to the card base using SSS Dot Tape Runner. I added a few PinkFresh Studio Gold Metallic Pearls to finish up.

That does it for this project! I love the large white border around the focal point of this card! I hope it inspires you to get crafty. Stop by and check out the entire And Back Again release, there’s lots of super, fun things in this one. Have a wonderful day and don’t forget to stay awesome!

Supply List:

* Affiliate links used at no cost to you. Thanks so much for your support!

Latest Instagram Posts

Simon Says Stamp Lots of Love Greetings

Hello Friends and thanks for joining me! I’m super excited to be participating in a SSS Instagram Hop today, to celebrate the And Back Again release! Be sure to head over there to check it out and leave comments along the hop! There are lots of $25 gift cards up for grabs! So, let’s go through the deets for today’s card!

The colors of this card remind me of Valentine’s Day conversation hearts! This card was definitely a labor of love! I hated it for a bit, and then I finally came around to liking it! But it was definitely one of those cards that starts out as a great idea in your head, but once you get started, it doesn’t look like you envisioned it. So then you end up stamping, cutting, moving things around, changing colors, etc., etc. before deciding on a finished project. Anyhoo, I began this project by stamping a bunch of the sentiments from the SSS XL Love Greetings set on Neenah Classic Crest 110lb cardstock using SSS Pawsitively Saturated inks in Bubblegum, Sweets, Cheeky, Melon, Sunbeam, Celery, Fairway, Seafoam and Marine.

I stamped each sentiment in it’s ink color, cleaned the stamped and re-inked it using VersaMark ink and then heat set it using Ranger Clear Embossing Powder. I continued this process for lots of sentiments obviously. When I was done, I used the coordinating SSS XL Love Greetings dies to trim those out.

This background was a bluish, ink smooshed background from my stash, but I decided that it needed some additional colors to tie in all of my colored sentiments. I added some Distress Oxide Spray in Picked Raspberry and moved that around with a water brush, as well as, some ink smooshed Twisted Citron. In addition to those, I used some Ranger Dina Wakely Gloss Sprays in Lime, Turquoise, Ocean and White to do a bunch of splattering. I did use my heat tool to speed up the drying process so that I could continue.

I laid out my sentiments on the panel in a way that I was satisfied with, but decided that they needed more dimension. So, I went back and cut another white layer using the dies and adhered all of those together using liquid glue. I then glued the sentiments to the panel and trimmed off any excess around the edges. I wasn’t quite satisfied, so I went back and stamped three of the sentiments using VersaFine Onyx Black ink and heat set those using the same clear embossing powder, and trimmed them out.

I adhered those three sentiments to the panel using foam tape for added dimension. I also added some pink glitter hearts, because why not, and because I felt like it needed something extra! This panel was then adhered to a black panel using foam tape, before being adhered to my card base with SSS Tape Runner, which I splattered with Royal Talens Amsterdam Oxide Black Acrylic Ink.

That finishes up this project! It took a while, but in the end, I love how it turned out! Don’t forget to head over to Instagram to participate in the hop and leave comments for your chance to win a gift card! Who doesn’t love winning gift cards?! Thanks again for stopping by and have a wonderful day!

Supply List:

* Some affiliate links used at no cost to you. Thank you for your support!

Latest Instagram Posts

Simon Says Stamp You Still Give Me Butterflies

Hello! Hello! I hope you’re having a wonderful day! I appreciate you stopping by to check out my post featuring new goodies from Simon Says Stamp’s latest release, And Back Again! Today’s project is featuring the new XL Love Greetings. I love this set so much, and have enjoyed playing with it. Of course, I had to order the coordinating die set, because, duh, I needed it! Anyhoo, let’s jump right into the details!

I started this project by doing some ink blending on a panel of Neenah Classic Crest 110lb cardstock using the SSS Stylized Butterfly Stencil. I needed rainbow colors, so I reached for Distress Oxide inks in Picked Raspberry, Spiced Marmalade, Mustard Seed, Twisted Citron and Broken China. Once I was done ink blending, I fussy cut the butterfly wings.

Then, I used the SSS Stylized Butterfly die to trim the butterfly wings twice from Neenah 110lb, and I trimmed the body from black cardstock. I adhered all of the pieces together, leaving the outside of the wings free-flowing so that I could zhoosh them up. I set the butterfly pieces aside while I worked on the remainder of the card.

I die cut some leaves using the SSS Privet Branch and lightly ink blended those using the remainder of the ink on my blending brush. I wanted just a small hint of color on those. I trimmed a panel of Neenah 110lb using the PinkFresh Studio Diagonal Stitched Rectangles and adhered the leaves atop that using liquid glue.

I stamped the sentiment, which is from the new SSS XL Love Greetings set using VersaFine Onyx Black ink and heat embossed that using Ranger Clear Embossing Powder. I stamped it a second time using VersaMark ink and embossed again using the same powder. By embossing twice, it gives it a much nicer, smoother finish. Once that was done, I had to fussy cut the sentiment, hence purchasing the coordinating die set!

The butterfly was glued to the center of the panel and the sentiment was adhered just below that using foam tape for dimension. This panel was then adhered to a black panel using SSS Dot Tape Runner, before being adhered to the card base. I added some iridescent confetti to finish up!

Super fun card to make! I hope you enjoyed it, and I hope it inspires you to get crafty! Stop by and check out the entire And Back Again, and let me know your favorites! Thanks again for stopping by, and don’t forget to stay awesome!

Supply List:

* Affiliate links used at no cost to you. Thanks so much for your support!

Latest Instagram Posts

Simon Says Stamp Hello Friend Snowflakes

Hello Crafty Friends! Thanks so much for stopping by! I’m still playing with goodies from Simon’s newest release, And Back Again. Today’s project is featuring the new Mini Slimline Snowflake Window stencil. Let’s go through the details!

I began by attaching the stencil to a panel of Neenah Classic Crest 110lb cardstock using masking tape, and began to do some ink blending using Distress Oxides in Speckled Egg, Salvaged Patina and Chipped Sapphire. Ink blending and stencils are so great, because a beautiful image comes together so effortlessly!

For the sentiment, I used the SSS Snowflake Season Stamp and Die set. I selected the sentiment and stamped it using VersaFine Onyx Black ink and heat embossed it using Ranger Clear Embossing Powder. I then used the coordinating die to trim that out.

The card needed some interest so I pulled out some black and white twine and wrapped it around the trimmed down card towards the bottom and tied a knot. I then adhered my sentiment atop that using some foam tape. I also added some pearls, which I thought was a nice addition.

Everything was adhered to a black panel using SSS Dot Tape Runner, and then adhered to my card base, which I had splattered with Royal Talens Oxide Black Acrylic Ink.

That finishes up this project! I hope you enjoyed it and I hope it inspires you to get crafty! Don’t forget to swing by the SSS website and check out the entire And Back Again release! Have a wonderful day and stay awesome!

Supply List:

* Affiliate links used at no cost to you. Thanks so much for your support!

Latest Instagram Posts

Simon Says Stamp Exotic Vines Hello

Hey Friends! How are you doing? Thanks for joining me today for another project featuring goodies from Simon’s newest release, And Back Again! Today’s card is using a new embossing folder called Exotic Vines. Read on for all the details!

To begin, I trimmed a panel of black cardstock and placed it inside the Exotic Vines folder and ran it through my die cutting machine. Make sure to check Simon’s website for the various sandwiches to use with the different machines. That’s super helpful!

Once my panel was embossed, I began watercoloring the raised portions using my new Iuile Watercolor palette that I received as a Christmas present! What a fun set this is! Actually, all of their watercolors are amazing! Anyhoo, I did the painting using a detail water brush. Once I was done, I sat that aside to dry while I worked on the sentiment.

I used the hello die from the SSS Handlettered Greetings set and cut that from SSS Holographic cardstock. I cut it a second time from black cardstock and adhered both of those together using liquid glue.

The sentiment was then glued to the upper portion of the embossed panel, and I trimmed off the excess before adhering the panel to the card base using foam tape. I also added some black crystals for that little, extra shine!

Super simple card today, but I thoroughly enjoyed using these new colorshift watercolors. From one angle, they look like one color and from a another angle, they look like a completely different color! Super fun! I hope you’ll stop by and check out the entire And Back Again release! Have a wonderful day and don’t forget to stay awesome!

Supply List:

* Affiliate links used at no cost to you. Thank you so much for your support!

Latest Instagram Posts

Simon Says Stamp Love Greetings

Hello Crafty Friends! Have you checked out the newest Simon release, And Back Again? What are your favorites? Today’s card is featuring a great new stamp set called XL Love Greetings! Large sentiments are absolutely my jam, so I was so excited to see this one! Let’s go through the details of the project.

I began this project by putting a panel of Neenah Classic Crest 110lb cardstock in the Misti and arranging a bunch of the sentiments from the XL Love Greetings on top, fitting as many as I could. Once I was satisfied with the placement, I inked the stamps up using VersaFine Onyx Black ink and heat embossed them using Ranger Clear Embossing Powder.

I trimmed the stamped panel using SSS Postage Stamp Edge Frames and adhered it to a black panel using SSS Dot Tape Runner. I created a striped panel using cardstock from the Stamp Market and used the heart die from the SSS Botanical Heart die set to trim it out.

The card was missing something, so I used the SSS Etched Meadow Flowers and Leaves set to cut some leaves from coordinating pink and white cardstock. I used the Ranger Embossing Dauber to add some ink to the edges of the pink leaves and heat set some Ranger Holographic Embossing Powder.

The leaves were glued underneath the heart, while the heart was adhered using foam tape for dimension. I also added a Doodlebug Designs Tiny Hearts sticker for a little added interest. Everything was then adhered to the card base to finish up.

That does it for this project! I hope you enjoyed it and I hope it inspires you to get crafty! Definitely stop by and check out this super fun release, And Back Again from Simon. Have a wonderful day and don’t forget to stay awesome!

Supply List:

* Affiliate links used at no cost to you. Thanks so much for your support!

Latest Instagram Posts

Simon Says Stamp Piece of My Heart

Hello Crafty Lovelies! It’s been quite some time since I’ve posted. We traveled for the holidays and then I spent some time with my family, but I’m back today with a project featuring the new Piece of My Heart die from Simon’s newest release, And Back Again! What a super fun release this is! I’ve had so much fun creating with the goodies that I received! Let’s jump right into the details for today’s project, shall we?

I began this project by cutting some strips of pink and blue cardstock using the PinkFresh Studio Slim Stripes die. I cut a scrap piece of Neenah Classic Crest 110lb cardstock and lined the strips up diagonally using liquid glue. Once all of the stripping was done, I used the new SSS Piece of My Heart die to cut it out of the striped piece.

Next, I trimmed a panel of Neenah 110lb using the PinkFresh Studio Diagonal Stitched Rectangles, and splattered that using Ranger Dina Wakely Gloss Spray in Ocean. While that was drying, I cut the SSS Clipping Heart die four times from SSS Holographic cardstock.

I began gluing the clipping hearts down to the panel, covering as much of the panel as possible. I trimmed the excess off and repositioned those in other places on the panel, so as not to waste any of the die cuts. I also cut the clipping hearts a couple of times from the blue cardstock, because I wanted to inlay just a few of those for interest.

I placed foam tape on the back of the SSS Piece of My Heart die and positioned it in the center of the panel. I found a coordinating SSS Sentiment Strip and glued that in the center of the heart. Everything was then adhered to a black panel using SSS Tape Runner, before being adhered in the same way to the card base.

That finishes up this project! Thanks so much for joining me today! I hope you’ll stop by and check out the entire And Back Again release! There’s so many fun things in this one! Have a wonderful day and don’t forget to stay awesome!

Supply List:
  1. SSS Piece of My Heart Die
  2. SSS Clipping Heart
  3. SSS Holographic Cardstock
  4. SSS Sentiment Strip
  5. SSS Surf Blue Cardstock
  6. SSS Tape Runner
  7. PinkFresh Studio Slim Stripes Die
  8. PinkFresh Studio Diagonal Stitched Rectangles
  9. Ranger Dina Wakely Gloss Spray, Ocean
  10. Neenah Classic Crest Solar White 110lb Cardstock
  11. Black Cardstock
  12. Tim Holtz Scissors
  13. Bearly Art Glue
  14. 3M Foam Tape
  15. Gemini Jr.

*Affiliate links used at no cost to you. Thanks so much for your support!

Latest Instagram Posts