Simon Says Stamp Lots of Love Greetings

Hello Friends and thanks for joining me! I’m super excited to be participating in a SSS Instagram Hop today, to celebrate the And Back Again release! Be sure to head over there to check it out and leave comments along the hop! There are lots of $25 gift cards up for grabs! So, let’s go through the deets for today’s card!

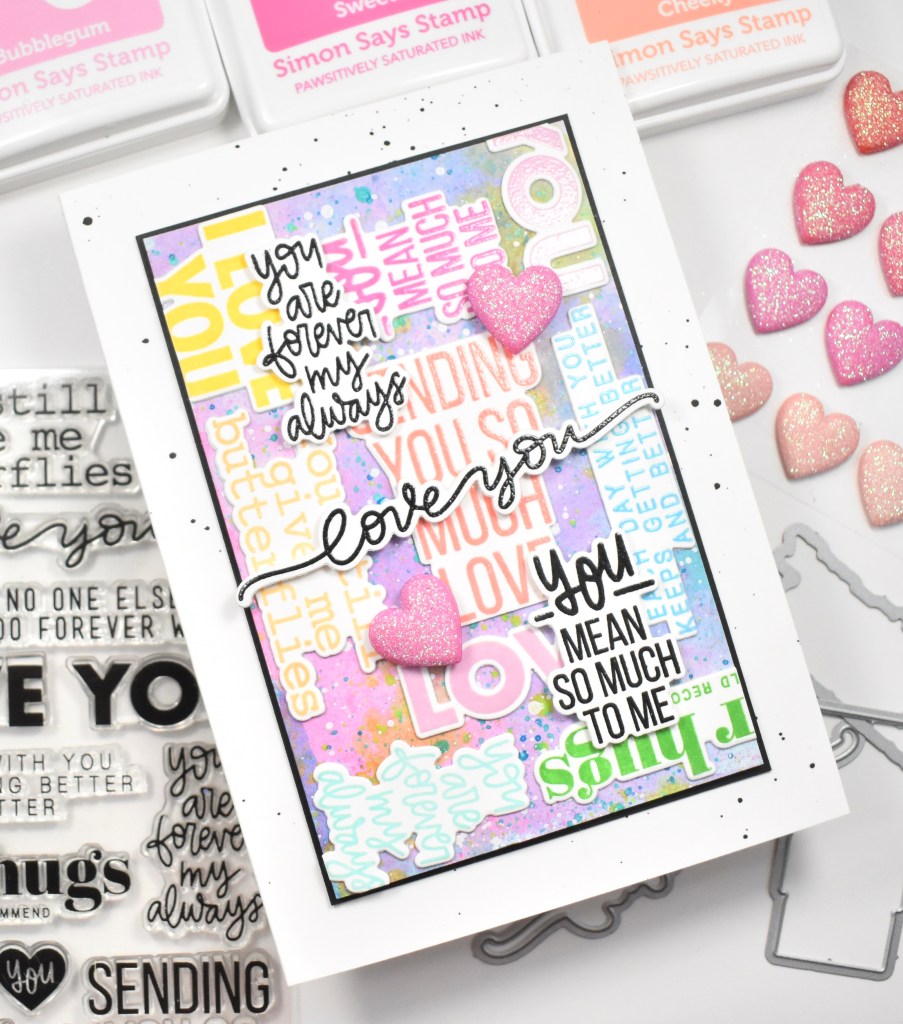
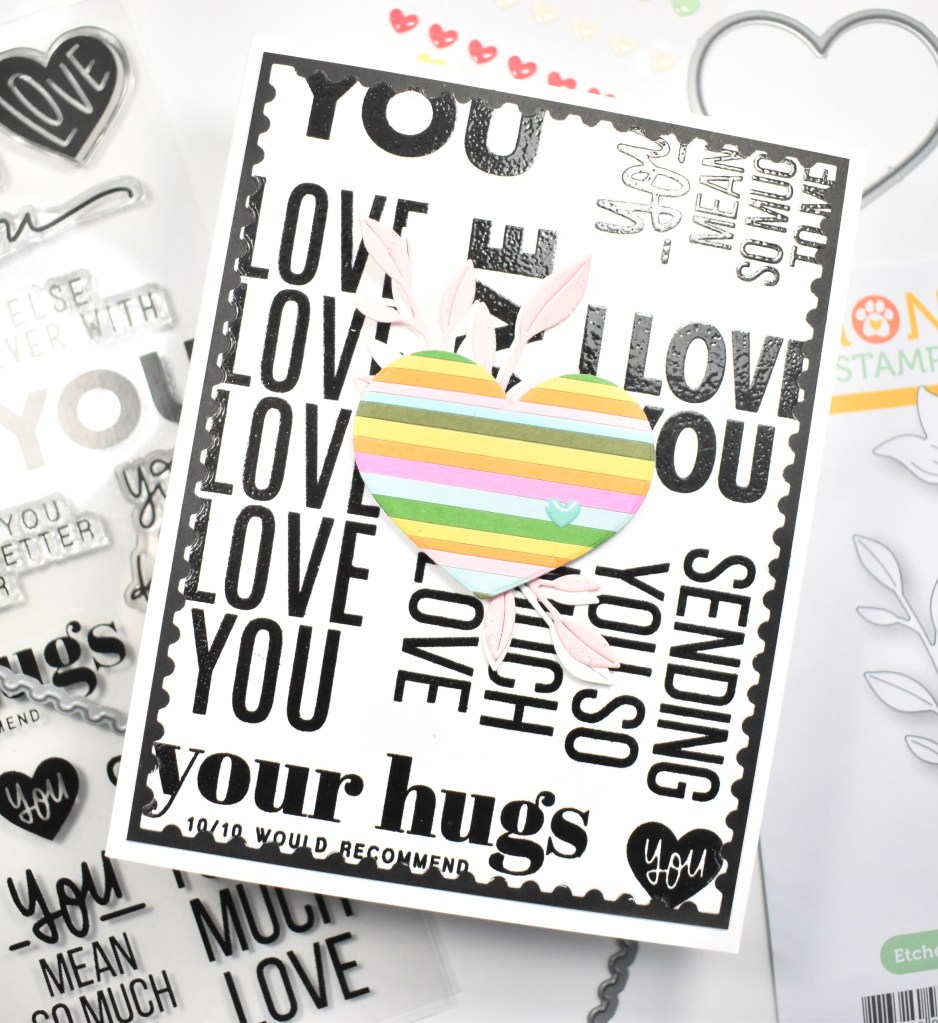
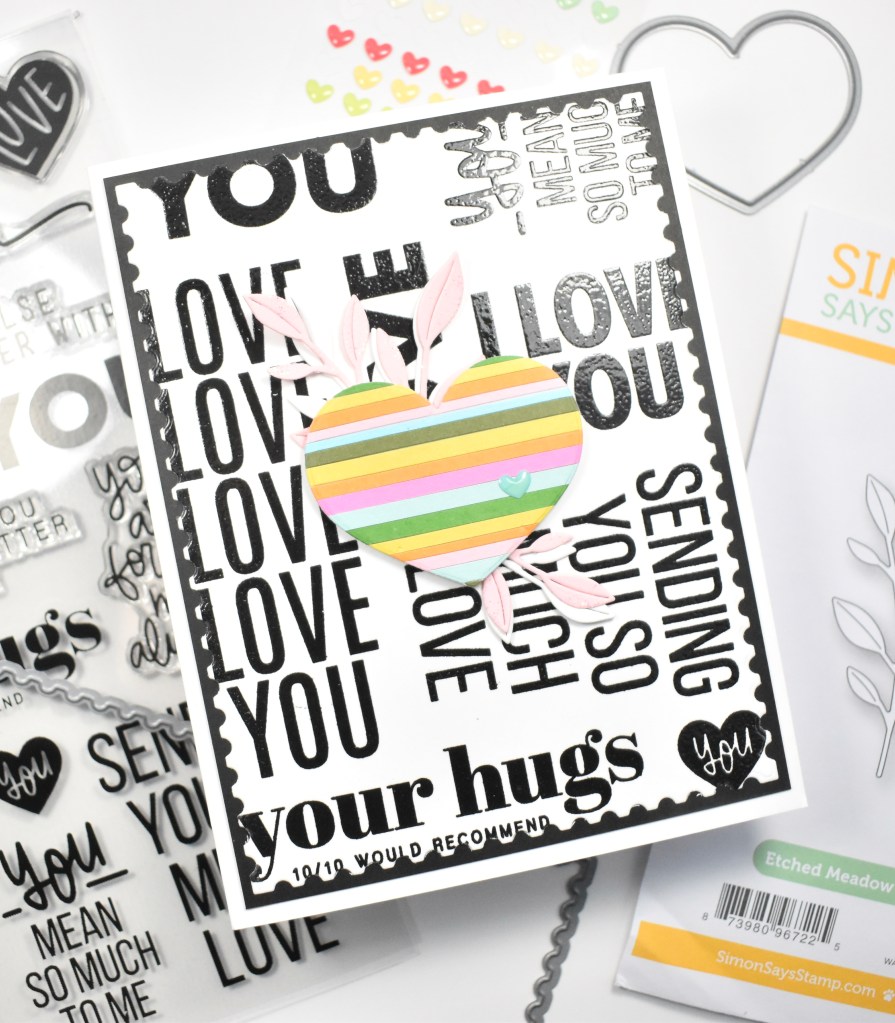
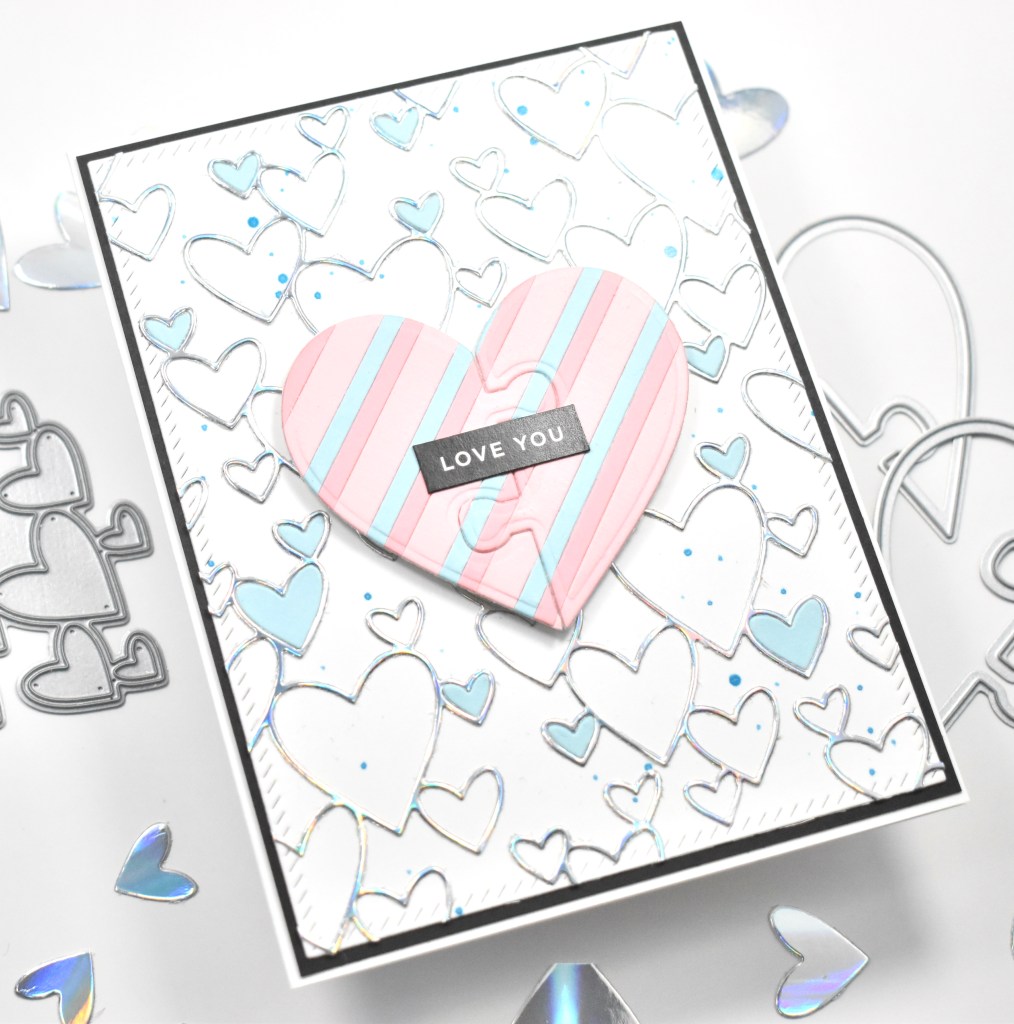
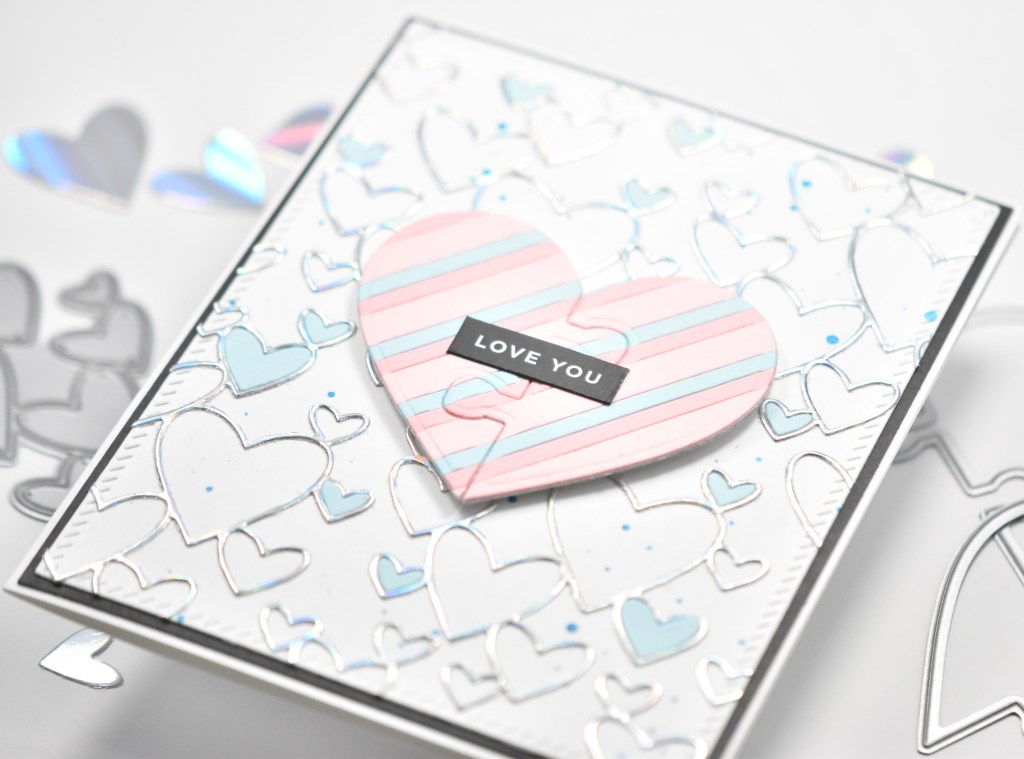
The colors of this card remind me of Valentine’s Day conversation hearts! This card was definitely a labor of love! I hated it for a bit, and then I finally came around to liking it! But it was definitely one of those cards that starts out as a great idea in your head, but once you get started, it doesn’t look like you envisioned it. So then you end up stamping, cutting, moving things around, changing colors, etc., etc. before deciding on a finished project. Anyhoo, I began this project by stamping a bunch of the sentiments from the SSS XL Love Greetings set on Neenah Classic Crest 110lb cardstock using SSS Pawsitively Saturated inks in Bubblegum, Sweets, Cheeky, Melon, Sunbeam, Celery, Fairway, Seafoam and Marine.

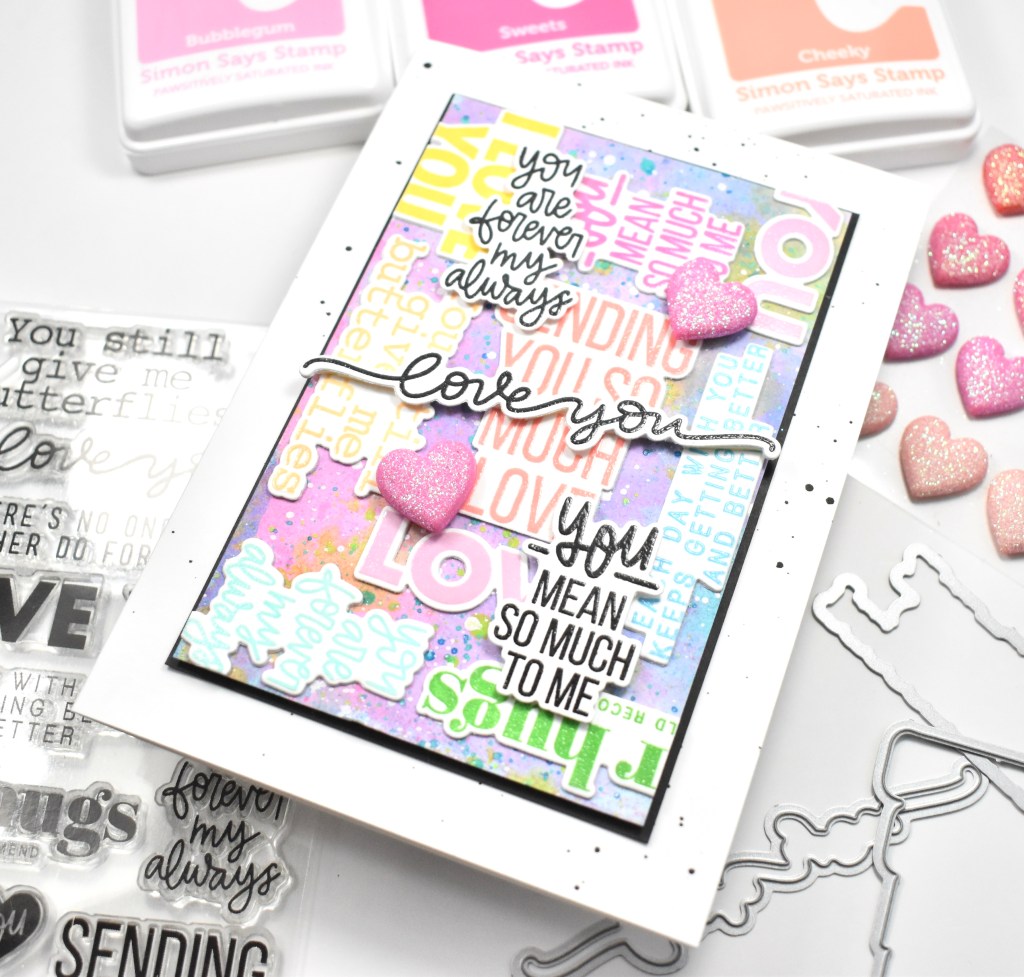
I stamped each sentiment in it’s ink color, cleaned the stamped and re-inked it using VersaMark ink and then heat set it using Ranger Clear Embossing Powder. I continued this process for lots of sentiments obviously. When I was done, I used the coordinating SSS XL Love Greetings dies to trim those out.

This background was a bluish, ink smooshed background from my stash, but I decided that it needed some additional colors to tie in all of my colored sentiments. I added some Distress Oxide Spray in Picked Raspberry and moved that around with a water brush, as well as, some ink smooshed Twisted Citron. In addition to those, I used some Ranger Dina Wakely Gloss Sprays in Lime, Turquoise, Ocean and White to do a bunch of splattering. I did use my heat tool to speed up the drying process so that I could continue.

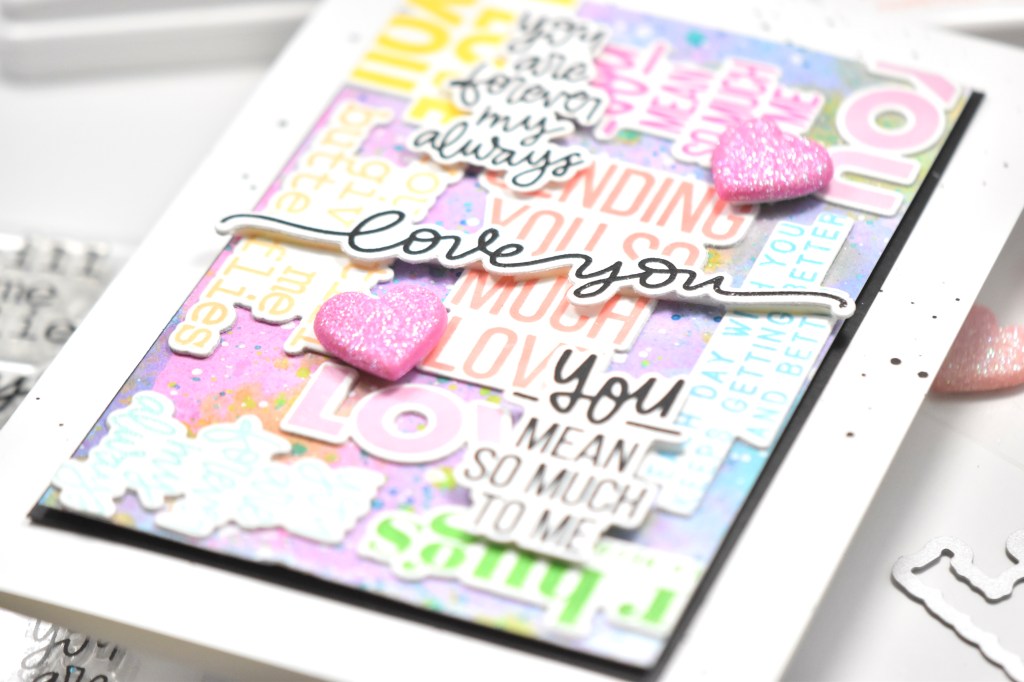
I laid out my sentiments on the panel in a way that I was satisfied with, but decided that they needed more dimension. So, I went back and cut another white layer using the dies and adhered all of those together using liquid glue. I then glued the sentiments to the panel and trimmed off any excess around the edges. I wasn’t quite satisfied, so I went back and stamped three of the sentiments using VersaFine Onyx Black ink and heat set those using the same clear embossing powder, and trimmed them out.

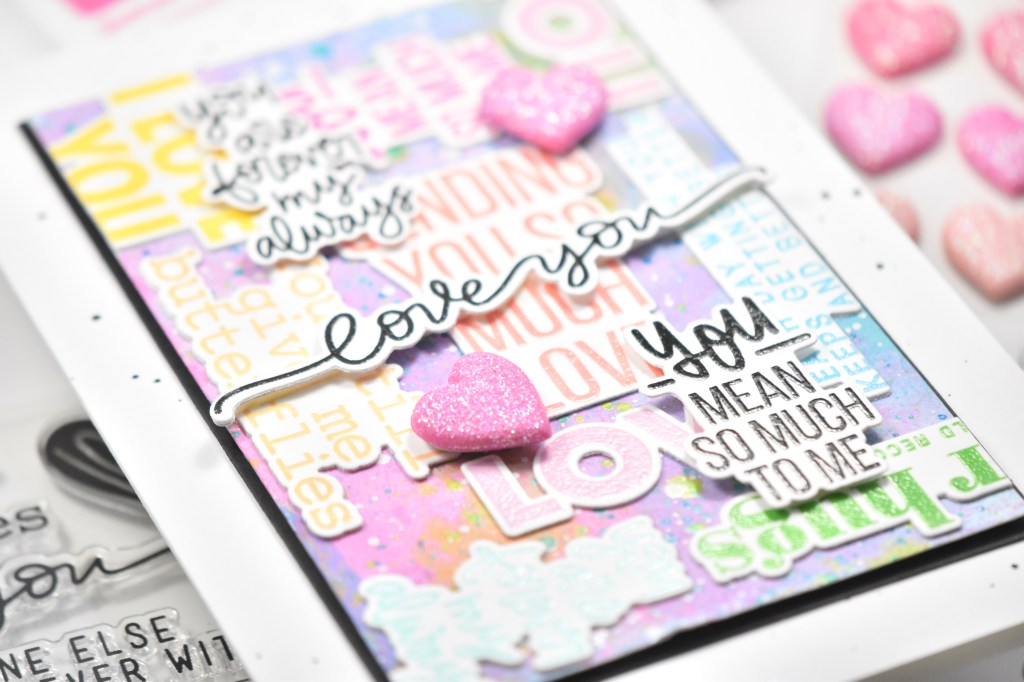
I adhered those three sentiments to the panel using foam tape for added dimension. I also added some pink glitter hearts, because why not, and because I felt like it needed something extra! This panel was then adhered to a black panel using foam tape, before being adhered to my card base with SSS Tape Runner, which I splattered with Royal Talens Amsterdam Oxide Black Acrylic Ink.

That finishes up this project! It took a while, but in the end, I love how it turned out! Don’t forget to head over to Instagram to participate in the hop and leave comments for your chance to win a gift card! Who doesn’t love winning gift cards?! Thanks again for stopping by and have a wonderful day!

Supply List:

* Some affiliate links used at no cost to you. Thank you for your support!

Latest Instagram Posts

Simon Says Stamp You Still Give Me Butterflies

Hello! Hello! I hope you’re having a wonderful day! I appreciate you stopping by to check out my post featuring new goodies from Simon Says Stamp’s latest release, And Back Again! Today’s project is featuring the new XL Love Greetings. I love this set so much, and have enjoyed playing with it. Of course, I had to order the coordinating die set, because, duh, I needed it! Anyhoo, let’s jump right into the details!

I started this project by doing some ink blending on a panel of Neenah Classic Crest 110lb cardstock using the SSS Stylized Butterfly Stencil. I needed rainbow colors, so I reached for Distress Oxide inks in Picked Raspberry, Spiced Marmalade, Mustard Seed, Twisted Citron and Broken China. Once I was done ink blending, I fussy cut the butterfly wings.

Then, I used the SSS Stylized Butterfly die to trim the butterfly wings twice from Neenah 110lb, and I trimmed the body from black cardstock. I adhered all of the pieces together, leaving the outside of the wings free-flowing so that I could zhoosh them up. I set the butterfly pieces aside while I worked on the remainder of the card.

I die cut some leaves using the SSS Privet Branch and lightly ink blended those using the remainder of the ink on my blending brush. I wanted just a small hint of color on those. I trimmed a panel of Neenah 110lb using the PinkFresh Studio Diagonal Stitched Rectangles and adhered the leaves atop that using liquid glue.

I stamped the sentiment, which is from the new SSS XL Love Greetings set using VersaFine Onyx Black ink and heat embossed that using Ranger Clear Embossing Powder. I stamped it a second time using VersaMark ink and embossed again using the same powder. By embossing twice, it gives it a much nicer, smoother finish. Once that was done, I had to fussy cut the sentiment, hence purchasing the coordinating die set!

The butterfly was glued to the center of the panel and the sentiment was adhered just below that using foam tape for dimension. This panel was then adhered to a black panel using SSS Dot Tape Runner, before being adhered to the card base. I added some iridescent confetti to finish up!

Super fun card to make! I hope you enjoyed it, and I hope it inspires you to get crafty! Stop by and check out the entire And Back Again, and let me know your favorites! Thanks again for stopping by, and don’t forget to stay awesome!

Supply List:

* Affiliate links used at no cost to you. Thanks so much for your support!

Latest Instagram Posts

Simon Says Stamp Love Greetings

Hello Crafty Friends! Have you checked out the newest Simon release, And Back Again? What are your favorites? Today’s card is featuring a great new stamp set called XL Love Greetings! Large sentiments are absolutely my jam, so I was so excited to see this one! Let’s go through the details of the project.

I began this project by putting a panel of Neenah Classic Crest 110lb cardstock in the Misti and arranging a bunch of the sentiments from the XL Love Greetings on top, fitting as many as I could. Once I was satisfied with the placement, I inked the stamps up using VersaFine Onyx Black ink and heat embossed them using Ranger Clear Embossing Powder.

I trimmed the stamped panel using SSS Postage Stamp Edge Frames and adhered it to a black panel using SSS Dot Tape Runner. I created a striped panel using cardstock from the Stamp Market and used the heart die from the SSS Botanical Heart die set to trim it out.

The card was missing something, so I used the SSS Etched Meadow Flowers and Leaves set to cut some leaves from coordinating pink and white cardstock. I used the Ranger Embossing Dauber to add some ink to the edges of the pink leaves and heat set some Ranger Holographic Embossing Powder.

The leaves were glued underneath the heart, while the heart was adhered using foam tape for dimension. I also added a Doodlebug Designs Tiny Hearts sticker for a little added interest. Everything was then adhered to the card base to finish up.

That does it for this project! I hope you enjoyed it and I hope it inspires you to get crafty! Definitely stop by and check out this super fun release, And Back Again from Simon. Have a wonderful day and don’t forget to stay awesome!

Supply List:

* Affiliate links used at no cost to you. Thanks so much for your support!

Latest Instagram Posts

Simon Says Stamp Piece of My Heart

Hello Crafty Lovelies! It’s been quite some time since I’ve posted. We traveled for the holidays and then I spent some time with my family, but I’m back today with a project featuring the new Piece of My Heart die from Simon’s newest release, And Back Again! What a super fun release this is! I’ve had so much fun creating with the goodies that I received! Let’s jump right into the details for today’s project, shall we?

I began this project by cutting some strips of pink and blue cardstock using the PinkFresh Studio Slim Stripes die. I cut a scrap piece of Neenah Classic Crest 110lb cardstock and lined the strips up diagonally using liquid glue. Once all of the stripping was done, I used the new SSS Piece of My Heart die to cut it out of the striped piece.

Next, I trimmed a panel of Neenah 110lb using the PinkFresh Studio Diagonal Stitched Rectangles, and splattered that using Ranger Dina Wakely Gloss Spray in Ocean. While that was drying, I cut the SSS Clipping Heart die four times from SSS Holographic cardstock.

I began gluing the clipping hearts down to the panel, covering as much of the panel as possible. I trimmed the excess off and repositioned those in other places on the panel, so as not to waste any of the die cuts. I also cut the clipping hearts a couple of times from the blue cardstock, because I wanted to inlay just a few of those for interest.

I placed foam tape on the back of the SSS Piece of My Heart die and positioned it in the center of the panel. I found a coordinating SSS Sentiment Strip and glued that in the center of the heart. Everything was then adhered to a black panel using SSS Tape Runner, before being adhered in the same way to the card base.

That finishes up this project! Thanks so much for joining me today! I hope you’ll stop by and check out the entire And Back Again release! There’s so many fun things in this one! Have a wonderful day and don’t forget to stay awesome!

Supply List:
  1. SSS Piece of My Heart Die
  2. SSS Clipping Heart
  3. SSS Holographic Cardstock
  4. SSS Sentiment Strip
  5. SSS Surf Blue Cardstock
  6. SSS Tape Runner
  7. PinkFresh Studio Slim Stripes Die
  8. PinkFresh Studio Diagonal Stitched Rectangles
  9. Ranger Dina Wakely Gloss Spray, Ocean
  10. Neenah Classic Crest Solar White 110lb Cardstock
  11. Black Cardstock
  12. Tim Holtz Scissors
  13. Bearly Art Glue
  14. 3M Foam Tape
  15. Gemini Jr.

*Affiliate links used at no cost to you. Thanks so much for your support!

Latest Instagram Posts

Simon Says Stamp Sketched Rose Faith

Hello Crafty Friends! Thanks for stopping by! I’m still playing with goodies from the newest, To the Moon release, from Simon Says Stamp! What a fun release this is! Today’s project is featuring the new Sketched Rose Trio. I’m really enjoying working with these foil plates and matching dies! Let’s get right into the deets for this project!

I began by foiling the Sketched Rose Trio twice on Neenah Classic Crest 110lb cardstock using Spellbinders Aura foil. I used Copic Markers G82, YG61, Y08, Y13 and Y15 to color these before using the included die cut to trim them out.

For the background, I trimmed a panel using the SSS Detail Petal Plate. Such an easy way to add interest and texture without distracting from the main focal point! I played with the arrangement and decided that I wanted some additional leaves and opted for the SSS Etched Meadow Flower and Leaves, and I think these ended up being the perfect addition.

To assemble the card, I adhered the white leaves first using liquid glue, and then I glued in the green leaves atop those. The bottom three flowers were glued directly to the panel, while the top two flowers were adhered using foam tape for dimension. I chose a SSS Sentiment Strip that would complement the card nicely and glued that across the flowers. To finish up, I added some PinkFresh Studio Gold Metallic Pearls and adhered my panel to the card base, which is also Neenah 110, using foam tape again.

That does it for this one! Have you checked out the new To the Moon release yet? I always enjoy seeing what new products Simon will release! Have a wonderful day and don’t forget to stay awesome!

Supply List:

* Affiliate links used at no cost to you. Thanks so much for your support!

Latest Instagram Posts

Simon Says Stamp Love You Peony

Hello Crafty Lovelies! Thanks for joining me for the brand new, To the Moon release from Simon Says Stamp! Today’s project is featuring the Peony and Leaves die cut. Let’s jump right into the details!

To begin this project, I cut the SSS Peony and Leaves four times. Once from Neenah Classic Crest 110lb cardstock, once from mirror gold cardstock, once from pink cardstock, and once from peacock cardstock. I cut it from the colors, because I was wanting to do an inlay technique.

For the background, I cut a panel with the SSS Stitched Whirl Background using Neenah 110lb. I also used the SSS Privet Branch for additional leaves. I cut those from Neenah 110lb, as well as, the mirror gold cardstock. I began by deciding the leaf placement under the flower and secured those using liquid glue. I offset the top gold leaf slightly so that both set of leaves would be visible.

Once the leaves were secured, I glued the white and mirror gold flowers together, and then glued that directly over the larger leaves on the panel. I did some light ink blending on the colored cardstock using SSS Pawsitively Saturated Ink in Bubblegum and Ocean for a little shadowing on the flower and leaves.

I then began inlaying the pieces securing them with liquid glue. To simplify this process, after I die cut the flowers from the colored cardstock, I used some Press N Seal to hold them together in place. That was such a time saver! Once all of the pieces were adhered, I added some PinkFresh Studio Gold Metallic Pearls to the berry portion of the die.

For the sentiment, I opted for the SSS Everyday Words on a Line. I die cut the Love You once from Neenah 110lb and once from mirror gold and glued those together, trimming off the ends, and then glued that directly to my panel. To finish up, I adhered the panel to my card base using foam tape for added dimension.

That finishes up this project! I hope you enjoyed it, and I hope it inspires you to get crafty! Stop by and check out the entire To the Moon release, and let me know your favorites! Have a wonderful day and don’t forget to stay awesome!

Supply List:

* Affiliate links used at no cost to you. Thanks so much for your support!

Latest Instagram Posts

Simon Says Stamp Imperia Rose Bud Bundle

Hello and thanks for joining me! Welcome to for another DIEcember project! Die cuts are absolutely my jam, and I love making cards with them! Today’s project is featuring the new Sketched Rose Bud Bundle. This set includes a foiling plate along with a die cut! Let’s jump right into the details, shall we?

I began this project by foiling the SSS Rose Bud Bundle three times using Spellbinders Champagne Foil on Neenah Classic Crest 110lb cardstock. I pulled out some Copic markers for the coloring using, RV91, RV93, RV95, G82 and YG61. That set of RV markers is really a gorgeous combination!

Once the coloring was complete, I used the included die cut to run that through the machine. For the background, I used the new, absolutely gorgeous SSS Imperia Plate. So much texture and detail with so little effort! That’s the amazing thing about background plates, in my opinion!

For the sentiment, I used the SSS Silhouette Sentiments. I stamped the sentiment on Neenah 110lb using VersaFine Onyx Black ink and heat embossed it using Ranger Clear Embossing Powder. The coordinating die was then used to trim it out. I also trimmed it three additional times and adhered all of those together, making it four layers thick.

After playing with the arrangement of the flowers on the background panel, I decided that it needed some additional white leaves, so I opted for the SSS Outline Clustered Leaves. This added just the slightest bit of interest that I was looking for. I adhered the flowers and leaves to the corners of the panel using a combination of foam tape and liquid glue. The sentiment was also glued directly to the panel along with some pearls. The panel was then adhered to the card base using foam tape.

And there you have it! I hope you enjoyed this project! I love foiling and die cutting, so this was a match made in heaven for me! Don’t forget to stop by and check out the entire DIEcember release! There’s so many amazing things to feast your eyes upon! Have a wonderful day and stay awesome!

Supply List:

* Affiliate links used at no cost to you. Thanks so much for your support!

Latest Instagram Posts

Simon Says Stamp Hang in There Blossom

Hello! Hello! Thanks so much for stopping by! I’m still working my way through some DIEcember products! Have you checked out the entire release? Tell me your favorites, because you know I want to know! I always ask! Anyhoo, today’s project is featuring the new Etched Evening Blossom and the Imperia Plate. These dies are so gorgeous! Let’s jump into the details!

To begin this project, I started ink blending a panel of Neenah Classic Crest 110lb cardstock using Distress Oxide inks in rainbow colors of course! I used Picked Raspberry, Spiced Marmalade, Mustard Seed, Twisted Citron and Broken China.

Once I was done ink blending, I ran that panel through the die cutting machine using the largest of the Honey Bee Deckle Edge A2 dies. Then, I ran that same panel through again using the new SSS Imperia Plate. I love, love, love background plates! I can’t say it enough!

For the sentiment, I used the SSS XL Greetings 2 set. I stamped the Hang in There sentiment using VersaMark ink on black cardstock and heat embossed it using SSS Detail White Embossing Powder, and used the coordinating die to trim that out. I searched through my SSS Sentiment Strips to find an appropriate sub-sentiment as well.

I die cut the SSS Etched Evening Blossom once from Neenah 110lb and once from black cardstock, adhering those together using liquid glue, offsetting them just slightly to achieve that silhouette look. For a little more added interest, I added some PinkFresh Jewels to the center of the flower, because bling! Every card needs bling!

To finish up this project, I glued the flower to the ink blended panel and attached both sentiments using foam tape. The panel was then adhered to a black panel before being adhered to the card base.

That does it for this project! I feel like for every release, I have to sneak a rainbow project or two! I hope you’ll swing by and check out the entire DIEcember release, this month is always one of my favorites! Have a wonderful day and don’t forget to stay awesome!

Supply List:

* Affiliate links used at no cost to you. Thanks so much for your support!

Latest Instagram Posts

Simon Says Stamp Evening Blossom Hugs

Hello Crafty Lovelies! Are you ready for DIEcember?! Stamptember and DIEcember are two of my favorite months of the year! Today’s project is featuring the gorgeous new Etched Evening Blossom! Let’s get right into the details.

I began this project by die cutting the SSS Etched Evening Blossom twice from Neenah Classic Crest 110lb cardstock and did some ink blending using SSS Bubblegum and Fairway ink for one of the flowers, and Distress Oxide Speckled Egg on the other flower.

Next, I used the SSS Chunky A2 Scalloped Rectangles to cut a panel of Neenah 110lb and then used the SSS Detail Petal Plate to add texture to the scalloped panel. I wanted some additional leaves, so I used the PinkFresh Studio Leafy Branch for those.

I added some Soft Snowball Mix Pearls to the centers of the flowers for some added detail, and I love how they look! I glued the flowers to the panel, offsetting them slightly so that both flowers were visible. I tucked the leaves from the Leafy Branch under the leaves of the flowers and secured those with glue as well.

The SSS Sentiment Strip was adhered to the panel using foam tape, and the whole panel was then then adhered to the card base, which is Neenah 110lb, using foam tape as well.

That does it for this project! I hope you enjoyed it, and I hope it inspires you to get crafty! Don’t forget to stop by and check out the entire DIEcember release, it’s magnificent! Have a wonderful day and stay awesome!

Supply List:

* Affiliate links used at no cost to you. Thanks so much for your support!

Latest Instagram Posts

Simon Says Stamp Be Your Amazing Self

Hello and welcome back! I can’t get enough of DIEcember! If you know me, then you know that die cutting is my jam! There are so many awesome things in this release! Have you checked it out yet? Today’s project is featuring the new Stylized Butterfly, so let’s get right to it!

My first order of business was spraying some Neenah Classic Crest 110lb cardstock with some Dina Wakely Gloss Sprays. I was going for a quasi rainbow feel, so the colors that I used were Lemon, Lime, Magenta and Ocean. I got a set of twelve sprays for my birthday, and I gotta say, I’m loving them! Once I was done with the sprays, I set that panel aside to dry.

I used the new SSS Imperia Plate to create the background for the butterflies using Neenah 110lb, and I die cut the SSS Stylized Butterfly from my sprayed panel three times, because I wanted some movement across the card. I also cut the butterfly three times from black cardstock, and adhered those together using liquid glue.

I glued just the inner edges of the butterflies to the background panel, along with their center body portions as well, trimming off the excess as needed. I chose a SSS Sentiment Strip that complimented the card well and adhered that with foam tape for dimension.

My panel was then adhered to the card base, which is also Neenah 110lb, and I added some confetti for that added pop of bling. Everything needs bling, am I right?!

I really like how this card turned out! I think the addition of the black shadow to the butterflies really added a lot of interest and contrast that was needed. I hope you like it, and I hope you’ll stop by and check out the entire DIEcember release! Lots of good stuff for sure! Have a wonderful day and don’t forget to stay awesome!

Supply List:

* Affiliate links used at no cost to you. Thanks so much for your support!

Latest Instagram Posts