Simon Says Stamp Rainbow Hearts Banner

Hello Friend! I’m so glad that you stopped by! I’m back with another card for Simon Says Stamp’s latest release, Sweetheart, featuring this super fun Heart Banners Stencil. Let’s run through the details, shall we?

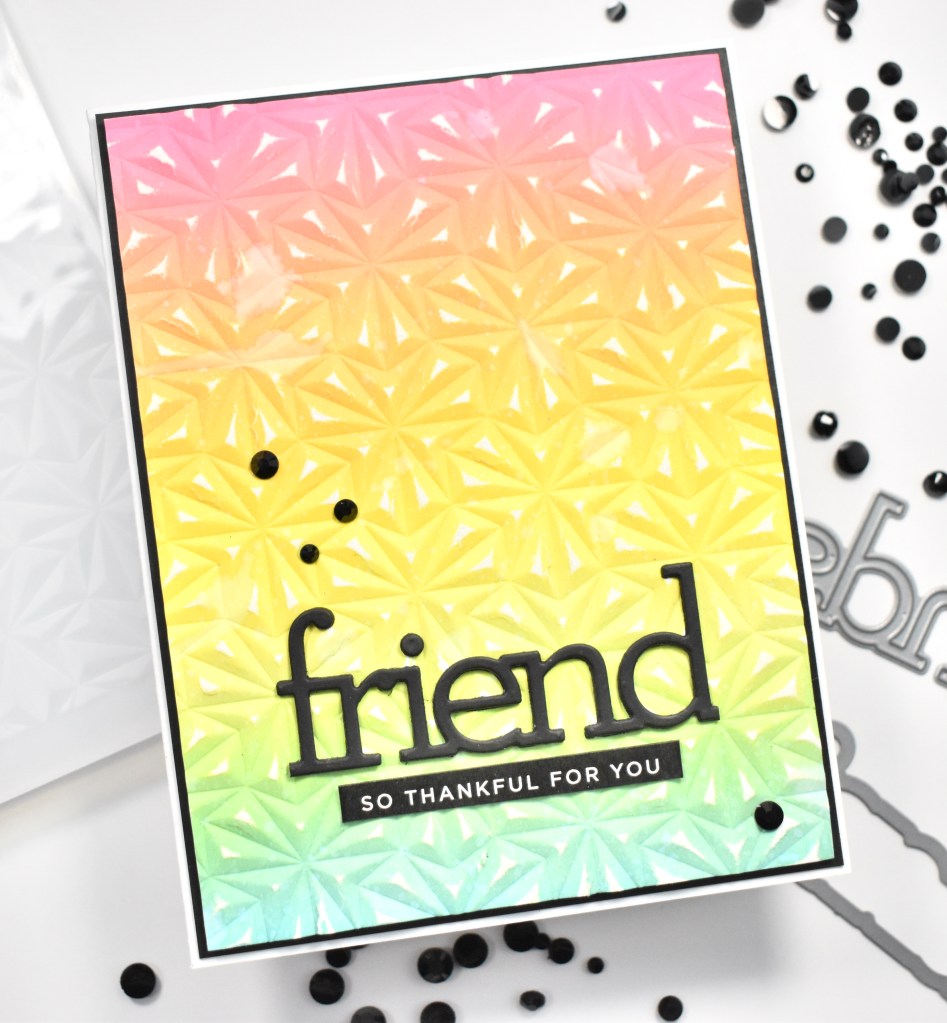
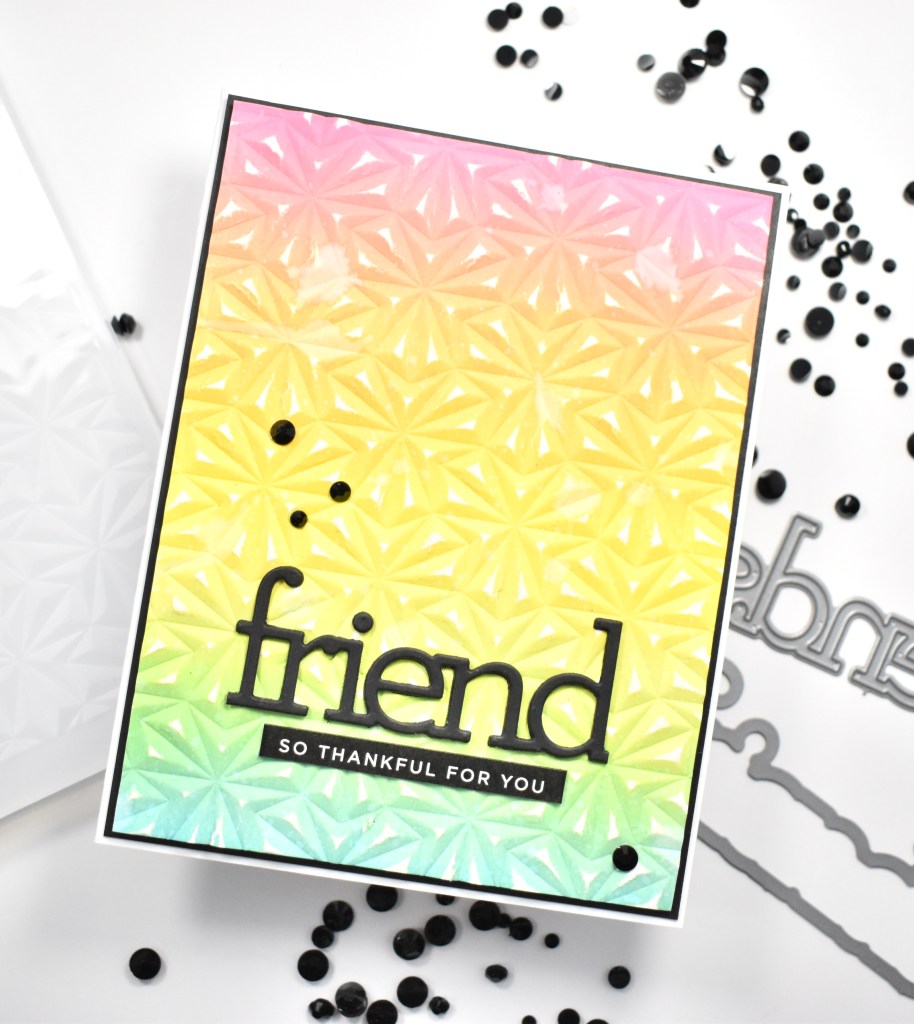
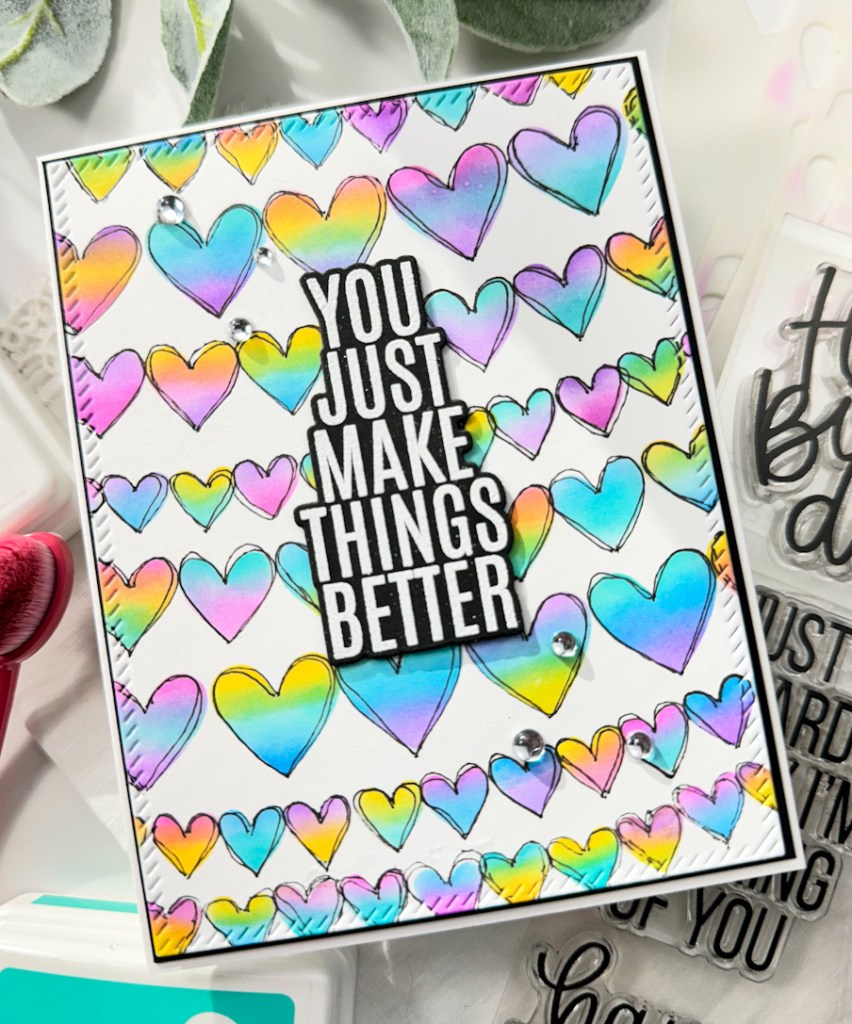
I began this card by cutting a panel of Neenah 110lb cardstock to 6×6. This is a set of four stencils, and I wasn’t quite sure how it was going to lay out on the cardstock, and that’s why I began with a 6×6 panel. I could always trim it down later, if I decided to. I taped the panel to the stencil and began ink blending using SSS Pawsitively Saturated Ink in Sweets, Sunbeam, Surf, Cadette and Orchid. I started in rainbow order, but then decided that I didn’t want all of the heart to look the same, so I began mixing up the colors a little bit. Instead of starting with the pink, I started with the blue, and so forth.

I continued through the stencils until the panel was complete. I used the PFS Diagonal Stitched Rectangles to trim the panel down, which left some white areas at the top and bottom. To remedy this, I just added more hearts to those areas, once again mixing up the colors so that everything wasn’t uniform. For a little added interest, I used a Copic Multiliner to draw double lines around each heart.

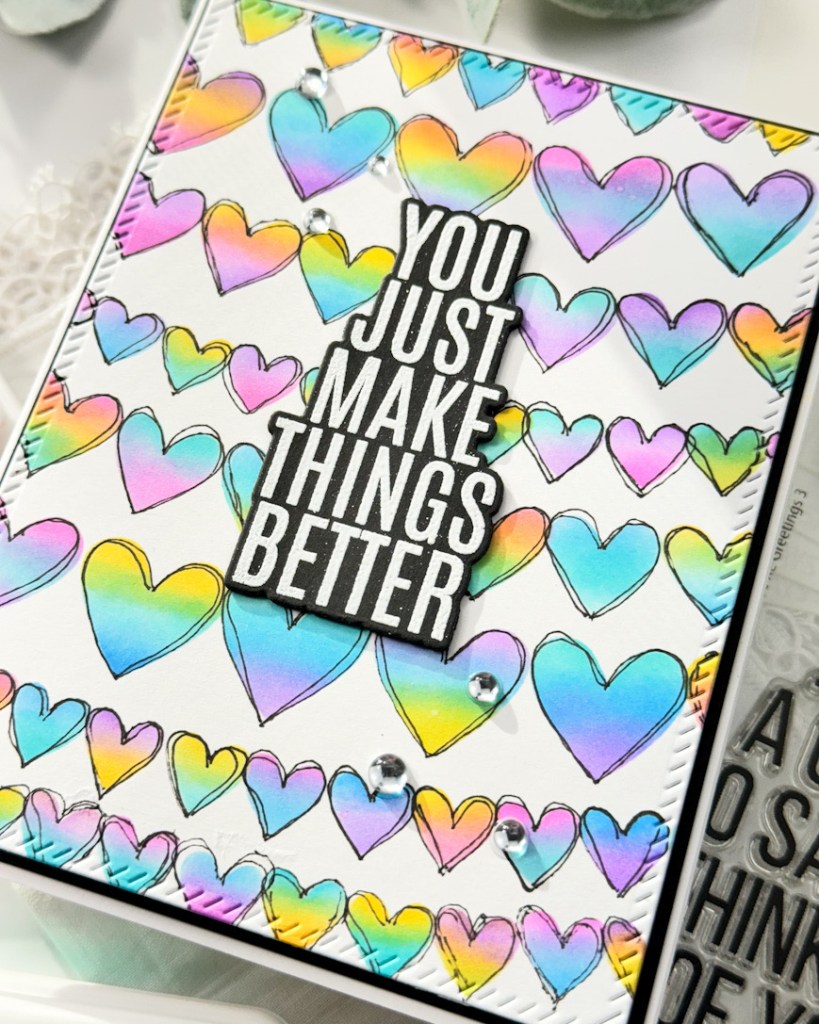
The sentiment, which is from the SSS XL Greetings 3, was stamped on black cardstock using VersaMark Ink and heat set using SSS Detail White Embossing Powder. I used the coordinating die to trim that out, along with two additional cuts and adhered all of those together using liquid glue. The sentiment was then glued directly atop the panel in the center. For some added bling, I added a few PFS Ice Clear Drops.

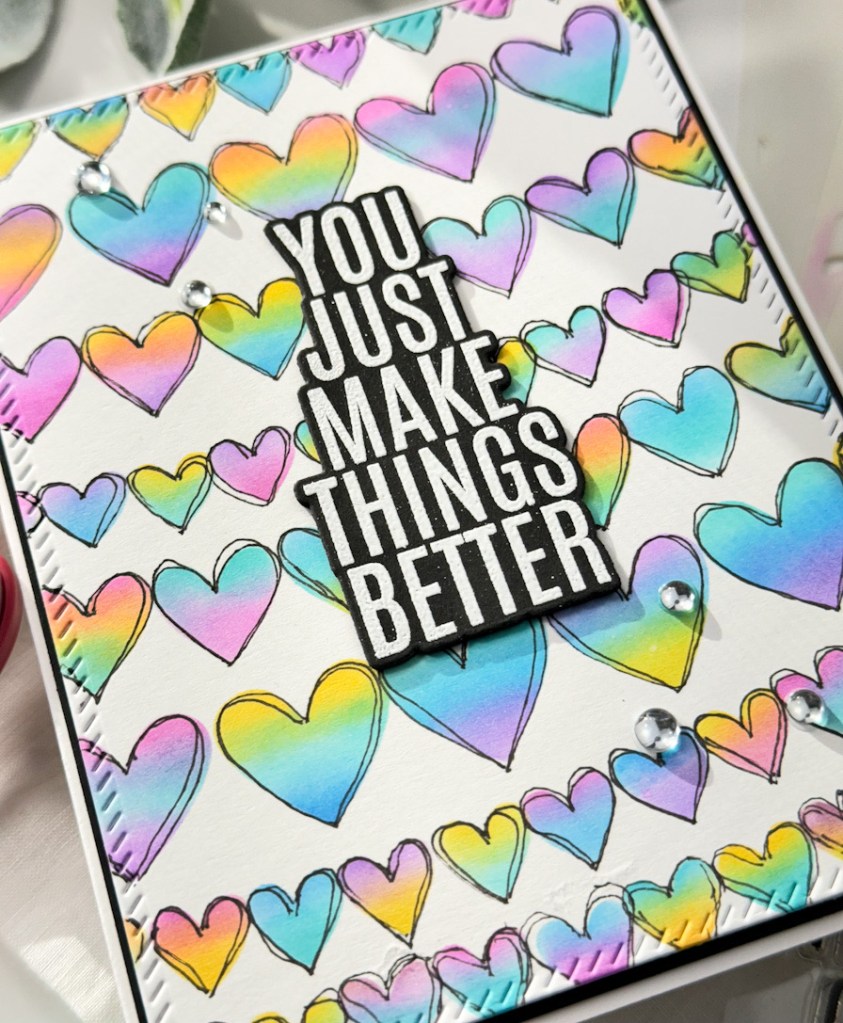
To finish up, the heart panel was adhered to a black panel using foam tape and then adhered to the card base.

That does it for this one! I really love all of the different hearts, and adding the black detail around the hearts made a huge difference, in my opinion. Thanks again for stopping by! I hope you have a wonderful day, and don’t forget to stay awesome!

Supply List:

* Affiliate links used at no cost to you. Thanks so much for your support!

Latest Posts

Latest Instagram Posts

Simon Says Stamp You’re Amazing

Hello Crafty Friends, and welcome back! I’m so glad that you’re here! Today’s card is featuring the Friendship Leafy Cluster Stamp and Stencil from Simon Says Stamp’s latest release, Sweetheart. Have you checked out the release yet? What are your favorites? I had a lot of fun with the ink blending on this one, so let’s go through the details!

I began by stamping the leaf clusters on some Neenah 110lb cardstock using VersaFine Onyx Black ink, and heat setting them using Ranger Clear Embossing Powder. I then began the ink blending with the stencil using SSS Pawsitively Saturated Ink in Bubblegum, Lemonade, Seafoam and Lilac. Once the ink blending was complete, I fussy cut the leaves and set them aside while I figured out the rest of the card.

I pulled a panel from the SSS Color Blend Pastel cardstock pack and used the SSS Dibble Dot Embossing Folder on it. That was then adhered to a black panel for contrast. I stamped the sentiment, which is from the SSS XL Greetings 2 set, on a scrap of black cardstock using VersaMark Ink and heat set that using SSS Detail White Embossing Powder. I then used the coordinating die to trim it out, along with two additional cuts, and adhered all of those together using liquid glue.

The leafy clusters were then adhered to the embossed panel using foam tape, trimming off the excess, and the sentiment was glued directly atop the leaves. Everything was then adhered to the card base to finish up.

That does it for this project! I hope you enjoyed it! I really like how this one turned out, and am really happy with the colors. Thanks again for stopping by! Have a wonderful day, and don’t forget to stay awesome!

Supply List:

* Affiliate links used at no cost to you. Thanks so much for your support!

Latest Posts

Latest Instagram Posts

Simon Says Stamp Thankful Layered Pumpkin

Hello Lovelies and thanks for stopping by! It’s STAMPtember and you know what that means .. a super, awesome release from Simon Says Stamp! We are celebrating today with a blog party, so be sure to start at Simon’s blog for links to everyone’s posts! There’s tons of inspiration, as well as exclusive promotions, so you’ll want to check those out for sure! Check the bottom of this post, for my STAMPtember promotion! For today’s project, I’m featuring the new Layered Pumpkin die. This project was super fun to put together, so let’s go through the details!

To begin, I pulled out five different yellow and orange scraps of patterned paper from my stash and cut each of them using the SSS Layered Pumpkin die. There is a solid pumpkin die in this set, and I cut that from a brown cardstock so that I would have a base for assembling the pumpkin.

I adhered the pieces of the pumpkin in their spots using liquid glue and then used some Copic Markers in Y02, Y17, YR24 and YR27 to add a bit of shading for a little more added interest. Once the pumpkin was assembled, I got to work of the rest of the card.

For the background, I used the SSS Stitched Whirl Background die on a panel of kraft cardstock, and I used the SSS Ornate Leaves set to cut one of the leaves twice from two different colors of green cardstock. Some of the pieces of the leaves fell out after die cutting, and I left them as they were, and adhered them together using liquid glue.

I arranged the leaves on the background and secured with glue, while adhering the pumpkin atop the leaves using SSS White Foam Tape for added dimension. I trimmed two SSS Sentiment Strips and adhered those with foam tape as well. The panel was then adhered to the card base using SSS Dot Tape Runner, and I finished up by adding some PFS Gold Metallic Pearls.

That does it for this project! I hope you enjoyed it, and I hope it inspires you to get crafty! Don’t forget to stop by and check out the entire STAMPtember release! You won’t be disappointed! Have a wonderful day and stay awesome! As mentioned above, here is my exclusive promotion for this awesome release!

Supply List:

* Affiliate links used at no cost to you. Thanks so much for your support!

Latest Posts
Latest Instagram Posts

Simon Says Stamp Floral Thank You

Hello Friends and thanks so much for stopping by! I’m still playing with goodies from Simon’s latest release, Happy and Joyful. There are so many beautiful florals in this release, and today’s card is featuring the new Lisianthus stamp set. Let’s run through the details for this card!

I began by stamping the floral image on a panel of Neenah Classic Crest 110lb cardstock using VersaMark Ink and then heat set it using SSS Detail White Embossing Powder.

I was going for an emboss resist technique so I used PinkFresh Studio inks in Soft Lilac and Lavender, as well as Simon’s Aspen Pawsitively Saturated Ink for the ink blending on this panel. When the ink blending was complete, I used the new SSS A2 Marquee die set to trim it down. I cut the marquee an additional two times and adhered all of those together using liquid glue for added dimension without the bulk. This is such a cool die, and I just love the detail that it adds! I also added some white splatter to the panel using Royal Talens Titanium White Acrylic Ink before moving on.

For the sentiment, I used the SSS Clean Line Gratitude stamp and die set. I stamped thanks using VersaFine Onyx Black ink and heat set that using Ranger Clear Embossing Powder. I trimmed it out using the coordinating die and placed foam tape on the back. I searched my SSS Sentiment Strips to find a sub-sentiment that worked well and added foam tape to that as well.

The sentiments were added to the panel along with some pearl accents before being added to the card base using SSS Dot Tape Runner.

Super simple card, but I love the soft airy feeling to it. I hope you enjoyed it, and I hope it inspires you to get crafty! Don’t forget to check out the entire Happy and Joyful release, and let me know your favorites! Have a wonderful stay and stay awesome!

Supply List:

* Affiliate links used at no cost to you. Thanks so much for your support!

Latest Posts
Latest Instagram Posts

PinkFresh Studio Happy Heart Sentiments

Hello Crafty Friends! How’s your day going? I appreciate you stopping by! Today’s project is featuring some products from PinkFresh Studio and Simon Says Stamp. Super simple, but I love the completed card! Let’s get into the details!

There are so many gorgeous papers in the new PinkFresh Studio Happy Heart paper pad! When I saw this paper that I chose, I saw color coordinated sentiments on the color blocks, so that’s where I went! I began by trimming the 6×6 sheet down using the PFS Diagonal Stitched Rectangles.

I then scoured through my abundance of SSS Sentiment Strips to find some that I thought would work well together. All of these came from lots of different sets, so just find some that work for you! You could even find sentiments to stamp, and those would work wonderfully as well. Once I found a few sentiments that I liked, I pulled out some Copic markers and colored over them to coordinate with the colors on the paper. If you’re interested, the markers that I used were B0000, BG10, BG11, RV10, Y00, Y02, YR000, and YR01.

I adhered the sentiments using foam tape for dimension and I also added a few PFS Jewels in coordinating colors as well. The panel was then adhered to a black panel for contrast using a SSS Dot Tape Runner, before being adhered to the card base.

See, super simple card, but I think it’s so cute! Anyhoo, I hope you like it, and I hope it inspires some creativity on your part! I have so much patterned paper, and I’m always thrilled to find a good project for some of it. Have a wonderful day and don’t forget to stay awesome!

Supply List:

* Affiliate links used at no cost to you. Thanks so much for your support!

Latest Instagram Posts

Simon Says Stamp Hello Friend Snowflakes

Hello Crafty Friends! Thanks so much for stopping by! I’m still playing with goodies from Simon’s newest release, And Back Again. Today’s project is featuring the new Mini Slimline Snowflake Window stencil. Let’s go through the details!

I began by attaching the stencil to a panel of Neenah Classic Crest 110lb cardstock using masking tape, and began to do some ink blending using Distress Oxides in Speckled Egg, Salvaged Patina and Chipped Sapphire. Ink blending and stencils are so great, because a beautiful image comes together so effortlessly!

For the sentiment, I used the SSS Snowflake Season Stamp and Die set. I selected the sentiment and stamped it using VersaFine Onyx Black ink and heat embossed it using Ranger Clear Embossing Powder. I then used the coordinating die to trim that out.

The card needed some interest so I pulled out some black and white twine and wrapped it around the trimmed down card towards the bottom and tied a knot. I then adhered my sentiment atop that using some foam tape. I also added some pearls, which I thought was a nice addition.

Everything was adhered to a black panel using SSS Dot Tape Runner, and then adhered to my card base, which I had splattered with Royal Talens Oxide Black Acrylic Ink.

That finishes up this project! I hope you enjoyed it and I hope it inspires you to get crafty! Don’t forget to swing by the SSS website and check out the entire And Back Again release! Have a wonderful day and stay awesome!

Supply List:

* Affiliate links used at no cost to you. Thanks so much for your support!

Latest Instagram Posts

Simon Says Stamp Evening Blossom Hugs

Hello Crafty Lovelies! Are you ready for DIEcember?! Stamptember and DIEcember are two of my favorite months of the year! Today’s project is featuring the gorgeous new Etched Evening Blossom! Let’s get right into the details.

I began this project by die cutting the SSS Etched Evening Blossom twice from Neenah Classic Crest 110lb cardstock and did some ink blending using SSS Bubblegum and Fairway ink for one of the flowers, and Distress Oxide Speckled Egg on the other flower.

Next, I used the SSS Chunky A2 Scalloped Rectangles to cut a panel of Neenah 110lb and then used the SSS Detail Petal Plate to add texture to the scalloped panel. I wanted some additional leaves, so I used the PinkFresh Studio Leafy Branch for those.

I added some Soft Snowball Mix Pearls to the centers of the flowers for some added detail, and I love how they look! I glued the flowers to the panel, offsetting them slightly so that both flowers were visible. I tucked the leaves from the Leafy Branch under the leaves of the flowers and secured those with glue as well.

The SSS Sentiment Strip was adhered to the panel using foam tape, and the whole panel was then then adhered to the card base, which is Neenah 110lb, using foam tape as well.

That does it for this project! I hope you enjoyed it, and I hope it inspires you to get crafty! Don’t forget to stop by and check out the entire DIEcember release, it’s magnificent! Have a wonderful day and stay awesome!

Supply List:

* Affiliate links used at no cost to you. Thanks so much for your support!

Latest Instagram Posts

Simon Says Stamp Thankful Laurel Leaves

Hello Crafty Friends! Thanks so much for stopping by today to check out my post featuring the brand new Laurel Leaves Background Plate from Simon Says Stamp’s new release, Peace on Earth! What a beautiful plate, and what a beautiful release! Let’s go through the details for today’s project!

I first die cut the SSS Laurel Leaves Background Plate from Sunshine cardstock and did a little bit of ink blending using Distress Oxide inks in Mustard Seed, Spiced Marmalade and Walnut Stain. I just wanted to give the leaves a little bit of color and depth.

Next, I found a piece of patterned paper that I thought would work good with this design. This piece happens to be from Simple Stories Cozy Days set, and was in a Simon card kit last fall. I adhered the laurel leaves panel to the patterned paper using liquid glue, while only applying glue to the outer edges and stems of the leaves.

I die cut the SSS Thankful 1 die once from mirror gold cardstock and cut the shadow three times from black cardstock and glued all of those together. I wanted to add a sub-sentiment, so I rummaged through my SSS Sentiment Strips to find one that worked.

Once I found the sentiment strip, I ran it through the Minc using gold foil. I trimmed it down to size and adhered it to the card panel using foam tape, and glued the thankful sentiment just above it.

To finish up, I added the panel to the card base, which is Neenah Classic Crest 110lb cardstock and added a few PinkFresh Studio Gold Metallic Pearls to pull it all together! I like the gold with the Sunshine cardstock and that added interest with the patterned paper! There are so many beautiful things in this Peace on Earth release, and I hope you’ll stop by and check them out! Have a wonderful day and don’t forget to stay awesome!

Supply List:

* Affiliate links used at no cost to you. Thank you so much for your support!

Latest Instagram Posts

Simon Says Stamp Magnetic Friend

Hello Lovelies, and thanks for stopping by today! I’m thoroughly enjoying Simon Says Stamp’s new release, Peace on Earth! Today’s project is featuring the new, super cool, Magnetic Embossing Folder! So let’s hop right into the details for this one!

I began by trimming an A2 panel of Neenah Classic Crest 110lb cardstock and did some ink blending using Distress Oxide, Picked Raspberry, Spiced Marmalade, Mustard Seed, Twisted Citron and Broken China. This is my favorite rainbow color combo! Once the ink blending was done, I ran the panel through in the SSS Magnetic Embossing Folder.

To be completely honest, my paper cracked while running it through with the embossing folder, so to remedy the situation and cover up those boo-boos, I pulled out a nail buffer that I use in the craft room. I just rubbed that over the top of the panel and distressed it a little more, revealing the white underneath. Voila, crisis averted!

I die cut the SSS Friends Die three times from black cardstock and adhered those together using liquid glue. I did trim off the “s” from Friends to suit my purposes. I also rummaged through my SSS Sentiment Strips to find an appropriate sub-sentiment for this card. Both of the sentiment were glued directly to the panel.

The panel was then trimmed down to just smaller than an A2 size so that I could layer it atop a black panel using foam tape. I always love incorporating black into my cards! That was then adhered to the card base, which is Neenah 110lb. I added a few Studio Katia Onyx Crystals to finish it up.

That does it for this card! I hope you like it and I hope it inspires you to get crafty! Have you checked out the Peace on Earth release yet? What are your favorites? I was just thinking that I need to start my Christmas Cards because I usually start them in October. When do you start yours? Anyhoo, have a wonderful day and don’t forget to stay awesome!

Supply List:

* Affiliate links used at no cost to you. Thank you so much for your support!

Latest Instagram Posts

Spellbinders Give Thanks

Hello Crafters and welcome back! I’m so glad that you stopped by today! For today’s project, I’m featuring the Spellbinders Falling Leaves Embossing Folder, as well as, the Mini Fall Blooms die set. These tiny blooms and leaves were so much fun to work with! So, let’s just jump right into the details!

To begin the project, I trimmed a panel of Neenah Classic Crest 110lb cardstock to just smaller than an A2 card and placed it in the Falling Leaves Embossing Folder and ran it through the die cutter. I then began cutting the blooms and leaves using a variety of Concord and 9th cardstock.

I also cut the centers for the flowers and parts of the sprigs with mirror gold cardstock, and adhered the gold pieces using liquid glue. I stamped the sentiment, which is from the Fun Stampers Journey Fall Thanks stamp set, using VersaMark Ink and heat embossed it using Ranger Princess Gold Embossing Powder. I repeated that process again for a smoother embossed look.

I used the Fun Stampers Journey Fall Thanks Die set to trim out the sentiment and cut it a second time from plain cardstock and adhered those together for dimension. I placed the sentiment atop the embossed panel and began adhering the leaves and sprigs around and underneath it using glue. Once all of the leaves were adhered, I glued the sentiment on top of those.

The flowers were placed around the sentiment using foam tape. I also added some Spellbinders Fashion Gold Embellishments for that added bit a bling that the card needed. The embossed panel was then adhered to a black panel before being adhered to the card base, which is also Neenah 110lb.

That finishes up this project! I hope you enjoyed it, and I hope it inspires you to get crafty! This was a fun set to work with, but I really do love working with all of the tiny leaves and bloom sets that Spellbinders has to offer! Have a wonderful day and don’t forget to stay awesome!

Supply List:

* Affiliate links used at no cost to you. Thank you so much for your support!

Latest Instagram Posts