Simon Says Stamp Hello Cherry Blossoms

Hello Crafty Friends, and thanks so much for joining me! I’m back today with a project featuring the new Cherry Blossom Embossing Folder from Simon Says Stamp’s latest release, Be Bold. There’s a lot going on with this card, so let’s get to the details!

Main Products:

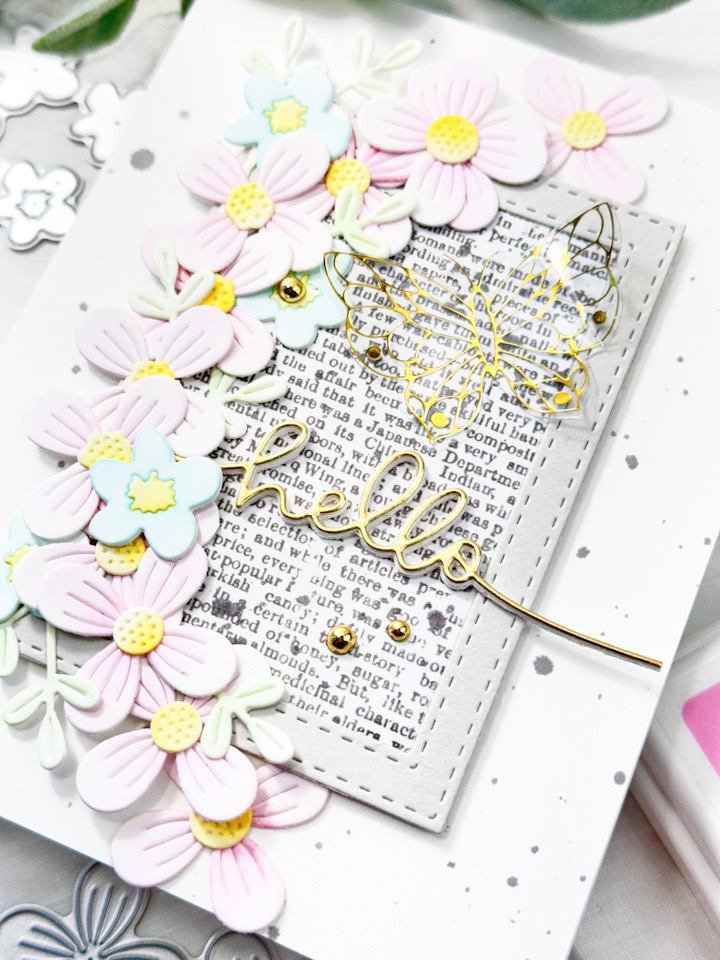
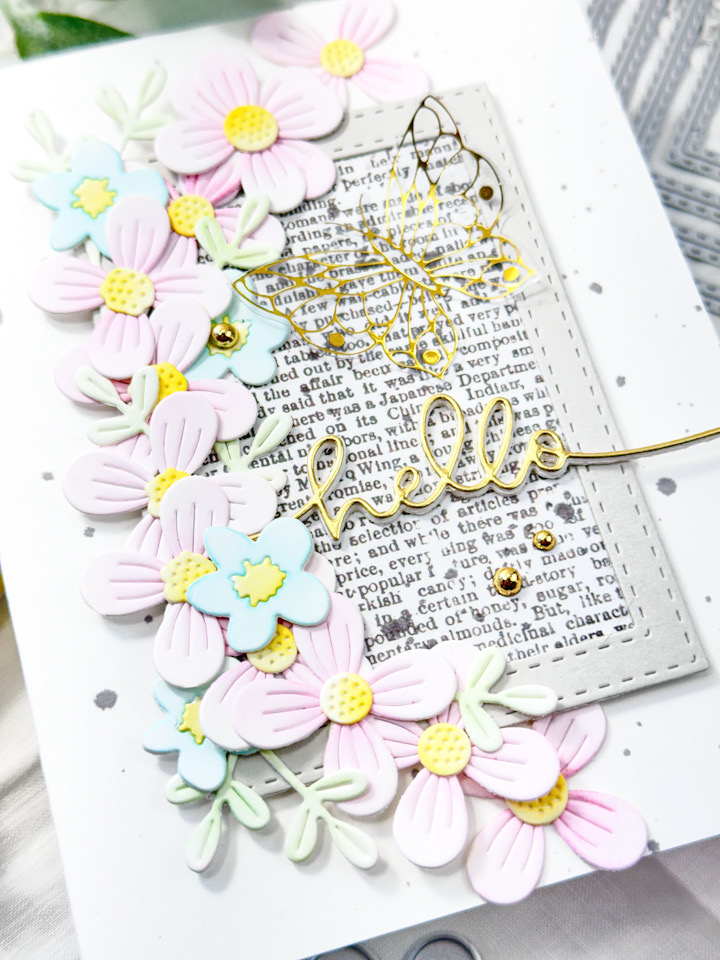
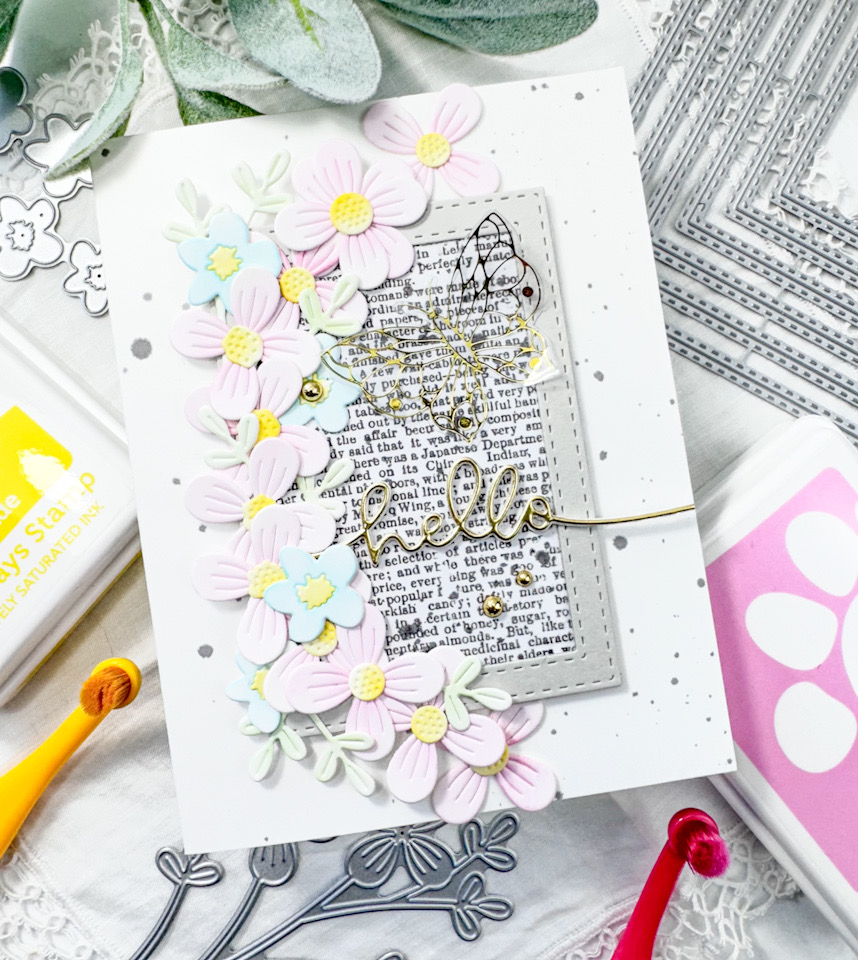
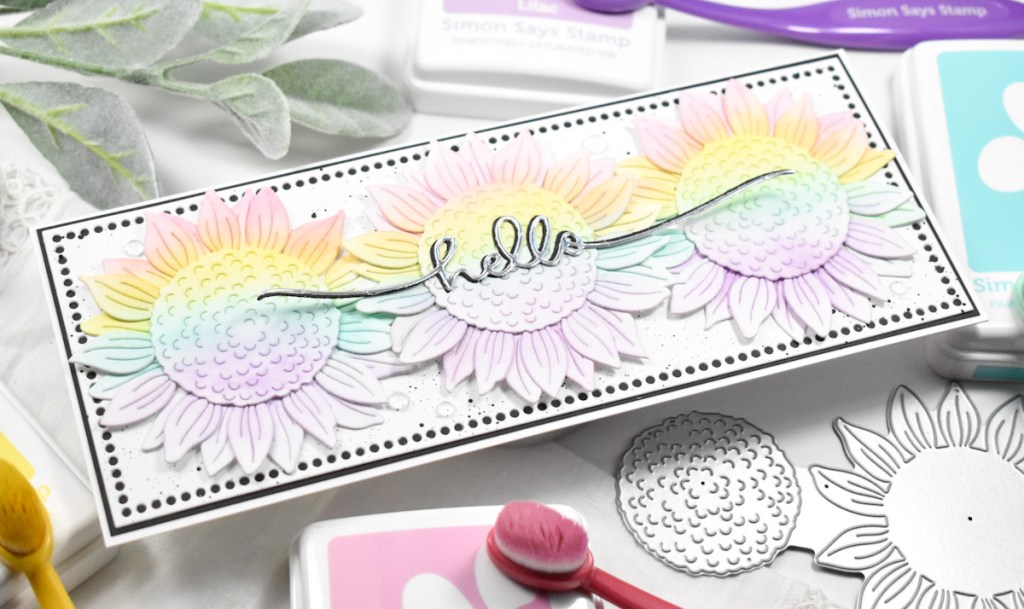
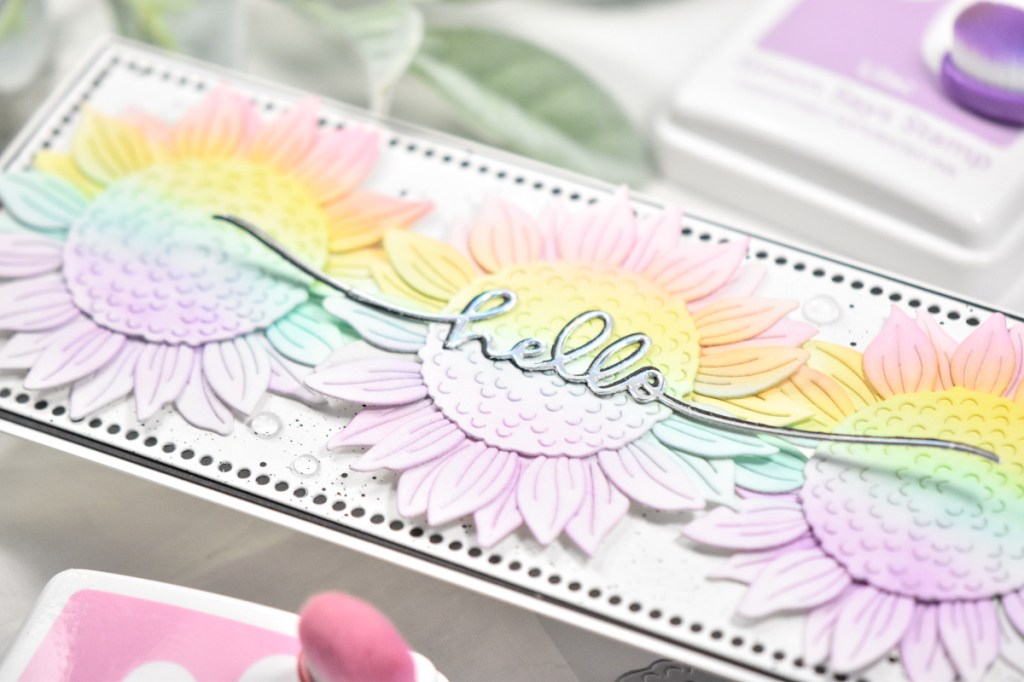
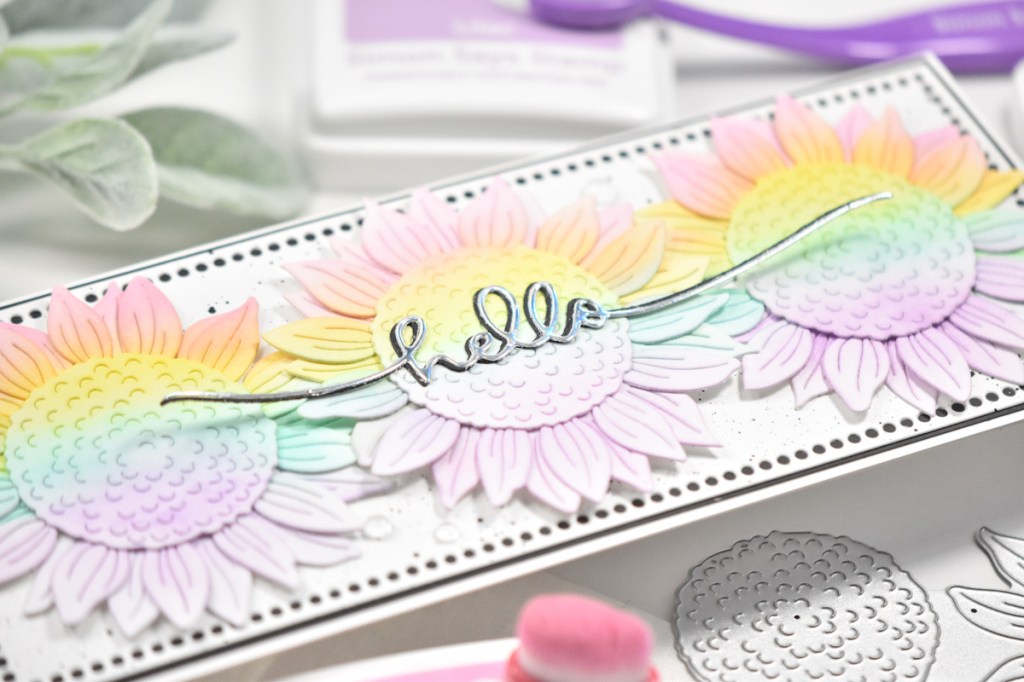
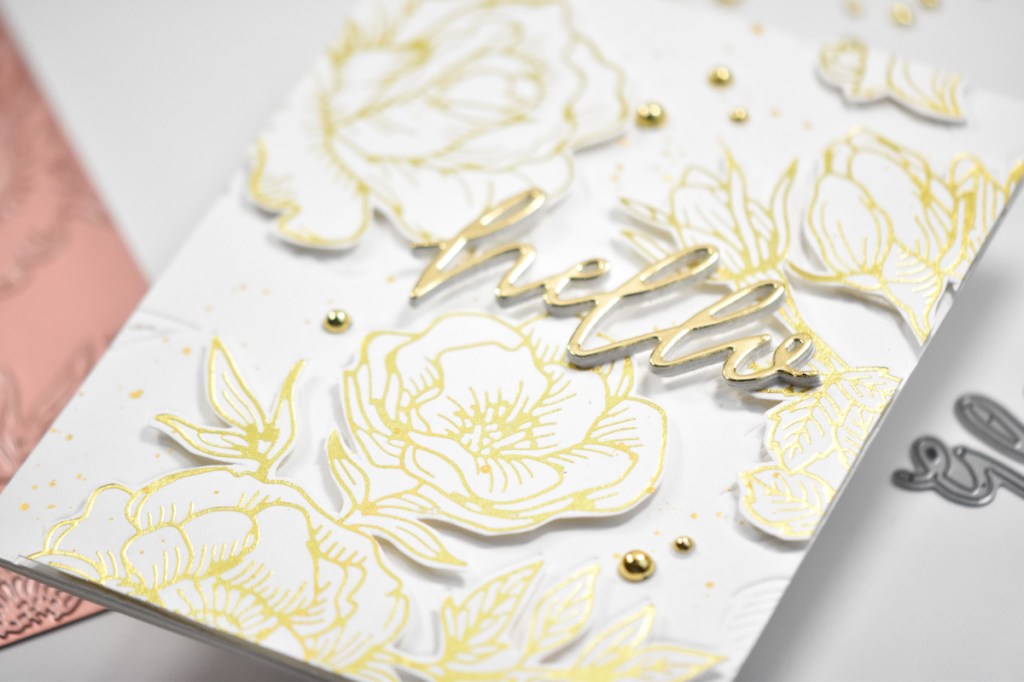
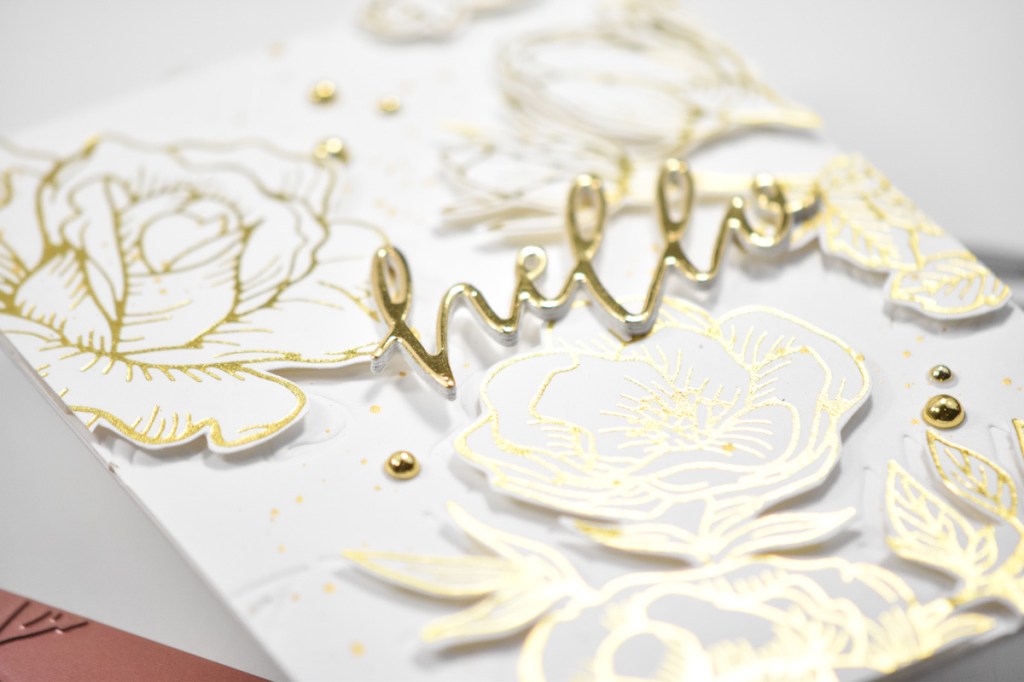
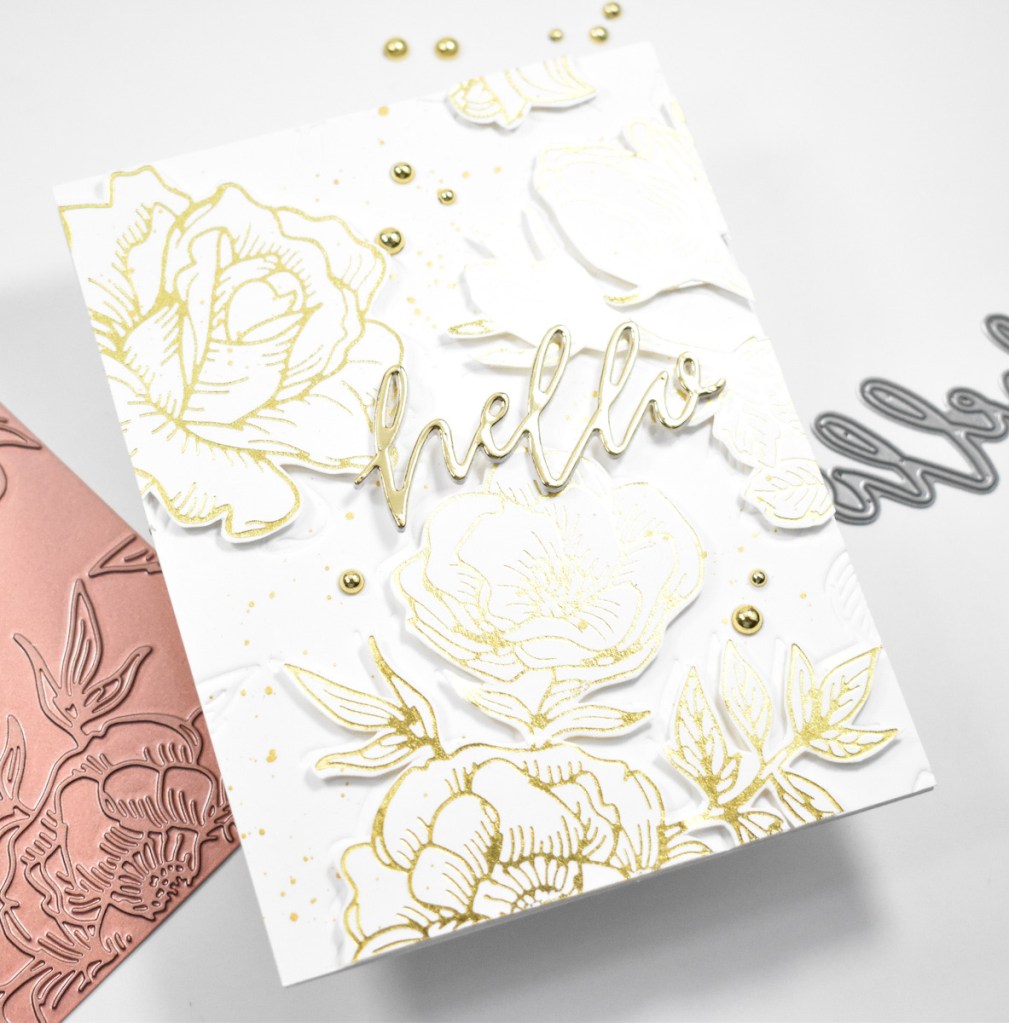
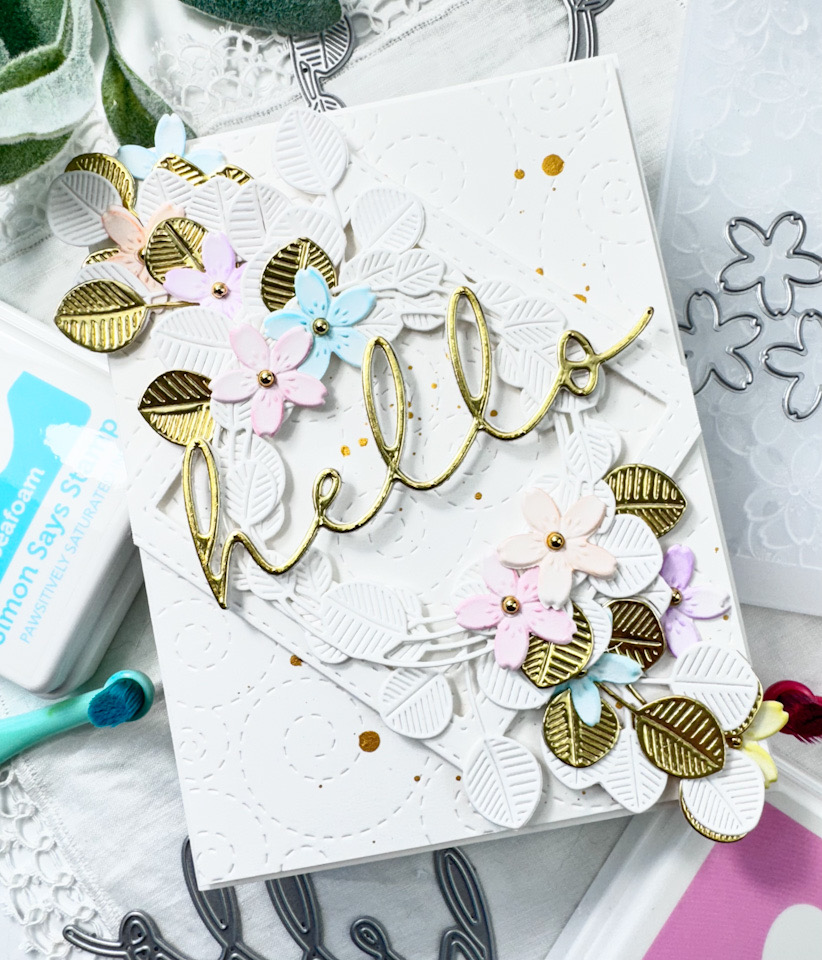
This card begins with cutting some white flowers using the included die from the SSS Cherry Blossom Embossing Folder. Once I had quite a few cut, I placed them inside the folder and ran them through the machine to add the embossed texture to them. I then did some light ink blending on them using SSS Pawsitively Saturated Inks in Bubblegum, Lilac, Lemonade, Marine, Seafoam, and Melon.

I then used the SSS Etched Eucalyptus Wreath and cut three of those from Neenah 110lb cardstock. While I was cutting, I went ahead and cut a bunch of leaves using the SSS Eucalyptus Leaves die from Neenah 110lb cardstock and gold cardstock, and I used the SSS Stitched Squares to cut one of those.

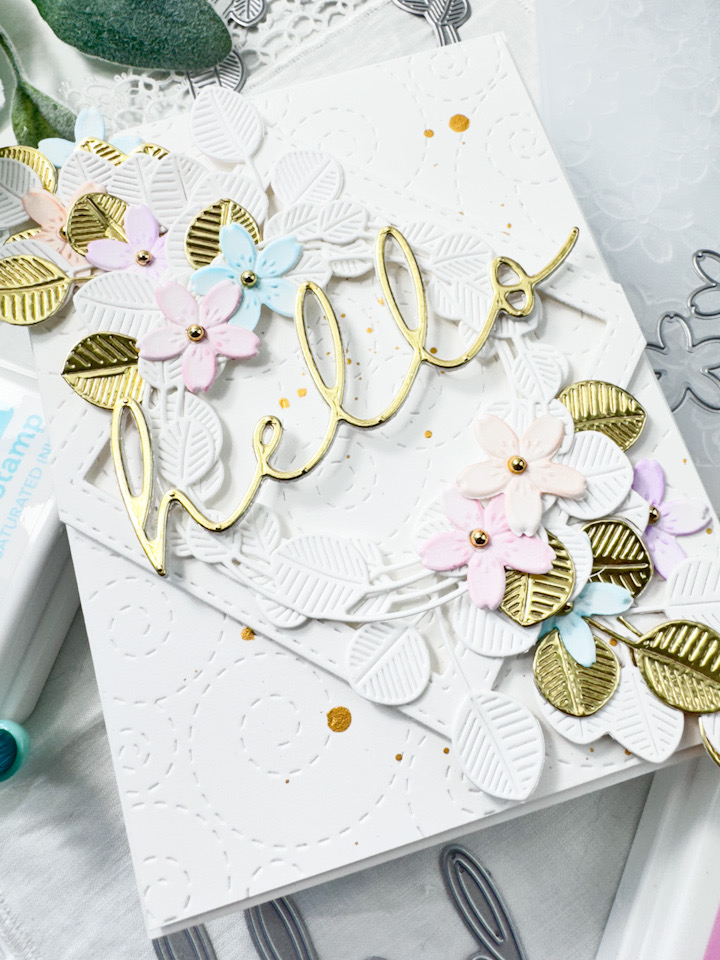
The background was created using the SSS Stitched Whirl Background and some gold acrylic ink splatter. As you can imagine, there was a lot of playing around with placement on this card! I adhered the three eucalyptus wreaths together using liquid glue and set that aside. I placed SSS 3D Foam Strips on the back of the square and decided placement of the leaves, and began gluing those in place. Some leaves had to be trimmed, and I reserved those to tuck back in where needed.

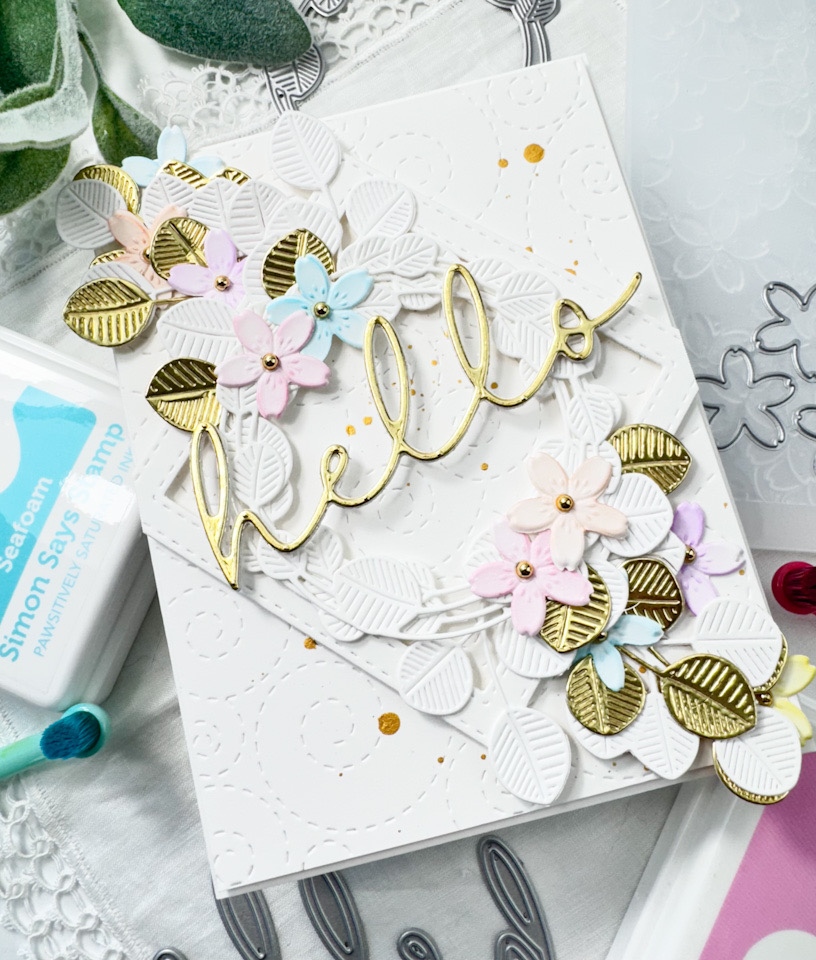
The square was then adhered to the panel and the wreaths were adhered atop that using a combination of liquid glue and foam strips for support. I glued a few flowers to the wreath and tucked in the remaining flowers here and there, along with the reserved white and gold leaves. I die cut the SSS Simple Hello once from gold cardstock and four times from Neenah 110lb cardstock and glued all of those together with liquid glue. I don’t normally make my sentiments that thick, but I knew it was going to need additional support, because it was going to be adhered atop the wreath with very few connect points.

I glued the Hello in place, and added some PFS Gold Metallic Pearls to the flower centers for added interest. The entire panel was then adhered to the card base using foam tape. Needless to say, this card is quite thick, but I love how it turned out!

Don’t forget to check out the entire Be Bold release over on Simon’s website! Thanks again for joining me, and I hope you have a fabulous day!

Other Products:

* Affiliate links used at no cost to you. Thanks so much for your support!

Latest Posts

Latest Instagram Posts

Golden Butterfly Hello

Hello Crafty Friends! I hope you are doing well! Thank you so much for stopping by to check out today’s card featuring a couple of new items from Simon Says Stamp’s latest release, Splendor, plus a few older favorites as well. Let’s run through the details.

I began this card by cutting a frame using the SSS Stitched Rectangles die and SSS Fog cardstock. I then trimmed a panel of patterned paper to fit behind the frame. I used the SSS Fine Floral Stem and the SSS Simple Flowers to cut those from Neenah 110lb cardstock. I did end up cutting the Fine Floral twice so that I would have enough flowers to curve around the frame.

For the ink blending on the flowers, I used SSS Pawsitively Saturated Ink in Bubblegum, Seafoam, Celery and Lemonade. Once the ink blending was complete, I assembled the flowers using liquid glue. I also ended up cutting apart the Fine Florals so that I could place the flowers where I needed them to go. I used the SSS Handlettered Greetings and die cut the hello sentiment once from gold cardstock and three times from Neenah 110lb cardstock, adhering all of those together with liquid glue.

The butterfly is from the PFS Small Butterflies Foil Plate, and I foiled that using gold foil onto acetate and used the coordinating die to trim it out. I splattered the patterned paper and the card base with Hickory Smoke Distress Spray Stain for a little bit of added interest.

To assemble the card, I adhered the frame to the card base using foam tape and arranged the flowers along the left edge of the frame, adhering those with glue. I tucked in the leaves where needed, and glued the butterfly and sentiment in place before adding some PFS Gold Metallic Pearls.

That finishes up this one! I hope you found some inspiration from this project! I really like all of the elements of this one, and thought that it came together quite nicely. Thanks again for stopping by. I hope you have an amazing day, and don’t forget to stay awesome!

Supply List:

* Affiliate links used at no cost to you. Thanks so much for your support!

Latest Posts

Latest Instagram Posts

Simon Says Stamp Hello Stems

Hello Crafty Friends, and thanks for stopping by! Today’s project is featuring the new Whirl Diamond Plate from Simon Says Stamp’s latest release, Sweetheart. So, let’s jump right into the details!

I began this card by cutting three SSS Sunrise Stems from Neenah 110lb cardstock. While I was cutting, I went ahead and cut the SSS Whirl Diamond Plate from a panel of black cardstock. I did some ink blending on the flowers using SSS Pawsitively Saturated Ink in Seafoam, Surf, Celery, Pearfection, Lemonade and Sunbeam.

Once all of the ink blending was done, I adhered the pieces of the flowers together using liquid glue. At this point, I did not adhere the flowers to the stems, because I was figuring out placement and deciding if I was going to need to trim some of the leaves off.

Before adhering the Whirl Diamond die cut to another panel of black cardstock, I splattered the panel with some gold acrylic ink for just a touch of added interest. Once that was dry, I adhered the die cut panel using liquid glue. I determined the placement of the florals, trimmed off a few leaves as necessary, and adhered the stems and flowers to the panel.

It was bothering me that I did not have three stems extending all the way to the bottom of the panel, because of placement on the card. To remedy this, I die cut the bottom of the stem two more times and ink blended them to match. I then tucked and glued the bottom portion so that I had three stems extending the length of the panel. That’s just me being a tad bit anal. What can I say?

I die cut the SSS Script Hello once from gold cardstock, cut the shadow three times from black cardstock and adhered them all together for a stacked sentiment. The sentiment was then adhered to the panel using foam tape. For a little bling, I added a few PFS Gold Metallic Pearls before adhering the panel to the card base.

That finishes up this project! I hope you enjoyed it! I love the look of bright florals against a black background. I think it’s so dramatic and beautiful. Don’t forget to check out the entire Sweetheart release! There’s so many fun things to feast your eyes upon. Thanks again for stopping by, and have a wonderful day!

Supply List:

* Affiliate links used at no cost to you. Thanks so much for your support!

Latest Posts

Latest Instagram Posts

Slimline Rainbow Sunflowers

Hello Fellow Crafters, and thanks for swinging by! I hope you’re doing well and having a wonderful day! Today I’m participating in a super fun Instagram Hop to celebrate Simon Says Stamp’s latest release, Out of This World, so be sure to head over there to check it out! Leave comments along the hop for your chance to win a $25 gift card to Simon Says Stamp! Who doesn’t love gift cards?!? Today’s project is once again featuring the new Bountiful Sunflower Blossom. I really have had loads of fun playing with this die! So let’s go through the deets for this one!

I had the idea of lining up sunflowers on a card, and in my brain, the sunflowers were smaller and I could get more on a card front, but that’s the problem with ideas. Sometimes they don’t work out as we had anticipated. But nonetheless, I like how this card turned out. To begin, I cut the SSS Bountiful Sunflower Blossom six times from Neenah 110lb cardstock. I had to cut it six times, because I used two rows of petals instead of just the one that it cuts.

I had to do the ink blending on each piece separately so as to get each petal covered, so I lined up the pieces for the flower up and proceeded to ink blend those. The colors that I used were the SSS Pawsitively Saturated inks in Bubblegum, Lemonade, Seafoam and Lilac. This seems to be my go-to set for rainbow ink blending. Once the flowers were done, I adhered the pieces together using liquid glue.

For the background of the card, I used the SSS Slimline Marquee die to trim a panel of Neenah 110lb cardstock and splattered it using acrylic ink. I set that aside to dry and worked on the sentiment. I die cut the hello sentiment, from SSS Handlettered Greetings, once from SSS Holographic Cardstock and once from black cardstock, and adhered those together off center just the slightest.

To assemble the card, I layered the splattered panel onto a black panel for contrast and glued the two side sunflowers directly to the panel, while adhering the center flower with some foam tape. I then glued the sentiment to the center of the middle flower, leaving the ends of the sentiment free floating, if you will. I added some clear drops before adhering everything to the card base.

That does it for this one! I never make slimline cards, but I end up liking them when I do! Anyhoo, I hope you like it too, and I hope it inspires you to get crafty in your space. Don’t forget to check out the entire Out of This World release, and let me know your favorites. Also, don’t forget to head over to Instagram to join in the hop! Have a fabulous day and as always, stay awesome sweet friend!

Supply List:

* Affiliate links used at no cost to you. Thanks so much for your support!

Latest Posts

Latest Instagram Posts

Simon Says Stamp Hello Horizon

Hello Friends and welcome back! I’m glad you stopped by to check out today’s project featuring the new On the Horizon set from Simon’s latest release, Dream Big. I’ve had a lot of fun with this release making my own backgrounds and ink blending, and today’s project was another fun one! Let’s get into the details!

To begin this project, I trimmed a panel of Neenah Classic Crest 110lb cardstock and did some ink blending on it using Distress Oxide inks in Wild Honey, Spiced Marmalade and Seedless Preserves. These colors really yielded a nice desert sunset scene in my opinion. Anyhoo, once the ink blending was complete, I used the PFS Diagonal Stitched Rectangles to trim it down, and spritzed it to get some water drop marks for added interest.

Once that was dry, I stamped some of the desert elements from the SSS On the Horizon set using VersaFine Onyx Black ink and heat set it using Ranger Clear Embossing Powder. I repeated that process twice to get a smoother finish on the embossing.

I used the hello sentiment, which is from the SSS Handlettered Greetings set, and die cut that twice from black cardstock and adhered them together using liquid glue. It was then glued directly to the panel, trimming off any excess.

Before adhering the panel to the card base using SSS Dot Tape Runner, I did give it a light splatter using Royal Talens Oxide Black Acrylic Ink.

And that does it for this one! I liked this particular sentiment with this card, because it kind of reminded me of a rope that a cowboy might use in the desert. Maybe that’s a weird thought, I don’t know. I can’t explain how my brain works most of the time! Thanks again for stopping by and don’t forget to swing by the website and check out the entire Dream Big release! Have yourself a fabulous day and as always, stay awesome!

Supply List:

* Affiliate links used at no cost to you. Thanks so much for your support!

Latest Posts
Latest Instagram Posts

Simon Says Stamp Sunshine Crocus

Hello Friends, and welcome back! The new Simon release, Let’s Chill, is live and boy is it a fun one! Today’s card is featuring the Hello Sunshine die in a repeat pattern. Let’s go through the details, shall we?

I began this project by die cutting the SSS Hello Sunshine twice from four different shades of yellow and orange. I did twice because I wasn’t sure how many it was going to take. I cut a panel of Neenah Classic Crest 110lb cardstock using the SSS Stitched Whirl Background, and began adhering the sentiment die cuts using liquid glue. I began at the top and worked my way down the panel.

Once all of the sentiments were adhered, I trimmed the panel down to the size of the sentiments. Moving along, I used the SSS Etched Crocus Stems to cut a few flowers from Neenah 110lb, and those were then glued directly atop the sentiments.

I splattered my card base using Royal Talens Light Gold Acrylic Ink and then adhered the panel using foam tape for dimension. No card is complete without bling, so I added a few pearls to finish up this project.

That does it! Simple card, but I love stretching my supplies and creating backgrounds from stand-alone sentiment dies. I hope you enjoyed it and I hope you’ll stop by and take a look at the entire Let’s Chill release. Have a wonderful day and don’t forget to stay awesome!

Supply List:

* Affiliate links used at no cost to you. Thanks so much for your support!

Latest Posts
Latest Instagram Posts

Simon Says Stamp Sunshine Medallion

Hello Friends, and thanks so much for stopping by! I’m back today featuring the new, super awesome Hello Sunshine die from Simon’s latest release, Let’s Chill! If you know me, you know that I love stand-alone sentiment dies, and I’ve had so much fun using this one! I’ve made several cards already using it! Anyhoo, let’s get into the details!

I began by die cutting the SSS Triangle Burst Medallion from four different yellow and orange cardstocks from my stash. I’ve had this die for a bit, but this is my first time using it, and I can totally see myself using it again for future projects! I also die cut the SSS Hello Sunshine once from gold cardstock and two more times from scraps of Neenah Classic Crest 110lb cardstock, adhering all of those together using liquid glue.

For the background, I used the SSS Geometric Lattice Embossing Folder and added a light layer of ink blending in the center using SSS Pawsitively Saturated Ink in Sunbeam. I went ahead and adhered all of the medallions together, offsetting them just slightly for a fuller look.

I did trim the Hello Sunshine die apart because I wanted the sentiment centered in the middle of the medallion. I glued those pieces to the medallion and then glued the medallion to the embossed panel as well.

The panel was then adhered to a black panel using foam tape for dimension, before being adhered to the card base. Of course, I had to add some PinkFresh Studio Gold Metallic Pearls for that added bling!

That finishes up this one! This was a simple card, but I love the medallion focal point with that shiny sentiment! Don’t forget to stop by and check out the entire Let’s Chill release! Have a wonderful day and stay awesome!

Supply List:

* Affiliate links used at no cost to you. Thanks so much for your support!

Latest Posts
Latest Instagram Posts

Sketched Floral Hello

Hello Friends and welcome back! I’ve been playing with goodies from the latest Erin Lee Creative release, and made another card using the new Sketched Floral Foil Cover Plate. So let’s run through the details!

All too often I get caught up in the thought that everything needs to be colored. Guess what? It doesn’t! I quite like this white and gold simplistic design on this one! Anyhoo, I began this project by embossing the Sketched Floral Foil Cover Plate onto a panel of Neenah Classic Crest 110lb cardstock. That provided just a tad of underlying detail.

I foiled the same plate using Spellbinders Gold Hot Foil and fussy cut those images and placed foam tape on the back. When adhering them to the embossed panel, I offset them just the slightest little bit so that you could still see the embossed details. I also added some gold splatter using Royal Talens Light Gold Acrylic Ink for some added interest.

For the sentiment, I cut the Hello Word Die once from gold cardstock and four more times from Neenah 110lb and adhered all of those together using liquid glue. I made the sentiment so thick because it was going atop the flowers that were adhered with foam tape, and I needed it to be quite sturdy.

The sentiment was glued atop the flowers and the panel was adhered to the card base using SSS Dot Tape Runner. Of course I had to add a little more bling, so I added a few PinkFresh Studio Gold Metallic Pearls to finish it up.

That does it for this one! I hope you enjoyed it. It’s hard for me not to color all the things, but white and gold are beautiful too! Have yourself a wonderful day, and don’t forget to stay awesome!

Supply List:

* Affiliate links used at no cost to you. Thanks so much for your support!

Latest Posts
Latest Instagram Posts

PinkFresh Studio Golden Sunflower Hello

Hello Crafty Friends and welcome back! I hope you’re having a great day! Today’s project is featuring the PinkFresh Studio Sunflowers Washi! I love all of the washi tapes that PFS has to offer, and this one is no different! They are just a great product for making quick, yet beautiful cards! Let’s run through the details shall we?

To begin, I rolled out a panel of PFS Sunflowers Washi Tape onto a panel of Neenah Classic Crest 110lb cardstock and ran that through the die cutting machine using the coordinating die. You end up with so many pieces of gorgeous flowers and leaves .. enough to make at least two cards worth!

For the background, I used the SSS Detail Pincushion Plate. I used the embossing mat and embossed the panel onto purple cardstock, and then die cut the panel from Neenah 110. I added some liquid glue to the back of the white panel and popped it right into place over the purple panel. It fits so nicely and looks like you spent a ton of time inlaying all the beautiful pieces.

I played around with the placement of the flowers and leaves and guess what, I determined that I needed some additional leaves! I’m not kidding, I think every card that I make needs additional leaves! Anyhoo, I used the PFS Leafy Branch die to cut some of those from gold cardstock.

The sentiment is from the PFS Perfect Sentiments product suite. In this case, I used the hot foil plate to foil the sentiments onto a panel of Neenah 110lb using Spellbinders Gold Foil, and used the coordinating die to trim them out. I did cut it two more additional times and adhered those together using liquid glue.

I began arranging and assembling the flowers and leaves using a combination of glue and foam tape for support, tucking leaves under as necessary. The sentiment was then glued atop the flowers and the whole panel was adhered to the card base using SSS Dot Tape Runner.

That finishes up this project! I hope you enjoyed it and I hope it inspires you to get crafty! If you haven’t tried any of the PinkFresh Studio washi tapes, I definitely recommend them! Have a wonderful day and don’t forget to stay awesome!

Supply List:

* Affiliate links used at no cost to you. Thanks so much for your support!

Latest Posts
Latest Instagram Posts

PinkFresh Studio Hello Brighter Days

Hello Friends and welcome back to my blog! Thanks for stopping by to check out this project featuring the Brighter Days product suite from PinkFresh Studio. I made this card using left over flowers and leaves from a previous project, as well as the negative hexagon pieces from another project. Let’s run through the details!

I began by adhering the negative hexagon pieces together using liquid glue and setting those aside. The previous card using the positive piece can be viewed here. I had cut two PFS Simply Hexagon pieces, one from Neenah Classic Crest 110lb cardstock, and one from a panel that I had ink blended using PFS Ocean Breeze. To assemble the background, I laid a positive hexagon piece on my panel and somewhat inlaid the negative pieces in there using foam tape. I say somewhat, because the negative pieces don’t actually fit into the space because they are bigger, as they are offset slightly. The positive piece was just used as a guide for placement, and removed once I had gotten the negative pieces situated.

As I said earlier, the flowers are from a previous card as well, and can be viewed here. These flowers were made using the PFS Brighter Days Hot Foil Plate, Stencil and Die suite. I foiled them using Spellbinders Champagne Foil and did the ink blending using PFS inks in Ocean Breeze, Aquamarine, Mint and Fresh Pear. Once I was done with the inks, I used the coordinating die to trim out all of the pieces.

I began my initial card layout, determining placement and the size of sentiment that I was going to be able to use. I opted for the Hello sentiment, which is from the PFS Classic Words Die Set. I die cut that once from polished gold cardstock and twice from black cardstock and adhered all of those together using liquid glue. In determining placement, I decided that I needed some extra leaves, because that’s apparently what I do. Every card seems to need additional leaves! I guess leaves are just my jam! Anyhoo, I die cut a few leaves using the PFS Leafy Branch and added those to my floral placement.

The hexagons were already adhered to the panel, so I began adhering the flowers and both kinds of leaves using liquid glue, tucking the leaves under as necessary. The sentiment was glued to the panel as well. I opted to add a little bling using the PFS Gold Metallic Pearls, because every card needs bling! Ok, so leaves and bling! The panel was then adhered to the card base using SSS Dot Tape Runner.

That finishes up this project! I hope you enjoyed it, and I hope it inspires you to get crafty! Have yourself a wonderful day and don’t forget to stay awesome!

Supply List:

* Affiliate links used at no cost to you. Thanks so much for your support!

Latest Posts
Latest Instagram Posts