Spellbinders Floral Thanks

Hello Crafty Friends, and thank you so much for stopping by! I’m back today with a project featuring some Spellbinders products from the May 2024 release, along with an older floral set. Let’s go ahead and run through the details, shall we?

Main Products:

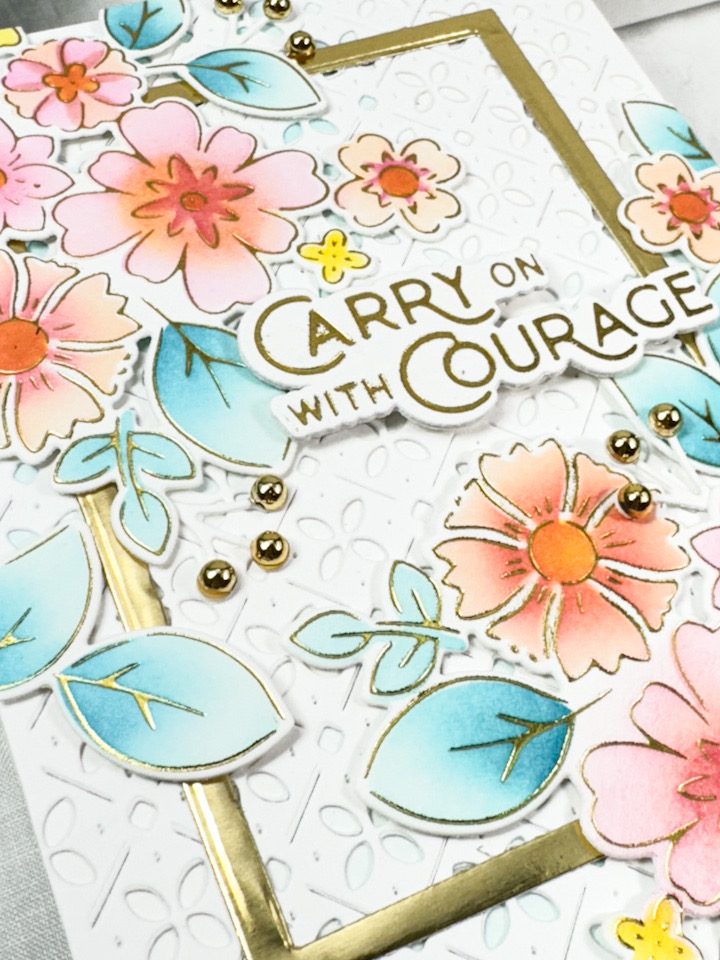
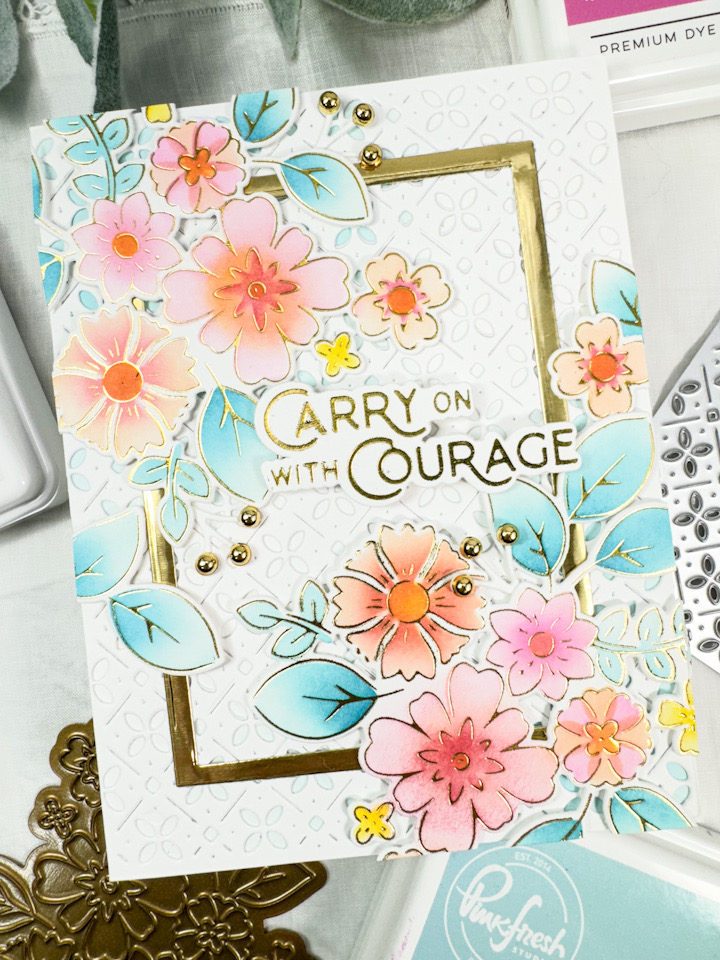
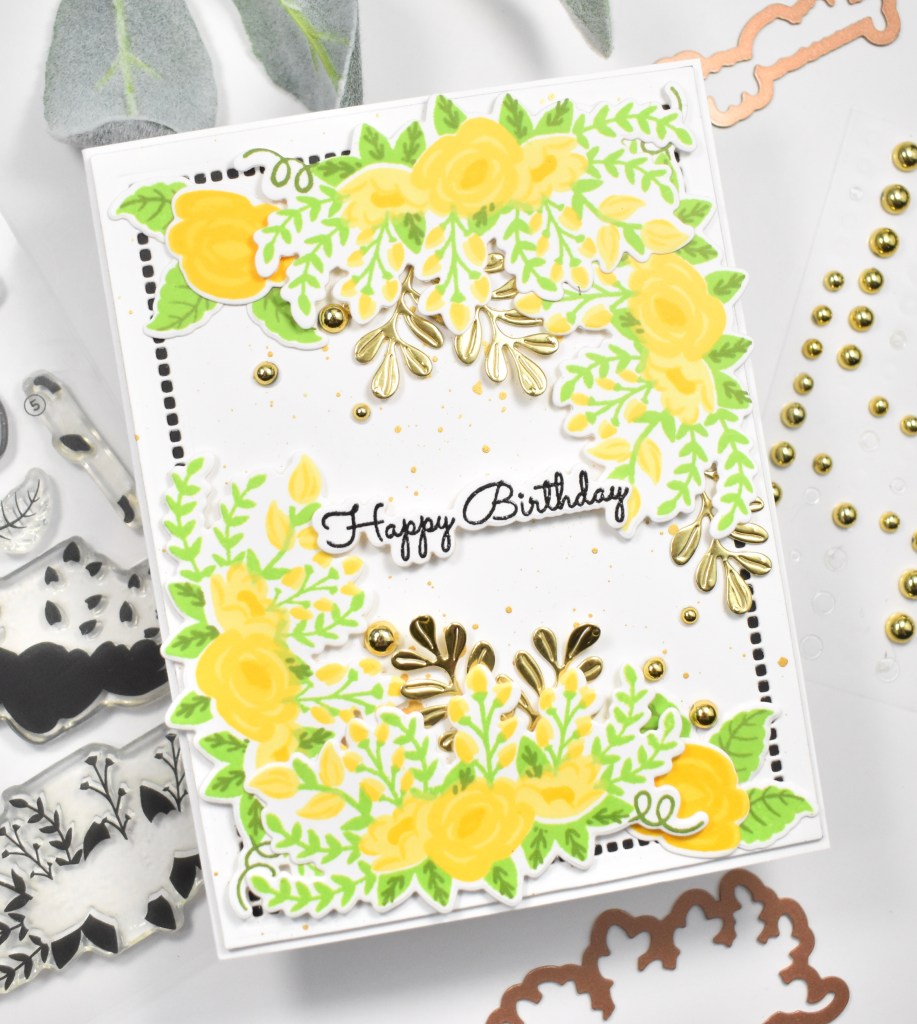
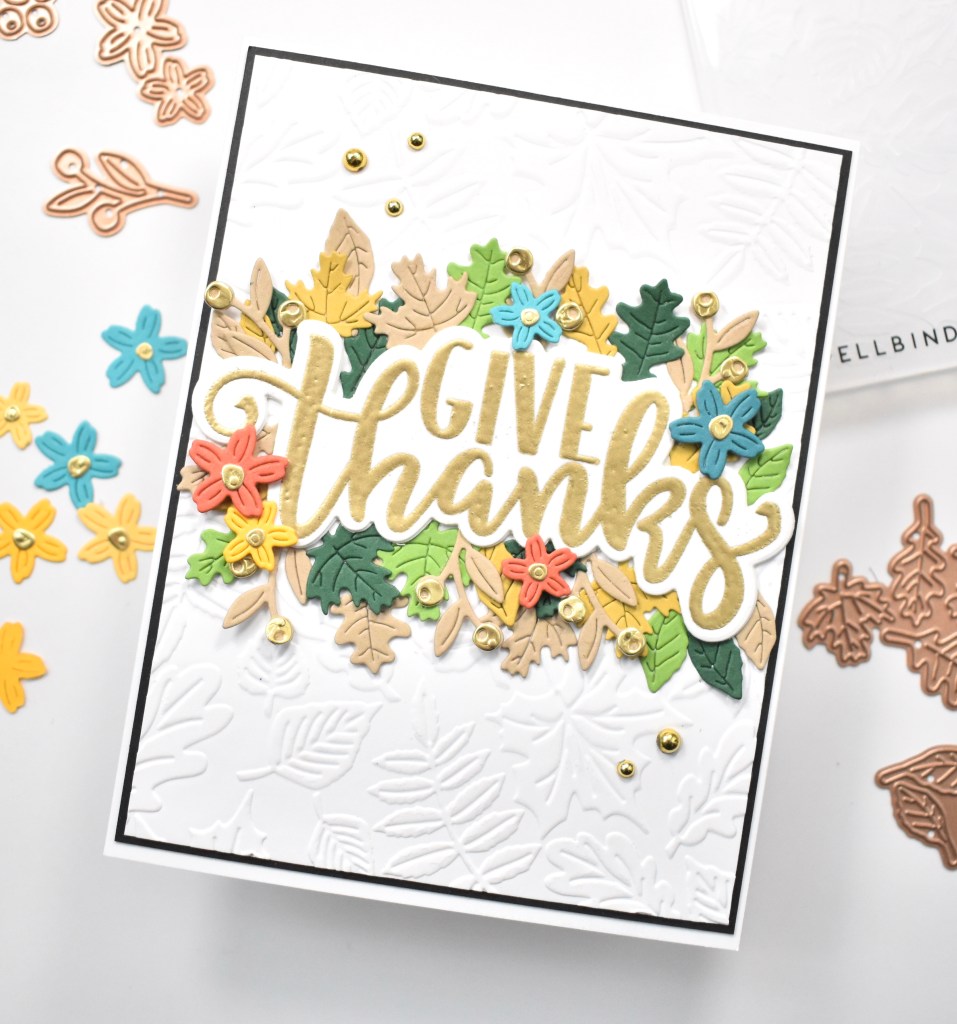
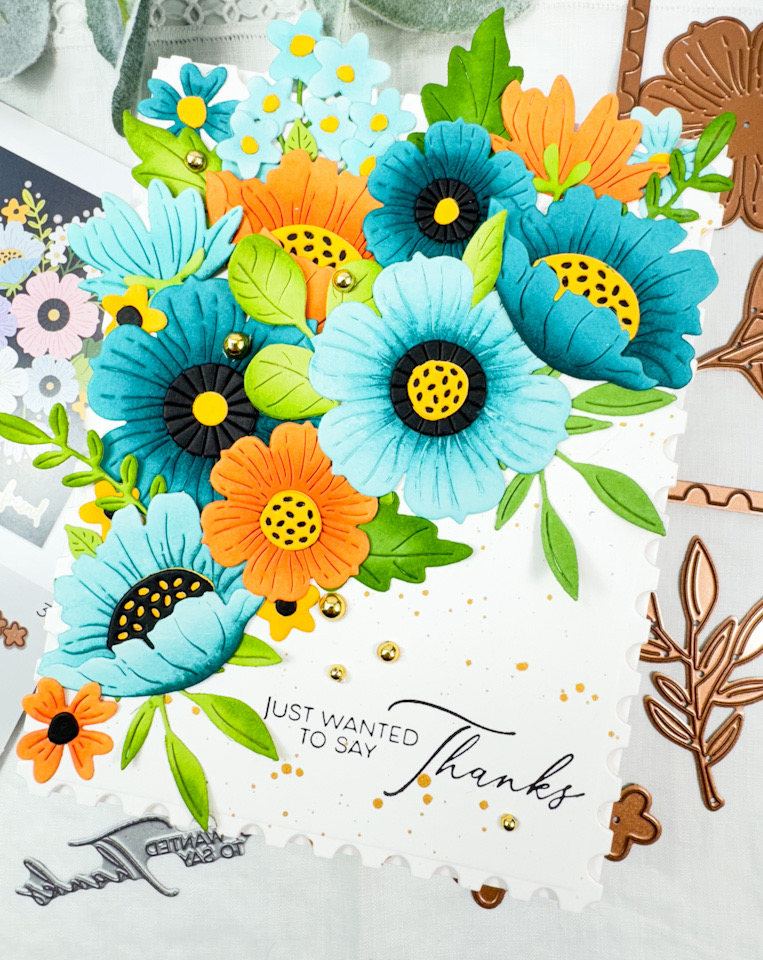
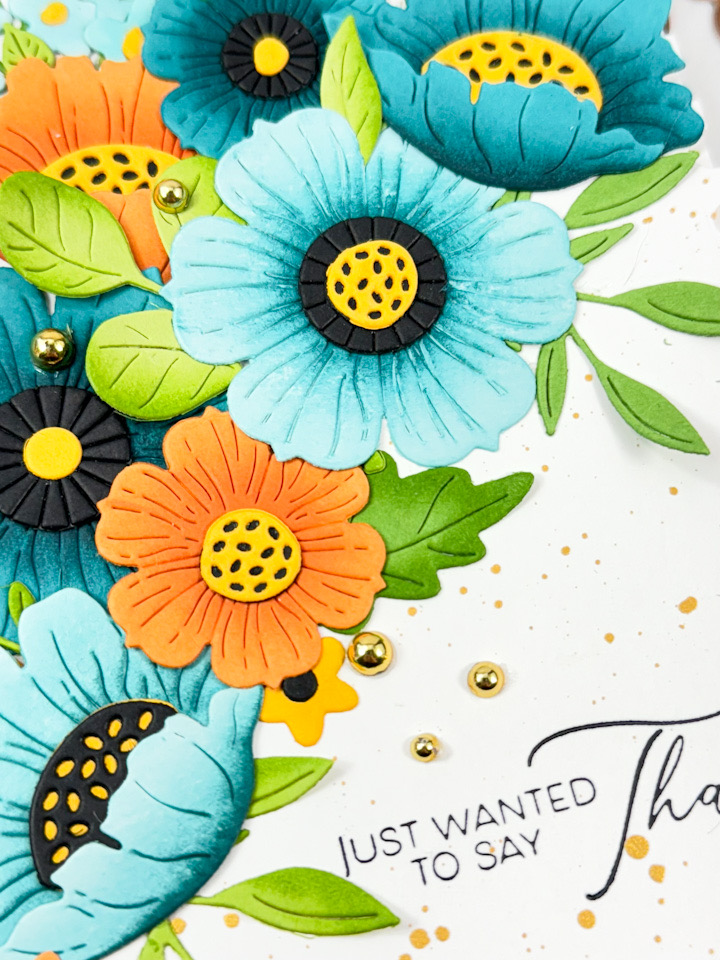
I recently created another card using this same color palette, and I loved it so much that I wanted to create another one! I began this card by using the Spellbinders Club Blooms Large Die of the Month from January 2023 and cutting the flowers and leaves from different shades of aqua, orange, green, yellow and black cardstock. I made quite a few flowers, and probably have enough to make one more card with those. Once the pieces were cut, I did some ink blending and assembled the flowers using liquid glue. These are great flowers, because you can assemble them in various ways.

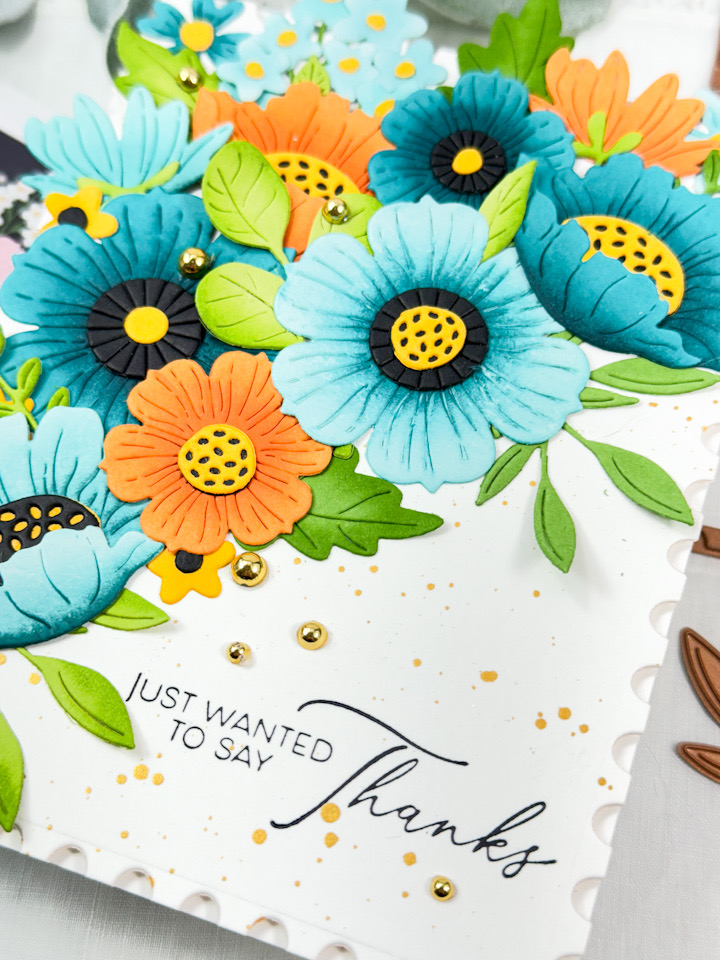
For the background panel, I used the Spellbinders Nested Postage Labels and Tag set to trim that down, and then added some gold splatter for some added interest. Once the splatter was dry, I used the Spellbinders New Beginnings Timeless Sentiments Press Plates to add the sentiment directly to the panel using BetterPress Black ink. I arranged the florals atop the panel at an angle and then used some Press N Seal to lift them off so that I could apply some glue to the back and then adhere them to the panel.

The panel was then adhered to the card base using foam tape, and I added some Spellbinders Fashion Gold Embellishments for some additional shine.

That finishes up this project! I hope you enjoyed it, and I hope it inspires you to get crafty in your space! I thoroughly enjoy assembling flowers and floral sprays like this, so this card was right up my alley! Thanks again for stopping by! Stay awesome friend, and have a wonderful day!

Other Products:

* Affiliate links used at no cost to you. What does this mean? If you use the links within this post to make a purchase, I will receive a small commission, which allows me to be able to continue posting crafty content for your enjoyment. I truly appreciate your support!

Latest Posts

Latest Instagram Posts

PinkFresh Studio May Challenge – Flower Power

Hello Crafty Friends, and welcome back to my blog! I rarely participate in challenges, but decided that I would give the PFS May Challenge a go. The theme is Flower Power, and flowers are always up my alley, so why not?! Let’s run through the details, shall we?

Main Products:

I began this project by foiling the PFS Simplest Gestures florals onto a panel of Neenah 110lb cardstock, using gold foil. I then used the coordinating stencils to do some ink blending using PFS inks in Bubble Gum, Sunkissed, Citron, Ocean Breeze and Atlantis. Once all of the ink blending was complete, I used the coordinating die to trim them out.

I went back to foiling for the sentiment using the PFS Wonderful Sentiment Foil Plate and coordinating die. I cut three and adhered all of the together using liquid glue for a stacked sentiment. Now to pull everything together! I did some light ink blending on my card base using leftover ink on the blending brush and glued the PFS Floral and Diamond Tiles panel atop that.

The card was needing a little something else, so I added a gold frame using the SSS A2 Thin Frames, and then adhered the florals using SSS Foam Squares. The sentiment was adhered amongst the flowers using SSS 3D Foam Strips for a little added dimension. I also used the SSS Budding Branches and cut a few of the ‘buds’, glued those in place and added some PFS Gold Metallic Pearls. I did trim off the excess flowers and added a few back in around the edges of the card to finish up.

That does it for this project! I hope you enjoyed it, and I hope it inspires you to get crafty in your space! Thanks again for joining me, and don’t forget to stay awesome!

Other Products:

* Affiliate links used at no cost to you. Thanks so much for your support!

Latest Posts

Latest Instagram Posts

BetterPress Magnolia Florals

Hello Friend! I’m so glad that you stopped by! Today, I’m sharing a card using various products, including the BetterPress Letterpress System. I’ve had my BetterPress system for quite a while, but haven’t used it too much until recently. Not too long ago, I posted a black and white card design for Simon Says Stamp, and I really loved it and wanted to try another black and white design. So, let’s run through the details of this one.

To begin, I used the SSS Etched Magnolia Blossom to cut two flowers from Neenah 110lb cardstock, and I cut a few leaves using the SSS Windswept Leaves from the same cardstock. I then did some very light ink blending on the flowers using C&9th Dove ink. I did go back and cut the centers of the flowers using black cardstock, because I liked the contrast. Once the ink blending was complete, I assembled the flowers using liquid glue.

For the background, I used the Spellbinders So Grateful For You Press Plate, black ink and a BetterPress A2 card panel. I inked up the plate and ran it through the die cutting machine to make the impression. I did end up trimming the panel down ever so slightly and mounted that onto a black cardstock panel.

I thought the panel needed a frame, so I used the PFS Folk Edge Rectangles and cut one of those from black cardstock and glued it to the background panel. Moving on to the sentiment, I used the SSS XL Love Greetings and stamped on black cardstock using VersaMark Ink and heat set that using SSS Detail White Embossing Powder. I then used the coordinating die to trim that out, along with two additional cuts for a stacked sentiment.

Let’s assemble this card! I adhered the sentiment in the center of the panel using liquid glue, and arranged the leaves adhering those with glue as well. The flowers were then adhered atop the leaves using foam tape for a little added dimension. Everything was then adhered to the card base using dot tape runner. To finish up, I added some clear drops for additional interest.

That finishes up this one! Like I said, I’ve had my BetterPress for a while now, but am just starting to use it. Mainly because I ordered some sentiments for it, and have really been enjoying those. I need to order some more cover plates, as I really like the look of those. I hope you enjoyed this project, and I hope it inspires you to get crafty in your space! Thanks again for stopping by, and I hope you have a wonderful day! Stay awesome Friend!

Supply List:

* Affiliate links used at no cost to you. Thanks so much for your support!

Latest Posts

Latest Instagram Posts

Spellbinders Stylized Birthday

Hello Friends! Thanks for joining me today as we celebrate Spellbinder’s 20th birthday! In honor of this major event, we are featuring products from the new Birthday Celebrations Collection! There are so many wonderful products in this collection, and today, I’m featuring three of those products on one card! Let’s go through the details, shall we?

I began this project by die cutting the Spellbinders Stylized Happy Birthday sentiment from their Mirror Gold cardstock, and cut the shadow portion of the die from Neenah Classic Crest 110lb cardstock. Once that was cut, I used liquid glue to adhere all of the letters. While I was cutting, I went ahead and trimmed a piece of patterned paper, which is from the Spellbinders Birthday Celebrations Embellishment Bundle. This is such a fun bundle with gorgeous papers, fun stickers and tons of ephemera pieces!

The sub-sentiment was made using the new Birthday Unboxing Glimmer Hot Foil Plates. This sentiment was foiled using gold foil, because I wanted it to match the die cut sentiment. Once the sentiments were ready, I placed foam tape on the back for a bit of dimension.

This is such a gorgeous paper, that I thought it would be fun to add some flowers and leaves in some springy colors! So, I used the Mini Blooms and Sprigs set and cut a bunch of flowers in various colored cardstocks, and cut a few leaves from the same Mirror Gold cardstock.

To assemble the card, I adhered the sentiments in the center, and adhered the flowers and leaves using a combination of liquid glue and foam tape, before adhering to the card base.

That does it for this one! I hope you enjoyed it, and I hope it inspires you to get crafty! Don’t forget to stop by and check out the entire Birthday Celebrations Collection! Thanks again for stopping by and have a wonderful day!

Supply List:

* Affiliate links used at no cost to you. Thanks so much for your support!

Latest Posts
Latest Instagram Posts

Spellbinders Sweet Sayings Hello

Hello Friends and welcome back! Hope you’re having a fabulous day! Today’s project is featuring the Sweet Sayings Notecard Sentiments from Spellbinders. I love die cut sentiments, so I was thrilled to get to play with this set. Let’s jump right into the details!

To begin, I used the Spellbinders Hand Drawn Wave Foil Plate, along with some matte gold foil to make a couple of panels using Neenah Classic Crest 110lb cardstock. Once those were done, I fussy cut them and set them aside while I prepared the rest of the card.

I trimmed a mini slimline panel using the Spellbinders Mini Slimline Envelope & Nested Card Creator set and splattered that using Royal Talens Light Gold Acrylic Ink. I set that aside to dry while I did some other die cutting. I die cut the Hello sentiment from the Spellbinders Sweet Sayings Notecard Sentiments once from seven different rainbow colors of cardstock from my stash. I also die cut a few leaves from mirror gold cardstock using the Spellbinders Mini Blooms and Sprigs set, as well as, the Spellbinders Bouquet of Flowers set.

For the sentiment, I used liquid glue to glue those together offsetting them just slightly so that all of the colors were visible. To assemble the card, I glued the top layer of the waves to the splattered panel, and adhered the bottom layer using foam tape for dimension, trimming off the excess as needed.

I also used liquid glue to adhere all of the leaves, tucking those down into the wave panels. The sentiment was then glued to the bottom of the panel. I added a few Spellbinders Fashion Gold Embellishments for some added bling. Everything was then adhered to a coordinating blue panel before being adhered to the card base, which is also Neenah 110lb.

That does it! I always love incorporating rainbow colors into my projects, and I loved making this sentiment! I hope you enjoyed this project, and I hope it inspires you to get crafty as well! Have a beautiful day and don’t forget to stay awesome!

Supply List:

* Some affiliate links used at no cost to you. Thanks so much for your support!

Latest Instagram Posts

Spellbinders Floral Happy Birthday

Hello Crafty Friends and thanks for stopping by! I hope you are doing well and having a wonderful day! Today’s project is featuring the Spellbinders Lyrical Layered Florals. Layered stamps make it so easy to achieve beautiful images with minimal effort! Let’s get to the details for my project!

I began by stamping the florals on a panel of Neenah Classic Crest 110lb cardstock using PinkFresh Studio inks in Grassy Knoll, Olive, Lemon Whip, Sweet Mustard and Marigold. Once the stamping was done, I used the coordinating die, which is included in the set, to trim them out.

For some added interest, I cut a panel of Neenah 110lb using the Spellbinders Hemstitch Rectangles and splattered that using Royal Talens Light Gold Acrylic Ink. I then adhered that panel to a black cardstock panel for contrast.

I stamped the sentiment using VersaFine Onyx Black Ink, heat embossed it using Ranger Clear Embossing Powder and trimmed it out using the included die cut. I did also go ahead and cut some leaves from the Spellbinders Mini Blooms and Sprigs set using mirror gold cardstock. I thought the gold would be a nice addition with the yellow flowers.

The florals and leaves were adhered to the splattered panel using a combination of liquid glue and foam tape. Once those were arranged, I nestled the sentiment in between and adhered that with foam tape as well. To finish off this project, I added some Spellbinders Fashion Gold Embellishments. No project is complete without some bling in my opinion!

That does it for this project! I hope you enjoyed it and I hope it inspires you to get crafty! Have a wonderful day and don’t forget to stay awesome!

Supply List:

* Some affiliate links used at no cost to you. Thanks so much for your support!

Latest Instagram Posts

Spellbinders October Card Kit Inspiration

Hello Crafty Friends and thanks for joining me today for some Spellbinders Monthly Card Kit inspiration! The October kit is called, “You are Stellar,” and it’s a beauty! I love all of the blues and purples! So let’s go over the details for my cards!

When working with the card kits, my favorite things are the patterned papers, stickers and ephemera pieces, so I always end up making cards using those elements!

My First project uses all of the zodiac stickers on one card, and I absolutely love the grid format! I used a piece of the included patterned paper, along with an ephemera sentiment. Super simple, but I just love the colors!

For my second card, I did use the included die cuts to cut this navy and gold frame that surrounds the center sentiment. I glued the frame to the patterned paper and adhered the sentiment using foam tape for dimension. I also adhered the moon and gold stars using a combination of glue and foam tape. I matted it with a panel of black cardstock for contrast.

My third project, once again, only uses papers and ephemera pieces included in the kit. I placed the gold Make a Wish sentiment in the center of the patterned paper and arranged the floral pieces around it, adhering those with a combination of glue and foam tape. I added the sub-sentiment using foam tape, and also added some Spellbinders Fashion Gold Embellishments to finish it up.

And my final project uses lots of sentiment strips from the kit. Some of them are stickers and some are ephemera pieces. They were all adhered to the paper using foam tape, as well as, the gold heart. The celebrate sentiment, which is from a previous card kit, was cut from mirror gold cardstock and glued to the paper. Once again, I matted it on black cardstock for contrast.

That does it for today! I hope you’ll swing by Spellbinders and check out the Monthly Card Kit, as well as all the other cool kits they have to offer. Have a wonderful day and don’t forget to stay awesome!

Supply List:

* Affiliate links used at no cost to you. Thank you so much for your support!

Latest Instagram Posts

Spellbinders Give Thanks

Hello Crafters and welcome back! I’m so glad that you stopped by today! For today’s project, I’m featuring the Spellbinders Falling Leaves Embossing Folder, as well as, the Mini Fall Blooms die set. These tiny blooms and leaves were so much fun to work with! So, let’s just jump right into the details!

To begin the project, I trimmed a panel of Neenah Classic Crest 110lb cardstock to just smaller than an A2 card and placed it in the Falling Leaves Embossing Folder and ran it through the die cutter. I then began cutting the blooms and leaves using a variety of Concord and 9th cardstock.

I also cut the centers for the flowers and parts of the sprigs with mirror gold cardstock, and adhered the gold pieces using liquid glue. I stamped the sentiment, which is from the Fun Stampers Journey Fall Thanks stamp set, using VersaMark Ink and heat embossed it using Ranger Princess Gold Embossing Powder. I repeated that process again for a smoother embossed look.

I used the Fun Stampers Journey Fall Thanks Die set to trim out the sentiment and cut it a second time from plain cardstock and adhered those together for dimension. I placed the sentiment atop the embossed panel and began adhering the leaves and sprigs around and underneath it using glue. Once all of the leaves were adhered, I glued the sentiment on top of those.

The flowers were placed around the sentiment using foam tape. I also added some Spellbinders Fashion Gold Embellishments for that added bit a bling that the card needed. The embossed panel was then adhered to a black panel before being adhered to the card base, which is also Neenah 110lb.

That finishes up this project! I hope you enjoyed it, and I hope it inspires you to get crafty! This was a fun set to work with, but I really do love working with all of the tiny leaves and bloom sets that Spellbinders has to offer! Have a wonderful day and don’t forget to stay awesome!

Supply List:

* Affiliate links used at no cost to you. Thank you so much for your support!

Latest Instagram Posts

Spellbinders September Card Kit Inspiration

Hello Crafty Friend! I’m so glad that you stopped by today! The September kit, Together is the Best, is the cutest! There’s so many fun ephemera pieces, stickers, and beautiful cardstock and printed papers! If you’ve never tried a Spellbinders Card Kit of the Month, whatchoo waiting for? Everything you need to make at least ten cards is included in this kit! This month, I made six cards that I’d like to share with you, so let’s jump right into it!

The first card is my absolute favorite! It was a little labor intensive, but I really do love the end result! So for this first card, I began by die cutting the included Hello You die cut a bunch of times from Neenah Classic Crest 110lb cardstock. I think I ended up having to cut it seventeen times to fill this black panel, which is 3.75 by 5.

Once those we all cut, I began adhering them down using liquid glue until the panel was full. I began at the top of the panel gluing down the full die cut and the portions of that row. For the next row, I off-centered the full die cut to the right and filled in with the remainders. The third row was then off-centered to the left and filled in. For the fourth row, I went back to the center, and so forth and so on. Hopefully that makes more sense while looking at the picture.

I then began die cutting the telephone pieces from pink and mirror gold cardstock, which is also included in this kit. I assembled the phone using glue and placed foam tape on the back of it. That was then adhered to the Hello You panel. That panel was glued to a panel of the same pink cardstock and then to a panel of black cardstock. Everything was then adhered to a card base, which is included in the kit, as well.

All of the next cards were created using the patterned paper, stickers, chipboard stickers and ephemera pieces. All of these pieces really make for some beautiful, quick cards!

For this next card, You and Me, I did use the Spellbinders Hemstitch Rectangles to trim out the piece of patterned paper and attached it to a black panel. I just love that little bit of detail and texture it gives. I adhered all of the pieces using a combination of glue and foam tape. The only additional pieces that this card uses is a gold flower that’s been hanging around on my desk, which is from the Spellbinders Mini Blooms and Sprigs set, and a Spellbinders Fashion Gold Embellishment. Everything was then attached to an included card base.

This third card, Celebrating You, once again uses ephemera pieces with the addition of the Hemstitch Rectangles again, as well as leaves from the die set in the Spellbinders July 2021 Card Kit. Once again, all of the pieces of ephemera were adhered using a combination of glue and foam tape. I loved adding the gold leaves to tie in with the other gold details on the ephemera pieces.

My fourth card, Happy Home, uses some ephemera, chipboard stickers and these gorgeous gold stickers! I did use the Hemstitch Rectangles again for that added interest. I did adhere all of the houses with foam tape for a bit of dimension.

The fifth card, Wishing You the Happiest of Days, uses those awesome Hemstitch Rectangles again, along with some leaves from the Spellbinders Mini Blooms and Sprigs die set. Such a great set for sure! I glued the gold leaves under the ephemera pieces and used glue and foam tape on everything else. I did mount my panel on some included pink cardstock for added interest.

My sixth and final card, Grateful for You, uses the rectangles again, as well as leaves from the Spellbinders Bouquet of Flowers die set. Everything was adhered using foam tape and glue. I did reinforce the chipboard banner stickers at the top with glue, just to be sure they didn’t come off. My panel was then adhered to an included card base.

That does it for this set of cards! I hope you enjoyed them and I hope it inspires you to get crafty! I made six cards, and I still have so much stuff left over to make lots more. I encourage you to check out all of the clubs that Spellbinders has to offer! Have a wonderful day and don’t forget to stay awesome!

Supply List:

* Affiliate links used at no cost to you. Thank you for your support!

Latest Instagram Posts

Spellbinders Chill Bear Winter Wishes

Hello Friend and thanks for stopping by! For today’s project, I’m featuring the Chill Bear and the Color Block Scenic Scape dies from the July releases from Spellbinders. There are so many beautiful and adorable Christmas and holiday things to choose from! I had a lot of fun playing with the Chill Bear, so let’s get into the details!

I began by cutting the Chill Bear and a bunch of “hills” using the Color Block Scenic Scape dies from Neenah Classic Crest 110lb cardstock. For the bear, I did cut two additional legs and I cut the face from pink and black cardstock so that I could inlay those pieces. I cut the snout and colored that using Copic Markers C00, N0 and 110 Black. I also cut some of the included trees from green cardstock. I smeared the trees with Tacky When Dry Gel Medium and set those aside to dry.

I cut a panel of Neenah Classic Crest 80lb cardstock just smaller than an A2 card, because I needed something to glue the “hills” to. I began adhering the hills to the panel using liquid glue, leaving the tops of the panels unglued so that I could tuck the trees inside. Once the trees were dry, I sprinkled some Crystal Glitter over them to give just a little bit of sparkle.

For the sentiment, I cut the Winter Wishes, which is from the Spellbinders Christmas Mix & Match Sentiments, once from Spellbinders Gold Mirror cardstock and twice from Neenah 110lb and glued all of those together. For the last bit of die cutting, I went ahead and cut the scarf from red cardstock and glued that to the bear.

I had to play around with the placement of the trees, the sentiment and the bear, but once decided, I adhered the bear to the panel using foam tape. I tucked the trees into the hills and glued the sentiment to the panel. Once all of that was done, I grabbed the Spellbinders Layered Christmas Tree Stencil and strategically placed some snow, using Gina K Iridescent Glitz Glitter Gel.

To finish up, I adhered the panel to a red cardstock panel using foam tape and that was then adhered to the card base, which is also Neenah 110lb. I hope you enjoyed this project, and I hope it inspires you to get crafty! Don’t forget to stay awesome!

Supply List:

*Affiliate links used at no cost to you. Thank you so much for your support!

Latest Instagram Posts