Spellbinders Deer Friend

Sweet Cardlets Collection II by Becca Feeken

Hello! Hello! I was super excited to be able to play with the new Deer Friend Glimmer Hot Foil Plate and Die Set from Becca Feeken! This is such a cute little set and made the sweetest card. Let’s get started!

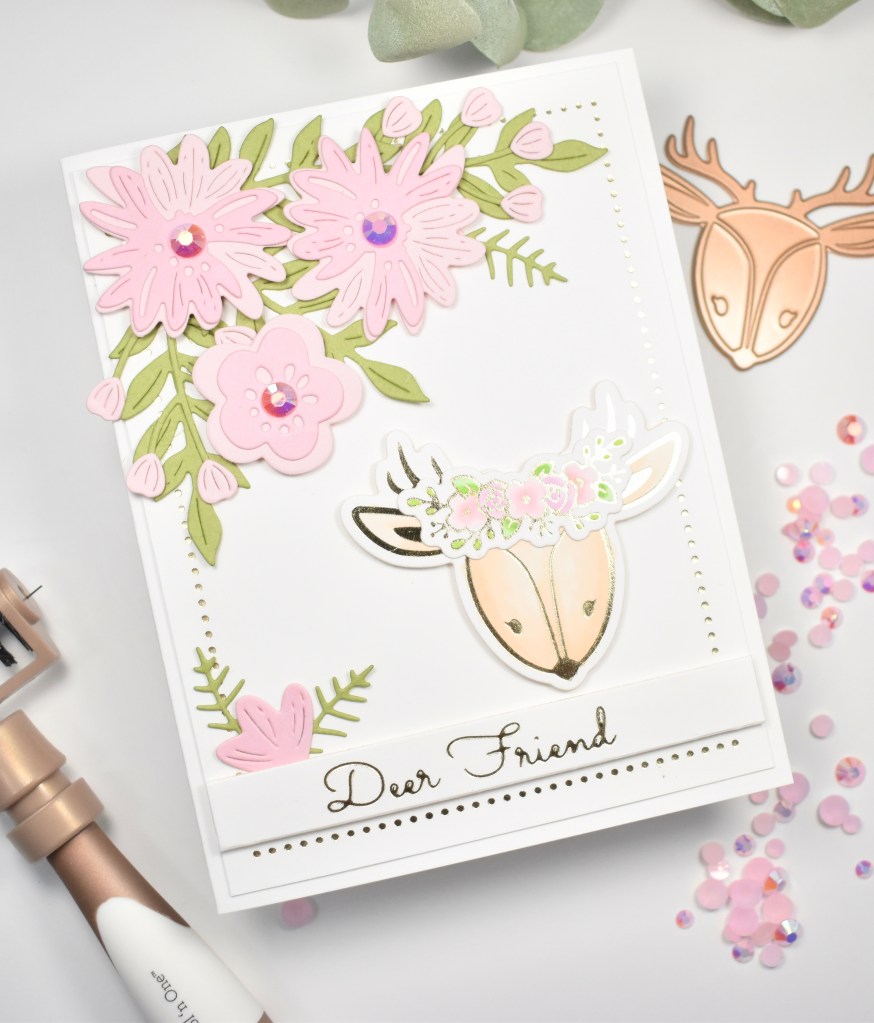
To begin, I trimmed a panel of Neenah Classic Crest 110lb cardstock, and heated up the Glimmer Hot Foil System. Using the Quick Trimmer, I trimmed some strips of Champagne Foil so that I could use the largest of the Essential Glimmer Rectangles set. Yana Smakula’s hinge method of foiling works GREAT, so I used that to position the foil strips and popped it on to hot foil. While everything was already hot, I went ahead and foiled all of the elements of the Deer Friend set.

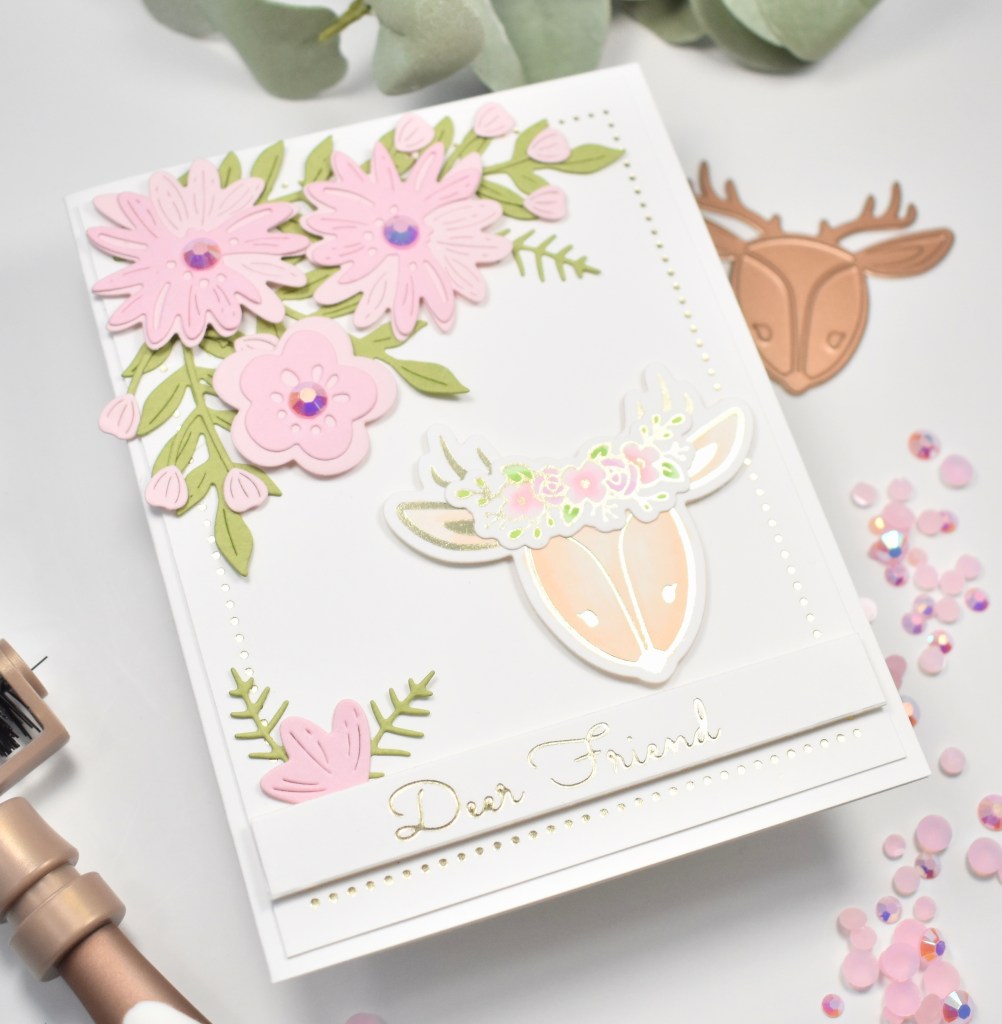
I used Copic Markers E000, E00, YG11, YG13, RV00 and RV10 to color the deer and florals, and used the coordinating dies in the set to cut them out. I also used the Simply Perfect Layered Blooms Set to cut some florals and leaves from pinks and green cardstock. I went ahead and adhered the floral pieces together using Craft Tacky Glue.

To assemble the card, I used foam tape for the sentiment and the deer in the bottom right corner, and used a combination of glue and foam tape to adhere the blooms and leaves in the upper left corner. I had a bloom left over, so I tucked it down around the sentiment. I added PinkFresh Studio Jewels to the centers of the flowers, because every card needs bling! Am I right?!?! I attached my panel to a Neenah 110lb card base to finish it up.

I hope you enjoyed this project! I think this deer is the cutest and really enjoyed playing with it! Don’t forget to check out the entire Sweet Cardlets II Collection from Becca Feeken. There’s other super cute stuff in this collection!

Thanks so much for stopping by today! Stay awesome!

Supply List:

*Affiliate links used at no cost to you. Thank you for your support!

Latest Instagram Posts

Spellbinders Delightful Darlings

Hello Crafters and welcome back! For today’s project, I’m featuring a card using the new Darling Bouquet stamp set, which is from a series of four sets illustrated by Mayline Jung. These are super cute and super fun! So, let’s get into today’s project.

To begin, I die cut a panel of Neenah Classic Crest 110lb cardstock using the PinkFresh Studio Diagonal Stitched Rectangles and placed that in my Misti. There are three small flowers in this set, and I decided to create my own background with those. I positioned the stamps and stamped them using VersaMark Ink and heat embossed them using Simon Says Stamp Detail White Embossing Powder. I rotated my panel for additional stamping and repositioned the stamps towards the end to fill the remaining space.

I very lightly ink blended Distress Oxide Spun Sugar over the entire panel and began coloring the stamped flowers using Copic Markers RV00, RV10, RV11 and RV32. I went back to my Misti and stamped the girl using Memento Tuxedo Black Ink and colored that image using E000, E00, E70, E71, E74, E79, N0, YG11, YG13, B00, BG70, BG72, BG75. As a note, I used the same pinks to color the bouquet that I used for the background. Once the coloring was done, I fussy cut the image for mounting.

I stamped the Happy Birthday sentiment on Neenah 110lb using VersaFine Onyx Black Ink and heat embossed that using Ranger Clear Embossing Powder. I trimmed that out using the Simon Says Stamp Sentiment Label Dies, and mounted the sentiment as well as the girl on my background panel using 3M Foam Tape.

I added pink jewels to the larger flowers using PinkFresh Studio Jewel Mix, and I added small dots of Nuvo Crystal Drops Carnation Pink to the smaller flowers on the background and the bouquet. I then mounted my panel to a card base, which is Neenah Classic Crest 110lb cardstock.

That finishes today’s project! I hope you enjoyed it, and I hope it inspires you to get crafty! Thanks for stopping by!

Have a wonderful day, and stay awesome friends!

Supply List:

*Affiliate links used at no cost to you. Thank you for your support!

Latest Instagram Posts

Alex Syberia Design Love You Daffodils

Hello there Crafty Friends! I hope you’re doing well, and I thank you for stopping by today! I’m featuring the new Alex Syberia Design Daffodils A2 Card Panel for this post. Alex has a new release, and you should definitely check out her Etsy shop for all the digi stamps and loads of inspirations!

To begin my project, I printed the Daffodils on a sheet of Neenah Classic Crest 110lb cardstock and began coloring the image using Copic Markers Y06, Y08, Y11, Y13, Y15, YR27, YG13, YG17, YG91, E71 and B0000. I continued to add shading and more details, such as the leaf veining using my PrismaColor pencils.

I didn’t want to lose too much of the image, so I trimmed my panel down to 3.75″ x 5.75″ and mounted it onto a panel of black cardstock that’s just slightly larger using 3M Foam Tape. I die cut the Lawn Fawn I Love You Border sentiment once from gold cardstock and twice from the same black cardstock and adhered those together using Craft Tacky Glue. This sentiment actually says I Love You, but I trimmed it down, because I only wanted the love you portion.

I die cut the Altenew Hanging Garden die twice from gold cardstock and prepared my card base by splattering it with Royal Talens Amsterdam Oxide Black Acrylic Ink. I love this ink because it’s such a perfect consistency for splatter! I positioned my panel over the card base to determine the placement of the gold leaves, and adhered those using glue. I then glued my panel atop the leaves to finish up my card.

This was a super fun card panel to color! Don’t forget to stop by Alex’s Etsy shop to check out all of the new images!

Stay awesome friends!

Supply List:

*Affiliate links used at no cost to you. Thank you for your support!

Latest Instagram Posts

Alex Syberia Design Hello Summer

Hello and welcome back friends! I’m super excited to be joining Alex for her May release! So many cool things in this release .. birds, underwater images, girly images and of course, Alex’s amazing floral images! You’ll definitely want to check out the Etsy shop! So let’s get into today’s project.

I’m using the Hello Summer A2 Card Panel and to begin, I printed the image out on a piece of Stonehenge Aqua Cold Press Watercolor paper. I then taped it down to my clipboard (Yes, I use a cheap clipboard from Target) using masking tape to prevent warping. My Karin Brushmarkers then got a good workout! I used those along with a waterbrush and a Princeton Heritage 3/0 Round Brush.

Once the watercoloring was done, I added some more detail and shading using PrismaColor pencils, Copic Markers E74 and E79, as well as, Copic Multiliner 0.3 and 0.5. I trimmed my watercolor panel out using PinkFresh Studio Diagonal Stitched Rectangle die, splattered it with Royal Talens Amsterdam Light Gold Acrylic Ink and mounted it on a panel of black cardstock using 3M Foam Tape, because dimension is life!

I settled on a Celebrate sentiment, which is from the PinkFresh Studio Classic Words Die set. I cut it once from gold cardstock and three times from black cardstock and adhered those together using Craft Tacky Glue. I then glued the sentiment directly to my card front and mounted everything on my card base, which is Neenah Classic Crest 110lb cardstock.

That does it for today’s project. I hope you enjoyed it, and I hope it inspires you to get crafty and creative! Don’t forget to hop over to the Alex Syberia Design Etsy Shop to check out the release and to see some creative inspirations as well. You don’t want to miss it!

As always, be well and stay awesome!

Supply List:

*Affiliate links used at no cost to you. Thank you for your support!

Latest Instagram Posts