
Hello Crafty Friends, and thanks so much for joining me! I’m back today with a labor of love, non-card project, featuring the new Whirl Blossom from Simon Says Stamp’s latest release, Be Bold. There’s an Instagram Hop going on today to celebrate the release! You don’t want to miss that, because Simon is giving away a $25 gift card to a random commenter at each stop along the hop! Who doesn’t love gift cards, am I right?! Anyhoo, let’s jump right in to the details for this project, shall we?

Main Products:

The fine folk at Simon LOVE non-card projects, and I’ve had this idea for a little while, and finally decided to just do it! I love this project so much, that I’m probably going to do a letter T at some point to display in my studio. I should totally start a series called, Diecutting is My Jam! Anyhoo, this project began with a decision to cover an S in rainbow flowers, so I went to one of the big-box craft stores to purchase said S. I knew that I wanted the S to be able to stand on it’s own, so it needed to be a little thicker. When looking around in the craft store, the larger S’s were thin, and would not stand on their own, so I opted to purchase three smaller S’s.
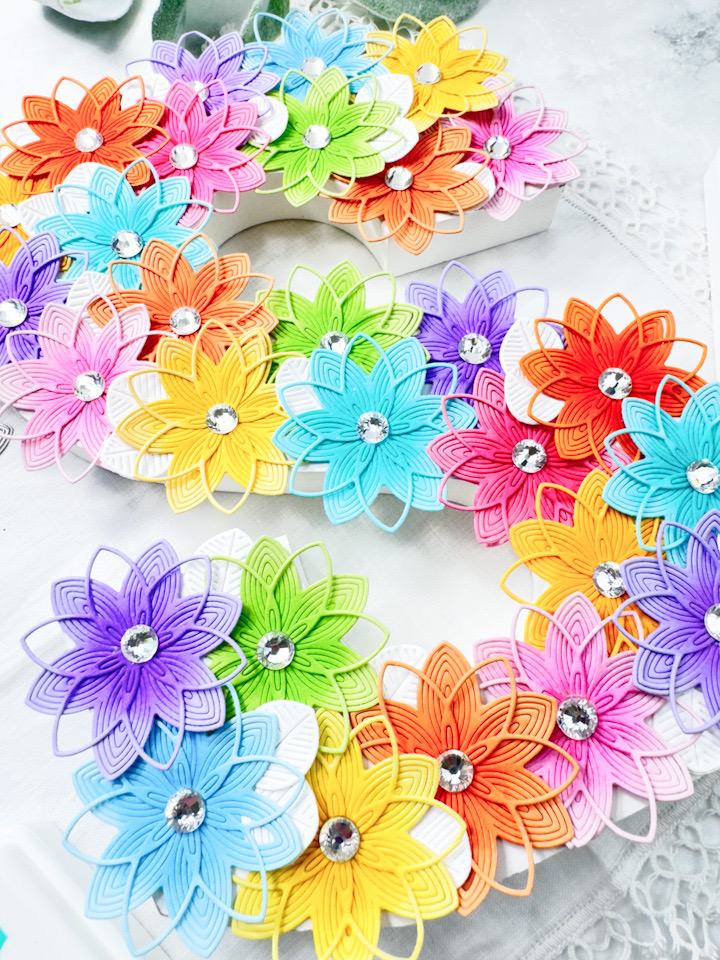
I used the SSS Whirl Blossom and cut bunches of flowers from rainbow-colored cardstock, of all different brands. I then pulled out the SSS Pawsitively Saturated Inks to do some ink blending in the center of both parts of the flowers. The inks used were Bubblegum, Peony, Cantaloupe, Sherbet, Blush, Sunbeam, Zest, Sprout, Fairway, Seafoam, Surf, Marine, Lilac and Orchid. I did ink blending with the lighter colors and when it dried back, I went back over it with the darker shade of ink.

Once all of the ink blending was complete, I glued the pieces of the flowers together and added a clear Dazzling Gem to the center of each flower. I decided that I also wanted some leaves to tuck in between the flowers and used the SSS Eucalyptus Leaves to cut those from Neenah 110lb cardstock. Of course, I had to play around with the placement before diving in! Thankfully, I didn’t have to do anything to the surface of the letters and could begin the task of assembly.

Each letter took approximately 28 flowers, so I started on one end of the S and began gluing those down in rainbow order until I reached the other end. Once all of the flowers were glued down, I went back through and glued leaves in the spaces available. Now, repeat this process another two times to complete three S’s. The flowers on the bottom of the S overhang slightly, so those are curled up some to allow the letters to stand on their own, as I had envisioned.

That does it for this non-card project! Like I said, it was a true labor of love to cut about 90 flowers for this project, but I’m so happy with how they turned out, and am looking forward to working on a letter T for my studio. Don’t forget to check out the entire Be Bold release over on Simon’s website, and also the Instagram Hop going on today. Thanks again for joining me, and stay awesome, friend!
Other Products:
- SSS Pawsitively Saturated Inks: Bubblegum, Peony, Cantaloupe, Sherbet, Blush, Sunbeam, Zest, Sprout, Fairway, Seafoam, Surf, Marine, Lilac, Orchid
- SSS Blender Brushes
- SSS Triangle Trays
- SSS Place and Score Embellishment Wand
- Neenah Classic Crest Solar White 110lb Cardstock
- Colored Cardstock
- Bearly Art Glue
- Spellbinders Platinum 6
- Letter S
* Affiliate links used at no cost to you. Thanks so much for your support!
Latest Posts
- Simon Says Stamp Braided Greetings

- Together By Design Color Cube Floral

- Simon Says Stamp Cute Duckling

- Simon Says Stamp Watercolor Wild Rose

- Simon Says Stamp Striped Missing You

