Hey There, and welcome back! I’ve done a couple of cutesy cards lately, and here is my second one featuring the Cute Campers set from Simon’s latest release, Happy Camper. Let’s go ahead and go through the deets!
NOTE:all supplies are linked in the thumbnails at the end of this blog post.
I began this project by stamping all of my elements using VersaFine Onyx Black ink and heat setting them with clear embossing powder. I then used way too many Copic Markers to color in all of my images! I’ll list those at the bottom of this post, to save space and time.
Once all of the coloring was complete, I fussy cut the images out. There are coordinating dies for this set to make things easier, but I didn’t have those. My background panel was created using a deckle edge die cut and some ink blending with Sky, Dusk, Night, Sunbeam and Black inks. I did add some white splatter on the panel to mimic stars for some added interest.
The tent, trees and camper element were adhered directly to the panel with liquid glue, because I wanted them to appear more in the background, while the critters, fire and sentiment were adhered with foam tape. The panel was then adhered to the card base to finish up.
That’s it for this project! I hope you enjoyed it! Cutesy cards really aren’t in my wheelhouse, but I really enjoyed creating this scene! Thanks again for joining me, and I hope you have an awesome day, friends!
Supply List
Affiliate links used at no cost to you. What does this mean? If you use the links within this post to make a purchase, I receive a small commission, which allows me to continue to post crafty content for your enjoyment. I truly appreciate your support!
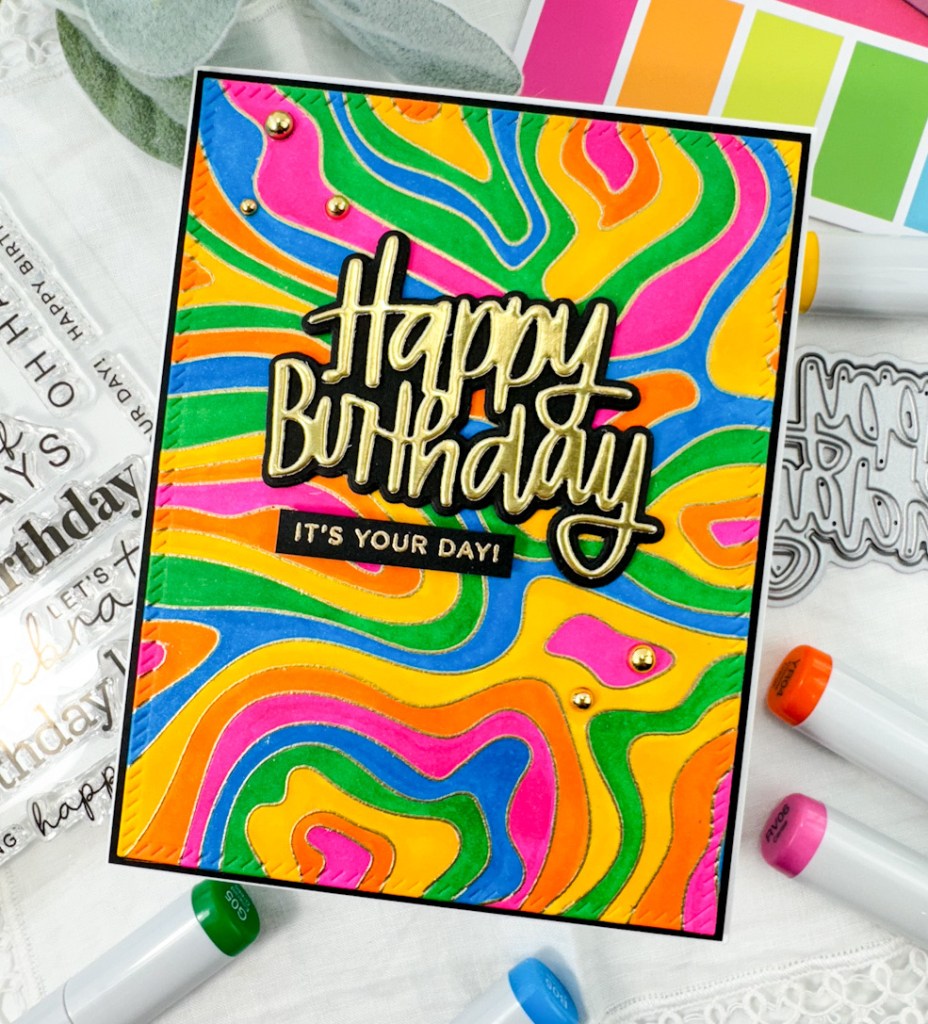
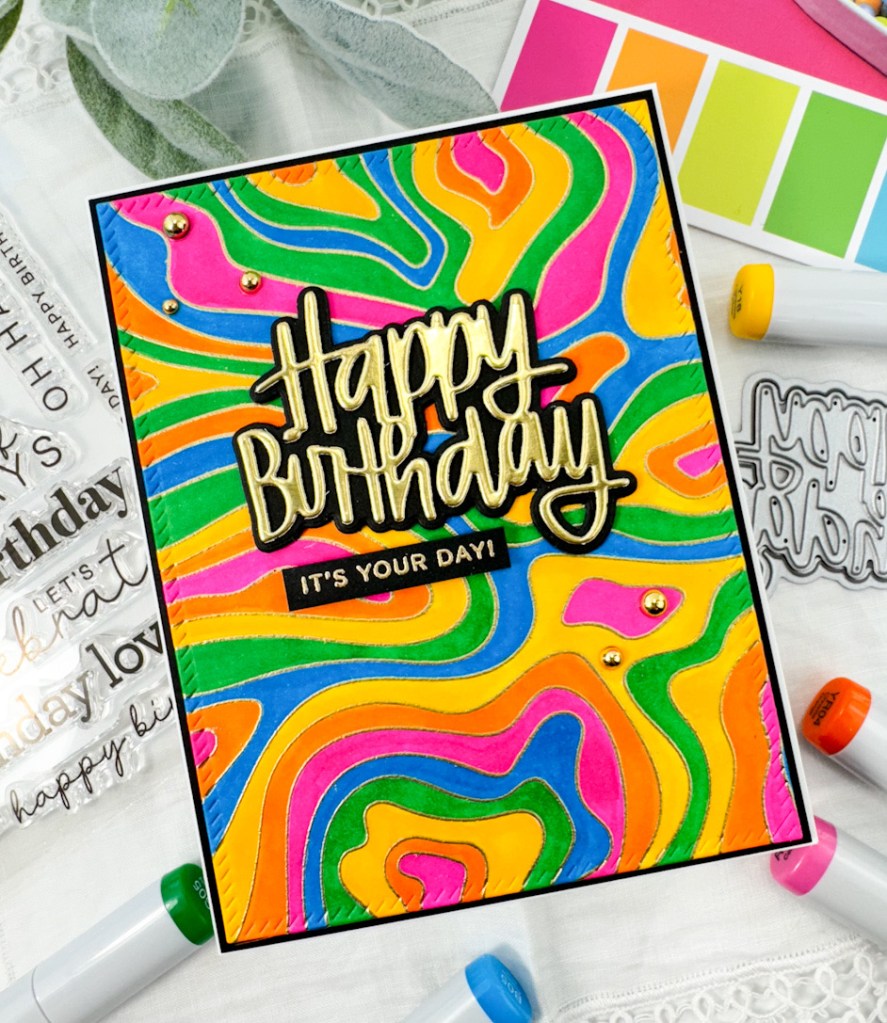
Hello Crafty Friends, and thank you so much for stopping by! It’s always a pleasure to have you! I’m back today with another card featuring the new Topography Background Stamp from Simon Says Stamp’s latest release, Splendor. Let’s run through the details for this one.
I received The Color Cubes as a Christmas gift, and I put them to good use on this card! The really cool thing about The Color Cubes is that you also receive a download that gives you the corresponding Copic marker colors. Once I decided on a card from the cube, I went and found the Copics to guide me.
I die cut the SSS Happy Birthday Brush Script once from gold cardstock and twice from black cardstock and adhered all of those together using liquid glue, along with three of the shadow die cuts as well. The sub-sentiment is from the new SSS Birthday Basics set, and I stamped that onto black cardstock using VersaMark Ink and heat set it using the same embossing powder and trimmed it down to an appropriate size.
To assemble the card, I adhered the panel to a black panel using foam tape, and glued the main sentiment in place and added the sub-sentiment with SSS 3D Foam Strips. Everything was then adhered to the card base, and I added a few PFS Gold Metallic Pearls for a bit of shine.
That does it for this one! I hope you enjoyed it, and I hope it inspires you to get crafty in your space. I actually colored this panel on a plane ride to Miami for a short getaway. I always bring things along with me on trips to occupy any downtime that I might have. Anyhoo, don’t forget to check out the entire Splendor release over on the Simon website. Thanks again for stopping by, and have a wonderful day!
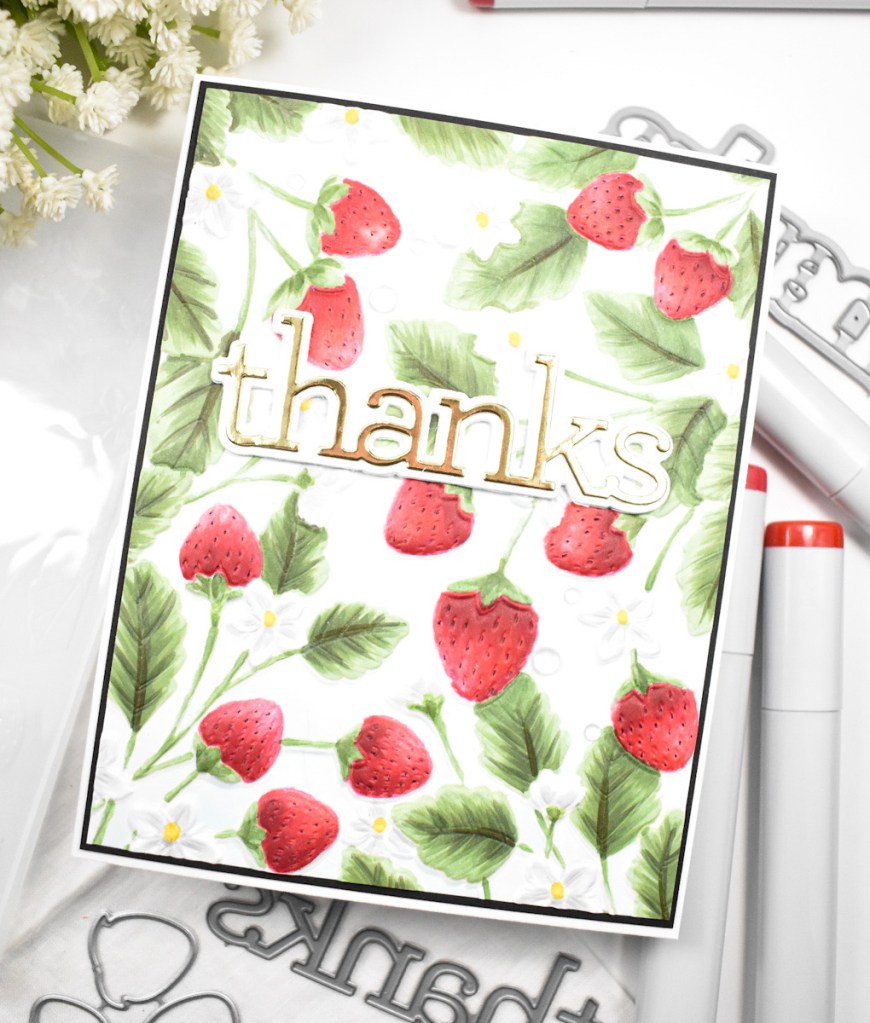
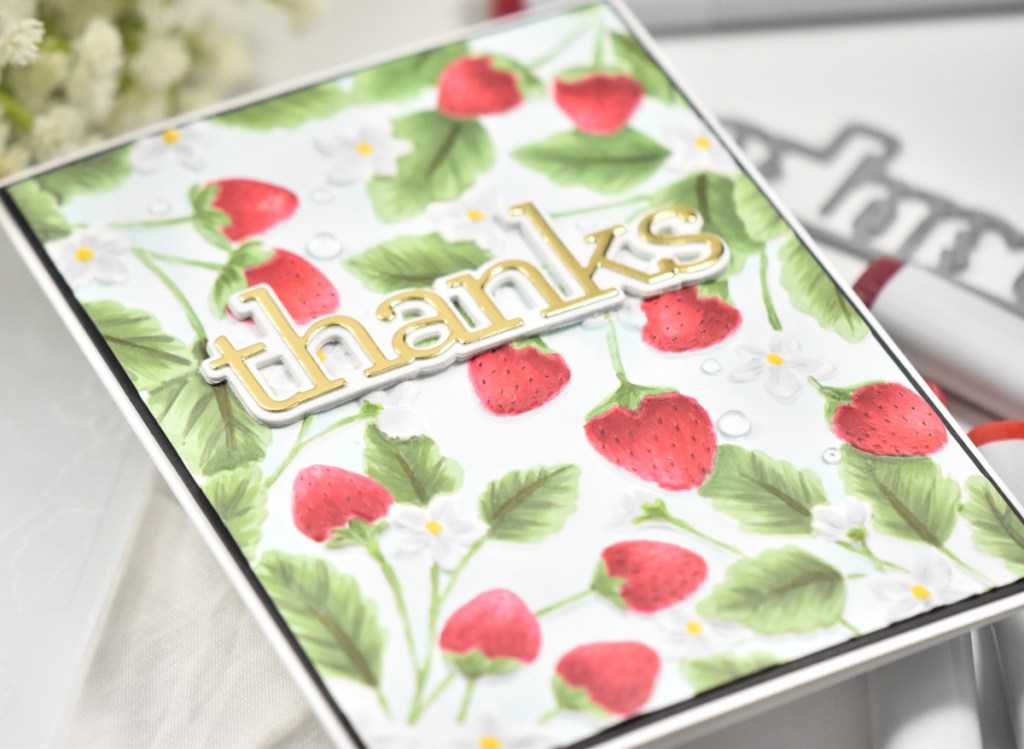
Hello Friends and thanks so much for stopping by! I’m back today with a card featuring the new Strawberry Fields Embossing Folder from Simon Says Stamp’s latest release, Out of This World. I had a fun time working on this one, although it took me the better part of a day. That’s just me though, it takes me forever to color anything! Anyhoo, let’s roll through the details of this one.
I began by trimming a panel of Neenah 110lb cardstock and misting it with a bit of water before running it through the die cutter. Once the image was embossed, I sat down and got to coloring! The Copic Markers used were R27, R35, R37, R39, RV14, B0000, Y18, N1, C2, BG96, YG99, G21, G24, G85 and G94. If you don’t have a Copic Hex Chart, I highly recommend it. It’s super nice to be able to glance at the chart and know which colors will work nicely together.
Once all of the coloring was complete, I used a Copic Multiliner 0.03 to add some detail for the strawberry seeds. I then trimmed the panel down just a smidge and adhered it to a black panel for a little bit of contrast.
For the sentiment, I opted to use the SSS Thanks die. I cut the shadow three times and the sentiment once from Polished Gold cardstock and adhered all of those together using liquid glue. That was then placed in the center of the panel.
I adhered everything to the card base and added a few clear drops to complete this project.
That does it for this one. Don’t forget to check out the entire Out of This World release and let me know your favorites! Thanks again for stopping by and have a wonderful day!
Hello Crafty Friends! Thanks so much for stopping by! Today, the design team is celebrating Alex’s new release with an Instagram hop, so be sure to head over there to check that out! She’s giving away a $15 gift card for her shop to three lucky commenters, so hop along for your chance to win! Let’s get into the details for my card today!
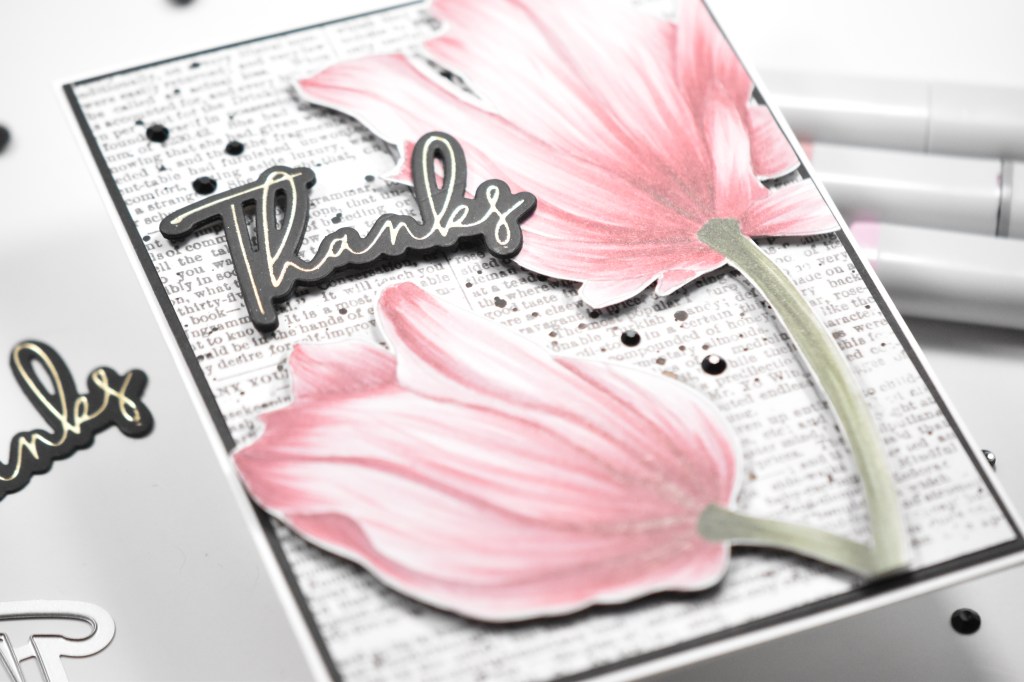
I began this project by printing the Tulip Close Up on some Neenah Classic Crest 110lb cardstock. I don’t use fancy software because I’m so not tech savvy. I just use Pages on my MacBook and resize the image to whatever size I’m looking for, and sometimes I tone down the opacity as I did for this image. That allows you to get a more no-line look, if you’re into that.
Once printed, I began coloring the image using Copic markers RV91, RV93, RV95, R56, BG93, BG96, BG99, N0 and N2. This is such a beautiful combination of pinks and reds, and definitely a go-to combo for me. When I was done coloring, I fussy cut the image and set it aside while I worked on the remainder of the card.
I’ve done a card like this before for Alex, and wanted to recreate that, so I pulled out this patterned paper, which is from the Wandering Ivy Collection from KaiserCraft and trimmed it down. For the sentiment, I decided to use the Thanks from PinkFresh Studio Fancy Script Words set. I hot foiled the sentiment using Spellbinders Champagne foil onto black cardstock and used the coordinating die set to trim that out. I did cut two more blank sentiments and adhered all of those together using liquid glue.
I applied foam tape to the tulips and adhered those to the text background, which I splattered using Royal Talens Oxide Black Acrylic Ink, trimming off any excess of the flowers. After those were on, I used the Copic markers in N0 and N2 to add shadows around the flowers. The text panel was then adhered to a black panel using SSS Dot Tape Runner, and that was then adhered to the card base. I adhered the sentiment using a combination of foam tape and liquid glue, and also added a few black jewels to finish up.
That does it for this project! I hope you enjoyed it, and I hope you’ll head over to Instagram to participate in the hop! Don’t forget to check out all of Alex’s new images over in her Etsy shop! Have a wonderful day and stay awesome!
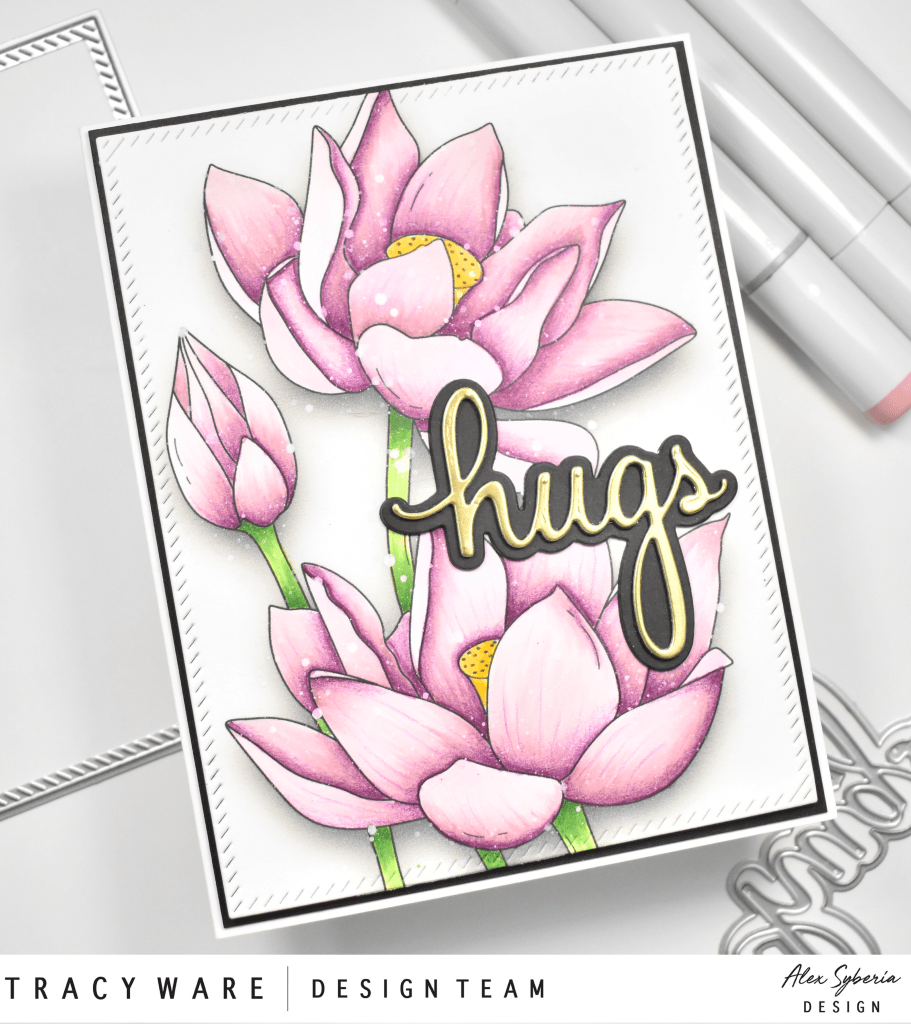
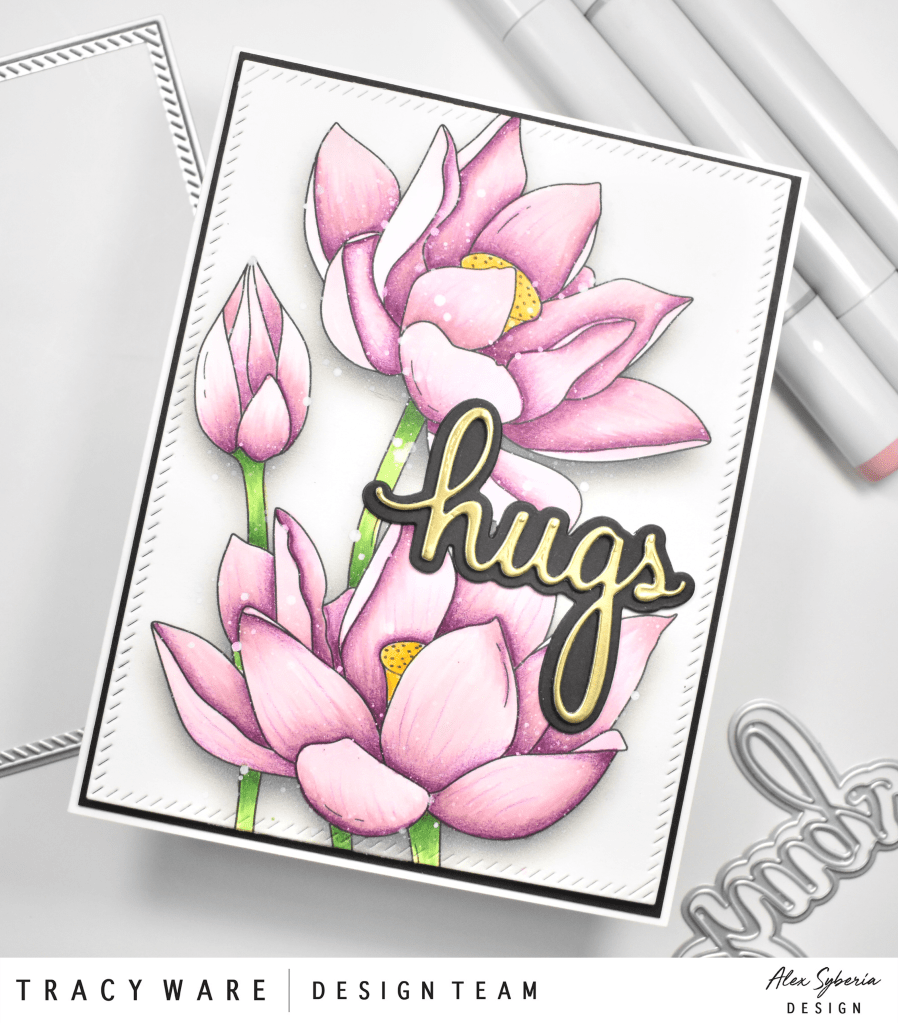
Hello Lovelies! I hope you’re doing well and having a wonderful day! It’s release day for Alex Syberia Design, and she’s got some beauties this month! I hope you’ll stop by her Etsy shop and take a peek at the whole collection. Today’s card is featuring the White Lotus digi stamp, and it happens to be my favorite from this release! So, let’s get right to it!
I began by printing the image on a panel of Neenah Classic Crest 110lb cardstock. I don’t use any fancy software at my house. I work on a MacBook, and I just insert the image into a Pages document and resize it. I’m not tech savvy and simple gets the job done around here. However, I will say that I discovered this time that I can print the image with that shadow around it. I was pretty exited about that!
Anyhoo, I realize this is supposed to be a white lotus, but in all honesty, I forgot that part and started coloring with pink! Oops! I’m just going with, it’s art and I can make it any color that I want! Am I right?! The Copic markers used on this image were RV00, RV91, RV93, RV95, Y08, Y15, YG13 and YG17. That combo of pinks might be my new favorite!
Once that was dry, I mounted it to a black panel using foam tape, because dimension! I wanted a small sentiment, because I didn’t want to cover up too much of the coloring, so I opted for this hugs sentiment from the PinkFresh Studio Sending Phrase Builder set. I cut it once from Mirror Gold cardstock and twice from black cardstock. I also cut the shadow twice from black as well. All of these were then adhered together using liquid glue, and glued to the panel. Everything was then mounted to the card base, which is also Neenah 110lb.
That finishes up this project! I really enjoyed coloring this digi from Alex, but I guess for my next one, I really should color it white, or at least try! I hope you’ll stop by and check out the full release over in Alex’s Etsy shop! Have a wonderful day and don’t forget to stay awesome!
Hello and welcome back! The latest Stock Your Stash Challenge is happening over on the Reverse Confetti blog, and this month’s theme is Wedding. I hope you’ll join in on the fun! Let’s get right in to the details of my wedding card!
I added foam tape to the back of the floral and tucked the leaves behind it, securing those with glue. I added the remaining leaves to the panel using foam tape, along with the sentiment. Everything was then adhered to the card base, which is Neenah 110lb. I had to add embellishments, right?! No card is complete without embellishments! I opted for some pearls from Little Things from Lucy’s Cards.
That finishes up this card! I hope you enjoyed it, and I hope you’ll head over to the Reverse Confetti blog to participate in this month’s challenge. Don’t forget to stay awesome friend!
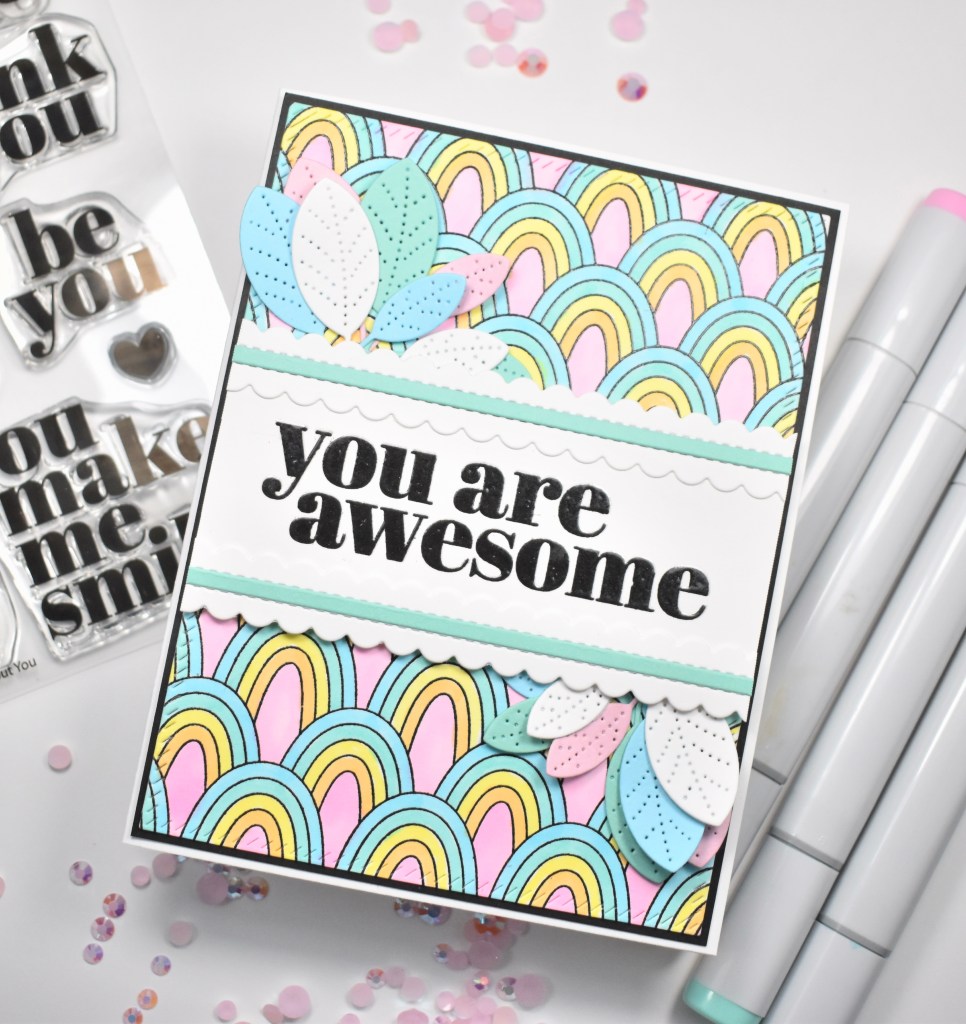
Hello and welcome back crafty friends! I’m back with another card featuring the all new All About You stamp set from the newest Simon Says Stamp Make Magic release! I love large sentiments and this set is perfect! Have you checked out the new release yet? What are some of your favorites? Let’s get into today’s project!
The Copic markers that I used for coloring were RV02, YR21, BG32 and BG01. I stamped the You are Awesome sentiment from the SSS All About You stamp set on Neenah 110lb using the same black ink and embossing powder. I repeated the stamping and embossing process one more time, stamping with VersaMark ink the second time. By double embossing, it gives it a smoother finish.
I positioned the sentiment atop the colored panel and glued the elm leaves under it before adhering with foam tape. I adhered the panel to black cardstock using foam tape as well, and then adhered the whole thing to my card base, which is also Neenah 110, using the SSS Dot Tape Runner.
That’s it for this card! I hope you enjoyed it and I hope it inspires you to get crafty! Stop by and check out the entire Make Magic release, and let me know your favorites! Have a wonderful day and stay awesome!
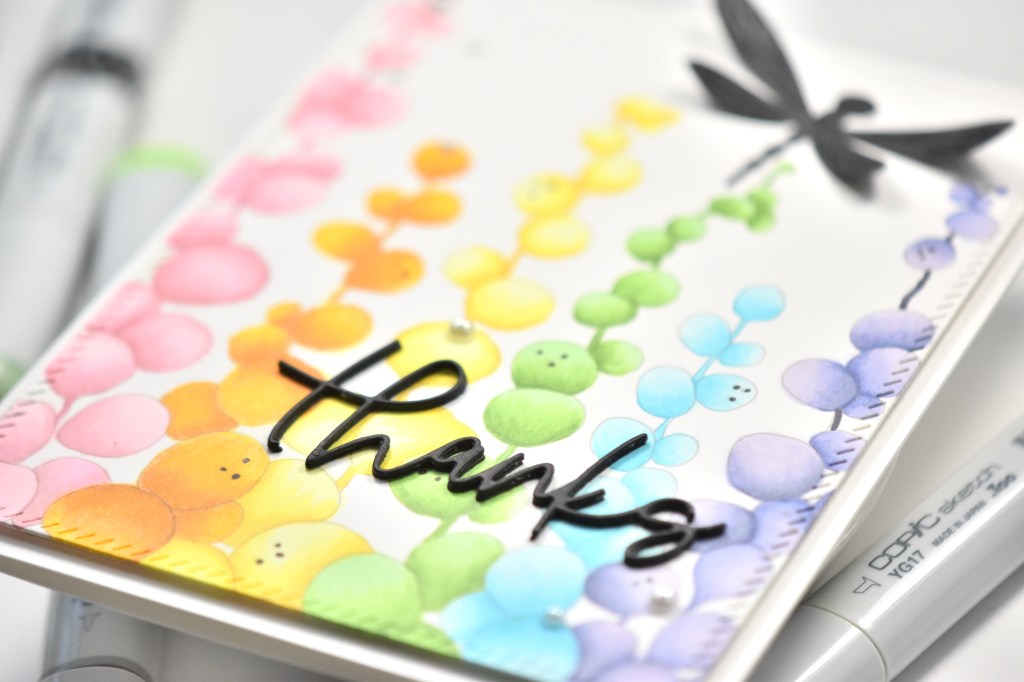
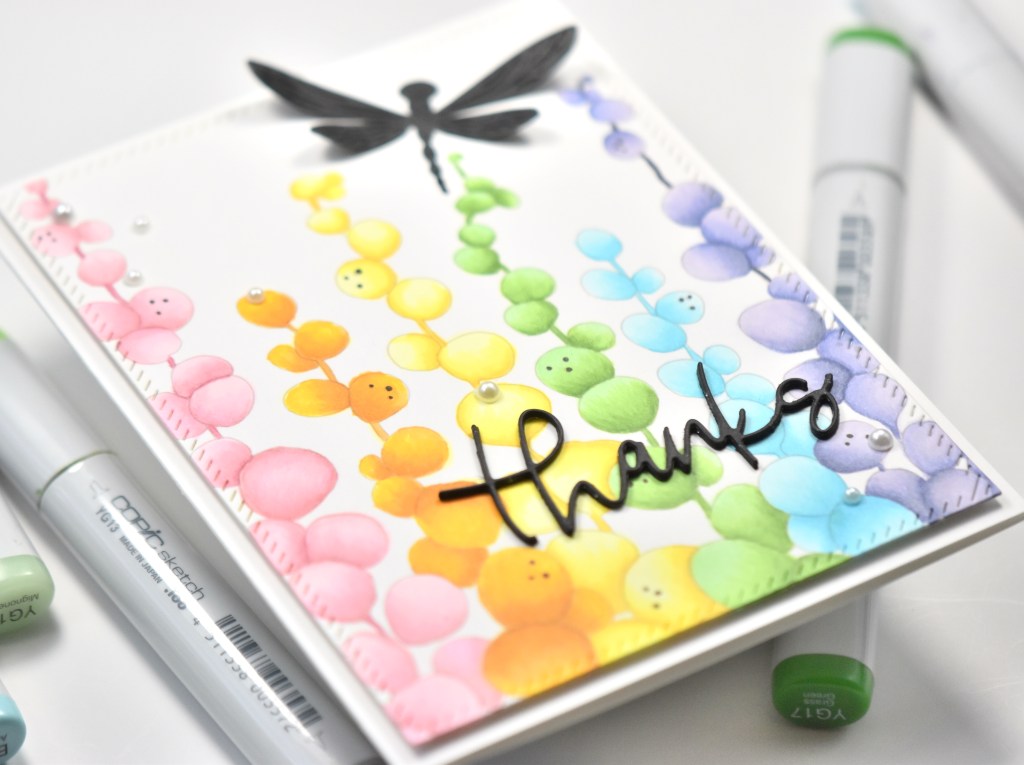
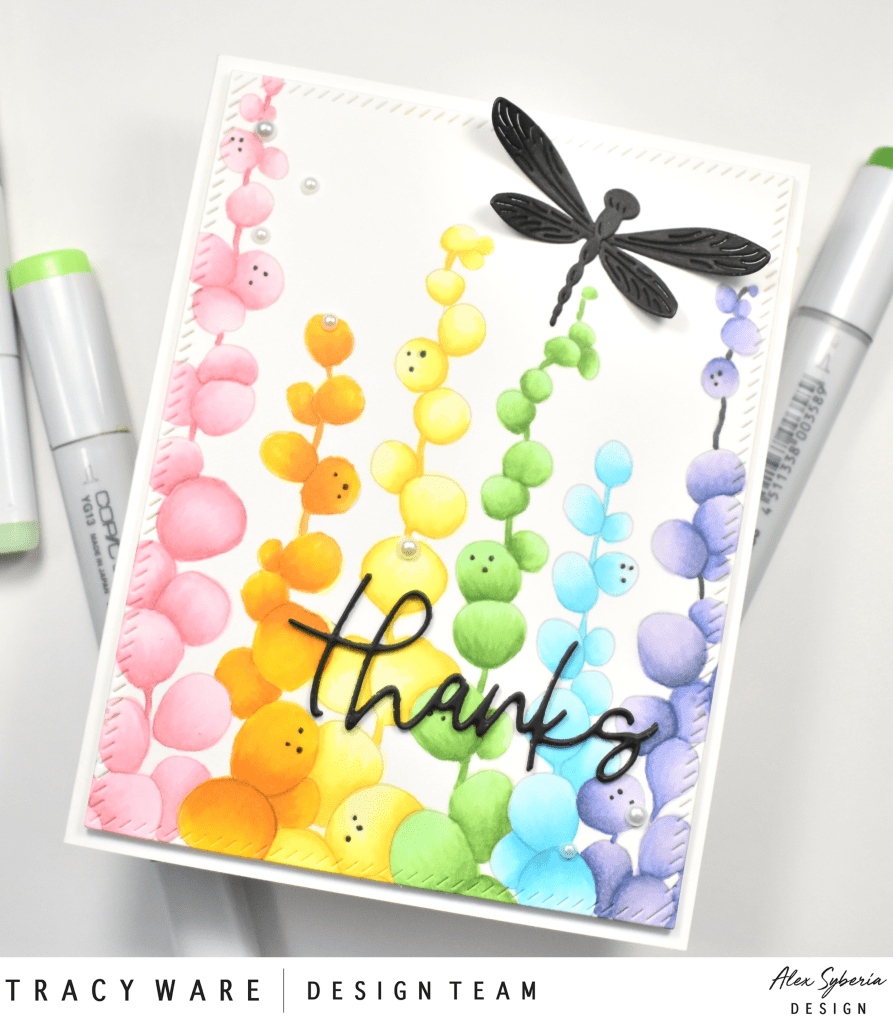
Hello Crafty Friends! Thanks for stopping by today to check out my project for the new July release from the awesome Alex Syberia! Lots of fun things in this release, and of course, some beautiful flowers for your coloring pleasure! To celebrate Alex’s new release, we are having a super fun Instagram Hop, with a chance to win a $20 gift certificate for her shop! You can check out her Instagram or my Instagram for all the details! For today’s project, I’m featuring the Coloring Therapy A2 Panel, so let’s get started!
I began by printing the image on Neenah Classic Crest 110lb cardstock. When I printed the image, I did adjust the opacity down to about 30%. By doing this, you can get somewhat of a no-line look, especially when watercoloring. I then got busy coloring. I started with the purples, and thought that I was going to color the whole thing purple to resemble grapes, but then decided that it might be cool to do rainbow colors instead.
I also used a Copic Multiliner 0.3 to add back the black dots on the “berries” as they got lost during the coloring process. I opted for a Thanks sentiment using the Concord and 9th Scripted Thanks die cut. I cut it three times from black cardstock and adhered those together using liquid glue. I also cut the SSS Etched Dragonfly from black cardstock.
I adhered the sentiment and the dragonfly to the colored panel using glue, and adhered the panel to my card base, which is also Neenah 110lb, using foam tape for dimension. To finish up the project, I added some Soft Snowfall Pearls from Little Things from Lucy’s Cards. I thought the softness of them added a nice little touch!
I hope you enjoyed this project, and I hope you found some inspiration to get crafty in your space! Head on over to Alex’s Etsy shop to check out the full release! You don’t want to miss it. Stay awesome sweet friend!
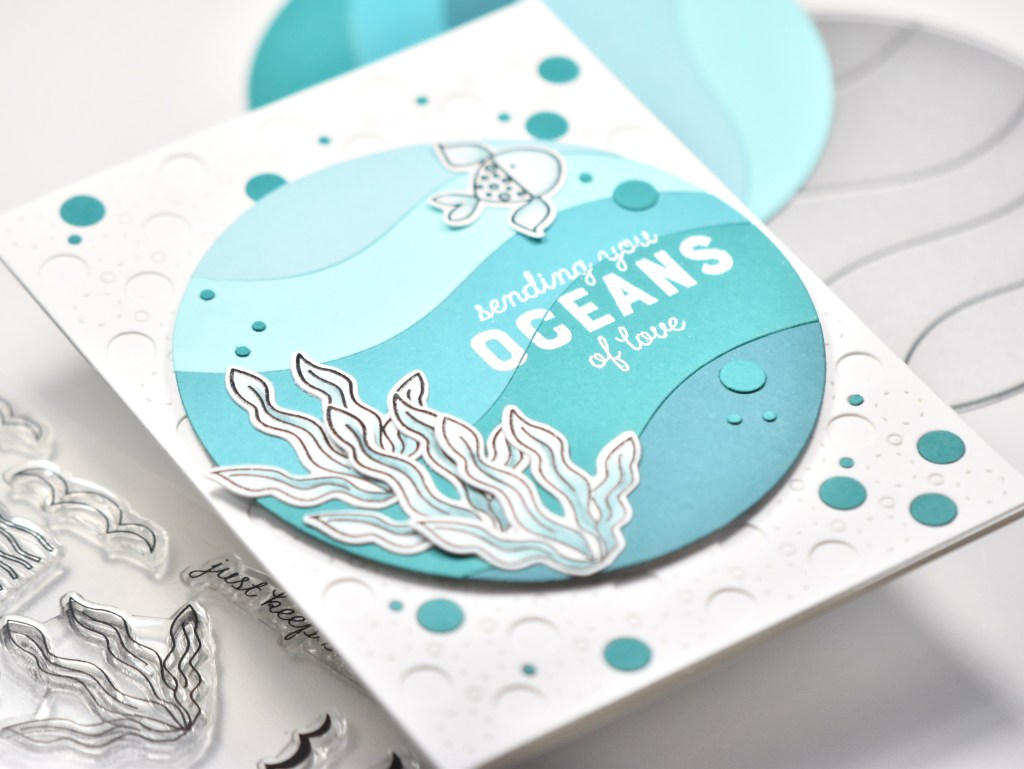
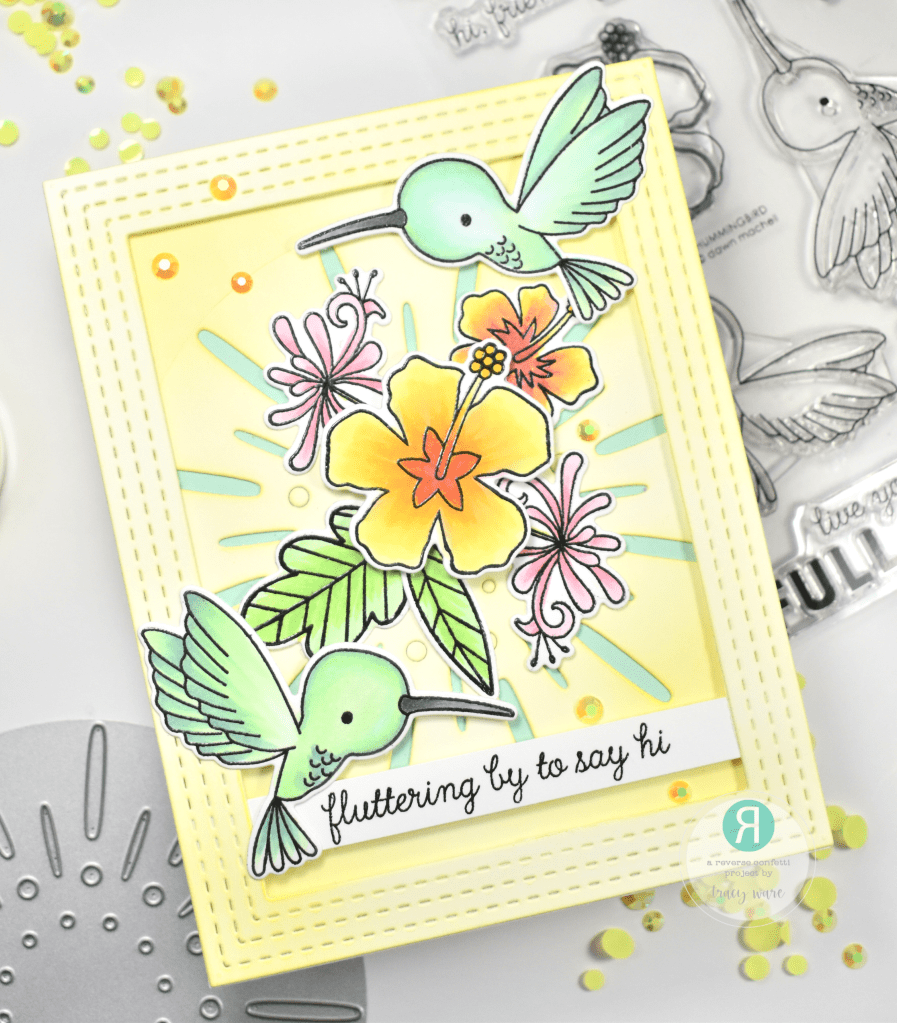
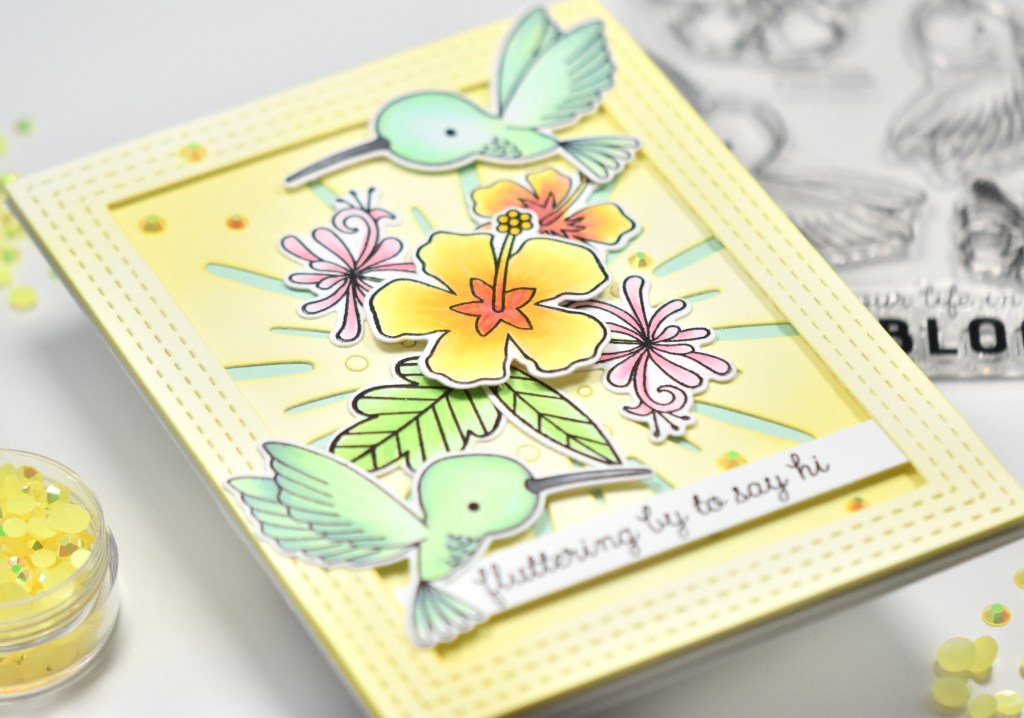
Hello Crafters and welcome back to day three of the Reverse Confetti Countdown to Confetti! The release will be going live tomorrow, woohoooo! Please note that new product links will not be active until then. To celebrate the countdown, we are having a blog hop, with a gift certificate up for grabs! Details below! For today’s projects, we are featuring the Oceans of Love and Hummingbirds sets! So, let’s jump right in to the projects!
For my first project, Oceans of Love, I began by grabbing the new Circle of Waves Confetti Cuts and cutting five different colors of blue cardstocks. Most of the blue cardstock is from Concord and 9th, and one is from Simon Says Stamp. I traced the circular die and fussy cut a solid circle and glued the “waves” to that.
I cut a panel of Neenah Classic Crest 110lb using the Reverse Confetti Stitched Circles Cover Panel Confetti Cuts and poked out all of the larger circles and a few of the smaller circles. I used a scrap of the blue cardstock to run that through using that same cover panel, because I wanted these to be the “bubbles” on the card. I adhered the Stitched Circles panel to my card base, which is also Neenah 110lb using liquid glue.
Then, I inlaid some of the blue “bubbles” for interest. I adhered the circular waves panel using foam tape and adhered the colored underwater elements using glue, adding some of the “bubbles” atop that as well. That finishes up this project!
I stamped the sentiment from the Hummingbird set using VersaFine Onyx Black Ink and heat embossed it using the same clear embossing powder. I trimmed that down and placed it behind the frame, and then added foam tape to the frame for dimension. I then adhered the frame to the Circle Element panel. I wanted a little added interest behind that Circle Element panel, so I cut piece of Concord and 9th Sea Glass cardstock and adhered that behind.
I then began adhering the Hummingbird elements to my framed panel using a combination of glue and foam tape. My panel was then adhered to my card base, which is also Neenah 110lb. To finish up this project, I added some PinkFresh Studio Jewels, because every project needs some bling in my opinion!
That does it for day three of the Countdown! I hope you enjoyed these projects, and I hope it inspires you to get crafty! Please note that the new product links will not be active until the release day and time.
As I mentioned earlier, to celebrate the countdown, we are having a blog hop! Leave comments along the hop for your chance to win a $15 gift certificate! You can also comment on Reverse Confetti’s Facebook page for another chance to win a gift certificate! Comments close at noon CST on July 7th and the winner will be announced at 5pm on July 7th over on the RC blog and FB page. The full hop list is below.
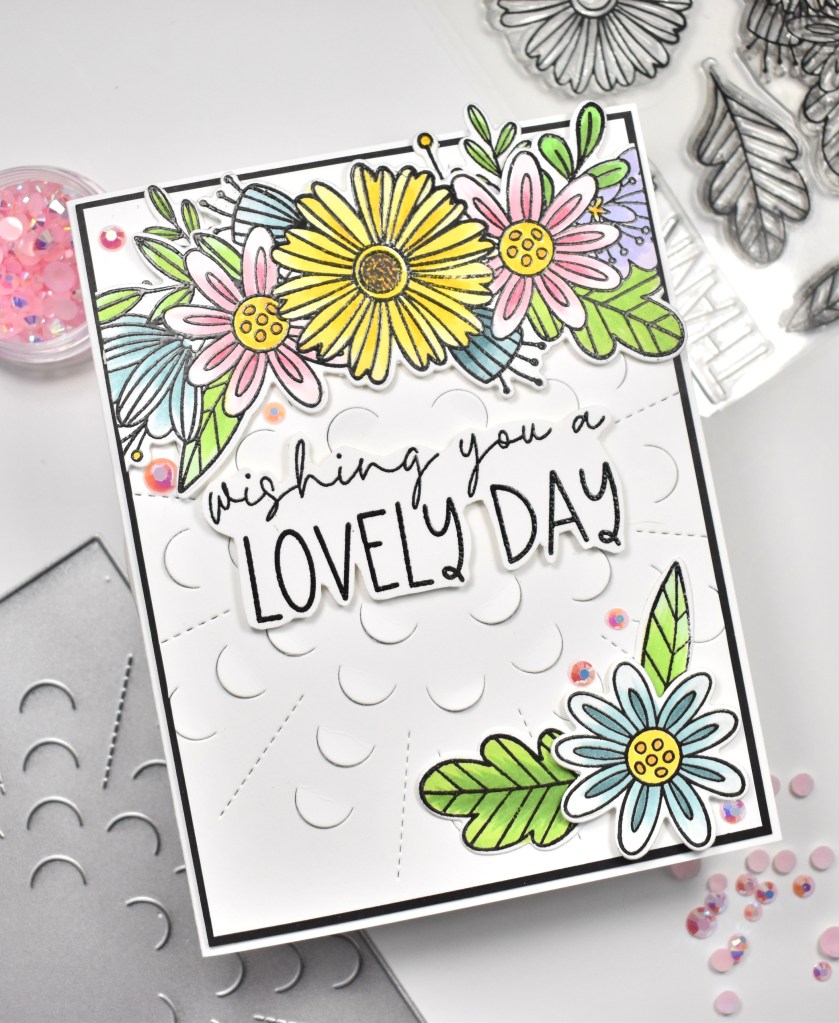
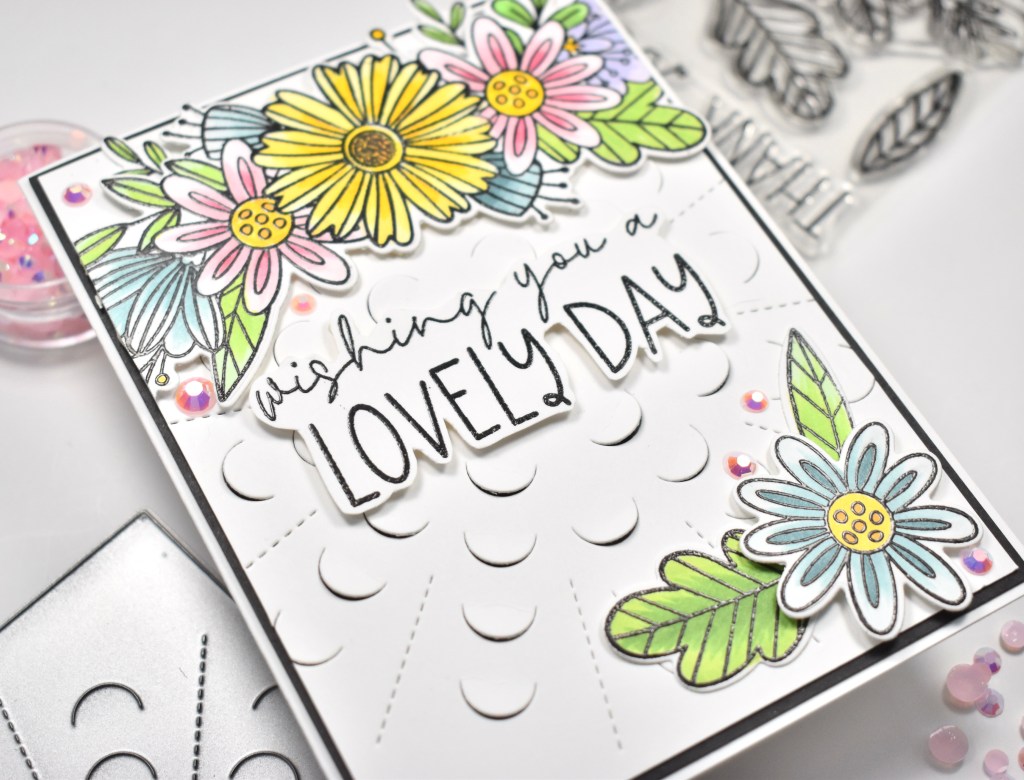
Hello Friends and welcome back to my blog! Thanks so much for stopping! It’s day two of the Reverse Confetti Countdown to Confetti! The release will go live on July 8th, so please note that new product links won’t be active until release day and time! To celebrate the Countdown, we are having a blog hop! I hope you’ll hop around and leave comments along the way for your chance to win a gift certificate! Details below! Today’s project is featuring the Lovely Day Sentiments stamp set along with the Bloom set, and Peekaboo Cover Panel Confetti Cuts from the new July release! I enjoy coloring, so this was a super fun card for me! Let’s jump right in!
I cut a panel of Neenah 110lb cardstock using the Peekaboo Cover Panel Confetti Cuts and carefully pulled up some of the cut portions. Laura Bassen would have used the term “jooshed.” So yeah, I jooshed the little peekaboo areas on the panel. I applied foam tape to the back of the flowers and adhered those to my panel, tucking the leaves behind the single flower at the bottom and securing with glue. I trimmed off the excess and adhered this panel to a black cardstock panel.
I fussy cut my sentiment and popped it in the center of the card using foam tape again. I love foam tape, if you couldn’t tell! Anyhoo, my panels were then attached to my card base, which is also Neenah 110lb. To finish up the project, I added some PinkFresh Studio Jewels because you’ve gotta have bling!
That does it! I hope you enjoyed this project, and I hope it inspires you to get crafty! I hope you’ll hop over and check out the new July release from Reverse Confetti! It’s such a beautiful release!
As I mentioned earlier, we are celebrating this release with a blog hop! You can comment along the hop for your chance to win a $15 gift certificate. Comments close on July 7th at noon CST, and the winner will be announced at 5:00pm on the Reverse Confetti Blog and Facebook page. Speaking of Facebook, you can also leave a comment over there for another chance to win a gift certificate! You can head to the RC Blog for more details! Here is the full hop line-up!