Spellbinders Sweet Sayings Hello

Hello Friends and welcome back! Hope you’re having a fabulous day! Today’s project is featuring the Sweet Sayings Notecard Sentiments from Spellbinders. I love die cut sentiments, so I was thrilled to get to play with this set. Let’s jump right into the details!

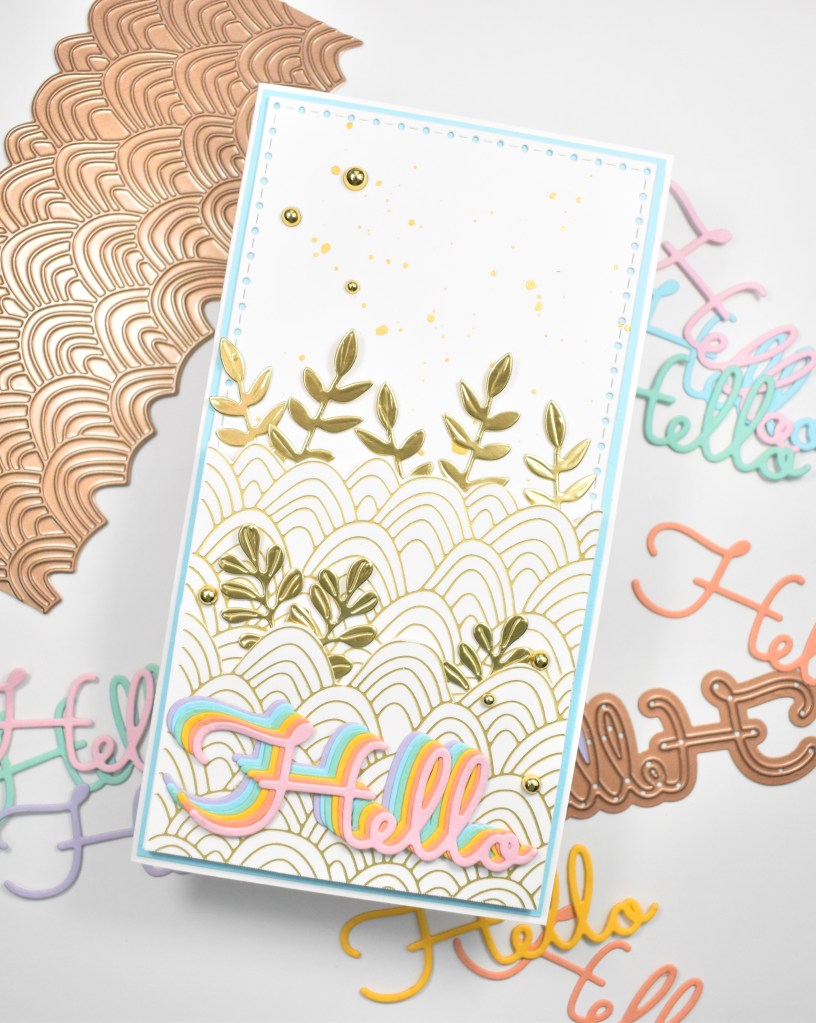
To begin, I used the Spellbinders Hand Drawn Wave Foil Plate, along with some matte gold foil to make a couple of panels using Neenah Classic Crest 110lb cardstock. Once those were done, I fussy cut them and set them aside while I prepared the rest of the card.

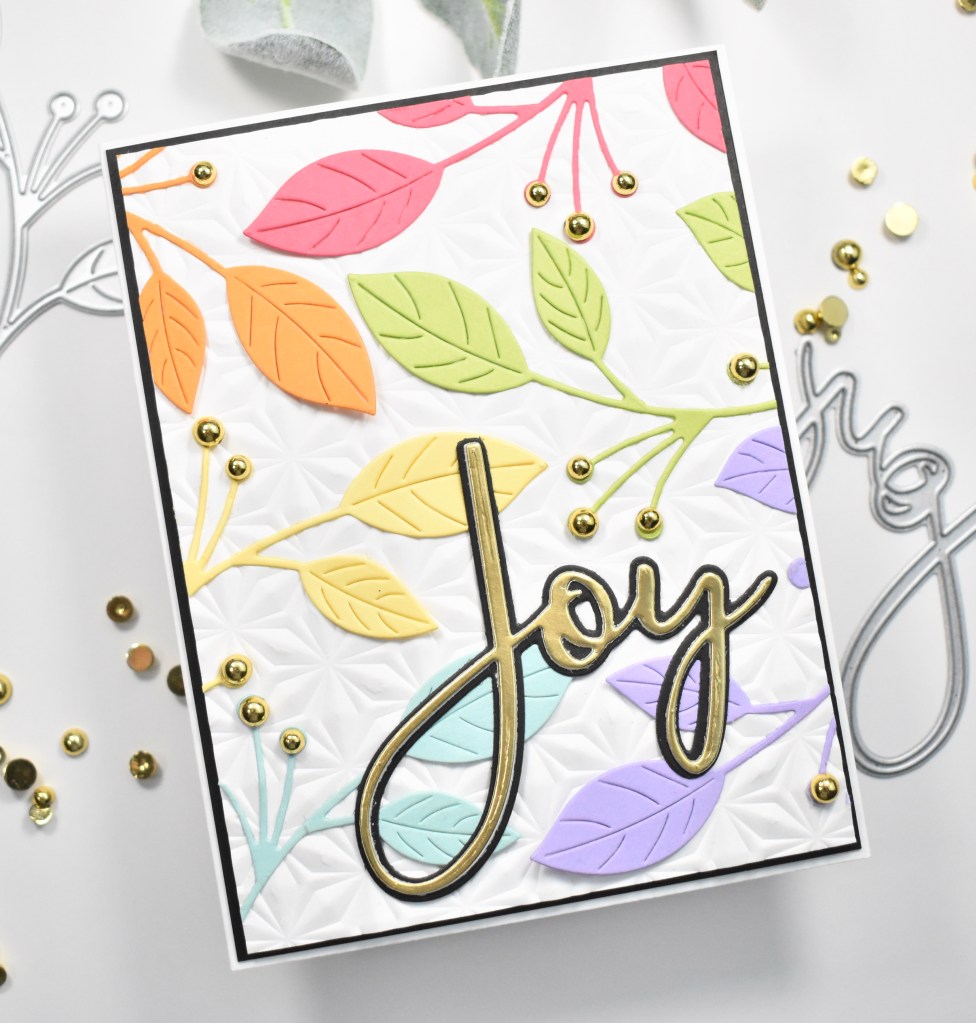
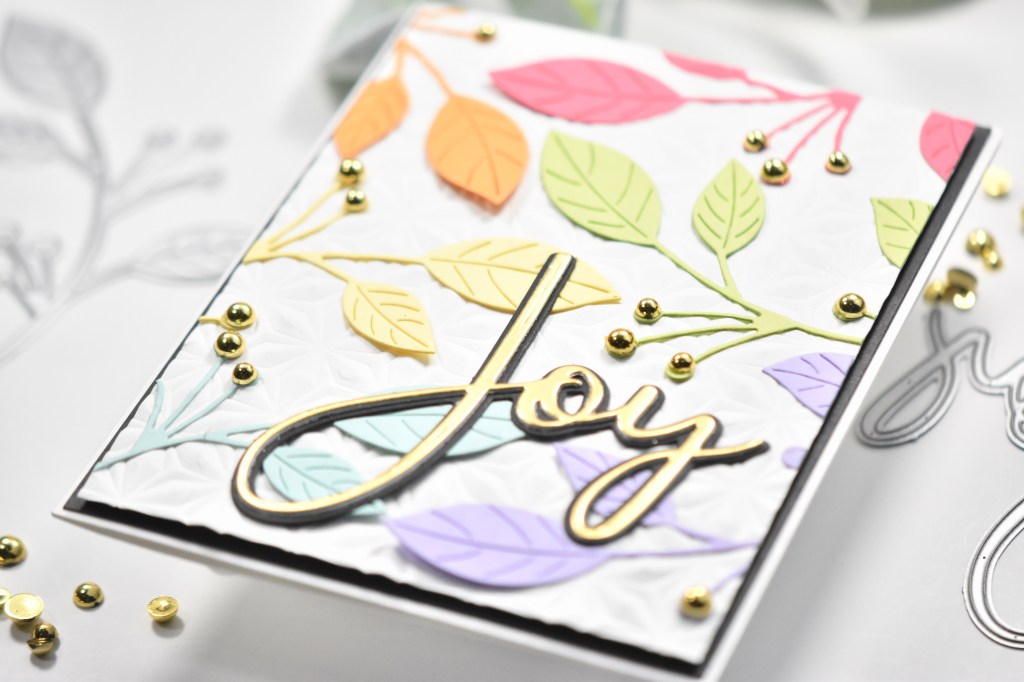
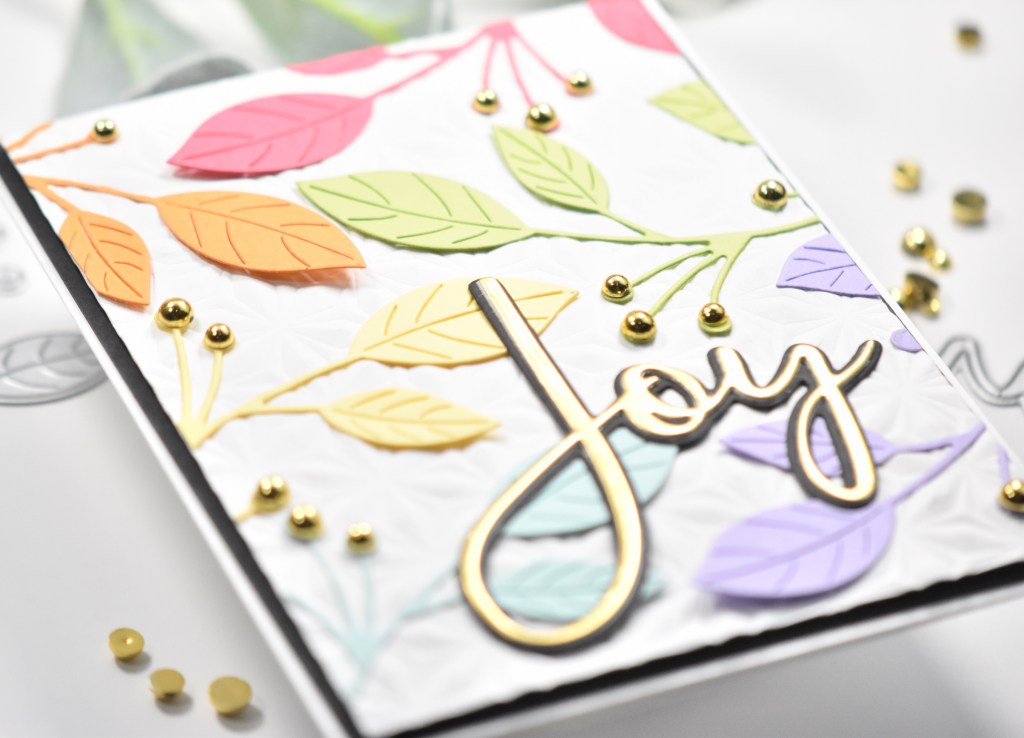
I trimmed a mini slimline panel using the Spellbinders Mini Slimline Envelope & Nested Card Creator set and splattered that using Royal Talens Light Gold Acrylic Ink. I set that aside to dry while I did some other die cutting. I die cut the Hello sentiment from the Spellbinders Sweet Sayings Notecard Sentiments once from seven different rainbow colors of cardstock from my stash. I also die cut a few leaves from mirror gold cardstock using the Spellbinders Mini Blooms and Sprigs set, as well as, the Spellbinders Bouquet of Flowers set.

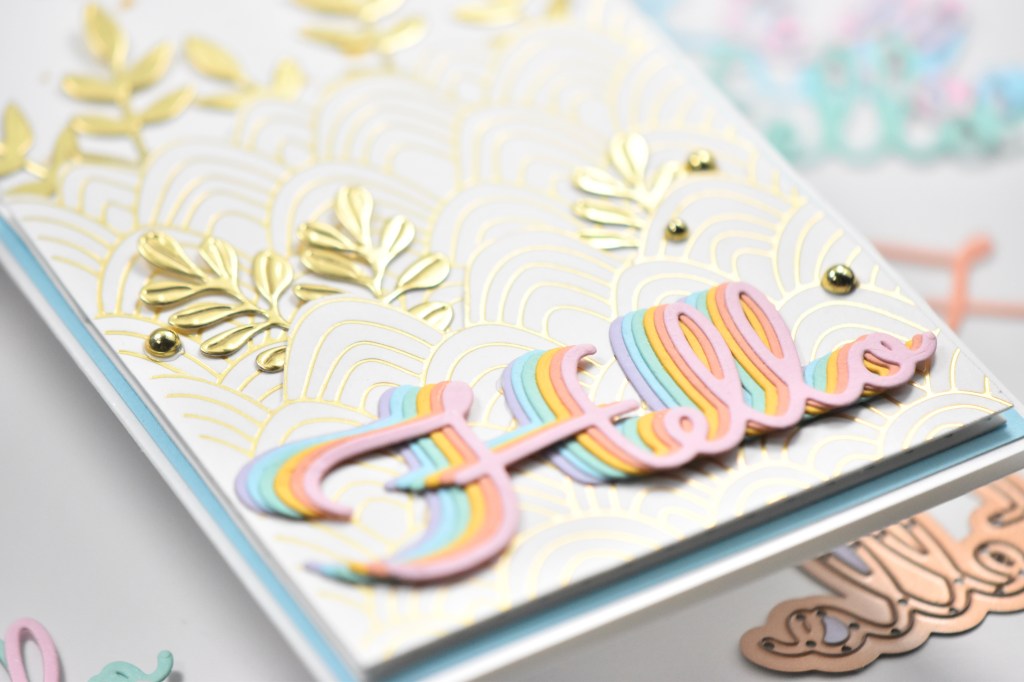
For the sentiment, I used liquid glue to glue those together offsetting them just slightly so that all of the colors were visible. To assemble the card, I glued the top layer of the waves to the splattered panel, and adhered the bottom layer using foam tape for dimension, trimming off the excess as needed.

I also used liquid glue to adhere all of the leaves, tucking those down into the wave panels. The sentiment was then glued to the bottom of the panel. I added a few Spellbinders Fashion Gold Embellishments for some added bling. Everything was then adhered to a coordinating blue panel before being adhered to the card base, which is also Neenah 110lb.

That does it! I always love incorporating rainbow colors into my projects, and I loved making this sentiment! I hope you enjoyed this project, and I hope it inspires you to get crafty as well! Have a beautiful day and don’t forget to stay awesome!

Supply List:

* Some affiliate links used at no cost to you. Thanks so much for your support!

Latest Instagram Posts

Simon Says Stamp Joyful Wreath

Hello Crafty Friends and thanks for stopping by! There’s an Instagram Hop going on today to celebrate Simon Says Stamp latest release, Handmade Holiday, and there are prizes to be won! Who doesn’t love prizes, right?! I think my favorite product from this release has been the Etched Berry Branch, so today’s project is featuring that, once again! Let’s go over the deets, shall we?

I began the project by cutting a few of the SSS Etched Berry Branch from Neenah Classic Crest 110lb cardstock and Tonic Studios Burnished Rose cardstock. I think that I ended up cutting three from each. Once those were all cut, I trimmed the leaves from the branches.

I wanted the background to have some subtle texture and interest, so I used the SSS Detail Petal Plate for this. I arranged the leaves atop the panel in a wreath fashion, gluing down only the center portion of the leaves. I glued only the center portion so that I had room to tuck the other leaves underneath.

Once all of the white leaves were glued, I then glued in the rose colored leaves. I trimmed off the berries and tucked those around the wreath as well, securing those with glue.

I die cut the SSS Joyful die twice from Neenah 110lb and cut the shadow twice from the same and adhered all of the pieces together. I placed small pieces of foam tape on the back and adhered it in the center of the wreath. No card is complete without embellishments, so I added some Soft Snowball Pearls. I think they are the perfect addition! This panel was then adhered to the card base using foam tape.

That finishes up this project! I love the soft feel of this card! I hope you’ll stop by Instagram to check out the hop! Leave comments along the way for your chance to win a $25 Simon gift card! Have a wonderful day and don’t forget to stay awesome!

Supply List:

* Affiliate links used at no cost to you. Thanks so much for your support!

Latest Instagram Posts

Spellbinders Floral Happy Birthday

Hello Crafty Friends and thanks for stopping by! I hope you are doing well and having a wonderful day! Today’s project is featuring the Spellbinders Lyrical Layered Florals. Layered stamps make it so easy to achieve beautiful images with minimal effort! Let’s get to the details for my project!

I began by stamping the florals on a panel of Neenah Classic Crest 110lb cardstock using PinkFresh Studio inks in Grassy Knoll, Olive, Lemon Whip, Sweet Mustard and Marigold. Once the stamping was done, I used the coordinating die, which is included in the set, to trim them out.

For some added interest, I cut a panel of Neenah 110lb using the Spellbinders Hemstitch Rectangles and splattered that using Royal Talens Light Gold Acrylic Ink. I then adhered that panel to a black cardstock panel for contrast.

I stamped the sentiment using VersaFine Onyx Black Ink, heat embossed it using Ranger Clear Embossing Powder and trimmed it out using the included die cut. I did also go ahead and cut some leaves from the Spellbinders Mini Blooms and Sprigs set using mirror gold cardstock. I thought the gold would be a nice addition with the yellow flowers.

The florals and leaves were adhered to the splattered panel using a combination of liquid glue and foam tape. Once those were arranged, I nestled the sentiment in between and adhered that with foam tape as well. To finish off this project, I added some Spellbinders Fashion Gold Embellishments. No project is complete without some bling in my opinion!

That does it for this project! I hope you enjoyed it and I hope it inspires you to get crafty! Have a wonderful day and don’t forget to stay awesome!

Supply List:

* Some affiliate links used at no cost to you. Thanks so much for your support!

Latest Instagram Posts

Simon Says Stamp Silent Night Birch Trees

Hello Crafty Friends and welcome back! I’m so glad that you stopped by! I’m still playing with goodies from the latest Simon Says Stamp release, Handmade Holiday. Today’s project is featuring the new Slimline Birch Trees Stencil. Even though this is a slimline stencil, I ended up making an A7 card. Let’s go through the details!

I began the project by ink blending a panel of Neenah Classic Crest 110lb cardstock using Distress Oxide Inks in Tumbled Glass, Faded Jeans and Chipped Sapphire. I did have to set that aside for a while to dry before proceeding with the stenciling. I positioned the stencil over my panel and used masking tape to hold it in place. I used a VersaMark Ink pad to smoosh the ink over a single tree and heat embossed it using SSS Detail White Embossing Powder.

I repeated this process several times to have multiple trees on the panel. Then, I splattered the panel using Royal Talens Titanium White Acrylic Ink to resemble falling snow. I cut some “hills” from Neenah 110lb cardstock and adhered the bottom hill to my panel using liquid glue, and adhered the top hill using foam tape for dimension.

The hills were then smeared with liquid glue and sprinkled with Distress Mica Flakes. I also added a little bit of glue and mica flakes in the bend of the branches as well. I used the Silent Night sentiment from the SSS Clean Line Christmas set, and stamped that using VersaFine Onyx Black ink and heat embossed it using Ranger Clear Embossing Powder.

I used the coordinating die to trim the sentiment, and cut two other times and adhered all of those together using glue. The sentiment was then glued to the panel just above the hills. Something was missing though! I die cut the SSS Sophie Snowflake twice from Neenah 110lb and glued those to my panel, trimming of the excess as needed. The panel was adhered to a black panel before being adhered to the card base, which was also splattered with Liquitex Iridescent Bright Silver Acrylic Ink. For the finishing touches, I added a few PinkFresh Studio Silver Metallic Pearls.

That does it for this project! I hope you enjoyed it and I hope it provided you with a little bit of inspiration! Don’t forget to check out the entire Handmade Holiday release over at Simon Says Stamp! Have a fabulous day!

Supply List:

* Some affiliate links used at no cost to you. Thanks so much for your support!

Latest Instagram Posts

Simon Says Stamp Starry Night Before Christmas

Hello, Hello, Lovelies! How’s it going? Have you checked out the new Simon Says Stamp release, Handmade Holiday, yet? What are your favorites? What have you ordered? Inquiring minds want to know! For today’s project, I’m featuring the new Night Before Christmas Stamp. This is a pull apart stamp, and is so much fun to work with! I’m going to have to consider getting some of their other pull apart stamps for sure! Anyhoo, let’s get to the details.

I began by trimming a panel of Neenah Classic Crest 110lb cardstock down to just smaller than a 5×7 card panel, and began ink blending using Distress Oxide Tumbled Glass, Chipped Sapphire, Villainous Potion and Black Soot. Once that was all blended, I splattered the panel with Liquitex Iridescent Bright Silver Acrylic Ink. I also sprayed a mixture of water and iridescent Pearl Ex over the panel for some shimmer.

Once that was dry completely, I popped it in the Misti and stamped the sleigh portion of the stamp using VersaFine Onyx Black Ink and heat embossed it using Ranger Clear Embossing Powder. I repeated that process again, but stamping in VersaMark for the second time. I do this because it’s less visible if it stamps even the slightest bit off due to paper warping from the heat. By heat embossing it twice, it gave the black a much smoother finish.

I decided on the Merry Christmas sentiment from the SSS Clean Line Christmas stamp set for this card. I stamped the image on Neenah 110lb using the same ink and embossing powder as before, and used the coordinating die to trim it out. I trimmed it again and glued those together. This was adhered to my card panel using liquid glue. After looking at the panel, I decided that it was missing something. Don’t you just hate that?! Because then you have to figure out what it’s missing!

I finally settled on adding some stars to the background, so I used the SSS Mini Stars Party die to cut those from glitter cardstock in the various sizes. The larger stars were adhered using foam tape, while the smaller stars were adhered using glue. Everything was then adhered to a black cardstock panel before being adhered to my card base, which I splattered with some Chipped Sapphire Distress Spray Stain for some added interest.

That finishes up this project! I hope you enjoyed it and I hope it inspires you to get crafty! Which Simon pull apart stamps have you tried? Head on over to Simon to check out the entire Handmade Holiday release! Have a fabulous day and stay awesome!

Supply List:

* Some affiliate links used at no cost to you. Thanks so much for your support!

Latest Instagram Posts

Simon Says Stamp Be Grateful

Hello Friends and thanks for joining me! The Handmade Holiday release from Simon Says Stamp is live and there are so many cool things that you absolutely need to check out! Like the new Simon Glitz Glitter Gels! Yup, you heard that right, Glitz Glitter Gels! I was super excited to find these in my package and couldn’t wait to play with them! Let’s get right to my project for today!

This set comes with six containers of gels, and they are all so gorgeous, but I’m only using four of them today. To begin, I trimmed a panel of Neenah Classic Crest 110lb cardstock using the PinkFresh Studio Diagonal Stitched Rectangles. I decided on the SSS Tumbling Leaves Stencil, so I taped that to my panel using masking tape, and began applying the gel. The colors that I ended up using were Pearfection, Surf, Citrine and Sherbert. I was going for an ombre look, so I applied the first gel over the top portion of the stencil, cleaning as much as possible from the top of the stencil. I moved to the next color of gel, overlapping the previous color just slightly, continuing with the four colors to the bottom of the stencil.

For the sentiment, I chose to use the SSS Be die along with the SSS Grateful die. I cut each of the words once from mirror gold cardstock and twice from black cardstock. I die cut the shadow for grateful once from black cardstock as well. The Be die cut does not have a shadow, so I traced the die cut on black cardstock and fussy cut that one. By tracing the die, it gives you the perfect size shadow when there isn’t one available. Once all of those were cut, I adhered them all together using liquid glue.

Once the panel was dry, I adhered it to a black cardstock panel using foam tape for dimension. I then glued the sentiments directly to the glitter panel, and adhered everything to the card base, which is Neenah 110lb. To finish up, I added a few PinkFresh Studio Gold Metallic Pearls for some added bling!

Super simple project, but I love the gels and love how this card came out! I hope you’ll stop by and check out the entire Handmade Holiday release! If you love embossing folders, this release is for you! Have a wonderful day and don’t forget to stay awesome!

Supply List:

* Affiliate links used at no cost to you. Thanks so much for your support!

Latest Instagram Posts

LDRS Grateful Heart

Hello Crafty Friends and thanks for joining me! Today’s project is featuring a couple of new products from the latest LDRS October Collection, the Modern Trellis Coverplate and the Thankful Flowers Slimline set. Let’s get right into the details!

To begin this project, I stamped the florals from the LDRS Corner Garden set on Neenah Classic Crest 110lb cardstock, using VersaFine Onyx Black Ink and heat set that using Ranger Clear Embossing Powder. I then colored the images using Copic markers. Unfortunately, I did not write down the specific colors used, which is unlike me, but sometimes things happen. So I apologize about that.

Once everything was colored, I used the LDRS Corner Garden Die set to trim those images out. While I was die cutting, I went ahead and die cut the LDRS Modern Trellis Coverplate from Neenah 110lb, and did some light ink blending, using LDRS Dan-D-Lion ink, on the corners where I intended to put the florals.

I decided on this sentiment from the new LDRS Thankful Flowers Slimline set because I loved it so much. I love die cut sentiments, so I’m thrilled to see some coordinating dies for the sentiments in the sets! Anyhoo, I stamped the sentiment with the same VersaFine Onyx Black Ink and heat set it using the same embossing powder. Once that was done, I used the coordinating die to trim it out.

To assemble the card, I adhered the trellis to the card base, which is also Neenah 110lb, using liquid glue, and adhered the florals to the ink blended corners using foam tape. I nestled the sentiment between those and adhered that with foam tape as well. To finish up, I added a few PinkFresh Studio Gold Metallic Pearls for some added bling!

That does it for this project! I hope you enjoyed it, and I hope it inspires you to get crafty as well! Stop by and check out all of the new October Collection goodies over at LDRS! Have a wonderful day and don’t forget to stay awesome!

Supply List:

* Affiliate links used at no cost to you. Thanks so much for your support!

Latest Instagram Posts

Simon Says Stamp Rainbow Berry Branch

Hello and welcome back! The new Simon Says Stamp release, Handmade Holiday, is in full swing and I’m loving it! Once again, for today’s post, I’m featuring the new SSS Etched Berry Branch. Can I just say that I love this die so much?! I’m a sucker for leaves and flowers though! Let’s go over the details for today’s project, shall we?

I began this project by cutting a panel of Neenah Classic Crest 110lb cardstock and running it through the die cutting machine using the SSS Kaleidoscope Embossing Folder. This added some much needed texture and interest for the background.

Next, I used the SSS Etched Berry Branch along with some rainbow cardstock pieces from my stash and made a bunch of branches. I arranged them atop the embossed panel, adhering only the stems with liquid glue.

I decided on this SSS Large Joy sentiment and die cut it once from mirror gold cardstock and once from white cardstock. I also cut the shadow portion of the die twice from black cardstock and glued all of those pieces together.

I glued the sentiment to the bottom portion of the panel and added PinkFresh Studio Gold Metallic Pearls for the berries. All of this was then adhered to a black cardstock panel using foam tape before being adhered to the card base, which is also Neenah 110lb.

Simple project for today, but I love the way that it came out. Who doesn’t love rainbow leaves?! Thanks for joining me today, and I hope you’ll stop by and check out the entire Handmade Holiday release! Let me know your favorites. Have an beautiful day and don’t forget to stay awesome!

Supply List:

* Affiliate links used at no cost to you. Thanks so much for your support!

Latest Instagram Posts

Simon Says Stamp Calm & Bright Berry Branch

Hello Lovelies, and happy release day! The new Simon Says Stamp release, Handmade Holiday, is live and ready for your viewing (and shopping) pleasure! I know that I say this every single time, but once again, it’s a gorgeous release, and you’ll definitely want to check it out! For today’s card, I’m featuring the brand new Etched Berry Branch, so let’s get right to the details!

First off, I made a striped panel using green cardstock from Concord & 9th. I used the PinkFresh Studio Slim Stripes die to cut all of the stripes and adhered them diagonally on a panel of Neenah Classic Crest 80lb cardstock using liquid glue. I used the PinkFresh Studio Diagonal Stitched Rectangles to cut two panels of Neenah 110lb cardstock.

I positioned the Etched Berry Branch in the top half of the panel, taped it in place, and ran it through the die cutting machine, making sure to save the branch. I positioned the branch die again on the lower half of the panel, and ran that through the machine again. Remember that I said that I cut two panels? I wanted a double layer of the negative panel for dimension without using foam tape. I lined up both panels, taped them together and placed the branch die back into the negative piece, taping it down, and running it through the machine again. It did not cut through the second panel, which I knew would be the case, but it did leave enough of an indentation that I could position the die on the second panel and cut through that one completely.

Once both of those negative panels were cut, I adhered them together using liquid glue. I once again used glue to adhere those panels to my striped panel. Now, to stop here was kind of boring, so I took the positive pieces of the berry branch and adhered those to the front of the card wherever they would fit, overlapping some as needed.

I used the calm & bright sentiment from the SSS Clean Line Christmas set, and stamped it using VersaMark ink and heat set it using Ranger Princess Gold Embossing Powder. Once that was done, I used the coordinating die to trim out the sentiment, and that was then adhered to my card using foam tape.

For even more added interest, I added some PinkFresh Studio Gold Metallic Pearls where the berries would be. Because that panel is two layers, they nestled down in there quite well. Everything was then adhered to a matching dark green panel before being adhered to the card base, which is Neenah 110lb.

That does it for this project! I had a lot of fun making this one! It’s a little bit outside of my norm, but I enjoyed it! I hope you’ll swing by and check out the entire Handmade Holiday release from Simon Says Stamp. You won’t be disappointed! Have a wonderful day and don’t forget to stay awesome!

Supply List:

* Affiliate links used at no cost to you. Thanks so much for your support!

Latest Instagram Posts

Simon Says Stamp Peace and Love to You

Hello Crafty Friends! Thanks so much for stopping by! There’s a new Simon release coming very soon, but today, we are having an IG Hop over on Instagram using products from the latest Peace on Earth release. I hope you’ll head over there to check it out. But for now, let’s go through the details of my card.

I don’t always like or love my own cards, but I do like this one! I began this project by using the PinkFresh Studio Diagonal Stitched Rectangles to cut a panel of Neenah Classic Crest 110lb cardstock. I then used the SSS Peace, Joy, Hope, Love Stencil along with the some Iridescent Gina K Glitz Glitter Gel to create this background panel. Super simple, yet so pretty!

For the sentiment, I opted to use the SSS Clean Line Christmas set. I’ve used this set over and over again! It ends up being my go-to set when I need a simple holiday sentiment. Anyhoo, I stamped the sentiments using VersaFine Black Onyx ink and heat embossed them using Ranger Clear Embossing Powder. I used the coordinating die to trim out the peace sentiment and just trimmed the sub-sentiment using my paper trimmer.

I used the SSS Delicate Leafy Branch and die cut it once from black cardstock, once from glitter cardstock and once from silver cardstock. I adhered all of those together, but only applying glue on the base part of the stems. By doing that, the leaves and part of the stem are “free-flowing,” which adds interest in my opinion.

To assemble the card, I glued the branch to the top corner and adhered the sentiments just below that using foam tape. I adhered the panel to black cardstock before adhering it to the card base.

That does it for this project! I hope you enjoyed it, and I hope you’ll stop by Instagram to check out the hop! Have a wonderful day and don’t forget to stay awesome!

Supply List:

* Affiliate links used at no cost to you. Thank you so much for your support!

Latest Instagram Posts