Simon Says Stamp Exotic Vines Hello

Hey Friends! How are you doing? Thanks for joining me today for another project featuring goodies from Simon’s newest release, And Back Again! Today’s card is using a new embossing folder called Exotic Vines. Read on for all the details!

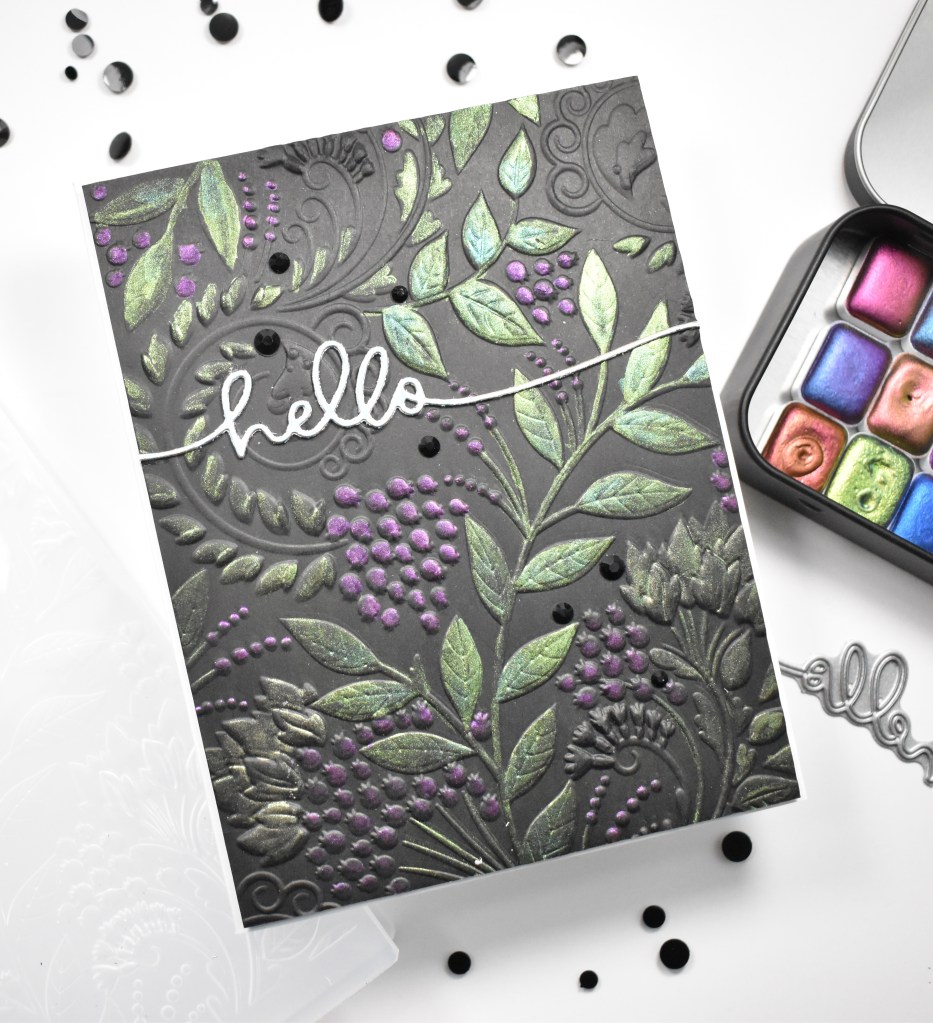
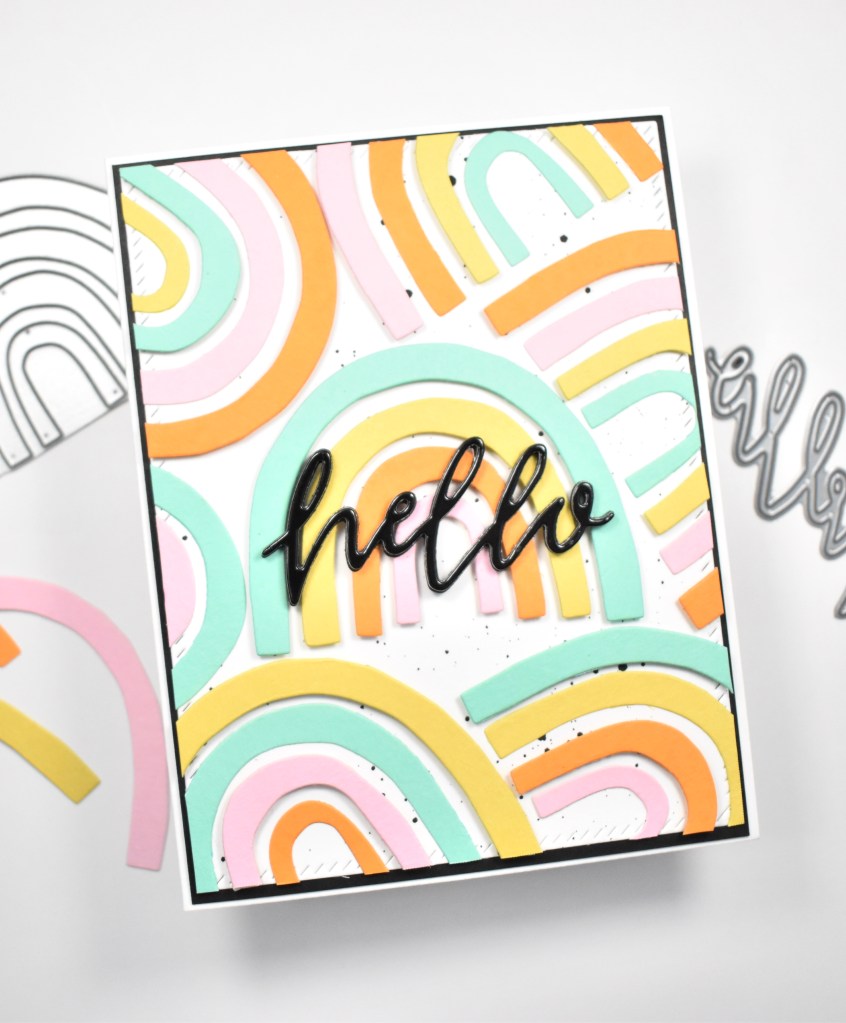
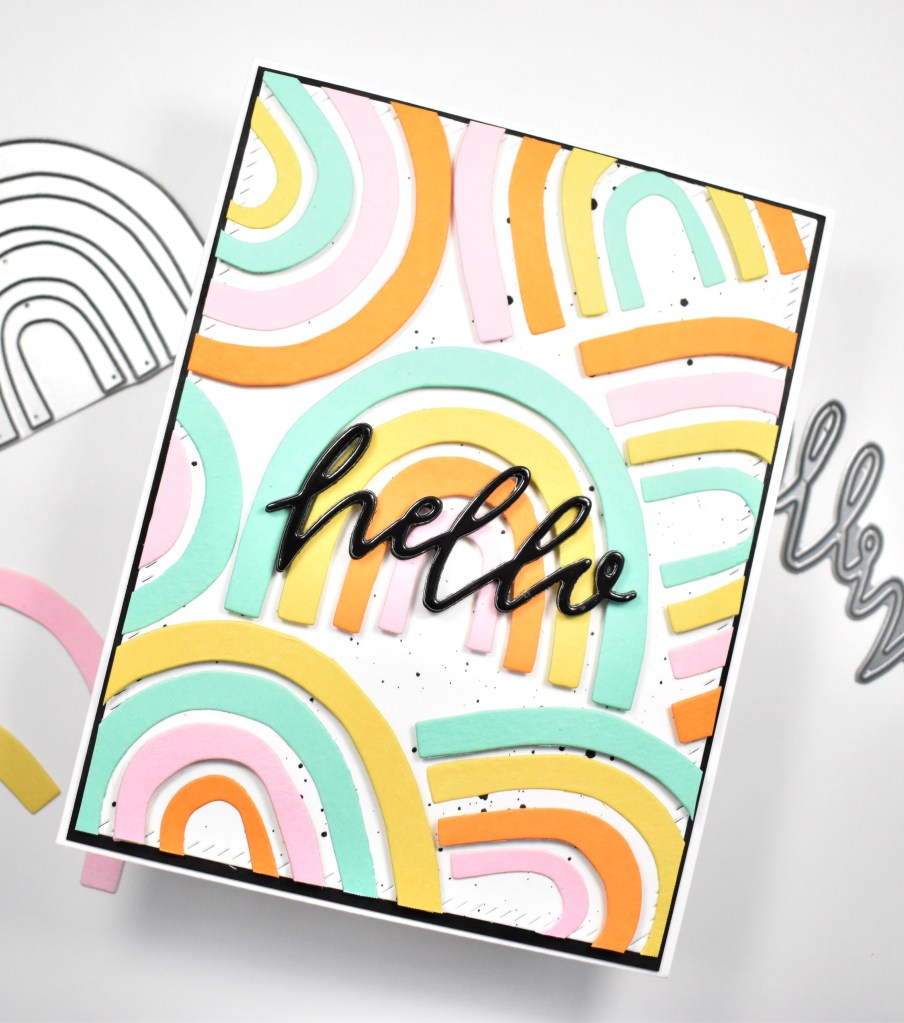
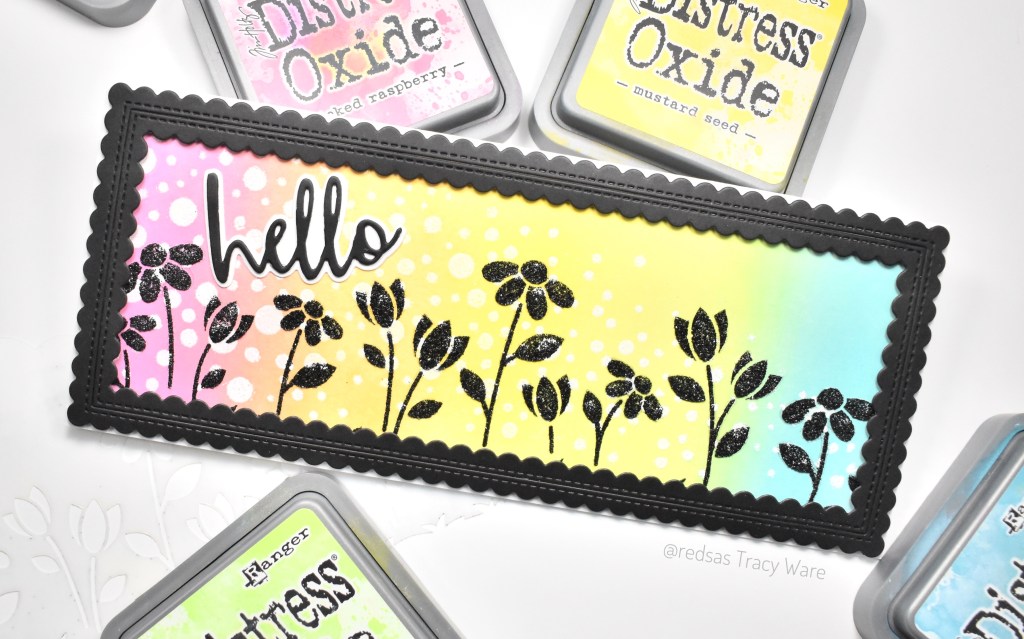
To begin, I trimmed a panel of black cardstock and placed it inside the Exotic Vines folder and ran it through my die cutting machine. Make sure to check Simon’s website for the various sandwiches to use with the different machines. That’s super helpful!

Once my panel was embossed, I began watercoloring the raised portions using my new Iuile Watercolor palette that I received as a Christmas present! What a fun set this is! Actually, all of their watercolors are amazing! Anyhoo, I did the painting using a detail water brush. Once I was done, I sat that aside to dry while I worked on the sentiment.

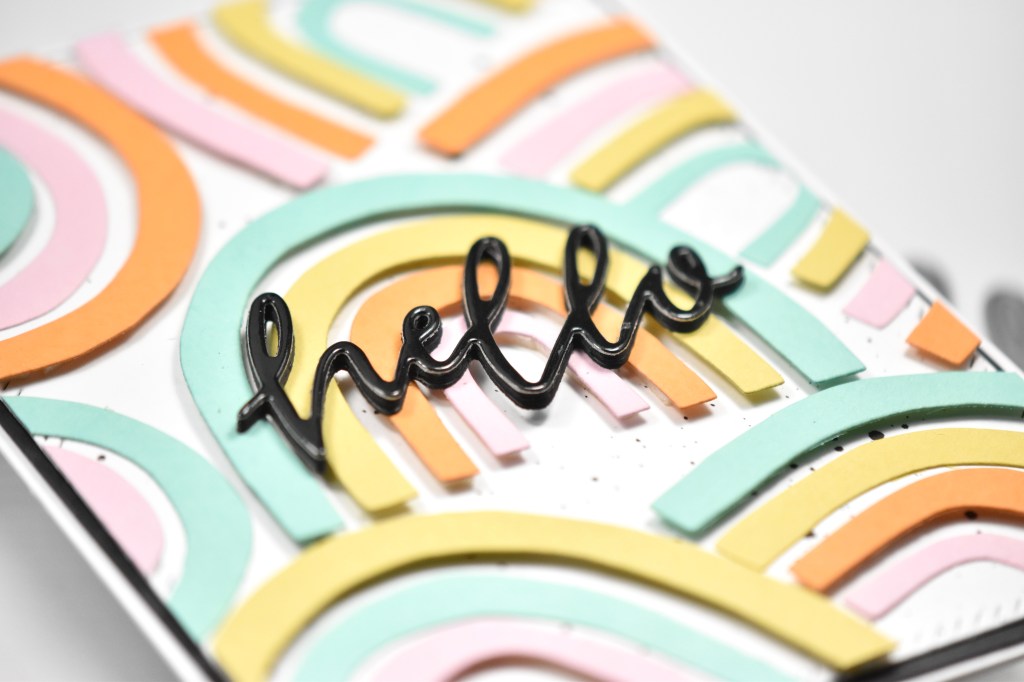
I used the hello die from the SSS Handlettered Greetings set and cut that from SSS Holographic cardstock. I cut it a second time from black cardstock and adhered both of those together using liquid glue.

The sentiment was then glued to the upper portion of the embossed panel, and I trimmed off the excess before adhering the panel to the card base using foam tape. I also added some black crystals for that little, extra shine!

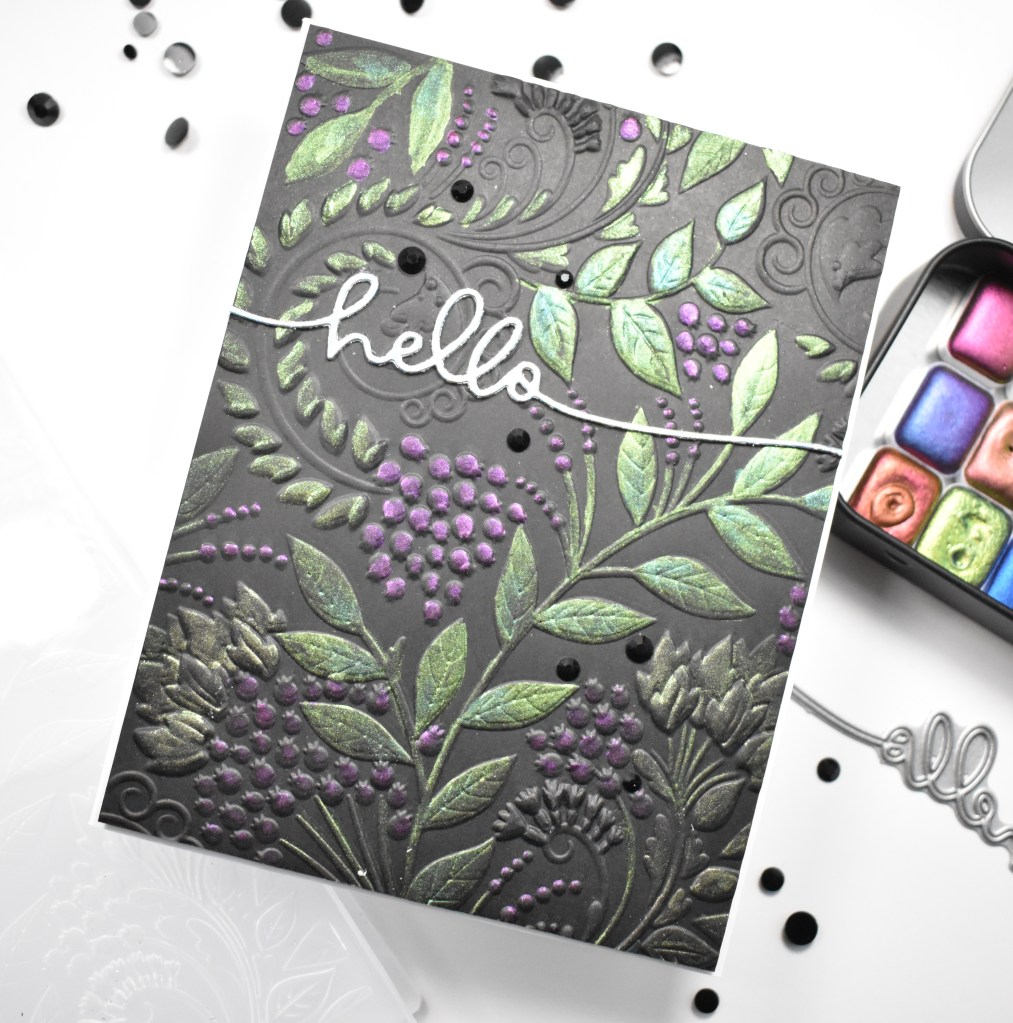
Super simple card today, but I thoroughly enjoyed using these new colorshift watercolors. From one angle, they look like one color and from a another angle, they look like a completely different color! Super fun! I hope you’ll stop by and check out the entire And Back Again release! Have a wonderful day and don’t forget to stay awesome!

Supply List:

* Affiliate links used at no cost to you. Thank you so much for your support!

Latest Instagram Posts

Spellbinders Sweet Sayings Hello

Hello Friends and welcome back! Hope you’re having a fabulous day! Today’s project is featuring the Sweet Sayings Notecard Sentiments from Spellbinders. I love die cut sentiments, so I was thrilled to get to play with this set. Let’s jump right into the details!

To begin, I used the Spellbinders Hand Drawn Wave Foil Plate, along with some matte gold foil to make a couple of panels using Neenah Classic Crest 110lb cardstock. Once those were done, I fussy cut them and set them aside while I prepared the rest of the card.

I trimmed a mini slimline panel using the Spellbinders Mini Slimline Envelope & Nested Card Creator set and splattered that using Royal Talens Light Gold Acrylic Ink. I set that aside to dry while I did some other die cutting. I die cut the Hello sentiment from the Spellbinders Sweet Sayings Notecard Sentiments once from seven different rainbow colors of cardstock from my stash. I also die cut a few leaves from mirror gold cardstock using the Spellbinders Mini Blooms and Sprigs set, as well as, the Spellbinders Bouquet of Flowers set.

For the sentiment, I used liquid glue to glue those together offsetting them just slightly so that all of the colors were visible. To assemble the card, I glued the top layer of the waves to the splattered panel, and adhered the bottom layer using foam tape for dimension, trimming off the excess as needed.

I also used liquid glue to adhere all of the leaves, tucking those down into the wave panels. The sentiment was then glued to the bottom of the panel. I added a few Spellbinders Fashion Gold Embellishments for some added bling. Everything was then adhered to a coordinating blue panel before being adhered to the card base, which is also Neenah 110lb.

That does it! I always love incorporating rainbow colors into my projects, and I loved making this sentiment! I hope you enjoyed this project, and I hope it inspires you to get crafty as well! Have a beautiful day and don’t forget to stay awesome!

Supply List:

* Some affiliate links used at no cost to you. Thanks so much for your support!

Latest Instagram Posts

Simon Says Stamp Rainbow Hello

Hello Crafty Friend, and happy StampTember! StampTember is always so exciting! So many new products, and so many awesome collaboration sets! To celebrate, we are having a huge blog party! There will be tons of inspiration AND a scavenger hunt for exclusive codes to the Simon Says Stamp store! You can check out the SSS Blog for more inspiration, more details and more links to blogs with even more exclusive codes! You’ll find my exclusive code below! Today’s card is featuring this new, awesome, Fine Petal Background Plate. Such a cool plate to play with! So, let’s get right into the details of it.

I began by ink blending a panel of Neenah Classic Crest 110lb cardstock using Distress Oxide inks in Picked Raspberry, Carved Pumpkin, Mustard Seed, Twisted Citron and Broken China. I then used the SSS Fine Petal Background Plate to cut the ink blended panel using the Gemini Jr. I did have to run it through about four times to get a really good cut.

Once the panel was cut, I zhooshed most of the petals to give them some good dimension! I left some petals near the bottom un-zhooshed, is that even a word? Anyhoo, I left some flat so that I had a place for the sentiment. I then adhered the ink blended panel to a black cardstock panel using liquid glue. I thought the black background made a bold impact against the rainbow!

Next, I used the SSS Hello die and cut that from black glossy cardstock three times and adhered all of those together using glue. I also cut the shadow once from vellum and glued that behind the sentiment. This was then glued to the panel near the bottom.

This panel was then glued to the card base, which is Neenah 110lb. This was a super simple and quick card, but I love how it turned out! I really love the black elements combined with the rainbow colors!

That does it for this one! I hope you enjoyed it, and I hope you’ll stop by and check out the entire StampTember line up! There’s so many great things in this release! Here’s my exclusive code for the SSS store! Join the scavenger hunt for more codes! Thanks for stopping by, have a wonderful day and don’t forget to stay awesome sweet friend!

Supply List:

* Affiliate links used at no cost to you. Thank you so much for your support!

Latest Instagram Posts

Erin Lee Creative Hello Somewhere Rainbow

Hello Crafty Lovelies! Hope you’re doing well and having a wonderful day! I’m back today featuring a couple of cool products from Erin Lee Creative, and can I just say, I love how this card turned out! Let’s get right into the details!

I began the project by cutting the Somewhere Rainbow twice from four different colors of cardstock from The Stamp Market. I cut them twice from each color because I wasn’t sure how many that I was going to need. I needed a panel to work on, so I cut a panel of Neenah Classic Crest 110lb cardstock using the PinkFresh Studio Diagonal Stitched Rectangles.

Once that was cut, I splattered it using Royal Talens Amsterdam Oxide Black Acrylic Ink and set it aside to dry. I began assembling the first rainbow in the center of the panel. For this one rainbow, each arch is adhered with foam tape.

I had to play with placement of the remaining rainbows as to fill in the panel the best way. Once that was decided, I began adhering the other rainbows, using a combination of glue and foam tape, alternating arches. Hopefully you can see that from the pics.

Once the panel was full of rainbows, I die cut the Hello Word Die once from Glossy Black cardstock and three times from black cardstock, gluing all of those together for dimension, because dimension rocks! I adhered the Hello sentiment in the center of the panel atop the center rainbow. My panel was then adhered to a black panel using foam tape, and then to the card base, which is Neenah 110lb.

That finishes up this project! You guys, Erin has some of the cutest rainbows, and I’m just in love with this one! I hope you’ll stop by her website and check out her awesome products! Stay awesome friend!

Supply List:

* Some affiliate links used at no cost to you. Thank you for your support!

Latest Instagram Posts

LDRS Hello Lovely

Hello Friend! Thanks for stopping by today! I hope you are doing well and having a wonderful day! I’m back today with an LDRS card featuring the Garden’s Edge Slimline Stamp and die. Wow, this is such a beautiful stamp, and I was super excited to play with it. So, let’s jump right in!

I began by stamping the LDRS Garden’s Edge Slimline stamp on a panel of Neenah Classic Crest 110lb cardstock, using VersaFine Onyx Black ink and heat setting it using Ranger Clear Embossing Powder. I then began coloring using Copic markers BG10, BG11, BG72, G21, G24, Y08, Y11, Y15, Y17, Y32, YR27, E99, RV00, RV10, RV11, RV17 and RV55.

Once the coloring was completed, I used the LDRS Garden’s Edge Slimline Die to trim it out, and I pulled out a piece of watercolor paper for the background. I used Distress Oxide Sprays Broken China and Prize Ribbon, and spritzed them onto my glass work surface, spritzed some water, and then did some ink smooshing to obtain the soft wash of color.

Once the watercolor panel was dry, I popped it into the Misti and stamped the Hello Lovely sentiment, which is also from the same stamp set, using VersaFine Onyx Black ink and heat setting it using the same embossing powder.

Since I was not using this slimline stamped image on a slimline card, I had to choose the placement of the florals. Once decided, I placed foam tape on the back and adhered it to the watercolor panel, trimming off the excess. The excess was then added to another section of the card. We can’t let any of it go to waste, right?! This was then adhered to the card base, which is also Neenah 110lb, using foam tape. I also added a few confetti sequins because we have to have bling!

That finishes up this project! I hope you enjoyed it and I hope you found some inspiration! Have a wonderful day and don’t forget to stay awesome friend!

Supply List:

* Affiliate links used at no cost to you. Thank you so much for your support!

Latest Instagram Posts

Erin Lee Creative Chevron Hi

Hello there crafty friend! I hope you’re having an amazing day! I’m so glad that you stopped by! I was beyond excited when asked to play with some goodies from Erin Lee Creative! Like beyond! So, today’s card is featuring the Chevron Builder and Jumbo Hi dies from her previous releases. Let’s jump right in to the details, shall we?

To begin this project, I pulled out six colors of cardstock from The Stamp Market and die cut the Chevron Builder from those colors twice. I also trimmed a panel of Neenah Classic Crest 110lb cardstock just smaller than an A2 card to layer the chevron pieces on.

I put foam tape on the back of the chevron pieces and began adhering them in rainbow order, leaving a small space between, until the entire panel was covered.

I die cut the Erin Lee Creative Jumbo Hi once from Glossy Black cardstock, and two more times from black cardstock and adhered all of those together using liquid glue. I then glued the sentiment in the center of the chevron panel.

This was then adhered to a black panel for contrast, and then to the card base, which is also Neenah 110lb. This card felt like it needed some embellishments, so I opted for some black crystals from Studio Katia.

That finishes up this project! I hope you enjoyed it, and I hope it inspires you to get crafty! I ended up with enough chevron pieces to make a second card, so I’ll post that soon! Have a wonderful day and don’t forget to stay awesome!

Supply List:

*Some affiliate links used at no cost to you. Thank you for your support!

Latest Instagram Posts

LDRS Floral Hi

Hello Crafty Friends and welcome back! I hope you’re doing well and having a fabulous day! Thanks for joining me today! I’m super excited to announce that I’ve joined the LDRS Design Team, and today is my first project for them! Today’s project is featuring the Garden Grandeur Slimline Stamp, Stencil and Die set from LDRS. So let’s just jump right into the details, shall we?

I began this project by stamping the Garden Grandeur floral on a piece of Neenah Classic Crest 110lb cardstock, using VersaFine Onyx Black ink and heat setting it using Ranger Clear Embossing Powder. The coordinating stencil was then adhered to the stamped image using masking tape. I used LDRS inks in Pink Tutu, Lipstick Jungle, Scarlet Rose, Lantern Yellow, Dan-D-Lion, Key Lime Pie and Olive Branch for the stenciling. When the stenciling was completed, I used the coordinating die to cut the flowers.

I cut an A2 panel of Neenah 110lb and used the Pink Tutu ink to do some very light ink blending in the corners. I also used the LDRS Pretty Patterns Slimline Die to cut a frame from Neenah 110lb as well. I positioned the frame diagonally across my panel, trimming off the excess. This is a great way to stretch your supplies! You can use those Slim Line dies in unique ways by positioning them differently on other size cards!

The excess pieces were then added around the corners of the panel, using liquid glue, for added interest. No sense in wasting those right?!? For the sentiment, I chose to use the LDRS Chloe Alpha Lowercase and cut the letters hi three times from Neenah 110lb, adhering with glue.

I played around with the placement of the flowers and sentiment, and when I finally was satisfied, I glued the sentiment directly to the panel and adhered the large floral using foam tape in the upper corner. I trimmed the excess, and placed the remaining portion of the floral in the bottom corner. I still had excess, so I added that to the side. Again, no sense in wasting it! To finish up, I added some pearls for added interest, and adhered everything to the card base, which is also Neenah 110lb.

That finishes up this project! I hope you enjoyed it, and I hope it inspires you to get crafty in your own space! I took no waste to a whole new level on this card! I should have taken a pic of the tiny little pieces that I had left over! Have a wonderful day and don’t forget to stay awesome!

Supply List:

*Affiliate links used at no cost to you. Thank you so much for your support!

Latest Instagram Posts

Reverse Confetti Countdown to Confetti Day One

Hello Fetti Friends and welcome back! So glad that you stopped by today for the Reverse Confetti Countdown to Confetti Day One! There is an August mini release and it’s a sweet one with beautiful cover panels with florals, along with a beautiful sentiment stamp set! To celebrate, we are having a blog hop! So hop along and leave comments for your chance to win a gift certificate! More details below. Please note that the new product links will not be available until the release goes live on August 8th. So let’s get into the details for my card!

I made a few cards using products from this release, as you’ll see in the upcoming days, while trying to use the products in different ways, rather than their intended use. For today’s card, I used the new Hello Daisy Cover Panel. This die includes a large Hello die, with the included frame and floral dies and I decided to make that Hello the focal point! I began by cutting the Hello die from black cardstock. I believe that I ended up cutting it five times to cover this A2 panel.

I also cut the Hello five times from black fun foam for dimension. I adhered all of the cardstock die cuts to the fun foam die cuts using liquid glue. I wanted a panel for assembly to work on, so I cut an A2 panel of Neenah Classic Crest 80lb cardstock for this.

The easiest way for me to get good placement of the Hello die cuts was to start in the middle of the panel with the full Hello word. I adhered that with glue and began placing the remaining die cuts, trimming of the excess, until my panel was completely covered.

I die cut a bunch of the included flowers using various colors of Sizzix cardstock, and adhered those around using a combination of glue and foam tape. To finish, I adhered the panel to a card base, which is Neenah Classic Crest 110lb cardstock.

That does it! I hope you enjoyed these projects, and I hope it inspires you to get crafty! As I mentioned earlier, we are having a blog hop with tons of inspiration projects from the team! Hop along and leave comments by noon central time on August 7th for your chance to win a Reverse Confetti $15 gift certificate! You don’t want to miss it! Hop list below.

Reverse Confetti Blog

Amy Kolling

Tricia Barber

Lisa Henke

Tracy Ware

Dilay Nacar

Jeanne Jachna

Audrey Tokach

Candice Fisher

Rachel Alvarado

Amy Tsuruta

Joe Sysavath

Supply List:

*Affiliate links used at no cost to you. Thank you so much for your support!

Latest Instagram Posts

Simon Says Stamp Hello Sunshine

Hello Friends! Thanks for stopping by today! The new SSS Make Magic release is awesome! I’ve had a lot of fun playing with some of the items from this release, including the new SSS Sunburst Die! So, let’s hop right into the details, shall we?

I started this project by die cutting the SSS Sunburst die from eight different sheets of patterned papers from my stash, as well as, cutting it from a piece of yellow cardstock. I ended up trimming off some of the bottom of the yellow die cut piece. I added a strip of complimentary washi tape, from Paper Source, along the bottom of my card base, which is Neenah Classic Crest 110lb cardstock.

I adhered the yellow sunburst die cut directly to my card base using liquid glue, just above the strip of washi tape, and did some ink blending in the sun area using Distress Oxide Mustard Seed. I then popped that into the Misti and stamped the Hello Sunshine sentiment, which is from the SSS Hello Sunshine stamp set, using VersaMark Ink and heat embossed it using Ranger Princess Gold Embossing Powder. Then, I trimmed out the pieces from the patterned papers that I was going to need for my card.

Once those were trimmed, I inlaid those on my card using foam tape, because dimension is life! I felt like it was missing something though! This is when I dorked around for quite a while trying to figure out what it needed! Do you ever do that too? Anyhoo, after much deliberation, I settled on some gold stars, thank goodness! I pulled out the SSS Mini Stars Party Die and cut that from some gold cardstock. I adhered the stars using glue and finally called it quits on this one! I love card making, but I get on my own nerves hem hawing around trying to figure stuff out sometimes!

Well, that finishes this project up! I hope you enjoyed it, and I really hope you’ll stop by and take a look at the entire Make Magic release! So many awesome things! Thanks for stopping by today, and don’t forget to stay awesome!

Supply List:

*Affiliate links used at no cost to you. Thank you so much for your support!

Latest Instagram Posts

Simon Says Stamp Slimline Rainbow Hello

Hello Friends and welcome back to my blog! The new release from Simon Says Stamp, Make Magic, is live today!! Have you checked it out? Oh my word, SO many awesome things! For today’s project, I’m featuring a double stenciling technique using the new SSS Slimline Floral Builder Stencil! So let’s get right into it, shall we?

To be honest, the first attempt at this card was not a success! And, sometimes that happens! It’s unfortunate when it does happen, but sometimes it does! I didn’t get a good impression with the stencil using the gel. To tackle this situation, I opted for using the trusty Pixie Spray! Ok, now that you know the back story, I’ll tell ya how I created the card!

I began by trimming a panel of Neenah Classic Crest 110lb cardstock and adhering the SSS Fading Tiny Dots Stencil to it using masking tape. I smooshed and smeared the VersaMark Ink pad over that, getting a good coating. Once the stencil was removed, I sprinkled SSS Detail White Embossing Powder over it, and heat set it. The next step was the rainbow ink blending, and I used Distress Oxide inks Picked Raspberry, Carved Pumpkin, Mustard Seed, Twisted Citron and Broken China.

This is where the error in my ways surfaced the first time, as I only adhered the SSS Slimline Floral Builder Stencil with masking tape. To correct on my second attempt, I gave that stencil a good spray of Pixie Spray and positioned it atop my rainbow panel, securing it with masking tape, just to be sure! I then, added black Gina K Glitz Glitter Gel, because I was going for a silhouette look against my rainbow background.

I wanted to add a black frame, so I opted for the PinkFresh Studio Slim Stitched Scalloped Rectangles to achieve that. I cut the SSS Script Hello sentiment twice from black cardstock and cut the shadow portion once from Neenah 110, adhering all of those together using liquid glue.

I added the frame to my rainbow panel using foam tape for dimension, and I added the sentiment using glue. This was then adhered to my card base, which is Neenah 110lb as well, using the new SSS Dot Tape Runner.

That finishes this project! It was a super fun one to make, except for the mishap stenciling my first time! Live and learn! I hope you’ll stop by and check out the entire Make Magic release! Have a wonderful and stay awesome!

Supply List:

*Affiliate links used at no cost to you. Thank you so much for your support!

Latest Instagram Posts