Alex Syberia Design February Release

Hello Crafty Friends! Thanks so much for stopping by! Today, the design team is celebrating Alex’s new release with an Instagram hop, so be sure to head over there to check that out! She’s giving away a $15 gift card for her shop to three lucky commenters, so hop along for your chance to win! Let’s get into the details for my card today!

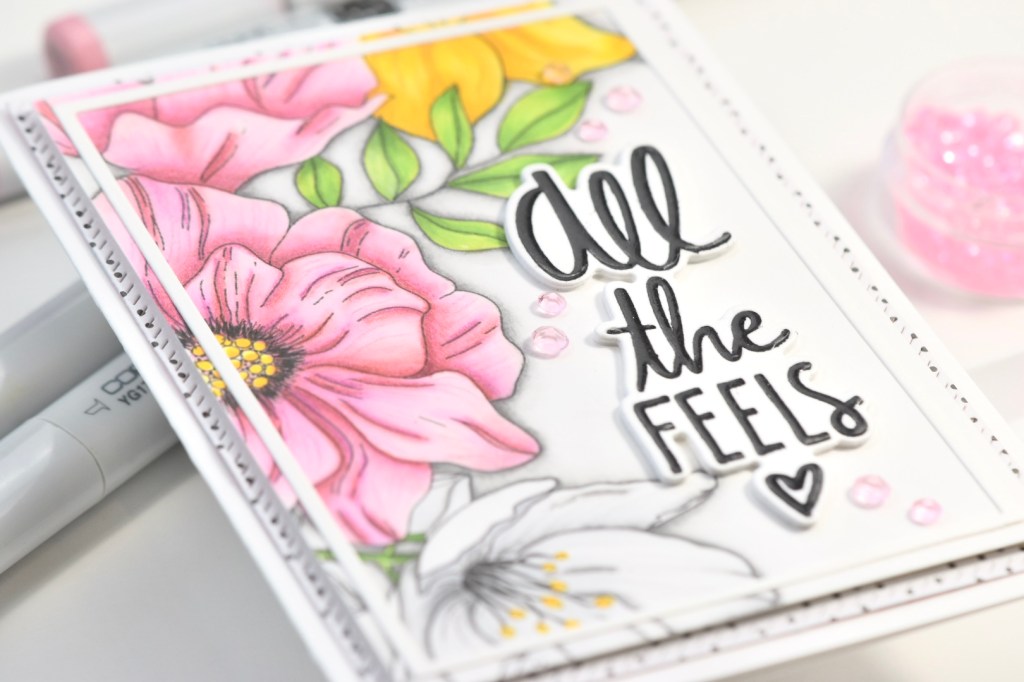
I began this project by printing the Tulip Close Up on some Neenah Classic Crest 110lb cardstock. I don’t use fancy software because I’m so not tech savvy. I just use Pages on my MacBook and resize the image to whatever size I’m looking for, and sometimes I tone down the opacity as I did for this image. That allows you to get a more no-line look, if you’re into that.

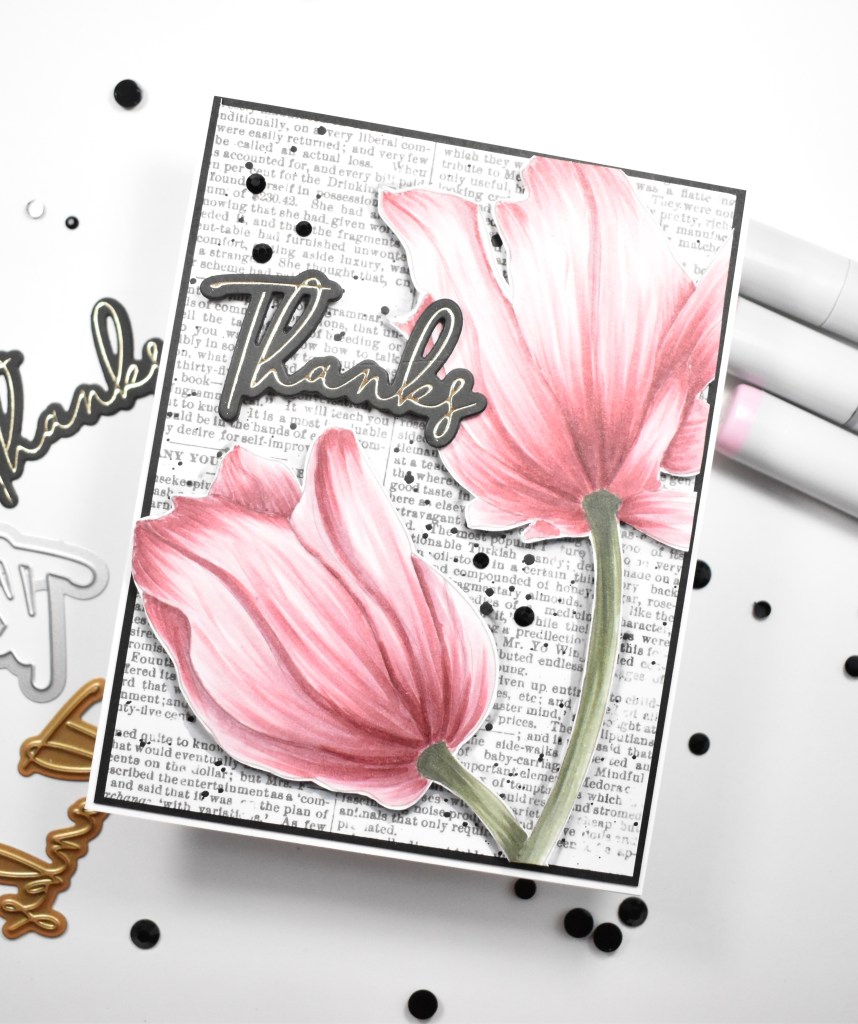
Once printed, I began coloring the image using Copic markers RV91, RV93, RV95, R56, BG93, BG96, BG99, N0 and N2. This is such a beautiful combination of pinks and reds, and definitely a go-to combo for me. When I was done coloring, I fussy cut the image and set it aside while I worked on the remainder of the card.

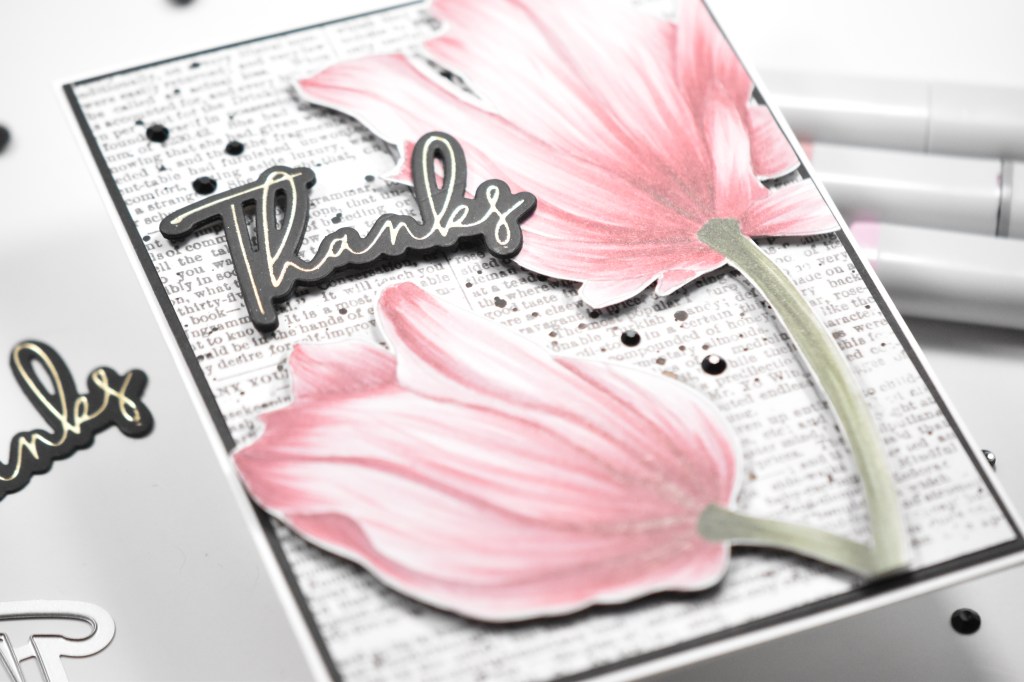
I’ve done a card like this before for Alex, and wanted to recreate that, so I pulled out this patterned paper, which is from the Wandering Ivy Collection from KaiserCraft and trimmed it down. For the sentiment, I decided to use the Thanks from PinkFresh Studio Fancy Script Words set. I hot foiled the sentiment using Spellbinders Champagne foil onto black cardstock and used the coordinating die set to trim that out. I did cut two more blank sentiments and adhered all of those together using liquid glue.

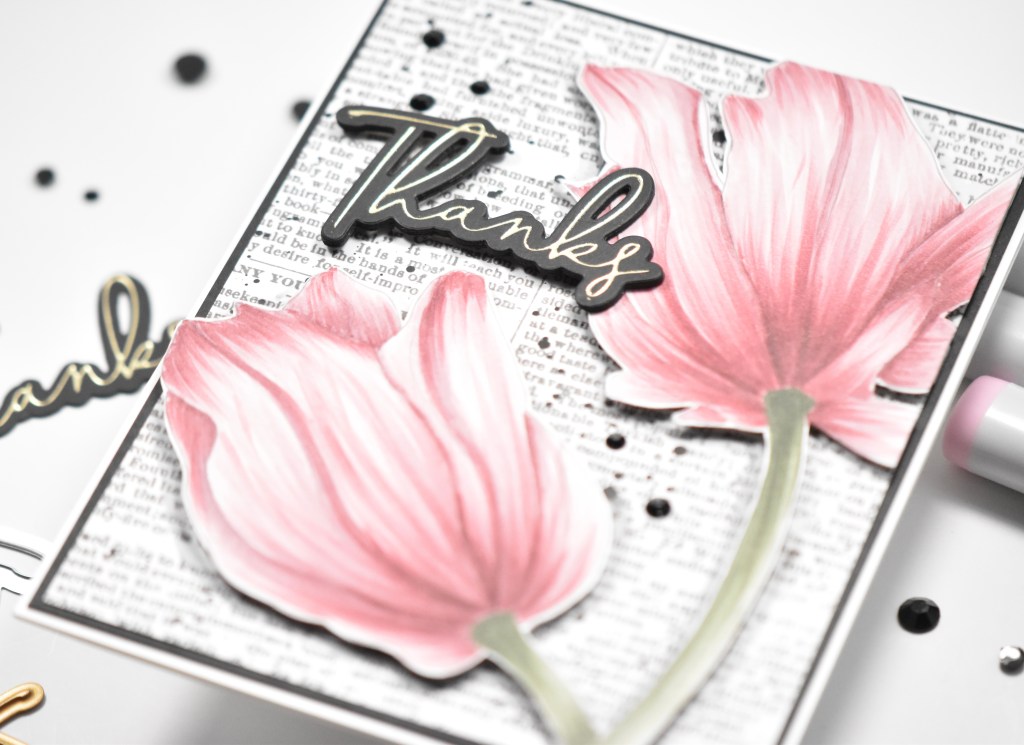
I applied foam tape to the tulips and adhered those to the text background, which I splattered using Royal Talens Oxide Black Acrylic Ink, trimming off any excess of the flowers. After those were on, I used the Copic markers in N0 and N2 to add shadows around the flowers. The text panel was then adhered to a black panel using SSS Dot Tape Runner, and that was then adhered to the card base. I adhered the sentiment using a combination of foam tape and liquid glue, and also added a few black jewels to finish up.

That does it for this project! I hope you enjoyed it, and I hope you’ll head over to Instagram to participate in the hop! Don’t forget to check out all of Alex’s new images over in her Etsy shop! Have a wonderful day and stay awesome!

Supply List:

* Some affiliate links used at no cost to you. Thanks so much for your support!

Latest Instagram Posts

Alex Syberia Design Lotus Hugs

Hello Lovelies! I hope you’re doing well and having a wonderful day! It’s release day for Alex Syberia Design, and she’s got some beauties this month! I hope you’ll stop by her Etsy shop and take a peek at the whole collection. Today’s card is featuring the White Lotus digi stamp, and it happens to be my favorite from this release! So, let’s get right to it!

I began by printing the image on a panel of Neenah Classic Crest 110lb cardstock. I don’t use any fancy software at my house. I work on a MacBook, and I just insert the image into a Pages document and resize it. I’m not tech savvy and simple gets the job done around here. However, I will say that I discovered this time that I can print the image with that shadow around it. I was pretty exited about that!

Anyhoo, I realize this is supposed to be a white lotus, but in all honesty, I forgot that part and started coloring with pink! Oops! I’m just going with, it’s art and I can make it any color that I want! Am I right?! The Copic markers used on this image were RV00, RV91, RV93, RV95, Y08, Y15, YG13 and YG17. That combo of pinks might be my new favorite!

Once I was done with the markers, I did go back in with some PrismaColor pencils in the nooks and crannies to deepen those shadows. I trimmed the panel using the PinkFresh Studio Diagonal Stitched Rectangles and splattered it using Royal Talens Amsterdam Titanium White Acrylic Ink.

Once that was dry, I mounted it to a black panel using foam tape, because dimension! I wanted a small sentiment, because I didn’t want to cover up too much of the coloring, so I opted for this hugs sentiment from the PinkFresh Studio Sending Phrase Builder set. I cut it once from Mirror Gold cardstock and twice from black cardstock. I also cut the shadow twice from black as well. All of these were then adhered together using liquid glue, and glued to the panel. Everything was then mounted to the card base, which is also Neenah 110lb.

That finishes up this project! I really enjoyed coloring this digi from Alex, but I guess for my next one, I really should color it white, or at least try! I hope you’ll stop by and check out the full release over in Alex’s Etsy shop! Have a wonderful day and don’t forget to stay awesome!

Supply List:

* Affiliate links used at no cost to you. Thank you so much for your support!

Latest Instagram Posts

Alex Syberia Sending Hugs

Hey! Hey! Hey! How’s it going? I’m back today with another project from Alex Syberia’s new July release. For this project, I’m featuring Tina’s Garden A2 Panel. What a great digi stamp this is! Perfect for coloring, whether you’re using markers, pencils or watercolors! So, let’s jump right into it!

I began by printing the image on Fluid Cold Press Watercolor Paper. I haven’t found a favorite watercolor paper yet, and this is just what I happen to have, so I used that. I recently attended the Concord and 9th summer camp, and we received some of their new liquid watercolors in a few shades in our kits. Since they were new, I wanted to pull them out and try them again. The colors that I used were Honeysuckle, Buttercup, Clover and Oceanside. I checked the C9 website to see if these watercolors are available for purchase, and I was unable to find them on their website. I’m not positive, but I think these will become available in the future. How awesome would it be to have liquid watercolors in all of their amazing colors?!?! With that being said, this is a beautiful digi stamp, and any watercolors that you have would be stunning on this!

Once the coloring was done, I used the PinkFresh Studio Diagonal Stitched Rectangles to trim the panel. I then used the PinkFresh Studio Perfect Sentiments Foil Plate to foil a sentiment from this set using Champagne foil on black cardstock. I used the coordinating die to cut the sentiments, and I ran it through again to cut blank sentiments so that I could stack them for dimension.

I adhered the sentiment directly to the panel using liquid glue and then adhered the watercolored panel to a panel of black cardstock, using foam tape, for contrast. This was then adhered to my card base, which is Neenah Classic Crest 110lb cardstock.

That finishes this project! I hope you’ll head to Alex’s Etsy shop to check out the new release! There are some super fun images that you don’t want to miss! Thanks for stopping by today, and don’t forget to stay awesome, because you are awesome!

Supply List:

*Some affiliate links used at no cost to you. Thank you so much for your support!

Latest Instagram Posts

Alex Syberia Design Coloring Therapy

Hello Crafty Friends! Thanks for stopping by today to check out my project for the new July release from the awesome Alex Syberia! Lots of fun things in this release, and of course, some beautiful flowers for your coloring pleasure! To celebrate Alex’s new release, we are having a super fun Instagram Hop, with a chance to win a $20 gift certificate for her shop! You can check out her Instagram or my Instagram for all the details! For today’s project, I’m featuring the Coloring Therapy A2 Panel, so let’s get started!

I began by printing the image on Neenah Classic Crest 110lb cardstock. When I printed the image, I did adjust the opacity down to about 30%. By doing this, you can get somewhat of a no-line look, especially when watercoloring. I then got busy coloring. I started with the purples, and thought that I was going to color the whole thing purple to resemble grapes, but then decided that it might be cool to do rainbow colors instead.

The Copic Markers that I used were BV000, BV00, BV01, BV02, BV04, BV23, BV29, Y00, Y06, Y08, Y11, Y13, Y15, Y17, RV00, RV02, RV11, RV32, R85, YR23, YR24, YG11, YG13, YG17, BG000, BG01 and BG02. Goodness gracious, that’s a lot of markers, right!?!? Anyhoo, once everything was colored, I used the PinkFresh Studio Diagonal Stitched Rectangles to trim the panel.

I also used a Copic Multiliner 0.3 to add back the black dots on the “berries” as they got lost during the coloring process. I opted for a Thanks sentiment using the Concord and 9th Scripted Thanks die cut. I cut it three times from black cardstock and adhered those together using liquid glue. I also cut the SSS Etched Dragonfly from black cardstock.

I adhered the sentiment and the dragonfly to the colored panel using glue, and adhered the panel to my card base, which is also Neenah 110lb, using foam tape for dimension. To finish up the project, I added some Soft Snowfall Pearls from Little Things from Lucy’s Cards. I thought the softness of them added a nice little touch!

I hope you enjoyed this project, and I hope you found some inspiration to get crafty in your space! Head on over to Alex’s Etsy shop to check out the full release! You don’t want to miss it. Stay awesome sweet friend!

Supply List:

*Affiliate links used at no cost to you. Thank you so much for your support!

Latest Instagram Posts

Alex Syberia Design Love You Daffodils

Hello there Crafty Friends! I hope you’re doing well, and I thank you for stopping by today! I’m featuring the new Alex Syberia Design Daffodils A2 Card Panel for this post. Alex has a new release, and you should definitely check out her Etsy shop for all the digi stamps and loads of inspirations!

To begin my project, I printed the Daffodils on a sheet of Neenah Classic Crest 110lb cardstock and began coloring the image using Copic Markers Y06, Y08, Y11, Y13, Y15, YR27, YG13, YG17, YG91, E71 and B0000. I continued to add shading and more details, such as the leaf veining using my PrismaColor pencils.

I didn’t want to lose too much of the image, so I trimmed my panel down to 3.75″ x 5.75″ and mounted it onto a panel of black cardstock that’s just slightly larger using 3M Foam Tape. I die cut the Lawn Fawn I Love You Border sentiment once from gold cardstock and twice from the same black cardstock and adhered those together using Craft Tacky Glue. This sentiment actually says I Love You, but I trimmed it down, because I only wanted the love you portion.

I die cut the Altenew Hanging Garden die twice from gold cardstock and prepared my card base by splattering it with Royal Talens Amsterdam Oxide Black Acrylic Ink. I love this ink because it’s such a perfect consistency for splatter! I positioned my panel over the card base to determine the placement of the gold leaves, and adhered those using glue. I then glued my panel atop the leaves to finish up my card.

This was a super fun card panel to color! Don’t forget to stop by Alex’s Etsy shop to check out all of the new images!

Stay awesome friends!

Supply List:

*Affiliate links used at no cost to you. Thank you for your support!

Latest Instagram Posts

Alex Syberia Design Hello Summer

Hello and welcome back friends! I’m super excited to be joining Alex for her May release! So many cool things in this release .. birds, underwater images, girly images and of course, Alex’s amazing floral images! You’ll definitely want to check out the Etsy shop! So let’s get into today’s project.

I’m using the Hello Summer A2 Card Panel and to begin, I printed the image out on a piece of Stonehenge Aqua Cold Press Watercolor paper. I then taped it down to my clipboard (Yes, I use a cheap clipboard from Target) using masking tape to prevent warping. My Karin Brushmarkers then got a good workout! I used those along with a waterbrush and a Princeton Heritage 3/0 Round Brush.

Once the watercoloring was done, I added some more detail and shading using PrismaColor pencils, Copic Markers E74 and E79, as well as, Copic Multiliner 0.3 and 0.5. I trimmed my watercolor panel out using PinkFresh Studio Diagonal Stitched Rectangle die, splattered it with Royal Talens Amsterdam Light Gold Acrylic Ink and mounted it on a panel of black cardstock using 3M Foam Tape, because dimension is life!

I settled on a Celebrate sentiment, which is from the PinkFresh Studio Classic Words Die set. I cut it once from gold cardstock and three times from black cardstock and adhered those together using Craft Tacky Glue. I then glued the sentiment directly to my card front and mounted everything on my card base, which is Neenah Classic Crest 110lb cardstock.

That does it for today’s project. I hope you enjoyed it, and I hope it inspires you to get crafty and creative! Don’t forget to hop over to the Alex Syberia Design Etsy Shop to check out the release and to see some creative inspirations as well. You don’t want to miss it!

As always, be well and stay awesome!

Supply List:

*Affiliate links used at no cost to you. Thank you for your support!

Latest Instagram Posts

Fabulous Floral Hugs

Alex Syberia Design

Hello! Hello! Alex Syberia’s March release is live, and it is AMAZING! Head on over to her Etsy shop to check out all of the awesomeness she has in store for you!

For today’s project, I’m using the Fabulous Floral Slimline Card Panel. This is a beautiful image that’s a regular slimline size, however, I resized mine to be a mini slimline. So let’s get started!

Once my image was printed on Neenah Classic Crest 110lb cardstock and trimmed down to size, I broke out the Copic markers and started coloring! This ended up being a small batch of Copics for me! The colors used were: BV0000, BV000, BV00, BV01, BV02, BV04 and Y15.

After all of the purples were colored, I went in with a black Copic Multiliner 0.3 to add the filament (Yes! I had to look that up) back in so that it was visible. I then added the yellow to the anther of the flower. You guys, I’m learning things about flowers!

I love to do shading around the edges of my flowers, and this was done using a graphite pencil, along with a blending stump to soften the edges. I think it just adds a little something. I used Royal Talens Amsterdam Titanium White Acrylic Ink to add some splatter to my panel.

For my sentiment, I used the Hugs from the PinkFresh Studio Sending Phrase Builder set. Because dimension is life, I cut the main sentiment once from Tonic Luna Silver cardstock and twice from Neenah 110lb. I also cut the shadow twice from black cardstock. I adhered all of those pieces together using Craft Tacky Glue, and then adhered the sentiment to my panel.

There always has to be embellishments! I don’t know how to make a card without embellishments! I’m sure it can be done .. but I don’t know how! Anyhoo, I used the PinkFresh Studio Jewels Mix to add some purple bling.

I then adhered my colored panel to a black cardstock panel using 3M Foam Tape, because I like the contrast that it provides and it pulls the black together. Those were then adhered to a Neenah Classic Crest 110lb card base.

That does it for today’s project. I’m so glad that you stopped by! I hope that this card inspires you to get crafty as well. There’s an Instagram hop going on today to celebrate Alex’s new release, so head over there to check it out and comment for your chance to win a giveaway! Giveaways are always cool! You can also head to Alex’s Etsy shop to snap up your own digital stamps!

Have a wonderful day and STAY AWESOME!

Supply List:

*Affiliate links used at no cost to you. Thank you for your support!

Latest Instagram Posts

Alex Syberia Design Winter Garden

Hello Lovelies! Have you had a chance to check out Alex Syberia’s February release? I always fall in love with her floral images .. without fail! This Winter Garden A2 card panel was no different! You can check out her Etsy shop here.

So the original image is the size of an A2 panel, but I decided to resize it so that I was only going to get a partial image .. the one you see above. Now I’m no tech savvy anything! I use a Mac and insert the image into a Pages document and resize from there. No fancy app or software being used at my house!

Once I was done resizing my image and had it the way that I wanted, I printed it out on Neenah Classic Crest 80lb cardstock. I’ll link to my printer down below. A lot of people have been curious about printers, because they want to be able to print on heavyweight 140lb watercolor paper. I was the same!! And I found this one and love it!

So back to my card! I printed and started coloring with Copic Markers. The colors I used were: RV00, RV10, RV11, YG03, YG13, YG17, Y08, Y15, C0, and C2. I also used a Micron pen .03 to add the black detail to the middle of the pink and white flowers.

Once all of my color was added with markers, I added some detail and shading using Prismacolor Colored Pencils. Then to add gray shading around the flowers and leaves, which I love to do, I used a graphite pencil with a tortillon blender stump.

I trimmed my card panel down to 3.75” x 5” and I added an Altenew Fine Frames in white. Because I’m me, I decided it needed some additional detail, so I found this cute polka dot paper from the Miss Modern 6×6 pad from The Stamp Market and trimmed it down using the Diagonal Stitched Rectangles die from PinkFresh Studio. Once that was done, I mounted my card panel to the printed paper using 3M Foam Tape, because dimension is life!

Don’t you just love this sentiment?! This sentiment is from the Simply Said stamp and die set from The Stamp Market. I thought it fit perfectly in the space on my card panel! To finish, I adhered my panel to my card base, which is Neenah Classic Crest 110lb cardstock, and added some pink jewels from the PinkFresh Studio Jewels Mix.

I hope you enjoyed this project and that it will inspire you to get creating! Don’t forget to check out Alex’s new release over in her Etsy shop, AlexSyberiaDesign!

Thanks for stopping by!

Stay awesome!

Supply List:

Latest Instagram Posts