Simon Says Stamp Missing You Daisies

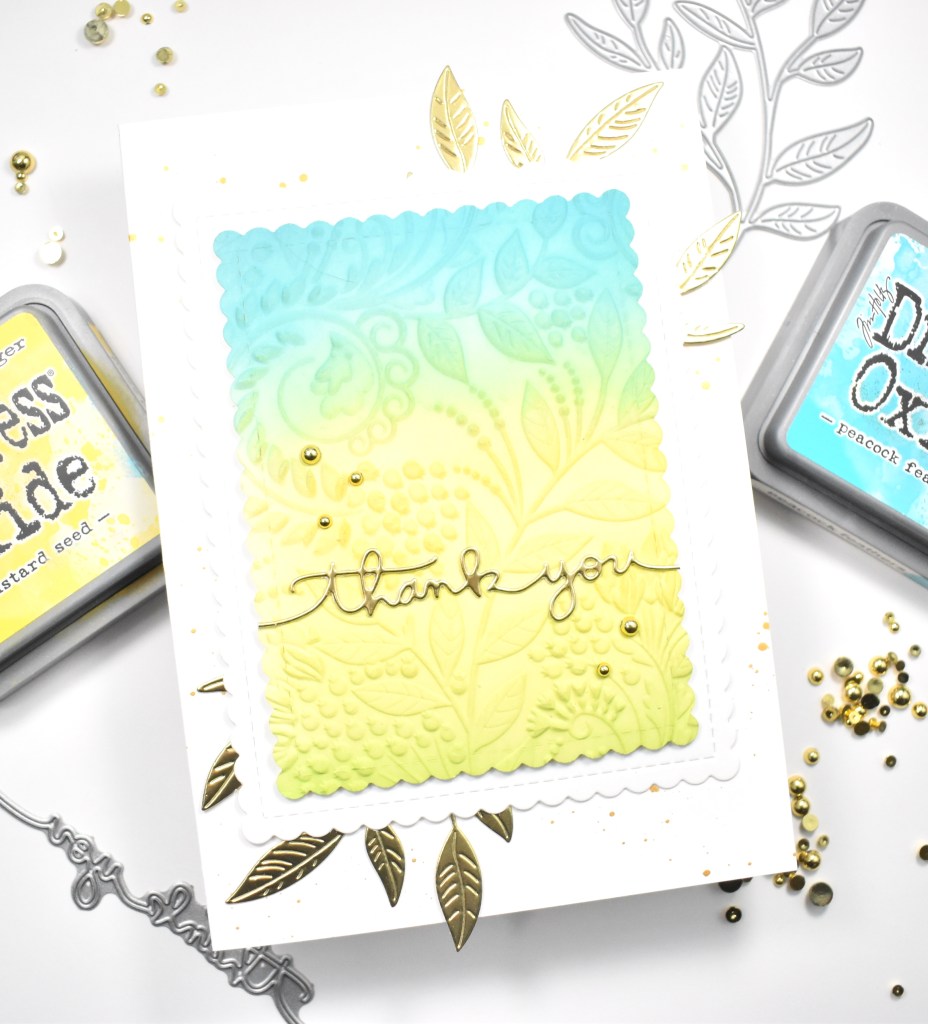
Hello Lovelies and thanks for joining me today! The newest Simon Says Stamp release, Hello Gorgeous, is gorgeous and I’ve loved playing with my goodies! Today’s project is featuring the Daisies and Leaves stencil in a combination of blue and yellow because I had the people from the Ukraine on my mind as I was making it. Let’s get into the details.

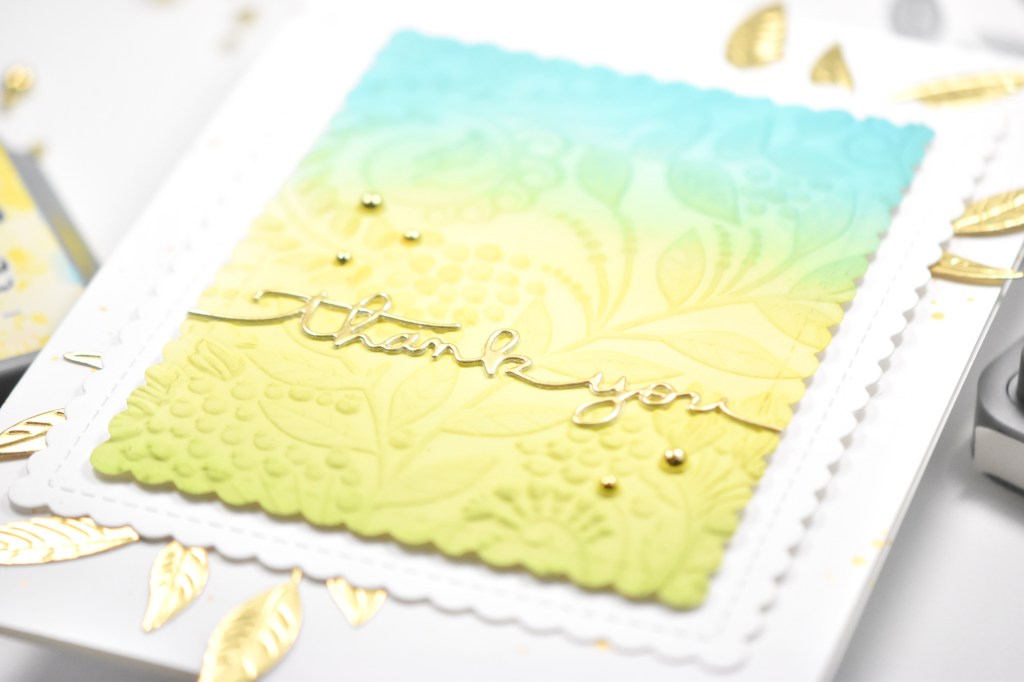
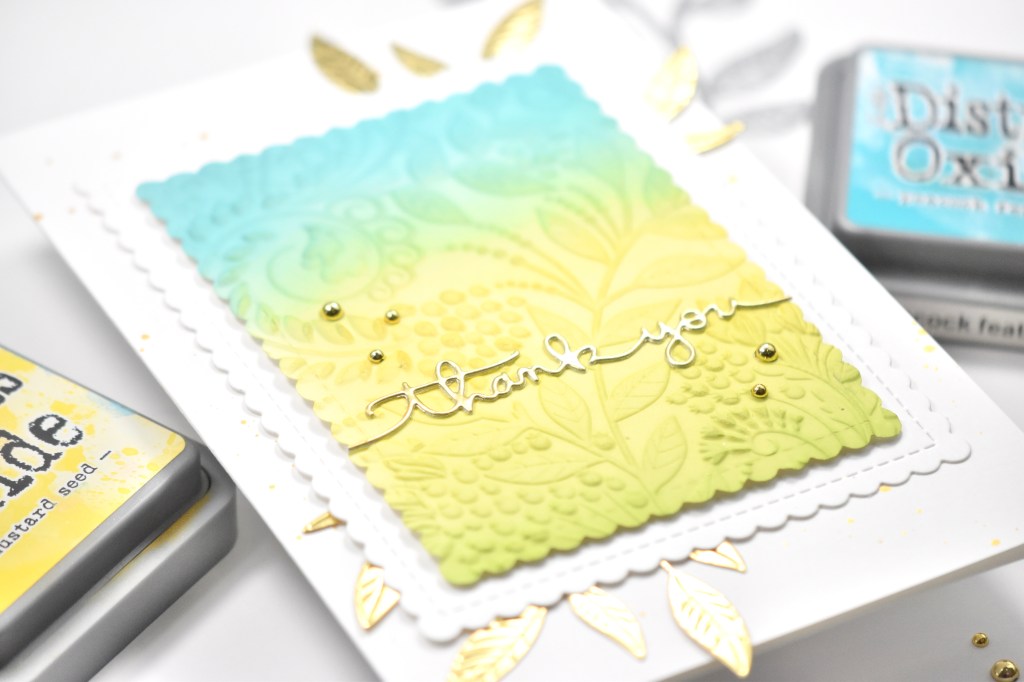
To begin this card, I secured the SSS Daisies and Leaves stencil to a panel of Neenah Classic Crest 110lb cardstock using Pixie Spray. Normally, I just use masking tape, but because this stencil is so intricate, I thought it best to use the spray for this go around. I used SSS Pawsitively Inks in Aspen, Sunbeam, Marine and Cadette for the ink blending. When that was done, I used the PinkFresh Studio Blanket Stitched Rectangle to trim it out.

For the sentiment, I chose the SSS Missing You So Much and die cut that three times from Neenah 110lb cardstock. I ink blended one of the die cuts using the Cadette ink, and ink blended another using the Marine ink. I adhered the darker sentiment to the plain white sentiment using liquid glue, and adhered the lighter sentiment atop the darker one, offset just a tad. I also die cut the shadow once from the same Neenah 110lb cardstock and adhered the stacked sentiment to that using glue as well.

I felt like the card needed some leaves. I’ve noticed that I often feel that way, and find myself reaching for leaf dies of all varieties! Anyhoo, I used the SSS Detailed Leaf Cluster and cut that from Neenah 110lb and used the Aspen ink to do a light ink blending over those.

To assemble the card, I tucked the leaves behind the sentiment and glued those in place, and adhered the sentiment using foam tape for a little dimension. Everything was then adhered to the card base, after adding a little bling! Every card needs bling in my opinion! And it seems as though every card might need a leaf too!

That finishes up this project! I hope you enjoyed it, and I hope it inspires you to get crafty! What are your favorites from the new Simon Says Stamp release, Hello Gorgeous? I’d love to know in the comments! I ended up purchasing one of the sentiment sets, a sentiment die, and guess what, another leaf die! Anyhoo, have a wonderful day and don’t forget to stay awesome!

Supply List:

* Affiliate links used at no cost to you. Thanks so much for your support!

Latest Instagram Posts

Simon Says Stamp Scripty Birthday

Hello Friends and thanks for stopping by!  I’m playing with goodies from Simon Says Stamp’s latest release, Hello Gorgeous, and today I’m featuring the new Folk Art Flowers background stamp!  What are your favorites from this release?  I’d love to know in the comments! Let’s run through the details of this card.

To begin, I stamped the SSS Folk Art Flowers on a panel of Neenah Classic Crest 110lb cardstock using VersaMark Ink and heat embossing that using Ranger Princess Gold Embossing Powder.  Once that was done, I used the PinkFresh Studio Diagonal Stitched Rectangles to trim it down.

For the ink blending, I used SSS Pawsitively Saturated Inks in Bubblegum, Cheeky, Lemonade and Seafoam.  For my sentiment, I chose the SSS Happy Birthday Brush Script die and cut that once from mirror gold cardstock and twice from Neenah 110lb and adhered those together using liquid glue.

As an added focal point, I used the PinkFresh Studio Stitched Scallop Square and trimmed that using the same mirror gold cardstock.  I also used the SSS Etched Meadow Flower and Leaves set to trim some vellum leaves.

To assemble the card, I adhered the frame and vellum leaves using liquid glue, and then positioned the sentiment in the center and glued that as well.  That panel was then adhered to the card base using foam tape for dimension, and I added some PinkFresh Studio Gold Metallic Pearls to finish it up!

That does it for today’s project!  I hope you’re loving the new Simon release, Hello Gorgeous, because I sure am!  Thanks again for stopping by and don’t forget to stay awesome!

Supply List:

* Affiliate links used at no cost to you. Thanks so much for your support!

Latest Instagram Posts

Simon Says Stamp Leafy Little Note

Hello Craft Friends and thanks so much for stopping by today!  The newest Simon Says Stamp release, Hello Gorgeous is live, and it’s a gorgeous one!  I’m featuring the new Tattered Leaves die for today’s project, so let’s go through the details, shall we?

To begin this project, I did some ink blending on some panels of Neenah Classic Crest 110lb cardstock using SSS Pawsitively Saturated Inks in Carnation, Cantalope, Lemonade, Sprout, Seafoam and Marine.  Once I was done ink blending, I ran those through using the SSS Tattered Leaves die.  I set those aside while I worked on the remainder of the card.

For my background panel, I decided to use the SSS Geometric Lattice Embossing Folder.  I thought that would give some interest and texture without distracting from the focal point of the card. I chose the “a little note” sentiment, which is from the SSS Just Because Word Mix 2 set.  I stamped the sentiment using VersaFine Onyx Black ink on a scrap of Neenah 110lb, and heat embossed it using Ranger Clear Embossing Powder.  I went ahead and used the coordinating die to trim that out.  For some added interest, I added a pink heart to the sentiment, which is from a Doodlebug Design sticker set.

To assemble the card, I held the sentiment atop the embossed panel while placing the leaves in rainbow order around it, tucking the ends underneath.  I secured the leaves using liquid glue, and adhered the sentiment using foam tape.  I did trim the leaves down some so that there wasn’t so much bulk underneath the sentiment.  Once everything was secured, I added in some of the trimmed off leaves to fill in.

I adhered the embossed panel to a black panel using a SSS Dot Tape Runner and then adhered that to my card base.  No card is complete without some bling, so I added some Studio Katia Majestic Confetti here and there!

That does it for this project!  I hope you enjoyed it and I hope it inspires you to get crafty!  Be sure to check out the entire Hello Gorgeous release, and let me know your favorites!  Have a wonderful day and don’t forget to stay awesome!

Supply List:

* Affiliate links used at no cost to you. Thank you so much for your support!

Latest Instagram Posts

Simon Says Stamp Here For You Daisy Layers

Hello Crafty Friends and thanks for stopping by! Today I’m participating in an Instagram Hop to celebrate Simon Says Stamp’s latest release, Good Luck Charm! Be sure to check it out because there are prizes to be won at each stop along the hop! Who doesn’t love prizes, right?! Today’s project is featuring the new Dreamy Daisy Layers and the Here For You dies. So let’s go through the deets!

I began this project by selecting a piece of patterned paper from the Craft Consortium Ink Drops Dusk paper pad and trimming it down using PinkFresh Studio’s Diagonal Stitched Rectangles. There are some gorgeous papers in this pad, and I can totally see just putting a beautiful sentiment on them and calling it done! Once trimmed, I splattered it using Royal Talens Amsterdam Light Gold Acrylic Ink.

My next step was to cut some SSS Dreamy Daisy Layers from Neenah Classic Crest 110lb cardstock. I cut one larger flower and three of the smaller flowers. Before adhering those together with liquid glue, I did the slightest amount of ink blending on the bottom layer using residual ink left on my pink blending brush. For that added bling, I added some PinkFresh Studio Gold Metallic Pearls to the centers of the flowers. I knew that I wanted a gold sentiment, so I cut some gold leaves using SSS Etched Meadow Flowers and Leaves.

I used the new SSS Here for You die to cut the sentiment from polished gold cardstock once, and I cut it an additional two times from Neenah 110lb and adhered all of those together using liquid glue. I laid everything atop my panel to determine placement, and decided that the gold leaves were a little too much. They took away from the sentiment in my opinion. So, to remedy this, I cut the same leaves from vellum and glued those together. I still had the gold leaves that I wanted, but the vellum just toned them down a bit!

I then began adhering everything to the panel using glue and placed foam tape on the larger flower, and one of the smaller flowers for added dimension. My panel was then adhered to the card base using SSS Dot Tape Runner.

And that finishes up this project! I love using beautiful patterned papers for cards, along with other elements in my stash! Don’t forget to stop by Instagram to participate in the hop for your chance to win one of several $25 gift cards to SSS! I hope you have a wonderful day and don’t forget to stay awesome friend!

Supply List:

* Some affiliate links used at no cost to you. Thanks so much for your support!

Latest Instagram Posts

Simon Says Stamp Wavy Circles Birthday

Hello Friends and thanks for stopping by! I hope you’re having a wonderful day! Today’s project is featuring the new Wavy Circles Background stamp along with the new Basic Box Card Happy Birthday. So let’s run through the details!

I began this project by stamping the SSS Wavy Circles Background on a panel of Neenah Classic Crest 110lb cardstock, using VersaFine Onyx Black ink and heat setting that with Ranger Clear Embossing Powder. Once that was complete, I did some ink blending using SSS Pawsitively Saturated Inks in Bubblegum, Cheeky, Lemonade and Seafoam. I trimmed the panel down using PinkFresh Studio Diagonal Stitched Rectangles.

I used the new SSS Basic Box Card Happy Birthday for the sentiment, and trimmed that once from SSS Holographic cardstock and twice from Neenah 110lb cardstock. I trimmed the shadow portion twice from black cardstock and adhered all of those together using liquid glue.

The card needed something behind the sentiment in my opinion, so I opted for some leaves from the SSS Etched Meadow Flowers and Leaves. I cut those from some Neenah 110lb, as well as, some black cardstock and tucked those underneath the sentiment. The sentiment was adhered to the panel with foam tape for some added dimension.

My panel was also adhered to the card base using foam tape, before adding some PinkFresh Studio Silver Metallic Pearls to finish up.

That does it for today’s project! I hope you enjoyed it and I hope it inspires you to get crafty! Have a wonderful day and don’t forget to stay awesome!

Supply List:

* Affiliate links used at no cost to you. Thanks so much for your support!

Latest Instagram Posts

Simon Says Stamp Glitzy Thank You

Hello Crafty Lovelies! I hope you’re having a great day! Thanks for stopping by to check out my project today featuring the new Radiating Squares Stencil set from Simon Says Stamp’s newest release, Good Luck Charm. Let’s go through the details.

I began this project by adhering my first stencil to a panel of Neenah Classic Crest 110lb cardstock using masking tape. There are four stencils in this set, so I pulled four PinkFresh Studio inks in Raspberry Bliss, Apricot, Lemon Whip, and Aquamarine, and began ink blending. I used a different ink for each stencil and made my way through the stencils.

To be honest, I messed up this panel, hence having to trim it down so small. But, mistakes happen, and you just have to roll with them! I wanted to add some glitz, so I adhered one of the stencils and used some Iridescent Gina K Glitz Glitter Gel. Once that was dry, I used a frame from the Honey Bee Scallop A2 Frames set to trim it down. I got a little ink out of place on the bottom corner, so I opted for the smaller size. I used another frame from the same set to cut a larger panel and adhered those together using SSS Dot Tape Runner.

I die cut the SSS Swoopy Thank You once from gold mirror cardstock and once from black cardstock, adhering those together with liquid glue. I also die cut the shadow twice from black cardstock and adhered those together as well. Once the sentiment was assembled, I placed foam tape on the back of that and placed it towards the bottom of the panel.

The card needed something in the middle of the squares, so I adhered some PinkFresh Studio Gold Metallic Pearls, before adhering everything to the card base.

That finishes up this project! I hope you enjoyed it and I hope it inspires you to get crafty! I was worried that I was going to have to trash this panel because of my mistake, but I worked through it and ended up with a cool card! Don’t forget to check out the entire Good Luck Charm release! There’s so many fun things in this release. Have a wonderful day and stay awesome!

Supply List:

Latest Instagram Posts

Simon Says Stamp Birthday Wrinkles

Hello Crafty Friends! Thanks so much for stopping by for today’s project featuring the Radiating Squares Stencil set from Simon Says Stamp’s newest release, Good Luck Charm! Have you checked out the release yet? I love sentiment sets, so I was thrilled to see a few of those in this release! Let’s get to the details!

I began this project by adhering the first stencil to a panel of Neenah Classic Crest 110lb cardstock using masking tape. There are a total of four stencils in this set, so I pulled out four inks for the ink blending. I ended up using Distress Oxide inks in Picked Raspberry and Kitsch Flamingo, as well as, PinkFresh Studio inks in Candy Violet and Lavender. For the ink blending, I used a heavier hand at the top and a lighter hand near the bottom creating that ombre look. I used a different ink for each stencil layer and just made my way through the stencils.

Once the ink blending was done, I trimmed the panel using the SSS Postage Stamp Edge Frames and set that aside while I worked on the remainder of the card. I stamped the Happy Birthday sentiment, which is from the SSS XL Greetings 3 set, onto black cardstock using VersaMark ink and heat set that using SSS Detail White Embossing Powder. I used the coordinating die to trim that out, along with two additional dies and adhered all of those together using liquid glue.

I wanted to add a sub-sentiment, so I found a SSS Sentiment Strip that I thought would work. I adhered the main sentiment to the panel using glue and adhered the sub-sentiments using foam tape for dimension.

The ink blended panel was then adhered to a black panel using foam tape, and everything was then adhered to the card base using SSS Dot Tape Runner. No card is complete without bling, so I added a few PinkFresh Studio Silver Metallic Pearls to finish it up!

That wraps up this project! I hope you enjoyed it, and I hope it inspires you to get crafty! Don’t forget to check out the entire Good Luck Charm release, there’s so many fun things! Have a wonderful day and stay awesome!

Supply List:

* Affiliate links used at no cost to you. Thanks so much for your support!

Latest Instagram Posts

Simon Says Stamp Spring Stems

Hello and welcome back! Thanks so much for stopping by to check out another project featuring the new Spring Stems stamp set from Simon Says Stamp’s newest release, Good Luck Charm! This release is so much fun, and I’ve loved playing with the goodies that I received! Let’s go through the details for today’s project!

I began this project by stamping the floral images from the new SSS Spring Stems stamp set onto Neenah Classic Crest 110lb cardstock using VersaFine Onyx Black Ink and heat setting it using Ranger Clear Embossing Powder. I used Copic markers in Y02, Y08, Y15, Y17, YR24, G43 and G94 to add color to the flowers and leaves. Once that was done, I fussy cut the images and placed foam tape on the back of one of them.

For the background, I used the SSS Detail Pincushion Plate and a panel of SSS blue cardstock. I wanted an ombre blue background, so I used SSS Pawsitively Saturated Ink in Marine and Cadette and did some ink blending on the blue cardstock. I adhered the pincushion panel to the blue panel using liquid glue.

For the sentiment, I used SSS Silhouette Sentiments stamp set. I stamped the thinking of you on black cardstock using VersaMark Ink and heat set that using SSS Detail White Embossing Powder, trimming that out with the coordinating die when finished.

I adhered one flower set directly atop the pincushion background using glue, while adhering the other with foam tape for dimension. I also placed foam tape on the sentiment and adhered that as well. Everything was then adhered to the card base using SSS Dot Tape Runner, and I added some pearls to finish it up!

I hope you enjoyed this project and I hope you’ll stop by and take a look at the entire Good Luck Charm release! Have a fabulous day and don’t forget to stay awesome!

Supply List:

* Affiliate links used at no cost to you. Thank you so much for your support!

Latest Instagram Posts

Simon Says Stamp Birthday Background

Hello Crafty Friends and welcome to another Simon Says Stamp release! Good Luck Charm is live and ready for your viewing pleasure! My project today is featuring the new Basic Box Card Happy Birthday. Let’s run through the details, shall we?

I’ve really enjoyed making backgrounds with sentiments lately, so I decided to hop on that bandwagon again for this one! It’s such a great way to stretch those sentiment dies, or even just stand alone dies! Anyhoo, I began this project by ink blending a large panel of Neenah Classic Crest 110lb cardstock using SSS Pawsitively Saturated Inks in Sweets, Blush, Sunshine and Surf. Once that was done, I die cut enough sentiments to cover an A2 card panel. I also cut them a second time for stacking purposes, and adhered them together using liquid glue.

I cut another panel of Neenah 110lb cardstock using the PFS Diagonal Stitched Rectangles and splattered that using Royal Talens Amsterdam Oxide Black Acrylic Ink. You guys know how much I love my black splatter! Once that panel was dry, I began adhering the sentiments in rainbow order using liquid glue.

Because the background was so colorful, I decided to downplay the floral elements by cutting the SSS Etched Crocus Stems from Neenah 110lb cardstock and leaving those white. I adhered the background panel to a black panel using SSS Dot Tape Runner and I adhered the flowers using glue. I found a coordinating SSS Sentiment Strip and adhered that over the stems using foam tape for dimension.

Everything was then adhered to the card base, and I added some PFS Jewels to finish it up with some bling.

I hope you enjoyed this project! Take a look at your dies and see what kind of background that you can make, and stretch those supplies! Stop by and check out the entire Good Luck Charm release and let me know your favorites! Have a wonderful day and don’t forget to stay awesome!

Supply List:

* Affiliate links used at no cost to you. Thanks so much for your support!

Latest Instagram Posts

Simon Says Stamp Thank You Vines

Hello Lovelies! I hope your day is going well! Thanks so much for stopping by to check out my project featuring the new Exotic Vines Embossing Folder from Simon Says Stamp’s newest release, And Back Again. Let’s go through the details!

I began this project by spritzing a panel of Neenah Classic Crest 110lb cardstock with water before placing it in the SSS Exotic Vines Embossing Folder and running it through my die cutting machine. Be sure to check Simon’s website for appropriate sandwiches for the different machines. That was super helpful for me!

Once the panel was embossed, I trimmed it down using the Honey Bee Scallop A2 Card Frames and ink blended that using Distress Oxide Broken China, Peacock Feathers, Mustard Seed, Twisted Citron and Mowed Lawn. I then sat that aside while I worked on the rest of the card. I decided on an A7 card base, which I splattered using Royal Talens Light Gold Acrylic Ink.

I die cut the thank you sentiment, which is from SSS Handlettered Greetings, once from mirror gold cardstock and once from Neenah 110lb, and adhered both of those together using liquid glue. I also die cut the SSS Privet Branch twice from the same mirror gold cardstock. I needed another layer, so I cut another panel of Neenah 110lb using a larger die from the same Honey Bee frame set.

I adhered the sentiment to the embossed panel using liquid glue and trimmed off the excess. The embossed panel was then adhered to the white scalloped panel using foam tape for dimension. The leaves were glued underneath the scalloped panels with the leaves peeking out from the edges for added interest, and everything was then adhered to the card base using SSS Dot Tape Runner. I added a few PinkFresh Studio Gold Metallic Pearls to finish up.

That does it for this project! I love the large white border around the focal point of this card! I hope it inspires you to get crafty. Stop by and check out the entire And Back Again release, there’s lots of super, fun things in this one. Have a wonderful day and don’t forget to stay awesome!

Supply List:

* Affiliate links used at no cost to you. Thanks so much for your support!

Latest Instagram Posts