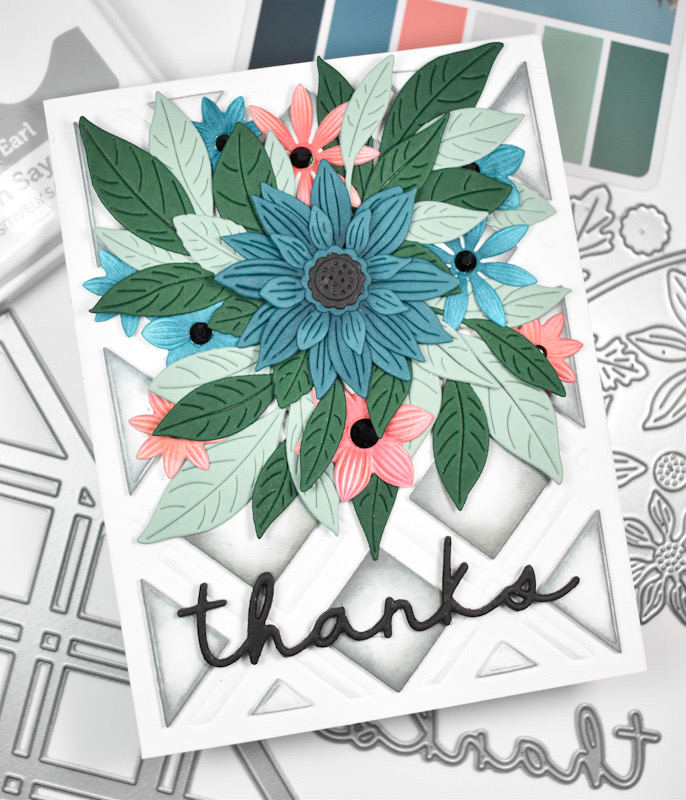
Hello Friends, and thanks so much for stopping by! The STAMPtember release is in full swing, and I’m back today with a project featuring several new products. I kind of went crazy with the new products on this one because it’s featuring the new Rustic Layering Flower, the Double Plaid Cover, the Simple Thanks and the Crimped Floral Embossing Folder & Die. So, let’s go through the details for this one!

NOTE: all supplies are linked in the thumbnails at the end of this blog post.
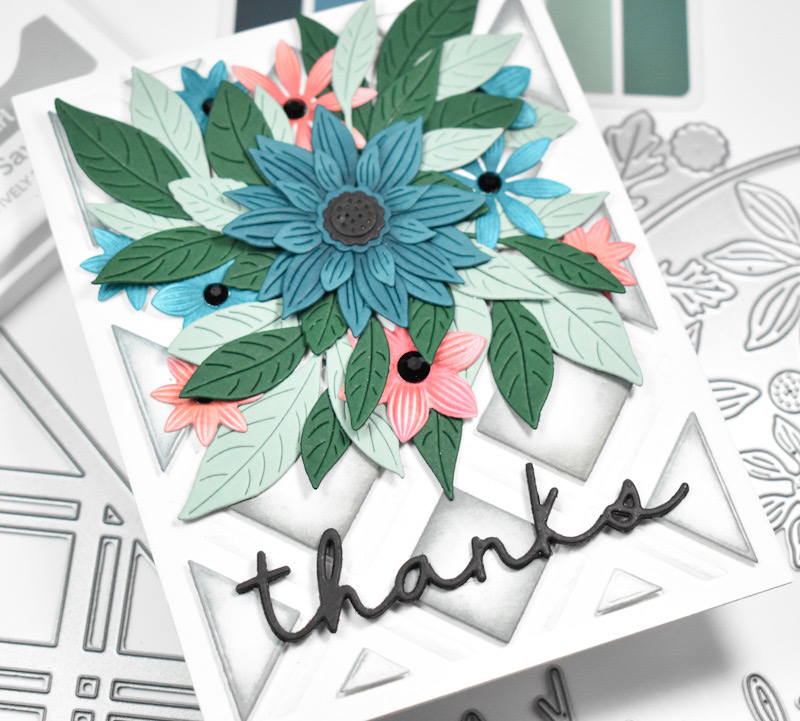
I said that I used the Crimped Floral Embossing Folder & Die, but I did not use the entirety of the folder itself. I used it to create the smaller flowers in my spray. Another thing to note, this card is giving an illusion of the Double Plaid Cover. I saved the left over squares and triangles from a previous project and ink blended the edges of those using Earl ink for a shadowed effect.

To begin, I used the Double Plaid Cover to emboss a panel of Neenah 110lb cardstock and then adhered the grey ink blended pieces using foam squares. I thought this was a super interesting way to utilize those leftover pieces. For some color inspiration, I pulled a card from the Color Cubes, and die cut the smaller flowers from colored cardstock, using the included die from the Crimped Floral Folder. For some depth, I did some ink blending on those using C&9 Peacock and Sorbet inks, and added a black crystal to the centers of the flowers.

I then cut the larger flower using the Rustic Layering Flower and ink blended that using that same Peacock ink before assembling the pieces. As always, I need leaves to go with my flowers, so I used the Arching Leaf Border set and cut those from a sage and pine colored cardstock. While die cutting, I went ahead and die cut the Simple Thanks four times from black cardstock, and adhered all of those together with liquid glue.

I began gluing the leaves in place first, as those were the bottom layers, and then I glued the larger flower in place next, and tucked in the other flowers where needed for fullness. The sentiment was glued directly to the panel to finish up.

That does it for this one! I hope you enjoyed it as much as I did! Don’t forget to head on over to Simon’s website to check out the entire STAMPtember release, and stay tuned all month long for the long awaited collaboration sets! Thanks again for hanging with me, and I hope you have a wonderful day!
Supply List
Affiliate links used at no cost to you. What does this mean? If you use the links within this post to make a purchase, I receive a small commission, which allows me to continue to post crafty content for your enjoyment. I truly appreciate your support!

Latest Posts
- Simon Says Stamp Groovy Birthday

- Simon Says Stamp Amazing Scattered Leaves

- Simon Says Stamp Beautiful Friend Floral

- Together by Design Featuring Pinkfresh Studio

- Simon Says Stamp Basket Bunny